Page is loading ...

PAGE 1 of 28 40721-1703
OWNER'S MANUAL
®
PERSONAL FIREPROOF SAFES
ENGLISH
Record the serial number from the tag on the back of the safe or from the tag on inside of
the lock cover plate on the front of the safe.
Record your combinaon number.
Keep keys and combinaon in a secure place away from children.
WARNING: Keep your safe closed and locked at all mes when not in use.
DO NOT STORE THIS DOCUMENT, KEYS OR YOUR COMBINATION INSIDE THE SAFE.
Do not store electronic media, computer disks, audio-visual media or photographic negaves
in this safe. These materials will not survive the rated internal temperature of the safe.
They may be damaged or destroyed.
If you intend to store jewelery with moving parts, we recommend storage in an air ght
container prior to storing them in the safe.
Do not store pearls in this safe. The internal temperature of this safe is rated up to 350° F.
Pearls can be damaged at much lower temperatures.
Note: Stack-On Products Co. is not responsible for damage or loss of items placed in this safe
due to moisture.
IMPORTANT
®
PFS-012-BG-E
PERSONAL FIREPROOF SAFES WITH ELECTRONIC LOCK
PFS-016-BG-E PFS-019-BG-E

PAGE 2 of 28 40721-1703
OWNER'S MANUAL
®
PERSONAL FIREPROOF SAFES
SERIAL #:
PLACE SERIAL # HERE
Tools Needed, Hardware Included 2
Geng Started 3
Baery Installaon and Replacement 4
Entering Your Security Code 5-6
Locking the Safe 6
Selecng a Locaon and Securing the Safe 7-9
Shelf Placement and Turning the Sound ON / OFF 10
Frequently Asked Quesons 11-12
Key Replacement 13
Warranty
14
TABLE OF CONTENTS PAGE
YOUR ELECTRONIC COMBINATION #
COMBINATION HERE
NOTE: You can store your Key #, Serial # and Combinaon at – stackon.com under
Customer Service.
Storing your Key # or Combinaon will provide instant access to this important informaon should
you ever lose your keys or your combinaon. Only you will have access to this informaon.
( 4 ) M6 x 50 mm (2” long) Lag Screws
Flat Head
Screwdriver
10 mm Socket
Wrench
Drill
3/16" Drill Bit
3/8" Drill Bit
TOOLS NEEDED
( 4 ) Washers
( 4 ) Plasc Masonry Anchors
HARDWARE INCLUDED

PAGE 3 of 28 40721-1703
OWNER'S MANUAL
®
PERSONAL FIREPROOF SAFES
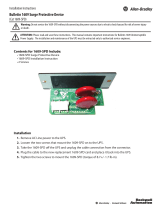
You will need to open the door with the key
in order to install the baeries. Baeries are
included and located inside the safe.
STEP 1
To open the door with the key, rst remove
the lock cover from the front of the faceplate
using a thin athead screwdriver.
STEP 2
Insert the key and turn counterclockwise.
STEP 3
Hold the key in the open posion and turn the
knob clockwise to open the door.
Locate the baeries inside the safe. Follow
steps on next page for baery installaon.
GETTING STARTED
NOTE: The key has been provided in case you lose or forget your security code or the baeries
run low. If you lose your key, you may purchase a replacement key by referencing the serial
number located under the removable lock cover. See secon at the end of this instrucon
regarding replacement keys.

PAGE 4 of 28 40721-1703
OWNER'S MANUAL
®
PERSONAL FIREPROOF SAFES
BATTERY
COVER
BATTERY
COVER
BATTERY
CARRIAGE
BATTERY
CARRIAGE
BATTERY INSTALLATION AND REPLACEMENT
STEP 1
To install or replace the baeries, open the baery
compartment on the back of the door by pushing the
baery cover plate in the direcon of the arrow and
install all new baeries as shown.
NOTE: Do not mix old and new baeries. Do not
mix alkaline, standard or rechargeable baeries.
STEP 2
Remove carriage
STEP 3
Make sure baery carriage is in the correct
orientaon as shown.
This safe uses 4 - AA baeries. Under normal use,
baeries will last about 1 year.
NOTE: If the baeries are low, the yellow light
will ash on the faceplate when you start to enter
your code.
STEP 4
Replace baery cover as shown.
Posion the baery cover in the middle of baery
opening.
Press down and back toward closed posion.
Make sure the cover is secured before closing safe.

PAGE 5 of 28 40721-1703
OWNER'S MANUAL
®
PERSONAL FIREPROOF SAFES
STEP 2
With the door open, enter your own personal
security code, which can be 3-8 digits long,
and conrm your new code by pressing the
green key on the electronic touch pad.
STEP 1
To enter your own security code you will need to follow the steps listed below:
Aer installing the baeries, locate the reset buon on the edge of the hinge side of the door.
Press the red reset buon and then release it, you will hear a beep.
DO NOT SHUT THE DOOR UNTIL YOU HAVE CONFIRMED YOUR NEW SECURITY CODE HAS BEEN
ENTERED CORRECTLY.
the safe.
You will have 3 seconds to press the green
key otherwise you will have to start over from
step one. There will be 2 beeps (if the sound is
turned on) and the green light will ash twice if
your code has been entered successfully.
Before you close the door, enter your new
security code and press the green key to
make sure the lock releases the knob so you can
turn it and retract the live acon locking bolts.
ENTERING YOUR SECURITY CODE
STEP 2 CONTINUE TO PAGE 6

PAGE 6 of 28 40721-1703
OWNER'S MANUAL
®
PERSONAL FIREPROOF SAFES
If the code fails, go to Step 1 and start again. If the code works successfully, then you
should lock the safe.
When you open the safe in the future, enter the security code you have set followed by the
green key and turn the knob.
If an incorrect security code is entered 3 mes the safe will beep 5 mes (if the sound is turned
on) and the
seconds before you can try your code again. The safe will beep one me (if the sound is turned
on) and the green light will ash once when the lockout period is over.
If an incorrect security code is entered 1 addional me the safe will beep 5 mes (if the sound
is turned on) and the
before the code can be tried again. The safe will beep one me (if the sound is
turned on) and the green light will ash once when the lockout period is over.
LOCKING THE SAFE
To lock the safe, close the door and turn the knob
counterclockwise to the 12:00 posion.
12:00 POSITION
NOTE ON LOCKING THE SAFE:

PAGE 7 of 28 40721-1703
OWNER'S MANUAL
®
PERSONAL FIREPROOF SAFES
STEP 1
Slowly drill out all mounng holes located on the back and boom of safe as shown below.
DO NOT DRILL FROM A RANDOM LOCATION FROM INSIDE THE SAFE.
SELECTING A LOCATION AND SECURING THE SAFE
BACK
BOTTOM
THE SAFE SHOULD ALWAYS BE KEPT
OUT OF THE REACH OF CHILDREN

PAGE 8 of 28 40721-1703
OWNER'S MANUAL
®
PERSONAL FIREPROOF SAFES
STEP 2
Posion the safe in
desired locaon.
Use a screw or pencil to mark the
4 mounng locaons on the
oor and wall.
NOTE: Make sure to mark
and secure to one wall stud
as shown.
Remove safe from marked locaon.
STEP 3
SECURING TO WOOD:
Using a 3/16" drill bit, drill a 2.5"
hole in marked locaon.
SECURING TO MASONRY:
Using a 3/8" drill bit, drill a 2.5" hole
in marked locaon.
WALL STUD
WALL STUD

PAGE 9 of 28 40721-1703
OWNER'S MANUAL
®
PERSONAL FIREPROOF SAFES
STEP 4
SECURING TO WALL AND WOOD
FLOOR OR PERMANENT SHELF:
NOTE: Posion plasc wall anchor
in wall before placing safe in
mounng locaon.
Use plasc wall anchor to secure the
other back hole that is not centered
on a wall stud.
Posion safe in mounng locaon.
Posion lag screws through washers
and safe as shown in FIGURE 1.
Tighten screws using a socket wrench.
SECURING TO MASONRY FLOOR:
Insert plasc wall anchors into
pre-drilled holes in masonry as
shown in FIGURE 2.
Use a plasc wall anchor to secure the
other back hole that is not centered
on a wall stud.
Posion safe in mounng locaon.
Posion lag screws through washers
and safe as shown in FIGURE 1.
Tighten lag screws into masonry
anchors using a socket wrench.
FIGURE 2
FIGURE 1
ANCHORS
LAG SCREWS
WASHERS
WALL STUD
WALL STUD
WALL ANCHOR
WALL ANCHOR

PAGE 10 of 28 40721-1703
OWNER'S MANUAL
®
PERSONAL FIREPROOF SAFES
PFS-016-BG-E, PFS-019-BG-E SHELF PLACEMENT
STEP 2
STEP 1
SHELF
CLIP
VERTICAL ADJUSTMENT
Determine the shelf locaon, and place 4 Shelf
Clips as shown.
Push top of Shelf Clip into Shelf Rail on inside
of safe. Rotate clip boom tab and push into
next hole in shelf rail.
To adjust shelf height, remove and reposion
shelf clips vercally on shelf rail.
SHELF
RAIL
TURNING THE KEYPAD SOUND OFF/ON
You can turn o the “Beep” sound of the
keypad by pressing the red key.
To turn the “Beep” sound on, press the
red key again.
SHELF
RAIL
NOTE: PFS-012-BG-E does not have an adjustable shelf, the shelf is removable to meet your storage needs.

PAGE 11 of 28 40721-1703
OWNER'S MANUAL
®
PERSONAL FIREPROOF SAFES
Q:
A: Retailers across the country carry Stack-On products but don’t always carry all models.
If you are buying online, you can nd our products on most large online retailers. If you want to buy a
product in a brick and mortar store, we recommend doing a Google search on a specic item to nd a
retailer near you.
Q:
A: No.
Q:
A: No. The parts are not interchangeable.
Q:
A: No. In order to maintain the re rang the door cannot be removed or adjusted.
Q:
A: You can register your Stack-On safe on our website at stack-on.com/product_registraon/new
Q:
A: This reproof safe has been built to protect rearms and documents during a re. The internal
temperature of the safe will not exceed 350° F. Media such as CDs, DVDs, video tapes, jump drives,
oppy drives, cassees or photo negaves can be damaged when temperatures exceed 180° F. This
safe will not protect these items if a re occurs.
Q:
A: Refer to the Warranty informaon aached to this instrucon sheet.
Q:
A: Complete the Key Request Form included with this instrucon sheet. You can also obtain a copy of
the form at stackon.com under the Customer Service tab.
Q:
A: Approximately 1 year under normal usage. Normal usage would be accessing the contents
of the safe twice a day.
FAQS CONTINUED ON PAGE 12
Please visit us at stackon.com for more informaon.
FREQUENTLY ASKED QUESTIONS

PAGE 12 of 28 40721-1703
OWNER'S MANUAL
®
PERSONAL FIREPROOF SAFES
Q:
A: First, replace the baery and try the key pad again. If the keypad is sll not responding, follow the
direcons on your instrucon sheet for using the trouble key that came with your electronic safe.
Once the door is open, test your combinaon with the door open. If your keypad is sll unresponsive,
please contact Stack-On’s Customer Service Department at 1-800-323-9601
(M-F, 8 am to 4:30 pm CST).
Q:
A: Make sure the code is NOT longer than 8 digits.
When you enter your new code, you will need to make sure you conrm your code by entering the
green key on your key pad.
Q:
A: Make sure the baeries are new and have not expired. If you have installed new baeries and this
problem persists, please contact our Customer Service Department at 1-800-323-9601
(M-F, 8 am to 4:30 pm CST).
Q:
A: Please refer to your instrucon sheet for addional informaon.
Q:
A: Please contact Stack-On’s Customer Service Department at 1-800-323-9601
(M-F, 8 am to 4:30 pm CST).
Q:
A: If you misplace your instrucon sheet, you can download a copy from the Stack-On website
at stackon.com/instrucon-sheets. All instrucon sheets are listed by model number.
We recommend you store the model number of your safe, along with the key number at
stackon.com/Customer Service - Secure Combinaons which will make it easier to retrieve
your instrucon sheet from the Stack-On website.
Please visit us at stackon.com for more informaon.

PAGE 13 of 28 40721-1703
OWNER'S MANUAL
®
PERSONAL FIREPROOF SAFES
Please visit us at stackon.com for more informaon.
Key Request
“This is not a Registration Form”
Verification of ownership is required in order to receive replacement key for your security product.
In order to receive a replacement key to your security product:
1. Complete the following form and send to Stack-On Products.
2. Send a copy of your valid driver’s license along with the form.
3. Send a copy of the receipt showing the original purchase.
4. Security product owner must sign form.
5. Owner’s signature must be notarized.
6. Send $10.00 for replacement key. Personal Check, MasterCard, or Visa accepted.
7. Send completed information to:
Stack-On Products Company
1360 N. Old Rand Road
P.O. box 489
Wauconda, IL 60084
Serial Number______________________
Key Number (if applicable) _______
Unit Dimensions________________________________________
Unit Description___________________________________________________________
Owner’s Name ____________________________________ Date Purchased___/___/____
Owner’s Address ___________________________ Unit or Apt Number _________________
City ___________________________ State _______________ Zip Code________________
Telephone Number: (____)___________________ Fax Number: (____)___________________
Owner’s Email Address: ________________________________________________________
Owner’s Signature __________________________ Notary Signature________________
Notary Commission Expires: _____/_____/_____ Notary Stamp
SERVICE REQUESTED
Key Replacement: Yes No
$10.00 charge for this service
Credit Card Information (Please circle one) MasterCard Visa
Expiration Date: ___/___/___ Card Number:______________________________________
Credit Card Identification Number (Located on back of card, last 3 digits on signature strip)_________
9/07
NOTE:
You can store your Key #, on Stack-On’s SECURE web site – stackon.com under Customer Service. Storing your
Key # will provide instant access to this important information should you ever lose your keys .
Only you will have access to this information.

PAGE 14 of 28 40721-1703
OWNER'S MANUAL
®
PERSONAL FIREPROOF SAFES
Please visit us at stackon.com for more informaon.
2/17
LIMITED LIFETIME WARRANTY AND GUARANTEE
(Valid Only for Purchases in North America)
If your Stack-On Fire Resistant Steel Safe suffers damage due to theft or fire at any time while still owned by the original
owner, Stack-On will either repair or replace (at Stack-On’s discretion) your safe free of charge. If Stack-On chooses to repair
the safe, such repair work may be performed by a local technician approved by Stack-On. Depending on the extent of the
damage, Stack-On may require the safe be returned to the factory for repair. If the safe is so returned, Stack-On will pay the
freight to the factory as well as the return freight. If the safe is replaced, Stack-On will pay the freight. This guarantee does not
cover labor costs for removal or installation of the safe and its contents. Any repair, dismantling, or tampering undertaken
without the prior written approval or direction of Stack-On will nullify this guarantee. Personal property in the safe is not
covered under this guarantee.
In addition, Stack-On Fire Resistant Steel Safes are warranted to be free from defects in material and workmanship for as long
as the original consumer owns the product (unless shorter periods are provided below). Locks and paint are warranted for a
period of five (5) years from the date of original consumer purchase. This warranty extends to the initial consumer only.
If you believe there is a defect in material or workmanship in your Stack-On Fire Resistant Steel Safe during the
warranty period, please contact our customer service department at the address and in the manner set forth below. If
Stack-On is properly notified during the warranty period and, after inspection confirms there is a defect, Stack-On will, at its
sole option, provide repair parts or exchange the product at no charge, or refund the purchase price of the product.
THIS WARRANTY DOES NOT COVER ANY PRODUCT, OR ANY PART OF ANY PRODUCT, WHICH HAS BEEN SUBJECT
TO EXCESSIVE USE, ACCIDENT, NEGLIGENCE, IMPROPER INSTALLATION, INCORRECT MAINTENANCE, ALTERATION
OR REPAIR BY ANYONE OTHER THAN STACK-ON, ABUSE, OR MISUSE.
THIS WARRANTY IS EXCLUSIVE AND EXPRESSLY IN LIEU OF ALL OTHER WARRANTIES EXPRESSED OR IMPLIED
INCLUDING THE WARRANTIES OF MERCHANTABILITY AND FITNESS FOR A PARTICULAR PURPOSE, WHICH ARE
HEREBY DISCLAIMED AND EXCLUDED. STACK-ON SHALL NOT BE SUBJECT TO ANY OTHER OBLIGATIONS OR
LIABILITIES. STACK-ON NEITHER ASSUMES NOR AUTHORIZES ANY OTHER PERSON TO ASSUME FOR IT, ANY
OTHER LIABILITY IN CONNECTION WITH THE SALE OF STACK-ON'S FIRE RESISTANT STEEL SAFES.
STACK-ON WILL NOT, UNDER ANY CIRCUMSTANCES, BE LIABLE TO THE INITIAL CONSUMER FOR ANY INCIDENTAL,
CONSEQUENTIAL, SPECIAL, EXEMPLARY, OR PUNITIVE DAMAGES ARISING OUT OF THE PURCHASE OR USE OF
ANY STACK-ON PRODUCT, INCLUDING THE FIRE RESISTANT STEEL SAFES. STACK-ON'S LIABILITY FOR ANY
BREACH OF THIS WARRANTY SHALL BE LIMITED EXCLUSIVELY TO REPAIR OR REPLACEMENT OF THE DEFECTIVE
PRODUCT, AS DESCRIBED ABOVE, OR A REFUND OF THE PURCHASE PRICE OF THE PRODUCT. IN NO EVENT
SHALL STACK-ON'S OBLIGATION UNDER THIS WARRANTY EXCEED THE PRICE OF THE PRODUCT.
THIS WARRANTY GIVES YOU SPECIFIC LEGAL RIGHTS. YOU MAY ALSO HAVE OTHER RIGHTS WHICH VARY FROM
STATE TO STATE.
Please send your claim pursuant to the above guarantee or warranty in writing by regular mail or email to:
Stack-On Products Co.
Attn.: Customer Service Department
1360 North Old Rand Road
Wauconda, IL 60084
Be sure to include:
• Your name and address
• A description of the warranty claim, fire or theft
• The model number and photographs of the safe
• The serial number off the front or back of the safe
• A copy of the report from the fire department, police or insurance company within 30 days of damage
(applies to units damaged by theft or fire)
• Proof of purchase information of the safe
This product is not designed for the storage of computer disks, SD Cards, CDs, DVDs, audio-visual materials or
photographs/negatives.
3/16

PAGE 15 of 28 40714-1609
MANUAL DEL PROPIETARIO
PERSONAL FIREPROOF SAFES
®
CAJAS FUERTES DE FUEGO PERSONAL CON BLOQUEO ELECTRÓNICO
ESPAÑOL
Anote el número de serie de la equeta en la parte posterior de la caja fuerte o de la equeta en
el interior de la placa de cubierta de la cerradura en la parte frontal de la caja fuerte.
Registre su número de combinación.
Mantenga las llaves y combinación en un lugar seguro lejos de los niños.
no esté en uso.
No almacene medios electrónicos, discos de computadora, medios audiovisuales o negavos fo-
tográcosEn esta caja fuerte. Estos materiales no sobrevivirán a la temperatura interna nominal
de la caja fuerte.Pueden ser dañados o destruidos.
Si ene intención de guardar joyas con piezas móviles, se recomienda el almacenamiento en un
herméco envase antes de su almacenamiento en la caja fuerte.
No guarde las perlas en esta caja fuerte. La temperatura interna de este seguro ene una
clasicación de hasta 350° F. Las perlas pueden ser dañados a temperaturas mucho más bajas.
Nota: Stack-On Products Co. no se hace responsable de los daños o la pérdida de los puntos
incluidos en esta caja fuerte debido a la humedad.
®
ImportaNtE
PFS-012-BG-E PFS-016-BG-E PFS-019-BG-E

PAGE 16 of 28 40714-1609
MANUAL DEL PROPIETARIO
PERSONAL FIREPROOF SAFES
®
SERIE #:
LUGAR DE SERIE # AQUÍ
Herramientas necesarias , materiales incluidos 16
Para empezar 17
Instalación de la batería y de Replacment 18
Cómo introducir su Código de Seguridad 19-20
Bloqueo de la Caja 20
Selección de la ubicación y jación de Segura 21-23
Al girar el Sonido ON / OFF 24
Preguntas frecuentes 25-26
Llave de repuesto 27
Garana
28
ÍNDICE PÁGINA
YOUR ELECTRONIC COMBINATION #
COMBINACIÓN AQUÍ
NOTA : Usted puede almacenar su clave # , # de serie y combinación de Stack-On de SEGURO
web - stack-on.com virtud de Servicio al Cliente.
Almacenamiento de la clave # o combinación proporcionará acceso instantáneo a esta importante
información debealguna vez pierde sus llaves o su combinación. Sólo tendrá acceso a esta
información.
( 4 ) M6 x 50 mm ( 2 "de largo) rafondos
Cabeza plana
10 mm llave
de tubo
Perforar
3/16" Broca
3/8" Broca
HERRAMIENTAS NECESARIAS
( 4 ) Anclajes de albañilería de plásco
HARDWARE INCLUIDO

PAGE 17 of 28 40714-1609
MANUAL DEL PROPIETARIO
PERSONAL FIREPROOF SAFES
®
Tendrá que abrir la puerta con la llave
con el n de instalar las baterías. Las
baterías sonincluido y situado en el interior
de la caja fuerte.
PASO 1
Para abrir la puerta con la llave, rere primero
la cubierta de la cerradura de la parte
delantera de la placa frontal ulizando un
destornillador plano no.
PASO 2
Introduzca la llave y gire hacia la izquierda.
PASO 3
Mantenga la llave en la posición abierta y gire
elperilla hacia la derecha para abrir la puerta.
Localizar las baterías dentro de la caja fuerte.
Seguirpasos en la página siguiente para la
instalación de la batería .
EMPEZANDO

PAGE 18 of 28 40714-1609
MANUAL DEL PROPIETARIO
PERSONAL FIREPROOF SAFES
®
INSTALACIÓN DE LA BATERÍA Y SUSTITUCIÓN
PASO 1
Para instalar o sustuir las baterías, abra la batería
comparmiento en la parte trasera de la puerta
empujando el placa de cubierta de la batería en la
dirección de la echa y instalar todas las pilas nuevas
como se muestra.
NOTA: No mezcle pilas viejas y nuevas. No haga
mezcle pilas alcalinas, estándar o recargables.
PASO 2
Retire carro
PASO 3
Hacer carro de la batería esté en la correcta
orientación como se muestra.
Esta caja fuerte uliza 4 - pilas AA. Bajo condiciones
normales de uso ,
pilas duran aproximadamente 1 año.
NOTA: Si las baterías están bajas , la luz amarilla
parpadeará en la placa frontal cuando se empieza a
introducir tu codigo.
PASO 4
Vuelva a colocar la cubierta de la batería como se
muestra.
Posicionado en la tapa de la batería en el medio de
apertura de la batería.
Presione hacia abajo y atrás hacia la posición cerrada.
Asegúrese de que la cubierta está asegurada antes del
cierre seguro.
CUBIERTA DE
LA BATERÍA
CUBIERTA DE
LA BATERÍA

PAGE 19 of 28 40714-1609
MANUAL DEL PROPIETARIO
PERSONAL FIREPROOF SAFES
®
PASO 2
Con la puerta abierta, introducir su propio
personalcódigo de seguridad, que puede ser
3-8 dígitos de longitud,y conrmar su nuevo
código pulsando el tecla verde en la
placa electrónica.
PASO 1
Para introducir su propio código de seguridad que tendrá que seguir los pasos que se
indican a connuación: Después de instalar las baterías, localizar el botón de reinicio en
el borde de la bisagra lado de la puerta.
Pulse el botón de reinicio rojo y luego soltarlo, se oirá un pido.
NO CERRAR LA PUERTA HASTA QUE CONFIRME SU NUEVO CÓDIGO DE SEGURIDAD HA SIDO
INTRODUCIDO CORRECTAMENTE.
-
-
Tendrá 3 segundos para presionar elclave verde
de lo contrario tendrá que empezar de nuevo
desdepaso uno. Habrá 2 pidos (si el sonido es
acvada) y la luz verde parpadea dos veces
siel código se ha introducido correctamente.
Antes de cerrar la puerta, introduzca su nueva
código de seguridad y pulse la tecla verde
paraasegúrese de que el bloqueo libera la perilla
para que puedaconverrlo y retraer los pernos de
bloqueo de acción en vivo.
INSCRIBIENDO SU CÓDIGO DE SEGURIDAD
PASO 2 CONTINÚA EN LA PÁGINA 6

PAGE 20 of 28 40714-1609
MANUAL DEL PROPIETARIO
PERSONAL FIREPROOF SAFES
®
Si el código de error , vaya al paso 1 y comenzar de nuevo. Si el código funciona correctamente,
entonces usted debe bloquear la caja fuerte.
Al abrir la caja fuerte en el futuro, introduzca el código de seguridad que haya congurado
seguido por el tecla verde y gire el mando.
Si se introduce un código de seguridad incorrecto 3 veces la caja fuerte sonará 5 veces (si está
acvado el sonido sucesivamente) y
antes de que pueda probar su
código de nuevo . La caja fuerte emirá un pido (si está acvado el sonido sucesivamente) y la
luz verde parpadea una vez cuando el período de bloqueo ha terminado.
Si se introduce un código de seguridad incorrecto 1 hora adicional de la caja fuerte sonará 5 veces
( si el sonidoe stá acvada) y
antes de que el código puede ser juzgado de nuevo.
La caja fuerte emirá un pido ( si el sonido es acvada) y la luz verde parpadea una vez cuando
el período de bloqueo ha terminado.
-
12:00 Posición
BLOQUEO DEL SEGURO
Para bloquear la caja de seguridad, cerrar
la puerta y girar el perilla a la izquierda a la
posición de las 12:00.
NOTA SOBRE EL BLOQUEO DEL SEGURO:
-
/