Philips HD9240/90 User manual

Category
Deep fryers
Type
User manual

This manual is also suitable for

18/05/2015
保留备用
4222.005.0459.4
HD9240
Question?
有疑问?
Contact Philips
请联系飞利浦
1
2 3 4 5
6
7 8 9
10 11 12 13
14 15 16 17
18
ENGLISH
Introduction
Congratulations on your purchase and welcome to Philips! To fully benet
from the support that Philips offers, register your product at www.philips.com/
welcome.
Your new airfryer allows you to prepare your favourite ingredients and
snacks in a healthier way.
The airfryer uses hot air in combination with high-speed air circulation
(Rapid Air) and a top grill to prepare a variety of tasty dishes in a healthy,
fast and easy way. Your ingredients are heated from all sides at once and
there is no need to add oil to most of the ingredients.
For more inspiration for recipes and information about the airfryer,
visit www.philips.com/kitchen.
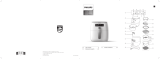
General description (Fig. 1)
1 Basket
2 MAX indication
3 Basket handle
4 Pan
5 Control panel
- A Power on/off button
- B Start/pause button
- C Preset button
- D Temperature increase and decrease buttons
- E Time/temperature indication
- F Timer increase and decrease buttons
6 Drawer
7 Air outlet openings
8 Air inlet
Important
Read this user manual carefully before you use the appliance and save it for
future reference.
Danger
- Never immerse the housing, which contains electrical components and
the heating elements, in water nor rinse it under the tap.
- Do not let any water or other liquid enter the appliance to prevent
electric shock.
- Always put the ingredients to be fried in the basket, to prevent them
from coming into contact with the heating elements.
- Do not cover the air inlet and the air outlet openings while the
appliance is operating.
- Do not ll the pan with oil as this may cause a re hazard.
- Never touch the inside of the appliance while it is operating.
Warning
- Check if the voltage indicated on the appliance corresponds to the local
mains voltage before you connect the appliance.
- Do not use the appliance if the plug, the mains cord or the appliance
itself is damaged.
- If the mains cord is damaged, you must have it replaced by Philips,
a service centre authorised by Philips or similarly qualied persons in
order to avoid a hazard.
- This appliance is not intended for use by persons (including children)
with reduced physical, sensory or mental capabilities, or lack of experience
and knowledge, unless they have been given supervision or instruction
concerning use of the appliance by a person responsible for their safety.
- Keep the appliance and its mains cord out of reach of children.
- Keep the mains cord away from hot surfaces.
- Do not plug in the appliance or operate the control panel with wet hands.
- Only connect the appliance to an earthed wall socket. Always make
sure that the plug is inserted into the wall socket properly.
- This appliance is not intended to be operated by means of an external
timer or a separate remote-control system.
- Do not place the appliance on or near combustible materials such as a
tablecloth or curtain.
- Do not place the appliance against a wall or against other appliances.
Leave at least 10cm free space at the back, on both sides and above
the appliance. Do not place anything on top of the appliance.
- Do not use the appliance for any other purpose than described in
this manual.
- Do not let the appliance operate unattended.
- During hot air frying, hot steam is released through the air outlet
openings. Keep your hands and face at a safe distance from the steam
and from the air outlet openings. Also be careful of hot steam and
air when you pull the pan out of the appliance.
- The accessible surfaces may become hot during use (Fig. 2).
- Immediately unplug the appliance if you see dark smoke coming out of
the appliance. Wait for the smoke emission to stop before you pull the
pan out of the appliance.
- The pan becomes hot all over when it is used in the airfryer. Let the pan
cool down before you handle it.
Caution
- Place the appliance on a horizontal, even and stable surface.
- This appliance is intended for normal household use only. It is not intended
for use in environments such as staff kitchens of shops, ofces, farms or
other work environments. Nor is it intended to be used by clients in hotels,
motels, bed and breakfasts and other residential environments.
- If the appliance is used improperly or for professional or semi-professional
purposes or if it is not used according to the instructions in the user
manual, the guarantee becomes invalid and Philips refuses any liability for
damage caused.
- Always return the appliance to a service centre authorised by Philips for
examination or repair. Do not attempt to repair the appliance yourself,
otherwise the guarantee becomes invalid.
- Always unplug the appliance after use.
- Let the appliance cool down for approx. 30 minutes before you handle
or clean it.
- Make sure the ingredients prepared in this appliance come out golden-
yellow instead of dark or brown. Remove burnt remnants. Do not
fry fresh potatoes at a temperature above 180°C (to minimise the
production of acrylamide).
Automatic switch-off
This appliance is equipped with an automatic switch-off. If you do not press a
button within 30 minutes, the appliance switches off automatically. To switch
off the appliance manually, press the power on/off button.
Electromagnetic elds (EMF)
This Philips appliance complies with all standards regarding electromagnetic
elds (EMF). If handled properly and according to the instructions in this user
manual, the appliance is safe to use based on scientic evidence available today.
Before first use
1 Remove all packaging material.
2 Remove the foil from the control panel and any stickers or labels
from the appliance.
3 Open the drawer by pulling at the handle. (Fig. 3)
4 Remove the basket by lifting the handle (1). To remove the pan, tilt it
backwards and lift it off the rails (2). (Fig. 4)
5 Thoroughly clean the basket and pan with hot water, some washing-
up liquid and a non-abrasive sponge.
Note: You can also clean these parts in the dishwasher.
6 Wipe the inside and outside of the appliance with a moist cloth.
7 Place the pan in the drawer (1) and put the basket in the pan (2) (Fig. 5).
8 Slide the drawer back into the airfryer by the handle.
Note: The appliance may produce some smoke when you use it for the rst
time. This is normal.
Preparing for use
1 Place the appliance on a stable, horizontal and level surface.
Do not place the operating appliance on non-heat-resistant surfaces.
Do not place the operating appliance near or underneath objects that
could be damaged by steam, such as walls and cupboards.
Note: Place the appliance on a worktop in such a way that the drawer can be
opened completely.
2 Pull the mains cord out of the cord storage compartment at the back
of the appliance.
This airfryer works on hot air. Do not ll the pan with oil, frying fat or
any other liquid.
Do not put anything on top of the appliance. This disrupts the airow and
affects the hot air frying result.
Using the appliance
The airfryer can prepare a large range of ingredients. The recipe booklet
included helps you get to know the appliance. You can nd more recipes at
www.philips.com/kitchen.
Preset button
You can program the appliance to prepare your favourite ingredients at a
specic temperature for a specic length of time.
Note: The appliance can only memorise one temperature and one cooking time.
To set your favourite settings:
1 Press the power on/off button to switch on the appliance. (Fig. 6)
2 Press the preset button (star symbol). (Fig. 18)
, The display shows the current saved settings.
3 Press the temperature increase or decrease button to set the desired
temperature. (Fig. 7)
, The star symbol starts ashing.
4 Press the timer increase or decrease button to set the desired time.
(Fig. 12)
5 Press the preset button (star symbol). (Fig. 18)
, You hear a beep and the star symbol lights up continuously to
indicate that the settings have been saved.
From now on, the appliance memorises your favourite settings. Just press
the preset button to recall the saved settings. Press the start/pause button
to start the program.
Note: If you want to change the saved settings, simply perform steps 1 to 5 again.
Settings
The table below helps you to select the basic settings for the ingredients
you want to prepare.
Note: Keep in mind that these settings are indications. As ingredients differ in
origin, size, shape as well as brand, we cannot guarantee the best setting for
your ingredients.
Because the Rapid Air technology instantly reheats the air inside
the appliance, pulling the pan briey out of the appliance during
cooking barely disturbs the process.
Tips
- Smaller ingredients usually require a slightly shorter cooking time than
larger ingredients.
- A larger amount of ingredients only requires a slightly longer cooking
time, a smaller amount of ingredients only requires a slightly shorter
cooking time.
- Shake smaller ingredients halfway through the cooking time to
redistribute them. This improves the end result and helps to prevent
unevenly cooked ingredients.
- Add some oil to fresh potatoes for a crispy result. Fry your ingredients
in the airfryer within a few minutes after you added the oil.
- Do not prepare extremely greasy ingredients such as sausages in the airfryer.
- Snacks that can be prepared in an oven can also be prepared in the airfryer.
- The optimal amount for preparing crispy fries is 750 grams.
- Use pre-made dough to prepare lled snacks quickly and easily. Pre-made
dough also requires a shorter cooking time than home-made dough.
- Place a baking tray or oven dish in the airfryer basket if you want to bake a
cake or quiche or if you want to fry fragile ingredients or lled ingredients.
- You can also use the airfryer to reheat ingredients. To reheat ingredients,
set the temperature to 150°C for up to 10 minutes.
Min-max
amount
(g)
Cooking
time
(min.)
Temperature
(°C)
Shake Extra
information
Potatoes
& fries
Thin frozen
fries
300g-
1000g
8-16 200 Shake
Thick frozen
fries
300g-
1000g
13-19 200 Shake
Home-
made fries
(8x8mm)
300g-
1200g
20-30 180 Shake add 1/2 tbsp
of oil for
300g; add 1
1/2 tbsp for
1200g
Home-
made
potato
wedges
300g-
900g
18-24 180 Shake add 1/2 tbsp
of oil or
300g; add 1
1/2 tbsp for
1200g
Snacks
Preheating
1 Put the mains plug in an earthed wall socket.
2 Press the power on/off button to switch on the appliance. (Fig. 6)
, The display shows the last selected temperature.
3 Press the temperature increase or decrease button to set the
required temperature. See section ‘Settings’ in this chapter to
determine the right temperature. (Fig. 7)
Tip: Press the increase or decrease button longer to put the temperature
forward or backward more quickly.
Note: If you do not want to preheat, but want to start frying immediately, skip
step 4 and follow the instructions in section ‘Hot air frying’ in this chapter.
4 Press the start/pause button. (Fig. 8)
, The appliance starts to heat up.
, The set temperature ashes until the set temperature has been
reached. Then the appliance beeps and the set temperature is
displayed continuously. The appliance stops beeping if you set the
required cooking time (see step 4 in section ‘Hot air frying’).
Note: You can also start the preheating process manually by setting the temperature
and then pressing the timer decrease button until ‘- -’ appears. (Fig. 9)
Hot air frying
1 Open the drawer by pulling at the handle. (Fig. 3)
2 Put the ingredients in the basket (Fig. 10).
Note: Never ll the basket beyond the MAX indication or exceed the amount
indicated in the table (see section ‘Settings’ in this chapter), as this could affect
the quality of the end result.
3 Slide the drawer back into the airfryer by the handle (Fig. 11).
Never use the pan without the basket in it. If you heat up the appliance
without basket, use oven gloves to open the drawer. The edges and inside
of the drawer become very hot.
Caution: Do not touch the pan during and some time after use, as it gets
very hot.
4 Press the timer increase or decrease button to set the timer to
the required cooking time. See section ‘Settings’ in this chapter to
determine the correct cooking time. (Fig. 12)
Tip: Press the timer increase or decrease button longer to put the time forward
or backward more quickly.
Note: If you have not preheated the appliance, add 3 minutes to the cooking time.
Note: If you do not set the required cooking time within 5 minutes,
the appliance switches off automatically for safety reasons.
5 Press the start/pause button to start the cooking process. (Fig. 13)
, The display starts counting down the set cooking time.
, Excess oil from the ingredients is collected on the bottom of the pan.
6 When the appliance starts to beep, the set cooking time has elapsed.
Note: You can also stop the cooking process manually. To do this, press the
start/pause button (Fig. 8).
7 Open the drawer by pulling at the handle and check if the ingredients
are ready. (Fig. 14)
If the ingredients are not ready yet, simply slide the drawer back into the
airfryer by the handle and add a few extra minutes to the set time.
8 To remove small ingredients (e.g. fries), lift the basket out of the pan
by the handle. (Fig. 15)
After the cooking process, the pan, the basket and the ingredients are hot.
Depending on the type of ingredients in the airfryer, steam may escape
from the pan.
9 Empty the basket into a bowl or onto a plate. (Fig. 16)
Tip: To remove large or fragile ingredients, use a pair of tongs to lift the
ingredients out of the basket (Fig. 17).
10 When a batch of ingredients is ready, the airfryer is instantly ready
for preparing another batch.
Note: Repeat steps 1 to 9 if you want to prepare another batch.
Note: If you prepare another batch within 30 minutes, it is not necessary to
preheat the appliance again.
11 Press the power on/off button to switch off the airfryer.
2 Wipe the outside of the appliance with a moist cloth.
Note: Make sure no moisture remains behind on the control panel. Dry the
control panel with a cloth after you have cleaned it.
3 Clean the pan and the basket with hot water, some washing-up liquid
and a non-abrasive sponge.
You can use a degreasing liquid to remove any remaining dirt.
Note: The pan and the basket are dishwasher-proof.
Tip: If dirt sticks to the basket or the bottom of the pan, ll the pan with hot
water with some washing-up liquid. Put the basket in the pan and let the pan
and the basket soak for approximately 10 minutes.
4 Clean the inside of the appliance with hot water and a non-abrasive
sponge.
5 Clean the heating element with a cleaning brush to remove any food
residues.
Storage
1 Unplug the appliance and let it cool down.
2 Make sure all parts are clean and dry.
3 Insert the cord into the cord storage compartment.
Ordering accessories
To buy accessories or spare parts, visit www.shop.philips.com/service
or go to your Philips dealer. You can also contact the Philips Consumer Care
Centre in your country (see the worldwide guarantee leaet for contact details).
Recycling
Do not throw away the appliance with the normal household waste at
the end of its life, but hand it in at an ofcial collection point for recycling.
By doing this, you help to preserve the environment.
Guarantee and support
If you need information or support, please visit www.philips.com/
support or read the separate worldwide guarantee leaet.
Troubleshooting
This chapter summarises the most common problems you could encounter
with the appliance. If you are unable to solve the problem with the
information below, visit www.philips.com/support for a list of frequently
asked questions or contact the Consumer Care Centre in your country.
Problem Possible cause Solution
The appliance
does not work.
The appliance is
not plugged in.
Put the mains plug in an earthed
wall socket.
The appliance is
not switched on.
Press the power on/off button to
switch on the appliance.
The ingredients
fried with
the appliance
are not done.
The set
temperature is
too low.
Press the temperature increase
button to the set the required
temperature (see section ‘Settings’
in chapter ‘Using the appliance’).
The cooking time
is too short.
Press the timer increase button to
set the required cooking time
(see section ‘Settings’ in chapter
‘Using the appliance’).
The amount of
ingredients in
the basket is too
big.
Put smaller batches of ingredients in
the basket. Smaller batches are fried
more evenly. Do not exceed the
MAX indication or the maximum
amount in the table.
The ingredients
are fried
unevenly in the
appliance.
Certain types of
ingredients need
to be shaken
halfway through
the cooking time.
Ingredients that lie on top of or
across each other (e.g. fries) need
to be shaken halfway through the
cooking time. See section ‘Settings’
in chapter ‘Using the appliance’.
Fried snacks
are not crispy
when they
come out of
the appliance.
You used a type
of snacks meant
to be prepared in
a traditional deep
fryer.
Use oven snacks or lightly brush
some oil onto the snacks for a
crispier result.
I cannot slide
the drawer
into the
appliance
properly.
There are
too many
ingredients in the
basket.
Do not ll the basket beyond the
MAX indication.
Min-max
amount
(g)
Cooking
time
(min.)
Temperature
(°C)
Shake Extra
information
Spring rolls 100g-
400g
7 200 Shake Use oven-
ready
Frozen
chicken
nuggets
400g 6 200 Shake Use oven-
ready
Frozen sh
ngers
4-12 8-10 200 Use oven-
ready
Roasted
vegetables
750g 15 200
Meat rolls 1-5 6 200
Hamburger 100g -
400g
6-7 180
Baking
Cake 500g 50 150 Use baking
tray
Quiche 400g 20 190 Use baking
tray/oven
dish
Mufns 400g 15 180 Use baking
tray
Min-max Amount
(g)
Cooking time (min.) at temperature
(°C)
Meat &
poultry
Steak* 100g 5 at 180°C and 4 at 100°C
600g 6 at 180°C and 4 at 100°C
Drumsticks* 1 (80g) 10 at 200°C and 10 at 150°C
7 (600g) 10 at 200°C and 10 at 150°C
Chicken breast* 100g 8 at 140°C and 6 at 180°C
800g 8 at 140°C and 8 at 180°C
* Always start cooking at the highest temperature and then continue at a lower
temperature until done.
Note: When you use ingredients that rise (such as with cake, quiche or mufns)
the baking tray should not be lled more than halfway.
Note: The cooking time does not include the time needed for preheating the appliance.
Making home-made fries
For the best results, we advise you to use pre-baked (e.g. frozen) fries. If you
want to make home-made fries, follow the steps below.
1 Peel the potatoes and cut them into sticks.
2 Soak the potato sticks in a bowl for at least 30 minutes, take them
out and dry them with kitchen paper.
3 Pour ½ tablespoon of olive oil in a bowl for 300g (for 1200g use
1½ tablespoon), put the sticks on top and mix until the sticks are
coated with oil.
4 Remove the sticks from the bowl with your ngers or a kitchen utensil
so that excess oil stays behind in the bowl. Put the sticks in the basket.
Note: Do not tilt the bowl to put all the sticks in the basket in one go, to prevent
excess oil from ending up on the bottom of the pan.
5 Fry the potato sticks according to the instructions in this chapter.
Cleaning
Clean the appliance after every use. Remove oil from the bottom of the
pan after each cooking process to prevent the development of smoke.
Open the drawer to let the airfryer cool down more quickly. Let the pan
cool down before you remove it from the appliance.
The pan, basket and the inside of the appliance have a non-stick coating.
Do not use metal kitchen utensils or abrasive cleaning materials to clean
them, as this may damage the non-stick coating.
1 Remove the mains plug from the wall socket and let the appliance
cool down.
危險
- 炸鍋外殼有電子元件及加熱裝置,不可浸泡在水中,或在水龍頭
下沖洗。
- 請勿讓水或其他液體進入產品內,以避免觸電。
- 務必將待炸的食材放在網籃中,避免與加熱組件接觸。
- 產品運作時,請勿遮蓋進風口和出風口。
- 請勿在炸鍋中裝油,否則可能導致起火危險。
- 產品運作時,切勿碰觸產品內部。
警示
- 在您連接電源之前,請檢查本地的電源電壓是否與產品所標示的
電壓相符。
- 當插頭、電線或產品本身受損時,請勿使用產品。
- 如果電線損壞,則必須交由飛利浦、飛利浦授權之服務中心,
或是具備相同資格的技師更換,以免發生危險。
- 本產品不適合供下列人士 (包括孩童) 使用:身體官能或心智能力
退化者,或是經驗與使用知識缺乏者。他們需要有負責其安全的
人員在旁監督,或指示產品的使用方法,方可使用。
- 請勿讓兒童接觸產品與電源線。
- 電源線應遠離高溫表面。
- 為產品插上電源或操作控制面板時,請確保雙手乾燥。
- 僅可將本產品連接到有接地的電源插座上。並請務必確定將插頭
確實插入電源插座中。
- 本產品的設計不是為了透過外部定時器或獨立遙控系統來進行操作。
- 請勿將產品放置在易燃物上或易燃物附近,如桌巾或窗簾。
- 請勿將產品放置於緊鄰牆壁或接觸其他電器的位置。請在產品背
面、兩側和上方至少保留 10 公分的間隔距離。產品頂部請勿放
置任何物品。
- 請勿將本產品使用於非本手冊描述之目的。
- 本產品運作時切勿置之不管。
- 在熱氣炸食期間,高溫蒸氣會透過出風口排出。請保持安全距離,
切勿將您的手與臉接近蒸氣與出風口。當您從產品中拉出炸鍋時,
也請注意高溫蒸氣和空氣。
- 產品表面在使用期間可能會變熱。 (圖 2)
- 如果您看到產品冒出黑煙,請立即拔下產品電源插頭。等到停止
冒煙後,再將炸鍋從產品中拉出。
- 在健康氣炸鍋中使用炸鍋時,整個炸鍋會變得燒燙。請在炸鍋冷
卻後再行搬運。
警告
- 請將產品置於平穩的表面上。
- 本產品僅供家用。並非用於商店的員工廚房、辦公室、農舍等等
或其他工作場所。亦非適用於供住宿用餐的飯店、汽車旅館與其
他居住場所。
- 如果不當使用本產品、作為 (半) 專業用途,或未依照使用手冊操作,
保固將無效,且飛利浦將不擔負任何損壞賠償責任。
- 務必將產品交由飛利浦授權之服務中心檢查或修理。請勿嘗試自
己動手修理;否則產品保固將無效。
- 用完本產品後,請務必將插頭拔掉。
- 搬運或清潔產品之前,請先讓產品冷卻約 30 分鐘。
- 請確定本產品調製出的食材呈現金黃色,而非黑色或褐色。
去除過焦的部分。請勿以高於 180°C 的溫度油炸新鮮馬鈴薯
(儘量降低丙烯醯胺的產生)。
自動關閉電源
本產品配備自動關閉電源功能。如果您在 30 分鐘內未按下任何按鈕,
產品將自動關閉。如要手動關閉產品,請按下電源開關按鈕。
電磁波 (EMF)
本飛利浦產品符合電磁波 (Electromagnetic fields,EMF) 所有相關
標準。只要使用方式正確並依照本使用手冊之說明進行操作,根據
現有的科學研究資料,使用本產品並無安全顧慮。
第一次使用前
1 移除所有包裝材料。
2 將控制面板上的保護膜,以及產品上的任何貼紙或標籤撕除。
3 拉著握把開啟抽屜。(圖3)
4 提起握把將網籃取出(1)。如要移除炸鍋,請將炸鍋向後傾斜,
再將它從軌道上提起。(2)。(圖4)
5 以熱水、少許清潔劑和非磨蝕性海綿徹底清洗網籃和炸鍋。
注意:您可以在洗碗機中清潔這些零件。
6 用濕布擦拭產品的外殼與內部。
7 將炸鍋放入抽屜(1)並將網籃放入炸鍋(2)。(圖5)
8 使用握把將抽屜推回健康氣炸鍋中。
注意:第一次使用時可能會產生一些煙霧,此為正常現象。
Problem Possible cause Solution
The pan and the
basket are not
placed correctly.
Make sure the pan and basket are
placed correctly.
White
smoke comes
out of the
appliance.
You are
preparing greasy
ingredients.
When you fry greasy ingredients in
the appliance, a large amount of oil
will leak into the pan.
The oil produces white smoke
and the pan may heat up more
than usual. This does not affect
the appliance or the end result.
The pan still
contains grease
residues from
previous use.
White smoke is caused by
grease heating up in the pan.
Make sure you clean the pan
properly after each use.
Fresh fries
are fried
unevenly in the
appliance.
You did not soak
the potato sticks
properly before
you fried them.
Soak the potato sticks in a bowl for
at least 30 minutes, take them out
and dry them with kitchen paper.
You did not use
the right potato
type.
Make sure you use fresh potatoes
and a rm type of potatoes.
Fresh fries
are not crispy
when they
come out of
the appliance.
The crispiness of
the fries depends
on the amount of
oil and water in
the fries.
Make sure you dry the potato sticks
properly before you add the oil.
Cut the potato sticks smaller and
add slightly more oil for a crispier
result.
The message
‘Er’ appears on
the display.
An error has
occurred.
Have the appliance checked by a
service centre authorised by Philips.
The time and
temperature
indications
change
automatically,
even though
I do not press
any buttons.
There is moisture
on the control
panel.
Make sure you dry the control
panel with a cloth after you have
cleaned it.
繁體中文
簡介
恭喜您購買本產品並歡迎加入飛利浦!請於 www.philips.com/
welcome 註冊您的產品,以善用飛利浦提供的支援。
您可以用新購買的健康氣炸鍋,以更健康的方式料理喜歡的食材和
小吃。
健康氣炸鍋的原理是運用熱氣、高速空氣對流技術 (Rapid Air) 和上
方烤盤,以健康,快捷而簡單的方式來料理各種美味菜餚。食材會
受到四面八方的均勻加熱,而且大多數的食材都不需要另外添加食
用油。
如需更多食譜靈感與健康氣炸鍋相關資訊,請瀏覽 www.philips.com/
kitchen。
一般說明 (圖 1)
1 網籃
2 MAX 刻度
3 網籃握把
4 炸鍋
5 控制面板
- A 電源開關按鈕
- B 開始/暫停按鈕
- C 預設按鈕
- D 增加和降低溫度按鈕
- E 時間/溫度標示
- F 定時增加和減少按鈕
6 抽屜
7 出風口
8 進風口
重要事項
在使用本產品前,請先仔細閱讀本使用手冊,並保留使用手冊以供
日後參考。
提示:要取出體積較大或者易碎的食材,請用夾子將食材夾出網籃。
(圖17)
10 當一批食材料理完畢時,健康氣炸鍋立即可以料理另一批食材。
注意:您若要料理另一批食材,請重複步驟1至9。
注意:若您在30分鐘內料理另一批食材,則不需要再次預熱本產品。
11 按下電源開關按鈕,關閉健康氣炸鍋。
預設按鈕
您可以設定本產品,使其以特定的溫度和時間長度料理您最愛的食材。
注意:產品只能記憶一個溫度和一個烹調時間。
設定您最愛的設定:
1 按下電源開關按鈕,開啟產品電源。(圖6)
2 按下預設按鈕(星星符號)。(圖18)
, 顯示器會顯示目前的儲存設定。
3 按下溫度增加或降低按鈕,設定想要的溫度。(圖7)
, 星星符號會開始閃爍。
4 按下定時增加或減少按鈕,設定想要的烹調時間。(圖12)
5 按下預設按鈕(星星符號)。(圖18)
, 您會聽到嗶聲,且星星符號會持續亮起,表示設定已儲存。
從現在起,產品已記憶您最愛的設定,只要按下預設按鈕,便可喚
出已儲存的設定。按下開始/暫停按鈕,開始烹調程序。
注意:如果您想要變更已儲存的設定,只要再次執行步驟1至5即可。
設定
下表能針對您想料理的食材,協助您選擇基本的設定。
注意:請注意,這些設定為參考指標。隨著食材產地、大小、
形狀以及品牌的不同,我們不能保證這些是最適合您食材的設定。
因為 Rapid Air 技術會立即重新加熱產品裡面的空氣,若在烹調時將
炸鍋短暫地拉出產品,對於料理程序幾乎不會有影響。
提示
- 體積較小的食材所需的烹調時間通常會比體積較大的食材短。
- 量較多的食材只需要略長的烹調時間;較少量的食材只需要略短
的烹調時間。
- 烹調中搖晃體積較小的食材,可以重新分配食材位置。這樣做可
使最後的烹調效果更好,並防止食材炸的不均勻。
- 將一些油加到新鮮的馬鈴薯上,可以炸出香脆的效果。在您加入
油之後,您可以用健康氣炸鍋來油炸食材數分鐘。
- 請勿在健康氣炸鍋中料理非常油膩的食材,例如香腸。
- 可以用烤爐料理的小吃,同樣也可以在健康氣炸鍋中料理。
- 料理脆炸薯條的理想重量是 750 公克。
- 使用市售麵團可以迅速而輕易地料理餡餅類的小吃。市售麵團所
需的烹調時間也比自製麵團短。
- 如果您想烤蛋糕或鹹派,或是想炸易碎或填塞餡料的食材,
請將烤盤放入健康氣炸鍋網籃中。
- 您也可以利用健康氣炸鍋重新加熱食材。要重新加熱食材,
請將溫度設定為 150°C,時間最多設定為 10 分鐘。
重量範圍
(公克)
烹調時
(分鐘)
溫度
(°C)
搖晃 其他資訊
馬鈴薯與
薯條
冷凍細
薯條
300 公
克-1000 公
8-16 200 搖晃
冷凍粗
薯條
300 公
克-1000 公
13-19 200 搖晃
自製薯條
(8x8 公
釐)
300 公
克-1200 公
20-30 180 搖晃 300 公克:
加 1/2 大匙的
油;1200 公
克:加 1 1/2
大匙的油
自製厚切
薯條
300 公
克-900 公克
18-24 180 搖晃 300 公克:
加 1/2 大匙的
油;1200 公
克:加 1 1/2
大匙的油
小吃
使用前準備
1 請將產品放在平穩的水平表面上。
請勿將使用中的產品放在不耐熱的表面上。
使用產品時,請勿將產品放在可能會受熱氣損壞的物品附近或下方,
例如牆壁和櫥櫃。
注意:產品放置在工作台上時,須讓抽屜能夠完全打開。
2 請將電線由產品後方的電線儲藏格內拉出。
健康氣炸鍋使用熱氣炸食。請勿在炸鍋中盛裝油脂或其他液體。
請勿將任何東西放在產品頂端。如此會擾亂氣流並影響熱氣炸食結果。
使用本產品
健康氣炸鍋可用於料理多種食材。隨附的食譜能幫助您瞭解本產品。
您也可以在 www.philips.com/kitchen 找到更多食譜。
預熱
1 將電源線插頭插入接地插座中。
2 按下電源開關按鈕,開啟產品電源。(圖6)
, 畫面中會顯示上次選取的溫度設定。
3 按下增加或降低溫度按鈕,設定所需的溫度。請參閱本單元的
「設定」一節,決定正確的溫度。(圖7)
提示:持續按下增加或降低按鈕,可更快速地增加或降低溫度。
注意:若您不要預熱,但想立即開始油炸,請跳過步驟4,並依照
本單元中「熱氣炸食」一節的指示操作。
4 按下開始/暫停按鈕。(圖8)
, 產品開始加熱。
, 設定的溫度會閃爍,直到達到設定溫度。接著產品會發出嗶聲,
並會持續顯示設定溫度。設定所需的烹調時間(請參閱「熱氣炸
食」一節步驟4)後,本產品會停止發出嗶聲。
注意:您也可以手動開始預熱程序:設定溫度,再按住定時減少按鈕,
直到出現「--」。(圖9)
熱氣炸食
1 拉著握把開啟抽屜。(圖3)
2 將食材置於網籃中。(圖10)
注意:盛裝時,不可超出網籃的MAX刻度之外,或超過表中指示
的數量(請參閱本單元中的「設定」一節),否則將影響料理品質。
3 使用握把將抽屜推回健康氣炸鍋中。(圖11)
切勿使用沒有網籃的炸鍋。若您未使用網籃即加熱本產品,請使用
隔熱手套打開抽屜,抽屜邊緣與內部會變得很燙。
警告:使用中與使用後的一段時間內,請勿碰觸炸鍋,因為此時炸
鍋依然處於高溫。
4 按下定時增加或減少按鈕,在定時器設定所需的烹調時間。
請參閱本單元的「設定」一節,決定正確的烹調時間。(圖12)
提示:持續按下定時增加或定時減少按鈕,可更快速地增加或減少
烹調設定時間。
注意:若您未預熱產品,請在烹調時間上再增加3分鐘。
注意:基於安全考量,若未在5分鐘內設定所需的烹調時間,
產品將自動關閉。
5 按下開始/暫停按鈕,開始烹調程序。(圖13)
, 顯示幕會開始倒數設定的烹調時間。
, 從食材中流出的油脂會留在炸鍋的底部。
6 當產品發出嗶聲時,表示達到設定的烹調時間。
注意:您也可以手動停止烹調程序。若要這樣做,請按下開始/暫停
按鈕。(圖8)
7 拉握把開啟抽屜,檢查食材是否料理完畢。(圖14)
若食材尚未料理完畢,只要持握手把將抽屜滑回健康氣炸鍋,
在設定時間上再增加幾分鐘即可。
8 要取出體積較小的食材(例如薯條),請提拉握把,將網籃從炸鍋
中移出。(圖15)
烹調程序結束後,炸鍋、網籃和食材的溫度很高。視健康氣炸鍋中
的食材類型而定,炸鍋中可能會冒出蒸氣。
9請將網籃中的食材舀到碗盤上。(圖16)
注意:炸鍋和網籃可用洗碗機清洗。
提示:如果污漬黏著在網籃或炸鍋的底部,在炸鍋中注入混有清潔
劑的熱水。將網籃放在炸鍋中,讓炸鍋和網籃浸泡約10分鐘左右。
4 以熱水和非磨蝕性海綿清潔產品內部。
5 以清潔刷清理加熱裝置,清除任何食物殘渣。
收納
1 拔除插頭並讓產品冷卻。
2 確認各零件均為清潔和乾燥。
3 將電源線收回收線槽。
訂購配件
若要購買配件或備用零件,請造訪 www.shop.philips.com/service
或洽詢您的飛利浦經銷商。您也可以聯絡您所在國家/地區的飛利浦
客戶服務中心 (聯絡詳細資料請參閱全球保證書)。
回收
本產品使用壽命結束時,請勿與一般家庭廢棄物一併丟棄。請將本
產品送至政府指定的回收站,此舉能為環保盡一份心力。
保固與支援
如果您需要資訊或支援,請造訪:www.philips.com/support
或另行參閱全球保證書。
疑難排解
本單元概述您使用本產品時最常遇到的問題。如果您無法利用以下
資訊解決您遇到的問題,請造訪 www.philips.com/support 查看常見
問題清單,或聯絡您所在國家/地區的飛利浦客戶服務中心。
問題 可能原因 解決方法
本產品無法
運作。
產品未插電。 將電源線插頭插入接地插座中。
您的產品沒有
開啟電源。
按下電源開關按鈕,開啟產品電
源。
產品沒有炸
熟食材。
所設定的溫度
過低。
按下增加溫度按鈕,設定所需的
溫度 (請參閱「使用本產品」單元
中的「設定」一節)。
烹調時間過
短。
按下定時增加按鈕,設定所需的
烹調時間 (請參閱「使用本產品」
單元中的「設定」一節)。
網籃中盛裝過
量的食材。
將食材先分批再放進網籃中。
分批的食材炸起來較為均勻。
請勿超越 MAX 刻度或表格中的最
大烹調量。
產品未將食
材炸得均
勻。
某些類型的食
材必須在烹調
的半途中搖
晃。
彼此重疊或交錯的食材 (例如薯條)
必須在烹調的半途中搖晃。請參
閱「使用本產品」單元中的「設
定」一節。
產品炸出來
的炸物不
脆。
您料理的是必
須使用傳統油
炸鍋的小吃。
請選擇適合烤爐的小吃,或在食材
上輕刷一些油,炸起來會更香脆。
我不能將抽
屜順利推進
產品中。
網籃中盛裝過
量的食材。
裝入網籃的食材量請勿超過 MAX
刻度。
炸鍋和網籃未
正確放置。
請確認炸鍋和網籃已正確放置。
產品冒出白
煙。
您正在料理油
膩的食材。
當您在產品中炸油膩的食材,
大量的油將滲漏到炸鍋中。油會
產生白煙,並使炸鍋異常加熱。
這不會影響產品或料理成果。
炸鍋還留有上
次使用後的油
脂殘渣。
白煙是由炸鍋中加熱的油脂造
成。請務必在每次使用後適度清
洗炸鍋。
新鮮的薯條
在產品中炸
得不均勻。
您沒有在炸之
前妥當浸泡薯
條。
將薯條浸泡在碗中至少 30 分鐘,
然後取出並以廚房紙巾吸乾水分。
您未使用正確的
馬鈴薯類型。
請務必使用新鮮的馬鈴薯及較結
實的馬鈴薯。
產品炸出來
的新鮮薯條
不脆。
薯條的脆度取
決於油和水在
薯條中的量。
請確定您在加入油之前,已妥善地
將薯條弄乾。把薯條切得更細,
並多加一點油,炸起來會更脆。
重量範圍
(公克)
烹調時
(分鐘)
溫度
(°C)
搖晃 其他資訊
春捲 100 公
克-400 公克
7 200 搖晃 使用烤爐- 就
冷凍雞塊 400 公克 6 200 搖晃 使用烤爐- 就
冷凍魚條 4-12 8-10 200 使用烤爐- 就
烤蔬菜 750 公克 15 200
肉捲 1-5 6 200
漢堡 100 公
克-400 公克
6-7 180
烘焙
蛋糕 500 公克 50 150 使用烤盤
鹹派 400 公克 20 190 使用烤盤
麥芬 400 公克 15 180 使用烤盤
重量範圍 (
公克)
在溫度 (°C) 的烹調時間 (分鐘)
肉類
牛排* 100 公克 以溫度 180°C 烹調 5 分鐘,再以溫
度 100°C 烹調 4 分鐘
600 公克 以溫度 180°C 烹調 6 分鐘,再以溫
度 100°C 烹調 4 分鐘
雞腿* 1 (80 公克) 以溫度 200°C 烹調 10 分鐘,再以溫
度 150°C 烹調 10 分鐘
7 (600 公
克)
以溫度 200°C 烹調 10 分鐘,再以溫
度 150°C 烹調 10 分鐘
雞胸* 100 公克 以溫度 140°C 烹調 8 分鐘,再以溫
度 180°C 烹調 6 分鐘
800g 以溫度 140°C 烹調 8 分鐘,再以溫
度 180°C 烹調 8 分鐘
*請務必以最高溫度開始烹調,之後以較低的溫度繼續,直到食材熟透。
注意:當您使用會發酵的食材(例如蛋糕、鹹派或鬆餅)時,烤盤請
勿超過半滿。
注意:烹調時間不包含預熱產品所需的時間。
製作自製薯條
為達到最佳料理效果,建議您使用預烤 (例如冷凍 ) 的薯條。如果您
想製作自製薯條,請遵循下列步驟。
1 將馬鈴薯削皮、切成條狀。
2 將薯條浸泡在碗中至少30分鐘,然後取出並以廚房紙巾吸乾水分。
3 在碗中倒入 ½大匙的橄欖油(若是300公克;1200公克則用
1½大匙);加入薯條攪拌,讓薯條表面均勻沾上一層油。
4 用手指或廚房器具從碗中取出薯條,讓多餘的油留在碗內。將薯
條放入網籃中。
注意:請勿直接從碗中一次倒入所有薯條,以免多餘的油流入炸鍋
底部。
5 根據本單元的指示說明來油炸薯條。
清潔
每次使用後請清潔本產品。每個烹調程序後請倒掉炸鍋底部的油,
避免產生煙霧。
開啟抽屜可讓健康氣炸鍋更快冷卻。請先讓炸鍋冷卻,再將炸鍋從
產品中取出。
炸鍋、網籃和產品內部均有不沾黏表層。請勿使用金屬廚房器具或
磨蝕性清洗材料來清洗,否則可能會破壞不沾黏表層。
1 將電源插頭從插座上拔除並讓本產品冷卻。
2 用濕布擦拭產品外部表面。
注意:確認控制面板後無濕氣殘留。清潔控制面板後,請以布拭乾。
3 以熱水、少許清潔劑和非磨蝕性海綿清洗炸鍋和網籃。
您可以用油污清潔劑除去任何殘餘的污漬。
- 在 Airfryer 空气炸锅中使用时,整个煎锅都会变热。待煎锅冷却
后再握持。
警告
- 将产品放在一个水平、平滑、稳固的表面上。
- 本产品仅限于正常家用。它不得用于商店、办公场所、农场或其
他工作环境的员工食堂。也不得由酒店、汽车旅馆、提供住宿和
早餐的场所及其他住宿环境中的客人使用。
- 对本产品使用不当,或者将其用于专业、半专业用途,或者没有
根据本用户手册中的说明进行使用,此类情况下保修将失效,
飞利浦对此类损坏概不负责。
- 产品只能送到由飞利浦授权的维修中心检修。不要自己修理产
品,否则产品维修保证书将会无效。
- 使用后务必拔下产品的插头。
- 在处理或清洁产品之前,必须先让产品冷却大约 30 分钟。
- 确保在本产品中烹饪的原料已呈现金黄色,而不是黑色或棕色。
烧焦的部分应该丢弃。切勿在高于 180°C 的温度下煎炸新鲜土豆
(以尽量减少丙烯酰胺的产生)。
自动关闭
本产品具有自动关闭功能。如果在 30 分钟内未按任何按钮,产品会
自动关闭。要手动关闭产品,请按下电源开/关按钮。
电磁场 (EMF)
这款飞利浦产品符合关于电磁场 (EMF) 的相关标准。据目前的科学
证明,如果正确使用并按照本用户手册中的说明进行操作,本产品
是安全的。
首次使用之前
1 除去所有包装材料。
2 去除控制面板上的保护膜以及产品上的不干胶或标签。
3 拉动把手,打开抽屉。(图3)
4 提起把手(1),取出炸篮。要取出煎锅,将其向后倾斜,然后从
导轨中提出(2)。(图4)
5 用热水、洗涤剂和非研磨性海绵彻底清洁炸篮和煎锅。
注意:也可以用洗碗机清洗这些部件。
6 用湿布擦拭产品的内部和外部。
7 将煎锅放在抽屉(1)中,然后将炸篮放入煎锅(2)。(图5)
8 用把手将抽屉滑回Airfryer空气炸锅。
注意:第一次使用产品时可能会出现一些烟雾。这是正常现象。
使用准备
1 将本产品放在稳固、水平且平坦的表面。
切勿将运转中的产品放在不耐热的表面上。
切勿将运转中的产品放在可能被蒸汽损坏的物体(例如墙壁和橱柜)
附近或下方。
注意:将产品放在抽屉可完全打开的台面上。
2 将电线从产品背面的电线储藏室中拉出。
这款Airfryer空气炸锅采用热空气加热。切勿向煎锅中倒油、油脂或
任何其他液体。
切勿在产品上方放置物品。这会阻隔气流并影响热空气加热的效果。
使用本产品
Airfryer 空气炸锅可用于烹饪许多原料。内附的食品制作手册将帮助您
了解此产品。您可以访问 www.philips.com/kitchen 以获得更多食谱。
预热
1 将插头插入有接地的电源插座。
2 按开/关按钮打开产品。(图6)
, 显示屏会显示上次选定的温度。
3 按温度调高或降低按钮设置所需的温度。请参阅本章中的
“设置”部分以确定合适的温度。(图7)
提示:长按调高和降低按钮可快速向前或向后调节温度。
注意:如果您不想预热,而是要立即开始煎炸,请跳过步骤4并按
照本章中“热空气煎炸”部分中的说明进行操作。
4 按下开始/暂停按钮。(图8)
, 产品开始加热。
, 在达到设定温度之前,设定温度会一直闪烁。然后,产品会发出
哔声,持续显示设定温度。设置所需的烹饪时间后,产品将停止
发出哔声(请参阅“热空气煎炸”部分中的步骤4)。
問題 可能原因 解決方法
顯示幕上出
現「Er」訊
息。
發生錯誤。 請由飛利浦授權服務中心檢查產
品。
即使我未按下
任何按鈕,
時間和溫度標
示也會自行變
動。
控制面板上有
水分。
清潔控制面板後,請確實以布拭
乾。
简体中文
简介
感谢您的惠顾,欢迎光临飞利浦!为了您能充分享受飞利浦提供的
支持,请在 www.philips.com/welcome 上注册您的产品。
新推出的 Airfryer 将帮助您以更健康的方式来烹饪您最喜爱的原料与
点心。
Airfryer 采用了热空气结合高速空气循环(快速换气)的原理,并且
还在顶部安装了烤架,方便您以健康、快速且简便的方式烹调各种
美食佳品。它将为您的食材提供一次性全方位加热,因此对大多数
食材而言,根本无需加油烹调。
有关食谱灵感以及有关 Airfryer 的信息,请访问 www.philips.com/
kitchen。
基本说明 (图 1)
1 蒸篮
2 MAX 指示
3 炸篮手柄
4 煎锅
5 控制面板
- A 电源开/关按钮
- B 开始/暂停按钮
- C 预设按钮
- D 温度调高和降低按钮
- E 时间/温度指示
- F 计时器增加和减少按钮
6 抽屉
7 出风口
8 进风口
注意事项
使用本产品之前,请仔细阅读本使用说明书,并妥善保管以备日后
参考。
危险
- 切勿将外壳浸入水中或在水龙头下冲洗,因为外壳中有电子元件
和加热元件。
- 切勿让水或其它液体进入该产品,以免发生电击。
- 始终将原料放置在炸篮中煎炸,以免接触到加热元件。
- 产品正在工作时,不要盖住其进风口和出风口。
- 切勿在煎锅中倒油,因为这可能导致火灾危险。
- 切勿在产品工作时触碰到它的内部。
警告
- 在将产品连接电源之前,请先检查产品所标电压与当地的供电电
压是否相符。
- 如果插头、电源线或产品本身受损,请勿使用本产品。
- 如果电源线损坏,为了避免危险,必须由飞利浦、飞利浦特约维
修中心或有同等维修资格的专业人员来进行更换。
- 产品不建议由有肢体、感官或精神能力缺陷或缺少使用经验和知
识的人(包括儿童)使用,除非有负责他们安全的人对他们进行
与产品使用有关的监督或指导。
- 将产品和电源线放在儿童接触不到的地方。
- 不要让电源线接触到高温的表面。
- 切勿用浸湿的手插入产品插头或操作控制面板。
- 产品必须插入有接地的插座,且务必确保其已正确插入。
- 本产品不能利用外部定时器或独立的遥控器系统操作。
- 切勿将产品放置在诸如桌布、窗帘等易燃材料的上面或附近。
- 切勿将产品靠墙或靠其他产品摆放。产品的后面、两侧和上方应
至少留出 10 厘米的自由空间。切勿在产品上放置任何物品。
- 请勿将本产品用于本手册中说明以外的任何其它用途。
- 产品使用时必须有人看管。
- 在利用热空气煎炸期间,会从出风口释放出高温蒸汽。手部和脸
部应与蒸汽和出风口保持安全距离。并且在将煎锅从产品中拉出
时也要注意高温蒸汽和热气。
- 使用产品时,其可接触的表面可能会变得很热。 (图 2)
- 如果产品冒出黑烟,立即拔掉电源。等待产品停止冒烟后再将煎
锅从产品拉出。
- 原料量较多时,仅需要稍微增加烹饪时间,而当原料量较少时,
只需稍微缩短烹饪时间。
- 在烹饪中途翻动体积较小的原料进行重新分布。这可以改善最终
烹饪效果,有助于防止原料烹饪不均。
- 在新鲜土豆中添加少许油可让原料更松脆。添加油后应将原料放
置几分钟,然后再在 Airfryer 中煎炸。
- 切勿在 Airfryer 中烹饪含油量极高的原料,例如香肠。
- 能够在烘箱中烹饪的点心同样可以在 Airfryer 中烹饪。
- 要烹饪出松脆的炸薯条,最佳的原料量是 750 克。
- 使用预发酵面团可以方便快捷地烹饪出夹心食品。与自制面团相
比,预发酵面团需要的烹饪时间更短。
- 如果您要烘烤蛋糕或乳蛋饼,或者要烹饪易碎或夹心的原料,
请将烘焙盘或烤盘放入 Airfryer 空气炸锅的炸篮。
- 您可以使用 Airfryer 重新加热原料。要重新加热原料,请将温度
设置为 150°C,烹饪时间最长为 10 分钟。
最小-最大
原料量
(克)
烹饪时
间(分
钟)
温度
(°C)
翻动 附加信息
土豆和炸
薯条
冷冻的薄
薯条
300 克 -
1000 克
8-16 200 翻动
冷冻的厚
薯条
300 克 -
1000 克
13-19 200 翻动
自制炸薯
条(8x8
毫米)
300 克 -
1200 克
20-30 180 翻动 300 克加 1/2
汤匙油;1200
克加 1 1/2
汤匙
自制土豆
300 克 -
900 克
18-24 180 翻动 300 克加 1/2
汤匙油;1200
克加 1 1/2
汤匙
点心
春卷 100 克 -
400 克
7 200 翻动 使用即烤型
冷冻炸鸡
400 克 6 200 翻动 使用即烤型
冷冻炸鱼
4-12 8-10 200 使用即烤型
烤蔬菜 750 克 15 200
肉卷 1-5 6 200
汉堡包 100 克 -
400 克
6-7 180
烘焙
蛋糕 500 克 50 150 使用烘烤盘
乳蛋饼 400 克 20 190 使用烘烤盘/
烤盘
松饼 400 克 15 180 使用烘烤盘
最小-最大原料量
(克)
所在温度 (°C) 下的烹饪时间
(分钟)
肉类和家禽
牛排* 100 克 180°C 时选择 5 100°C 时
选择 4
600 克 180°C 时选择 6 100°C 时
选择 4
鸡腿* 1(80 克) 200°C 时选择 10 150°C 时
选择 10
7(600 克) 200°C 时选择 10 150°C 时
选择 10
鸡脯* 100 克 140°C 时选择 8 180°C 时
选择 6
800 克 140°C 时选择 8 180°C 时
选择 8
*请始终以最高温度开始烹饪,然后继续以较低温度烹饪直至完成。
注意:您也可以通过以下操作手动开始预热过程:设置温度,
然后按计时器减少按钮,,直至出现“--”。(图9)
热空气煎炸
1 拉动把手,打开抽屉。(图3)
2 将原料放入炸篮。(图10)
注意:放入的原料量切勿超过MAX指示线或者超过下表中所示的数
量(参阅本章中的“设置”),因为这可能影响最终的煎炸质量。
3 用把手将抽屉滑回Airfryer空气炸锅。(图11)
切勿在没有炸篮的情况下使用煎锅。如果在没有炸篮的情况下加热
产品,请使用烤箱专用手套打开抽屉。抽屉的边缘和内侧会变得非
常烫。
警告:在使用过程中和使用后的短时间内切勿触碰煎锅,因其非常烫。
4 按计时器增加或减少按钮可将计时器设置为所需的烹饪时间。
请参阅本章中的“设置”部分以确定正确的烹饪时间。(图12)
提示:长按计时器增加或减少按钮可快速向前或向后调整时间。
注意:如果没有预热产品,则增加3分钟烹饪时间。
注意:如果在5分钟内未设置所需的烹饪时间,出于安全考虑,
产品会自动关闭。
5 按启动/暂停按钮可开始烹饪过程。(图13)
, 显示屏将从设定的烹饪时间开始倒计时。
, 原料中多余的油份将收集在煎锅底部。
6 产品开始发出哔声,表明设置的烹饪时间已结束。
注意:您也可以手动停止烹饪过程。如需进行此操作,请按开始/暂
停按钮。(图8)
7 拉动把手,打开抽屉,检查原料是否已熟透。(图14)
如果原料仍需烹饪,只需用把手将抽屉滑回 Airfryer 空气炸锅中,
再将设置的时间增加几分钟。
8 要取出体积较小的原料(例如炸薯条),请用把手将炸篮提出煎。
(图15)
烹饪过程结束后,煎锅、炸篮和原料仍很烫。根据Airfryer空气炸锅
中的原料类型,可能会有蒸汽从煎锅中喷出。
9将炸篮中的原料全部倒入碗或碟中。(图16)
提示:要取出体积较大或易碎的原料,可以使用夹钳将原料从炸篮
中夹出来。(图17)
10在一批原料烹饪完毕后,Airfryer可随时开始烹饪下一批原料。
注意:如果想烹饪下一批原料,请重复执行步骤1至9。
注意:如果想在30分钟内烹饪下一批原料,则无需重新预热产品。
11 按电源开/关按钮关闭Airfryer空气炸锅。
预设按钮
您可以将产品设定为以特定温度和特定时长烹饪自己喜爱的原料。
注意:本产品只能记忆一种温度和一个烹饪时间。
要设置喜爱的设置:
1 按开/关按钮打开产品。(图6)
2 按预设按钮(星号)。(图18)
, 显示屏将显示当前保存的设置。
3 按温度调高或降低按钮设置所需的温度。(图7)
, 星号开始闪烁。
4 按计时器增加或减少按钮可设置所需的时间。(图12)
5 按预设按钮(星号)。(图18)
, 您将听到一声哔声,并且星号持续亮起,表示设置已保存。
从现在开始,产品已存储您喜爱的设置。只需按预设按钮即可调出
保存的设置。按开始/暂停按钮可启动程序。
注意:如果要更改保存的设置,只需重复执行步骤1至5即可。
设置
下表可帮助您为要烹饪的原料选择基本设置。
注意:请记住这些设置仅供参考。由于原料的来源、大小、形状和
品牌各有不同,我们无法保证为您的原料提供最佳设置。
由于快速换气技术会即时对产品内的空气进行重新加热,因此在烹
饪时快速将煎锅拉出产品几乎不影响烹饪过程。
提示
- 与体积较大的原料相比,体积较小的原料需要的烹饪时间会稍短
一点。
问题 可能的原因 解决方法
产品不能工
作。
产品电源插头
没有插上。
将插头插入有接地的电源插座。
产品未打开电
源。
按开/关按钮打开产品。
使用产品烹
饪的原料没
有全熟。
设定的温度太
低。
按温度调高按钮可设置所需的温
度(请参阅“使用产品”一章中
的“设置”部分)。
烹饪时间太
短。
按计时器增加按钮可设置所需的
烹饪时间(请参阅“使用产品”
一章中的“设置”部分)。
炸篮中的原料
量太多。
将原料分成小批放入炸篮。小批
量原料煎炸得更均匀。不要超出
表中的 MAX 指示或最大份量。
原料在产品
中未得到均
匀的煎炸。
某些原料需要
在烹饪中途进
行翻动。
如果某些原料处于最上面,或者
与其他原料交叠(例如炸薯条)
,则需要在烹饪中途翻动它们。
请参阅“使用产品”一章中的“
设置”部分。
从产品做出
来的煎炸点
心并不松
脆。
您选择的煎炸
点心应该在传
统的油炸锅中
进行烹饪。
可选择烤箱点心,或者在点心上
刷少许油以增加其脆度。
我无法将抽
屉正确地滑
回到产品
中。
炸篮中的原料
量过多。
切勿让炸篮中的原料量超过 MAX
指示线。
煎锅和炸篮放
置不正确。
确保煎锅和炸篮放置正确。
从产品中冒
出白烟。
您正在烹饪含
油量较高的原
料。
在产品中烹饪含油量较高的原料
时,大量油烟会渗透到煎锅中。
油份会产生白色的油烟,同时煎
锅可能比正常状态下更热。这不
会影响产品煎炸原料的最终效
果。
煎锅中还残留
了上次使用后
的油污。
白烟是由于油脂在煎锅中加热而
产生的。确保您在每次使用后都
正确地清洁煎锅。
新鲜薯条在
产品中未得
到均匀地煎
炸。
您在煎炸前未
正确地浸泡土
豆条。
在碗中浸泡土豆条至少 30 分钟,
然后将它们取出并放在厨房用纸
上沥干。
您没有使用正
确的土豆品
种。
确保使用固定品种的新鲜土豆。
从产品做出
来的炸薯条
并不松脆。
炸薯条的松脆
程度取决于薯
条中的含油量
和含水量。
确保正确沥干土豆条,然后再加
油。将土豆条切细一点并加少许
油可使其更松脆。
显示屏上出
现“Er”
(错误)消
息。
发生错误。 请飞利浦授权的维修中心对产品
进行检查。
即使未按任
何按钮,时
间和温度指
示也会自动
更改。
控制面板上有
湿气。
确保清洁后用布擦干控制面板。
注意:在使用会发的原料(例如蛋糕、乳蛋饼、或松饼)时,烘烤
盘不应注入超过一半的量。
注意:烹饪时间不包括预热产品所需的时间。
自制炸薯条
为了获得最佳的效果,建议您使用预烘焙薯条(例如冻薯条)。
如果要自制炸薯条,请按照以下步骤执行操作。
1 将土豆削皮并切成小条。
2 在碗中浸泡土豆条至少30分钟,然后将它们取出并放在厨房用
纸上沥干。
3 若土豆条重300g,则向碗中倒入½汤匙的橄榄油(若为
1200g,则使用1½汤匙),放入土豆条并充分搅拌,直到所有
土豆条都均匀上油。
4 用手或厨具将土豆条从碗中拿出来,让多余的油份留在碗里。
然后再将土豆条倒入炸篮。
注意:不要一次性将所有土豆条从碗里倒入炸篮,这样可以防止最
后在煎锅底部存留过多的油份。
5 按照本章中的说明煎炸土豆条。
清洁
每次使用后都要清洁产品。每次烹饪过程结束后都要去除煎锅底部
的油,以防产生油烟。
打开抽屉可使Airfryer空气炸锅更快冷却下来。待煎锅冷却后再将
其从产品中取出。
煎锅、炸篮和产品内部均覆有不黏涂层。切勿使用金属厨具或研磨
性的清洁材料进行清洁,因为这可能会破坏不黏涂层。
1 从电源插座中拔下电源插头,让产品冷却。
2 用湿布擦拭产品的外部。
注意:确保控制面板背面未留有湿气。清洁后用布擦干控制面板。
3 用热水、洗涤剂和非研磨性海绵清洗煎锅和炸篮。
您可以使用除油剂洗去残留的脏污。
注意:煎锅和炸篮可放在洗碗机中清洗。
提示:如果脏污粘附在炸篮上或煎锅底部,请在煎锅中加入热水,
再添加一些洗涤剂。将炸篮放入煎锅,并让煎锅和炸篮浸泡10分钟
左右。
4 用热水和非研磨性海绵清洗产品内部。
5 用清洁刷清洁加热元件,以扫除任何食品残渣。
存储
1 拔掉产品的插头,并使其完全冷却。
2 确保所有部件已经清洁并干燥。
3 将电源线插入电线储藏格。
订购附件
要购买附件和备件,请访问 www.shop.philips.com/service 或 请联
系飞利浦经销商。您也可以联系您所在国家/地区的飞利浦客户服务
中心(联系详情,请参阅全球保修卡)。
回收
弃置产品时,请不要将其与一般生活垃圾扔在一起,应将其交给指
定的回收中心,这样做有助于保护环境。
保修和支持
如果您需要信息或支持,请访问 www.philips.com/support 或阅读单
独的全球保修卡。
故障种类和处理方法
本章归纳了使用本产品时最常见的一些问题。如果您无法根据以下
信息解决问题,请访问 www.philips.com/support 查阅常见问题列
表,或联系您所在国家/地区的客户服务中心。
  • Page 1 1
  • Page 2 2
  • Page 3 3
  • Page 4 4
  • Page 5 5
  • Page 6 6
  • Page 7 7
  • Page 8 8
  • Page 9 9
  • Page 10 10

Philips HD9240/90 User manual

Category
Deep fryers
Type
User manual
This manual is also suitable for

Ask a question and I''ll find the answer in the document

Finding information in a document is now easier with AI

in other languages