Bosch KGP36371/30 Owner's manual
- Category
- Fridge-freezers
- Type
- Owner's manual
Page is loading ...
Page is loading ...
Page is loading ...
Page is loading ...
Page is loading ...
Page is loading ...
Page is loading ...
Page is loading ...
Page is loading ...
Page is loading ...
Page is loading ...
Page is loading ...
Page is loading ...
Page is loading ...
Page is loading ...
Page is loading ...

17
en
Removal and
Disposal of old
appliances
Disposal of your old
appliance
Old appliance contain materials which
can be recovered and should, therefore,
be disposed of at an official centre for
the collection and recovery of recyclable
materials.
You should render your old appliance
useless prior to disposing of it and
replacing it with a new one:
• Unplug your appliance from the mains
electricity supply.
• Cut the mains cable on your appliance
and remove it, together with the plug.
• Remove all locks and/or closure
fittings from the door or disable them in
order to prevent any children that
might come to play with the appliance
from getting locked inside and running
the risk of death (suffocation).
All refrigeration and freezing appliances
contain insulating and refrigerating gases
which need to be specially treated and
disposed of. Make sure that the piping
on your appliance’s cold circuit is not
damaged in any way before disposing of
it at your local Official Collection Centre.
Recommendations for
the disposal of packing
material
Do not let children play with the packing
material or any part of it. This appliance
is not a toy! The cardboard and plastic
sheeting used for packing may give rise
to suffocation!
The packing material is there to protect
your new appliance during transportation
to your home. All the packing materials
used are environmentally friendly and
can either be recycled or re-used.
Help protect the environment by making
sure that packing material is disposed
of/recycled by environmentally friendly
means.
Your Supplier or Local Authority will be
pleased to inform you as to how these
materials may best be disposed of in
such a way as not to harm the
environment.
This appliance is labelled in
accordance with European Directive
2002/96/EG concerning used electrical
and electronic appliances (waste
electrical and electronic equipment -
WEEE). The guideline determines the
framework for the return and recycling
of used appliances as applicable
throughout the EU.
Safety Advice and
General Warnings
Read and observe both these
instructions of use and all other
information that comes with your
appliance. Keep these instructions for
later use or for later owners.
This appliance has been designed for
• use solely in a household environment,
• the refrigeration and freezing of food.
Should the appliance be used for
industrial purposes, then the relevant
rules and standards should be taken into
consideration.
EN.qxd 05/10/05 13:50 Page 17

18
en
Warning!
Install and connect this appliance to the
mains electricity supply in accordance
with the assembly instructions attached.
Should the appliance be or have been
damaged in any way, then it should not
be used (turned on). In case of doubt,
get in touch with the distributor you
purchased your appliance from.
Warning!
Do not obstruct the ventilation and
aeration openings on the appliance
Warning!
Do not use methods other than those
described by the manufacturer in order
to speed up the defrosting process.
Warning!
Do not use electrical appliances not
authorised by the manufacturer inside
the refrigeration and freezing
compartments
Warning!
Do not damage the parts and
components that comprise the
refrigeration circuit, for example by
piercing the refrigerant fluid pipes with
sharp objects, bending the pipes or
scratching the materials that surfaces
are coated with, etc. If the refrigerant
fluid spurts out under pressure, then you
are in danger of injury to your eyes. The
agent may also catch fire.
Emergency procedure
• Rinse your eyes with abundant water;
contact a doctor.
• Keep the appliance away from sparks
used to light flames or fire sources.
• Remove the mains cable from the
mains electricity supply. Ventilate, the
room thoroughly for several minutes.
Danger of explosion
Keep drinks with high alcohol content in
hermetic containers; they should also be
placed in an upright position at all times.
Important
• Do not block the ventilation grilles on
the refrigerator casing.
• Do not use mechanical devices or any
other method to accelerate the
thawing-out process, other than those
recommended by the manufacturer.
• Do not damage the refrigeration
circuit.
• Always use the internal electrical
components recommended by the
manufacturer for your
refrigerator/freezer.
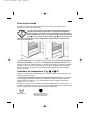
Getting to know the
unit
These instructions are valid for different
models and may, therefore, describe
features and points which are not
relevant to your particular appliance.
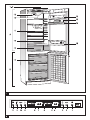
Figure Q
A Refrigerator compartment
B Freezing compartment
1-9 Control panel
10 Interior lighting
EN.qxd 05/10/05 13:50 Page 18

19
en
11 Refrigerator shelves
to store bread and pastries, cooked
food, milk products, meat and cold
meats.
12 Vegetable drawer
to store fruit and vegetables
13 Door shelves, to store small jars
and cans.
14 Butter and cheese compartment
15 Egg rack
16 Bottle rack to store large bottles
17 Freezer drawer
18 Fan
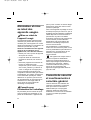
Control Panel
Figure W
1. Refrigerator compartment ON/OFF
switch
Used to turn the refrigerator
compartment on and off
independently.
2. <<Super>> ultra-fast refrigeration
button
Used to activate and deactivate the
ultra-fast refrigeration function.
This function is used to refrigerate
food or drink in the refrigerator
compartment. Activate the function
when you wish to refrigerate the food
or drink.
Indicator light 5 <<super>> (amber)
indicates that the function has been
activated. Display 4 indicates “SU”.
When the function has been
activated, the refrigerator unit works
to reach the lowest possible
temperatures in the refrigerator
compartment.
The function is turned off manually
by pressing button 2 again or
automatically 6 hours after activation,
the setting returning to the position
set prior to the activation of the
<<super>> function.
3. Refrigerator temperature setting
button
Press the temperature setting button
repeatedly or continually until the
desired temperature appears on the
display. The system memorises the
last figure shown. (the figures appear
in sequence from +2ºC to +11ºC.
+2ºC appears again after +11ºC).
4. Refrigerator temperature display
Indicates the selected refrigerator
temperature.
5. <<Super>> ultra-fast refrigeration
indicator light
This indicator only lights up when
option 2 <<ultra-fast refrigeration>>
has been activated.
6. <<Super>> ultra-fast freezing
indicator light
This indicator only lights up when
option 10 <<ultra-fast freezing>> has
been activated.
7. Freezer temperature display
Indicates the selected freezer
temperature.
8. <<Alarm>> indicator light
The alarm comes on when
excessively high temperatures are
registered inside the freezer
compartment and the products are in
danger of thawing.
The light goes out as soon as the
freezer reaches its normal service
temperature again.
EN.qxd 05/10/05 13:50 Page 19

20
en
The alarm may also come on from
time to time without representing an
immediate risk to the products stored
in the freezer:
-When the appliance is turned on
-When large amounts of fresh food
are placed in the freezer.
9. Freezer temperature setting button
Press the temperature setting button
repeatedly or continually until the
desired temperature appears on the
display. The system memorises the
last figure shown. (the figures appear
in sequence from -18 ºC to -26ºC.
-18 ºC appears again after -26ºC).
10. <<Super>> ultra-fast freezing
button
Used to activate and deactivate the
ultra-fast frezing function.
Indicator light 6 <<super>> (amber)
indicates that the function has been
activated. Display 7 indicates “SU”.
This function is used to freeze large
quantities of food. To do this, the
function should be activated up to 24
hour prior to placing the fresh food in
the freezer.
When the function has been
activated, the refrigerator unit works
continually to reach very low
temperatures in the freezer
compartment (extreme cold).
The <<super>> ultra-fast freezing
function is turned off manually by
pressing button 10 again or
automatically once the food has
frozen (the freezing process for
small amounts of food takes
several hours; freezing large
amounts of food may take up to
two days).
If the ultra-fast freezing function has
been activated and the food is not
placed in the freezer, the function is
deactivated automatically 26 hours
after activation.
11. “ ” button
Used to deactivate the acoustic
alarm.
The acoustic alarm sounds when
excessively high temperatures are
registered inside the freezer
compartment and the products are in
danger of thawing. (<<Alarm>>
indicator light 8 comes on at the
same time).
The acoustic alarm may also come
on from time to time without
representing an immediate risk to the
products stored in the freezer:
-When the appliance is turned on
-When large amounts of fresh food
are placed in the freezer
-When the freezer door is left open
for too long
The acoustic alarm is turned off by
pressing button 11.
12. Freezer ON/OFF switch
Used to turn the freezer
compartment on and off
independently.
EN.qxd 05/10/05 13:50 Page 20

21
en
Climate class -
Maximun room
temperatures
Each appliance’s climate class is shown
on its characteristics plate and indicates
what temperature ranges the appliance
is designed to work in.
Climate class Room
temperature
SN +10 ºC to 32 ºC
N +16 ºC to 32 ºC
ST +18 ºC to 38 ºC
T +18 ºC to 43 ºC
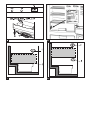
Ventilation
Figure E
The hot air produced between the
appliance and the wall behind it must be
allowed to escape easily, otherwise the
appliance shall have to work harder than
necessary and thereby incur high and
unnecessary electricity consumption.
For this reason, the ventilation and air
openings must never be blocked.
Usable capacity
Information on the usable capacity can
be found inside your appliance on the
rating plate.
Connecting the
appliance/
Turning it on/
Setting the temperature
Clean the appliance before turning it on
for the first time.
Connecting the appliance
The mains electricity supply socket must
be easily accessible. Connect the
appliance to a 220-240 V (N/SN) or 220-
230 V (ST)/50 Hz AC electricity current
via an earthed electricity socket fitted in
accordance with relevant standards. The
connection must be protected by a fuse
of at least 10 amps.
When an appliance is to be used in a
Non-European country, it is
necessary to check that the
connection voltage and the type of
current described on the appliance’s
characteristics plate are the same as
the national mains electricity system.
The characteristics plate is on the
bottom left-hand side inside the
refrigerator compartment. Should it
be necessary to change the mains
electricity supply plug, then this must
be carried out by the brand’s
specialist technicians.
Warning!
Do not under any circumstances
whatsoever connect the appliances to
electronic energy-saving connection
devices (e.g. Ecoboy, Sava Plug, etc.)
or inverse rectifiers which convert DC
currents into 230 AC currents (e.g.
solar energy systems, maritime
electricity systems).
EN.qxd 05/10/05 13:50 Page 21

22
en
Connecting the appliance
Figure W
• Press button 1 to turn the refrigerator
compartment on. The light comes on
when the door is opened.
• Press button 12 to turn the freezer
compartment on.
• Alarm indicator light 8 lights up after
turning the freezer on (See Control
Panel section. 8 alarm indicator light)
The appliance is factory-set to the
following basic settings
Refrigerator temperature: +6ºC
Freezer temperature: -18ºC
Setting the temperature
The set temperatures can be changed.
See the descriptions in the following
sections:
3 Refrigerator temperature setting
button.
9 Freezer temperature setting button.
Note refrigeration zones
in the refrigerator
compartment!
The air circulation in the refrigerator
compartment means that there are
zones at different temperatures.
Depending on the model, the zone for
sensitive foods is right at the bottom
between the arrow on the side and the
glass surface below (fig. !1/1 and 2) or
between the two arrows (fig. !2/1 and 2).
Ideal for storing meat. fish, sausage and
salad mixtures, etc.
Information and warnings
regarding the appliance
when in use .
• The fan (Fig. Q/18) turns itself on and
off as required by the refrigerator
compartment.
• The front of the freezer housing heats
up slightly. This prevents condensed
water from forming in the area of the
door seal.
• When the refrigeration system is
working, drops of water or frost form
on the back wall of the refrigerator.
This is perfectly normal and occurs for
technical reasons. It is not necessary
to scrape the frost or dry the drops as
they should desappear automatically.
Defrosting water is collected in the
drainage duct (Fig. I/A) and returned
to the refrigerator system, where it
then evaporates.
• When air conditions are extremely
humid, condensed water may form
inside the refrigerator, particularly on
the glass shelves. Should this happen,
then food in the refrigerator should be
wrapped and a lower temperature set.
• Sometimes after closing the door, it
may not be possible to open it straight
away. This is because a depression is
created inside the appliance when the
door is opened. When this happens,
wait two or three minutes before trying
to open the door again to allow the
depression inside the appliance to be
compensated for.
• The refrigeration system your
appliance uses means that frost may
form quite quickly on some points of
the freezer shelves. This does not in
any way affect the working order of
your appliance or bring about any
increase in electricity consumption.
EN.qxd 05/10/05 13:50 Page 22

23
en
Accumulated frost need only be
removed if the layer of frost or ice
reaches a thickness of more than 5mm
on the entire freezer shelf surface.
• Do not allow grease or oil to come into
contact with plastic parts inside the
refrigerator or the door seal. Both this
plastic and the rubber door seal are
liable to perish.
• To enhance appliance performance to
the full, do not place foodstuff near to
the refrigerator compartment sensor
(fig. Q/19).
Turning off and
disconnecting the
appliance
Turning off the appliance
• To turn the refrigerator off, press
button W/1. The interior lighting and
display W/4 both go aut.
• To turn the freezer off, press button
W/12. Display W/7 goes out.
Disconnecting the
appliance
When the appliance is not to be used for
a long period of time:
• Remove the plug from the mains
electricity socket.
• Defrost and clean the appliance.
• Leave the doors on the appliance
open.
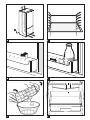
Refrigerator
equipment
The positions of the shelves in the
refrigerator and the racks and shelves
on the inside of the door can be changed
individually:
Figure R
• Slide the shelves forwards, tilt them
downwards and remove.
Figure T
• Lift the racks and shelves on the inside
of the door and remove or set to new
position.
Optional equipment
(not included on all models)
Bottle rack
Figure Y
The rack means that bottels do not fall
over when the door is opened or closed.
EN.qxd 05/10/05 13:50 Page 23

24
en
Freezing and storing
frozen food
Things to remember
when buying ultra-frozen
products
Make sure that the wrapping on the
frozen product is not or has not been
damaged in any way.
Check the best before/expiry dates on
food. Make sure that these have not
passed.
The temperature indication on the
freezer at the establishment where you
purchase your food should show a
minimum temperature of -18ºC.
Whenever possible take the products
home straight away in an isothermal bag.
Freezing fresh food at
home
Warning!
Do not use materials which may be
harmful to the health when wrapping or
sealing food.
Suitable material to wrap food up in
Plastic film, polyethylene bags and film,
aluminium foil, boxes and containers
specially designed for frozen food.
Suitable material to seal food
wrapping with
Elastic bands, plastic clips, string,
nonfreezable adhesive tape, etc.
Whenever possible, ensure that frozen
food already in the freezer compartment
does not come into contact with the fresh
food you wish to freeze.
Information about the max. freezing
capacity according to current
standards can be found on the rating
plate.
The maximum freezing capacity for
fresh food in 24 h (distributed on the
freezer racks) is indicated on the
characteristics plate (in Kg/24h), see
figure !!0.
In order for it to maintain its nutritional
value, vitamins and appearance, it is
necessary to freeze the middle of the
food as fast as possible. For this reason,
the appliance’s maximum freezing
capacity should not be exceeded.
In the event of needing to freeze a large
quantity of foodstuff, all the freezer
drawers can be removed (except the
lowermost drawer) and the food can be
stacked on the freezer shelves. To
remove the drawers, pull them out to
their limit and then tilt them upwards.
When freezing products in the freezer
drawers, reduce the appliance’s freezing
capacity slightly.
If you wish to keep already-frozen food
in the freezer, turn the “super” function
on several hours before putting the fresh
food in the freezer.
Storing frozen products
• In order not to obstruct the free
circulation of air inside the appliance,
make sure that all the freezer drawers
in the compartment are pushed in to
the limit.
EN.qxd 05/10/05 13:50 Page 24

25
en
Freezing calendar
In order not to affect its quality and
nutritional value, frozen food should be
consumed before its maximum “best
before date” at -18ºC is up.
Fish, up to 6 months
pre-cooked
food, bread
and pastries
Chesse, poultry up to 8 months
and meat
Fruit and vegetables up to 12 months
Making ice cream
Warning!
Do not use electric ice-cream makers
inside the freezer compartment.
Making ice cubes
Figure U (not included on all models)
3/4 fill the ice tray with water. Place it in
the freezer compartment.
Separate the bottom of the ice tray from
the bottom of the freezer compartment
using a blunt object (e.g. the handle of a
spoon). To remove the ice cubes from
the tray, place the tray under running tap
water for a short period of time or bend it
slightly.
Place the ice tray in the first drawer to
make ice cubes more quickly
(Fig. Q/17).
Defrosting and
cleaning the unit
Clean the refrigerator once a month.
You are recommended to clean the
freezer compartment each time you
defrost it.
Danger of electric shock!
Do not use any kind of vapour/steam
cleaning device. Hot steam could
damage the surfaces on the appliance or
its electric system. The electrical safety
of your appliance could be seriously
affected!
Do not scrape ice or frost using knives or
other sharp objects.
Do not damage the parts and
components which make up the cold
circuit, for example by piercing the
refrigerant fluid pipes.
If the refrigerant fluid spurts out under
pressure, then you are in danger of
injury to your eyes. The agent may also
catch fire.
Under no circumstances whatsoever are
you to use electric appliances or active
fire sources (e.g. candles or petrol
lamps) inside the appliance.
EN.qxd 05/10/05 13:50 Page 25

26
en
Defrosting the freezer
compartment
• Remove the drawers and any food
they may contain from the freezer
compartment. Place frozen food on the
cold accumulator (if supplied). Store
the drawers in the coldest place
possible.
• Unplug the appliance from the mains
electricity socket.
• After defrosting the appliance, empty
the defrosting water that has gathered.
Clean and dry the bottom of the
freezer compartment with a sponge.
Special defrosting sprays
Observe the instructions and warnings
provided by the spray manufacturer
strictly.
Warning!
Special defrosting sprays should be
used with the utmost caution. These
sprays can be a source of explosive
gas or contain solvents or propellants
which may harm the plastic parts on
the unit or even be harmful to the
health.
Practical defrosting advice
• To speed the defrosting process up, a
pan with very hot (not boiling) water
can be placed on a protective support
base inside the freezer compartment.
Cleaning the appliance
• Clean with warm water and a small
amount of disinfecting detergent, such
as mild manual washing-up liquid.
The door seal should only be cleaned
with clean water. It should be dried
properly after cleaning.
Make sure that the water used to clean
the appliance does not enter the
drainage orifice and flow to the
evaporation tray.
Under no circumstances should
abrasives, scrubbing products or
cleaning substances which contain acid
or chemical solvents be used.
Never wash the shelves, racks,
containers or drawers in a dishwasher.
The parts may lose shape!
• Plug the mains cable into the mains
electricity socket. Connect the fuse.
EN.qxd 05/10/05 13:50 Page 26

27
en
Practical
energy-saving advice
• Install the appliance in a cool, dry,
well-ventilated room. Remember that
the appliance should not be installed in
a position in which it receives direct
sunlight or near to an active heat
source, such as a cooker, radiator, etc.
• Let food and drink reach room
temperature before putting them in the
freezer.
• Defrost frozen products by placing
them, for example, in the refrigerator
compartment. In this way, the cold
temperatures given off by the frozen
food will help refrigerate the fresh food
in the refrigerator.
• Keep the door on the appliance open
for as short a time as possible.
• Clean the rear grille on the refrigerator
(condenser) to enhance appliance
performance to the full.
Information about the
noises the appliance
makes while in use
Perfectly normal sounds
Quiet humming sound
This is unavoidable when the
compressor is in use.
Strange quiet gurgling sound
This is caused when the compressor is
on by the refrigerant fluid as it enters the
narrower pipes.
Abrupt clicks
These are only heard when the regulator
turns the compressor on and off.
Easily solved noises
The appliance is on an uneven
surface
Level the appliance using a spirit level
and the built-in threaded feet or wedges.
If the appliance is in contact with
furniture or other appliances
Separate the appliance from the furniture
or appliances it is in contact with.
The drawers, baskets, shelves or
racks shake or are stuck in place
Check the affected parts over. Put them
back in their right position if necessary.
The bottles or containers come into
contact with each other
Separate the bottles and the containers
slightly.
EN.qxd 05/10/05 13:50 Page 27

28
en
Small easily-solved problems
Problem
The light
inside the
refrigerator
does not work
although the
refrigeration
system
works
Water has
built up at
the bottom of
the appliance.
«E
1
» (s4),
«E
2
» (s7)
Possible cause
The light bulb is faulty.
The switch on the light is
stuck (Fig. O/A).
The defrosting water
drainage tube is blocked
(Fig. I/B).
Solution
Change the light bulb.
1.Unplug the appliance from the mains
electricity supply or switch the fuse
to off.
2.Release the screen (Fig. O/B) by
turning the lower wheel in an anti-
clockwise direction (Fig. O/C), as
shown in the figure.
3.Change the blown light bulb.
(Bulb:, 220-240 V, AC E14 base),
see faulty bulb for Watts.
Check that the switch on the light
inside the refrigerator moves freely.
Clean the drainage channel and the
drainage hole (Fig. I/B). See section
“Cleaning the appliance”
Technical Assistance Service
Before getting in touch with the
Official Technical Assistance Service:
Before calling the technical service,
check to see if the problem or fault you
have noticed figures among the following
list of recommendations
This will help you avoid unnecessary
expense as technical assistance for the
situations listed is not covered by the
appliance’s warranty.
EN.qxd 05/10/05 13:50 Page 28

29
en
Problem
The “alarm”
indicator
lights up
None of the
screens or
indicators
light up.
Possible cause
The ventilation and air
openings are blocked.
The freezer
compartment door is
open.
Too much fresh food
has been out in the
freezer compartment.
The electricity supply
has been cut for some
reason; the fuse has
been triggered; the
plug is not properly
inserted in the socket.
Solution
Unblock the ventilation openings
Close the door.
Do not exceed the appliance’s
maximum freezing capacity.
Check that the electricity supply
is in order. The fuse must be set
to on.
Technical Assistance
Service
If the repair cannot be performed or the
problem continues and cannot be solved
by following the recommendations
outlined in the section “Small easily-
solved problems”:
• Disconnect the appliance from the
mains electricity supply or switch the
fuse off
• Do not open the doors on the
appliance without good reason.
The telephone number of your nearest
Technical Assistance Service is listed in
the relevant Phone book or Technical
Assistance Service Directory. When
calling the Technical Assistance Service,
do not forget to quote your appliance’s
product number (E-Nr.) and series
number (FD).
Both numbers can be found on the
apliance’s characteristics plate.
Fig. !0
Remember that by quoting your
appliance’s product and series numbers,
you may be able to avoid the Technical
Assistance Service unnecessary call-
outs and expense which you will
otherwise be charged for.
EN.qxd 05/10/05 13:50 Page 29
Page is loading ...
Page is loading ...
Page is loading ...
Page is loading ...
Page is loading ...
Page is loading ...
Page is loading ...
Page is loading ...
Page is loading ...
Page is loading ...
Page is loading ...
Page is loading ...
Page is loading ...
Page is loading ...
Page is loading ...
Page is loading ...
Page is loading ...
Page is loading ...
Page is loading ...
Page is loading ...
Page is loading ...
Page is loading ...
Page is loading ...
Page is loading ...
Page is loading ...
Page is loading ...
Page is loading ...
Page is loading ...
Page is loading ...
Page is loading ...
Page is loading ...
Page is loading ...
Page is loading ...
Page is loading ...
Page is loading ...
Page is loading ...
Page is loading ...
Page is loading ...
Page is loading ...
Page is loading ...
Page is loading ...
Page is loading ...
Page is loading ...
Page is loading ...
Page is loading ...
Page is loading ...
Page is loading ...
Page is loading ...
Page is loading ...
Page is loading ...
Page is loading ...
Page is loading ...
Page is loading ...
Page is loading ...
Page is loading ...
Page is loading ...
Page is loading ...
Page is loading ...
Page is loading ...
Page is loading ...

90
el
Exoike…wsh
me
th
suskeu»
Oi paroÚsej Odhg…ej cr»shj iscÚoun
gia diaforetik£ montšla suskeuèn: g…
autÒ, e…nai dunatÒn na perigr£foun
carakthristik£ kai leptomšreiej
exoplismoÚ pou den sump…ptoun me th
dik» saj suskeu».
EEiikkÒÒnnaa
Q
AA QQ££llaammoojj
yyuuggee……oouu
BB QQ££llaammoojj
kkaattaayyÚÚkktthh
11-99 PP……nnaakkaajj
DDiiaakkooppttèènn
1100 EEsswwtteerriikkÒÒjj
FFwwttiissmmÒÒjj
1111 QQ»»kkeejj
mmššssaa
ssttoo
yyuuggee……oo
gia fÚlaxh ywmioÚ kai
artopoihm£twn, mageiremšnwn
pi£twn, proïÒntwn g£laktoj,
kršatoj, allantikèn.
1122
Q
»»kkhh
llaaccaanniikkèènn
gia th fÚlaxh lacanikèn, froÚtwn
kai salatikèn.
1133 RR££ffiiaa
ggiiaa
nnaa
ttooppooqqeettee……ttee
gguu££lliinnaa
ddooccee……aa
kkaaii
mmiikkrrššjj
kkoonnssššrrbbeejj..
1144 QQ££llaammoojj
ggiiaa
bbooÚÚttuurroo
kkaaii
ttuurr……..
1155 QQ»»kkhh
aauuggèènn
1166 FFiiaallooqq»»kkhh
ggiiaa
mmeegg££lleejj
ffii££lleejj
1177 SSuurrtt££rrii
kkaatt££yyuuxxhhjj
1188 EExxaaeerriisstt»»rraajj
P…nakaj
diakoptèn
EEiikkÒÒnnaa
W
11.. DDiiaakkÒÒpptthhjj
ggiiaa
ttoo
AANNAAMMMMAA//SSBBHHSSIIMMOO
ttoouu
qqaall££mmoouu
yyÚÚxxhhjj
.
CrhsimeÚei gia na an£bete kai na
sb»nete to q£lamo yÚxhj kat£
trÒpo anex£rthto.
22..
KKoommbb……oo
ggiiaa
mmiiaa
uuppeerrttaaccee……aa
yyÚÚxxhh
«super»
..
CrhsimeÚei gia na energopoie…te
kai na apenergopoie…te thn
upertace…a yÚxh.
Me th leitourg…a aut» mpore…te
na yÚxete trÒfima kai pot£ pou
br…skontai sto q£lamo yÚxhj.
Proj toÚto, qa pršpei na
energopoi»sete th leitourg…a aut»
th stigm» pou qšlete na pagèsete
ta trÒfima » ta pot£.
H energopo…hsh thj leitourg…aj
aut»j upodeiknÚetai apÒ to
lamp£ki
55
«super» (crèma
portokal…). H oqÒnh ende…xewn
44
upodeiknÚei “SU”.
Otan energopoie…te th leitourg…a
aut», to sÚsthma yÚxhj
leitourge… kata trÒpo èste na
epitugc£nontai oi camhlÒterej
dunatšj qermokras…ej sto q£lamo
yÚxhj.
H leitourg…a aut»
apenergopoie…tai me to cšri kai,
proj toÚto, qa pršpei na pišsete
xan£ to komb…o
22
» autÒmata, Òtan
per£soun 6 èrej apÒ thn
energopo…hs» thj, opÒte kai
epistršfei h rÚqmish tou yuge…ou
sthn epilegmšnh arcik£ qšsh prin
apÒ thn energopo…hsh thj
leitourg…aj «super».
EL.qxd 05/10/05 13:56 Page 90
Page is loading ...
Page is loading ...
Page is loading ...
Page is loading ...
Page is loading ...

96
el
KKaatt££yyuuxxhh
kkaaii
ddiiaatt»»rrhhsshh
kkaatteeyyuuggmmššnnwwnn
ttrrooff……mmwwnn
SShhmmee……aa
ppoouu
qqaa
pprrššppeeii
nnaa
ššcceettee
uuppÒÒyyhh
ssaajj
ggiiaa
tthhnn
aaggoorr££
kkaatteeyyuuggmmššnnwwnn
ttrrooff……mmwwnn
Dèste prosoc» sto peritÚligma twn
kateyugmšnwn trof…mwn » proïÒntwn
èste na mhn parousi£zei zhmišj kanenÒj
tÚpou.
Exet£ste thn hmeromhn…a l»xhj twn
trof…mwn. Sigoureuqe…te Òti aut» den
šcei xeperasqe….
O de…kthj qermokras…aj tou katayÚkth
tou katast»matoj Òpou agor£zete ta
trÒfima qa pršpei na upodeiknÚei m…a
tim» -18ºC to el£cisto.
Prospaq»ste na metafšrete ta trÒfima
apeuqe…aj sto sp…ti mšsa se mia
isoqermik» sakkoÚla.
KKaatt££yyuuxxhh ffrrššsskkwwnn
ttrrooff……mmwwnn
ssttoo
sspp……ttii
¡
PPrroossoocc»»
!
Mh crhsimopoie…te ulik£ blaber£ gia
thn uge…a kat£ to paket£risma » to
kle…simo thj suskeuas…aj twn trof…mwn.
KKaatt££llllhhllaa
uulliikk££
ggiiaa
tthh
ssuusskkeeuuaass……aa
ttwwnn
ttrrooff……mmwwnn
Plastik£ fÚlla, askkoÚlej kai lept£
fÚlla apÒ poluaiqulšnio, cart…
aloumin…ou, kout£kia kai eidikšj
suskeuas…ej gia thn kat£yuxh
trof…mwn.
KKaatt££llllhhllaa
uulliikk££
ggiiaa
ttoo
kkllee……ssiimmoo
tthhjj
ssuusskkeeuuaass……aajj
Lastic£kia, plastik£ klipj, sp£ggoj,
kollhtik» tain…a pou den pagènei, klp.
Na prosšcete štsi èste ta kateyugmšna
trÒfima pou br…skontai ston katayÚkth
na mhn šrcontai se epaf» me ta fršska
trÒfima kai epiqume…te na katayÚxete.
TTaa
ssttooiiccee……aa
sscceettiikk££
mmee
tthh
mmššggiisstthh
ccwwrrhhttiikkÒÒtthhttaa
kkaatt££yyuuxxhhjj
ssÚÚmmffwwnnaa
mmee
ttoo
eepp……kkaaiirroo
pprrÒÒttuuppoo
qqaa
ttaa
bbrree……ttee
sstthhnn
ppiinnaakk……ddaa
ttÚÚppoouu..
HH
mmššggiisstthh
dduunnaammiikkÒÒtthhttaa
kkaatt££yyuuxxhhjj
nnwwppèènn
ttrrooff……mmwwnn
((ttooppooqqeetthhmmššnnwwnn
pp££nnww
ssttiijj
sscc££rreejj
kkaatt££yyuuxxhhjj))
ssee
2244
èèrreejj
uuppooddeeiikknnÚÚeettaaii
sstthhnn
ppll££kkaa
ccaarraakktthhrriissttiikkèènn
((ssee
KKgg//2244hh)),,
bbllššppee
EEiikkÒÒnnaa
!0
..
Gia na diathroÚn ta trÒfima thn
qreptik» touj ax…a, tij bitam…nej kai thn
kal» touj emf£nish, qa pršpei na
katayucqe… to kšntro Òso to dunatÒn
pio gr»gora. Gia to lÒgo autÒ den qa
pršpei na xeperaste… h anètath
dunamikÒthta kat£yuxhj thj suskeu»j.
Se per…ptwsh kat£yuxhj twj proïÒntwn
sta surt£ria kat£yuxhj, meiènetai
elafr£ h dunamikÒthta kat£yuxhj thj
suskeu»j.
Se per…ptwsh fÚlaxhj trof…mwn pou
e…nai »dh kateyugmšna ston katayÚkth,
qa pršpei na energopoi»sete thn
leitourg…a »super» arketšj èrej prin
thn topoqšthsh twn fršskwn trof…mwn
ston katayÚkth.
DDiiaatt»»rrhhsshh
ttwwnn
kkaatteeyyuuggmmššnnwwnn
ttrrooff……mmwwnn
• Me skopÒ na mhn parempod…zete thn
kuklofor…a tou ašra sto eswterikÒ
thj suskeu»j, qa pršpei p£nta na
sigoureÚeste Òti Òla ta surt£ria tou
katayÚkth br…skontai topoqethmena
mšcri to tšrma sth qšsh touj sto
q£lamo tou katayÚkth.
EL.qxd 05/10/05 13:56 Page 96
Page is loading ...
Page is loading ...
Page is loading ...

100
el
PPrriinn
nnaa
eeiiddooppooii»»sseettee
tthhnn
EEpp……sshhmmhh
UUpphhrreess……aa
ttoouu
TTeeccnniikkooÚÚ
SSššrrbbiijj
:
Gia šna apofÚgete mia £skoph
epšmbash thj tecnik»j maj uphres…aj,
saj parakaloÚme na elšgxete an h
bl£bh » el£ttwma pou diapistèsate
br…sketai metaxÚ autèn gia tij opo…ej
d…nontai oi parak£tw sumboulšj kai
proeidopoi»seij.
Me autÒn ton trÒpo qa apofÚgete mh
apara…thta šxoda, afoÚ se tštoiej
periptèseij ta šxoda tou tecnikoÚ
proswpikoÚ den kalÚptontai apÒ thn
eggÚhsh pou prosfšretai.
Mikršj
bl£beij
me
eÚkolh
lÚsh
BBll££bbhh
OO
eesswwtteerriikkÒÒjj
ffwwttiissmmÒÒjj
ttoouu
yyuuggee……oouu
ddeenn
lleeiittoouurrggee……,,
aann
kkaaii
ttoo
ttmm
mmaa
yyuuggee……oouu
ddoouulleeÚÚeeii..
EEcceeii
ssuuggkkeennttrrwwqqee……
nneerrÒÒ
ssttoo
kk££ttww
mmššrroojj
ttoouu
yyuuggee……oouu
«E
1
» (w4),
«E
2
» (w7),
PPiiqqaann»»
aaiitt……aa
H l£mpa e…nai
elattwmatik».
O diakÒpthj tou
eswterikoÚ fwtÒj šcei
koll»sei (Eik. O/A).
O swl»naj ekro»j tou
neroÚ thj apÒyuxhj e…nai
fragmšnoj (Eik. I/B).
TTrrÒÒppoojj
eepp……lluusshhjj
Antikataste…ste th l£mpa.
1. Bg£lte to bÚsma thj suskeu»j
apÒ to hlektrikÒ reÚma »
aposundšste thn asf£leia.
2. Afairšste to prostateutikÒ
(Eik. O/B) stršfontaj thn k£tw
rÒda (Eik. O/C) ant…qeta apÒ th
for£ tou wrolog…ou, štsi Òpwj
saj upodeiknÚei h eikÒna.
3. Antikataste…ste thn kammšnh
l£mpa me mia kainoÚria.
(antallaktik» l£mpa, 220-240V,
enallassÒmeno reÚma me b£sh
E 14, gia thn iscÚ se bat
sumbouleuqe…te thn
elattwmatik» l£mpa).
Elšgxte thn kinhtikÒthta tou
diakÒpth tou eswterikoÚ fwtÒj.
Kaqar…ste to kanalšto ekro»j tou
neroÚ kai thn op» apostr£ggishj
(Eik. I/B). Blšpe scetik£ to
kef£laio “KaqarismÒj thj
suskeu»j”.
Uphres…a TecnikoÚ Sšrbij
EL.qxd 05/10/05 13:56 Page 100
Page is loading ...
Page is loading ...
Page is loading ...
Page is loading ...
Page is loading ...
Page is loading ...
Page is loading ...
Page is loading ...
Page is loading ...
Page is loading ...
Page is loading ...
Page is loading ...
Page is loading ...
Page is loading ...
Page is loading ...
Page is loading ...
Page is loading ...
Page is loading ...
Page is loading ...
Page is loading ...
-
 1
1
-
 2
2
-
 3
3
-
 4
4
-
 5
5
-
 6
6
-
 7
7
-
 8
8
-
 9
9
-
 10
10
-
 11
11
-
 12
12
-
 13
13
-
 14
14
-
 15
15
-
 16
16
-
 17
17
-
 18
18
-
 19
19
-
 20
20
-
 21
21
-
 22
22
-
 23
23
-
 24
24
-
 25
25
-
 26
26
-
 27
27
-
 28
28
-
 29
29
-
 30
30
-
 31
31
-
 32
32
-
 33
33
-
 34
34
-
 35
35
-
 36
36
-
 37
37
-
 38
38
-
 39
39
-
 40
40
-
 41
41
-
 42
42
-
 43
43
-
 44
44
-
 45
45
-
 46
46
-
 47
47
-
 48
48
-
 49
49
-
 50
50
-
 51
51
-
 52
52
-
 53
53
-
 54
54
-
 55
55
-
 56
56
-
 57
57
-
 58
58
-
 59
59
-
 60
60
-
 61
61
-
 62
62
-
 63
63
-
 64
64
-
 65
65
-
 66
66
-
 67
67
-
 68
68
-
 69
69
-
 70
70
-
 71
71
-
 72
72
-
 73
73
-
 74
74
-
 75
75
-
 76
76
-
 77
77
-
 78
78
-
 79
79
-
 80
80
-
 81
81
-
 82
82
-
 83
83
-
 84
84
-
 85
85
-
 86
86
-
 87
87
-
 88
88
-
 89
89
-
 90
90
-
 91
91
-
 92
92
-
 93
93
-
 94
94
-
 95
95
-
 96
96
-
 97
97
-
 98
98
-
 99
99
-
 100
100
-
 101
101
-
 102
102
-
 103
103
-
 104
104
-
 105
105
-
 106
106
-
 107
107
-
 108
108
-
 109
109
-
 110
110
-
 111
111
-
 112
112
-
 113
113
-
 114
114
-
 115
115
-
 116
116
-
 117
117
-
 118
118
-
 119
119
-
 120
120


Bosch KGP36371/30 Owner's manual
- Category
- Fridge-freezers
- Type
- Owner's manual
Ask a question and I''ll find the answer in the document
Finding information in a document is now easier with AI
in other languages
- italiano: Bosch KGP36371/30 Manuale del proprietario
- français: Bosch KGP36371/30 Le manuel du propriétaire
- español: Bosch KGP36371/30 El manual del propietario
- Deutsch: Bosch KGP36371/30 Bedienungsanleitung
- Nederlands: Bosch KGP36371/30 de handleiding
- português: Bosch KGP36371/30 Manual do proprietário
Related papers
-
Bosch KGP36360 User manual
-
Bosch KSV32320FF/01 User manual
-
-
-
Bosch KDV24V00CH User manual
-
Bosch KGP34360 Kühl-gefrierkombination Owner's manual
-
Bosch KGS36300 User manual
-
Bosch KSV32301IE/01 User manual
-
Bosch KGM39T60 User manual
-
Other documents
-
Siemens kg 36p320 ff Owner's manual
-
Samsung RT2ASKSW User manual
-
-
BALAY 3KE7930A/01 User manual
-
BALAY 3KF4967A/01 User manual
-
Siemens KG33S310FF User manual
-
-
-
-
CONSTRUCTA CK267301 Owner's manual