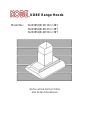
Kobe IS23 SQB-1 Installation guide
- Category
- Cooker hoods
- Type
- Installation guide
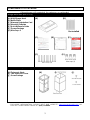
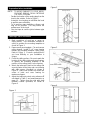
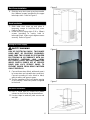
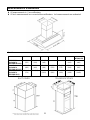
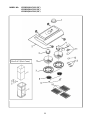
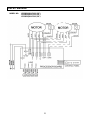
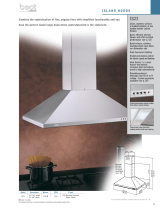
Kobe IS23 SQB-1 is a range hood designed to help you maintain a clean and fresh kitchen environment. With its powerful motor, it effectively removes smoke, odors, and grease from the air, leaving your kitchen smelling fresh and clean. The range hood also features multiple fan speeds, allowing you to adjust the suction power to your needs. Additionally, the range hood is equipped with LED lights, providing bright illumination for your cooking area. Here are some of the key features and benefits of the Kobe IS23 SQB-1 range hood:
- Powerful motor for effective smoke, odor, and grease removal
- Multiple fan speeds for customized suction power


-
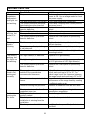
 1
1
-
 2
2
-
 3
3
-
 4
4
-
 5
5
-
 6
6
-
 7
7
-
 8
8
-
 9
9
-
 10
10
-
 11
11
-
 12
12
-
 13
13
-
 14
14
-
 15
15
-
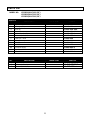 16
16
-
 17
17
-
 18
18
-
 19
19
-
 20
20
-
 21
21
-
 22
22
-
 23
23


Kobe IS23 SQB-1 Installation guide
- Category
- Cooker hoods
- Type
- Installation guide
Kobe IS23 SQB-1 is a range hood designed to help you maintain a clean and fresh kitchen environment. With its powerful motor, it effectively removes smoke, odors, and grease from the air, leaving your kitchen smelling fresh and clean. The range hood also features multiple fan speeds, allowing you to adjust the suction power to your needs. Additionally, the range hood is equipped with LED lights, providing bright illumination for your cooking area. Here are some of the key features and benefits of the Kobe IS23 SQB-1 range hood:
- Powerful motor for effective smoke, odor, and grease removal
- Multiple fan speeds for customized suction power
Ask a question and I''ll find the answer in the document
Finding information in a document is now easier with AI
Related papers
-
Kobe IN2830SQB-XX Installation guide
-
-
-
-
-
-
-
-
-
Other documents
-
Ancona AN-1286 User guide
-
Ancona AN-1285 User guide
-
Kobe Range Hoods RA9236S User manual
-
-
Mackie DC16 Road Case Operating instructions
-
-
 BEST Range Hoods IS23 User manual
-
Hydro Crunch GDF250 User manual
-
 Geek Chef GWS-A30A User manual
-
 Geek Chef GWS-A30A Installation guide


