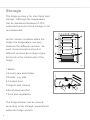
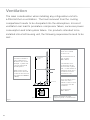
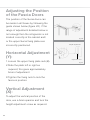
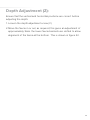
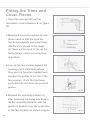
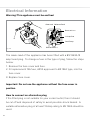
CDA FW951 is a frost-free integrated fridge freezer that offers a range of features for convenient food storage and preservation. With a spacious interior, adjustable shelves, and separate temperature controls for the fridge and freezer compartments, it provides flexible storage options. The super cool and super freeze functions allow for rapid cooling and freezing of large quantities of fresh food, while the salad crisper with humidity control helps keep fruits and vegetables fresher for longer.
CDA FW951 is a frost-free integrated fridge freezer that offers a range of features for convenient food storage and preservation. With a spacious interior, adjustable shelves, and separate temperature controls for the fridge and freezer compartments, it provides flexible storage options. The super cool and super freeze functions allow for rapid cooling and freezing of large quantities of fresh food, while the salad crisper with humidity control helps keep fruits and vegetables fresher for longer.


-
 1
1
-
 2
2
-
 3
3
-
 4
4
-
 5
5
-
 6
6
-
 7
7
-
 8
8
-
 9
9
-
 10
10
-
 11
11
-
 12
12
-
 13
13
-
 14
14
-
 15
15
-
 16
16
-
 17
17
-
 18
18
-
 19
19
-
 20
20
-
 21
21
-
 22
22
-
 23
23
-
 24
24
-
 25
25
-
 26
26
-
 27
27
-
 28
28
-
 29
29
-
 30
30
-
 31
31
-
 32
32


CDA FW951 is a frost-free integrated fridge freezer that offers a range of features for convenient food storage and preservation. With a spacious interior, adjustable shelves, and separate temperature controls for the fridge and freezer compartments, it provides flexible storage options. The super cool and super freeze functions allow for rapid cooling and freezing of large quantities of fresh food, while the salad crisper with humidity control helps keep fruits and vegetables fresher for longer.
Ask a question and I''ll find the answer in the document
Finding information in a document is now easier with AI
Related papers
Other documents
-
Everbilt 1259-110-RF Operating instructions
-
shopify T518LEMBI Integrated fridge Installation guide
-
Coolzone CZ51039IFF Operating instructions
-
LAMONA LAM6700 Owner's manual
-
COOKOLOGY CITDLFR1770 User manual
-
White Knight FF250IH User manual
-
Rangemaster 50:50 Intergrated Fridge Freezer User guide
-
-
 Matrix Appliances MFU200 User manual
-
Electrolux EHE5224B-A User guide
