
11
DESCRIPTION OF THE APPLIANCE
A thermostat knob
B timer knob
C indicator light
D function selector knob
E glass door
F bottom heating element
G flat wire rack
H dripping pan
I shaped wire rack (if supplied)
L crumb tray
M top heating element
N inside light (if supplied)
O broil rack (if supplied)
P pizza plate (if supplied)
IMPORTANT WARNINGS
• Read all the instructions carefully before using the appliance.
• This oven has been designed to cook food. It must never be used for other purposes, modified or tampered with in any way.
• Place the appliance on a horizontal surface at a height of at least 85 cm and out of reach of children.
• Wash all accessories thoroughly before use.
A
B
C
D
E
M
N
L
F
PO
GHI

12
• Before plugging into the mains, make sure that:
- the mains voltage corresponds to the voltage indicated on the rating plate;
- the mains socket has a minimum rating of 16A and an earth wire.
The manufacturer declines all liability in the event that this important accident-prevention rule is not respected.
• Before using the oven for the first time, remove any paper and other material inside the oven such as protective card-
board, booklets, plastic bags, etc.
• Before using for the first time, operate the oven empty with the thermostat at maximum for at least 15 minutes to eli-
minate the "new" smell and any smoke caused by the presence of protective substances applied to the elements befo-
re transport. During this operation, ventilate the room.
IMPORTANT: when you have unpacked the appliance, make sure the door is undamaged and working correctly. The
door is made from glass and is therefore fragile. If it is visibly chipped, scored or scratched, it should be replaced. While
using, cleaning or moving the appliance, avoid slamming or knocking the door violently. Do not pour cold liquid onto
the glass while the appliance is hot.
• When in operation, the door and accessible external surfaces could become very hot. Always use the
knobs, handles and buttons. Never touch metal parts or the glass. Use oven gloves if necessary.
• This electrical appliance operates at high temperatures which could cause burns.
• The appliance is not intended for use by persons (including children) with reduced physical, sensory or men-
tal capabilities, or lack of experience and knowledge, unless they have been given supervision or instruction
concerning use of the appliance by a person responsible for their safety. Children should be supervised to ensure that
they do not play with the appliance.
• Do not move the appliance while in use.
• Do not use the appliance if…
- the power cable is faulty,
- the appliance has been dropped, is visibly damaged or malfunctions.
Should this occur, to avoid all risk take the appliance to your nearest authorised service centre.
• Do not let the power cable dangle and avoid touching hot parts of the oven. Never unplug the appliance by pulling
on the power cable.
• If you intend to use an extension, make sure it is in good condition, that the plug is earthed and that the cross section
of the wires is at least equal to that of the power cable provided with the appliance.
• To avoid all risk of electric shock, never immerse the power cable, plug or appliance itself in water.
• Never position the appliance near heat sources.
• Do not leave inflammable products near the oven or under the work surface where it is located.
• Bread may burn. Never leave the oven unattended during toasting or grilling. Never operate the appliance under a
wall cupboard or shelf or near inflammable materials such as curtains, blinds, etc.
• Do not use the appliance as a heat source.
• Never place paper, cardboard or plastic inside the oven and never rest anything on top of the appliance (utensils, wire
racks, other objects).
• Never insert anything into the ventilation openings. Make sure they are unobstructed.
• If food or other parts of the oven catch fire, never try and put out the flames with water. Close the door, unplug
from the mains and smother the flames with a damp cloth.
• This oven is not designed for built-in installation.
• When the door is open, remember:
- never exert excessive pressure with overly heavy objects or pull the handle
downwards;
- never rest heavy containers or boiling saucepans just out of the oven on the open
door.
• Given the differences in legislation in force, if the appliance is used in a country other
than that where it was bought, have it checked by an authorised service centre.
• For your personal safety, never take the appliance to pieces on your own. Always con-
tact an authorised service centre.
• This appliance is designed for domestic use only. Professional or inappropriate use,
or failure to observe the instructions absolves the manufacturer from all responsibility and invalidates the guarantee.
• When not in use and before cleaning, always unplug the appliance.
• If the supply cord is damaged, it must be replaced by the manufacturer, its service agent or similarly qualified persons
in order to avoid a hazard.
• This appliance conforms to EC directive 2004/108/EC on Electromagnetic Compatibility and EC regulation no.
1935/2004 of 27/10/2004 on materials intended for contact with food.
• This appliance is not intended to be operated by means of an external timer or separate remote-control system.
• This appliance must be placed to work with the rear side approached to the wall.
Keep these instructions
K
g
.

13
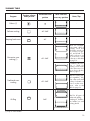
Program
SUMMARY TABLE
Function selector
knob position
Thermostat knob
position
Wire rack and
accessory position
Notes/Tips
Defrost (*)
•
-
Keeping food warm
60° -
Convection oven
cooking (*)
60°-245°
Ideal for lasagna,
meat, pizza, cakes in
general, foods that
should be crunchy on
the surface (“au gra-
tin”) and bread. For
details on how to use
the accessories, refer
to the tips in the table
on page 16.
In addition, this func-
tion is ideal for
cooking on two levels
at the same time. For
tips on how to do this,
refer to page 17.
Traditional oven
cooking
60°-245°
Ideal for cooking stuf-
fed vegetables, fish,
plum cakes and small
poultry. For details on
how to use the acces-
sories, refer to the
table on page 16.
Grilling
Ideal for all types of
traditional grilling:
hamburgers, frankfur-
ters, kebabs, etc. and
toasting bread.
(*) only on some models
Delicate cooking
60°-245°
-
only for model with broil rack
only for model without broil rack
245°

14
USING THE CONTROLS
Thermostat knob (A)
Select the desired temperature, as follows:
• To defrost (*) (see page 15): . . . . . . . . . . . . . . . . . .Thermostat knob in the “•” position.
• To keep food warm (see page 15): . . . . . . . . . . . . .Thermostat knob in the “60°C” position.
• For convection oven cooking (*) or traditional
oven cooking (see page 15-16): . . . . . . . . . . . . . . .Thermostat knob from “60°C” to “245°C”.
• For all types of grilling (see page 18): . . . . . . . . . .Thermostat knob in the “245°C” position.
Timer knob (B)
• To program the cooking time: . . . . . . . . . . . . . . . . .Turn the knob clockwise to the desired time (max.
120 minutes); when the set time has elapsed, an
audible signal will be emitted and the oven will
automatically switch off.
• To switch the oven off: . . . . . . . . . . . . . . . . . . . . . .Turn the knob to the “0” position
To set times less than 20 minutes, first turn the knob all the way round, then back to the desired time.
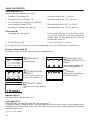
Function selector knob (D)
This knob is used to select the cooking functions available, that is:
DEFROSTING (*)
(ventilation only)
TRADITIONAL OVEN
COOKING, KEEPING FOOD
WARM
(only top heating element and
bottom heating element on)
CONVECTION OVEN
COOKING (*)
(top heating element, bottom hea-
ting element and ventilation on)
GRILLING
(only top heating element on
at maximum power)
DELICATE COOKING
(only bottom heating element
on)
Indicator light (C)
The light on means that the oven is on.
Inside light (N) (*)
When the oven is on, the light inside the oven is always on.
To replace the bulb, proceed as follows: unplug the appliance from the power socket, unscrew the glass cover
and replace the burnt-out bulb with a new one of the same type (resistant to high temperatures) and then
replace the glass cover.
(*) only on some models

15
USING THE OVEN
General tips
• When cooking with the convection oven, traditional oven and grilling, always preheat the oven for 5
minutes to the set temperature, so as to achieve best results.
• The cooking times depend on the quality of the products, on the temperature of the food and on perso-
nal tastes. The times indicated in the table are purely indicative and subject to variation, and do not inclu-
de the time required to preheat the oven.
• To cook frozen foods refer to the recommended times on the product packaging.
Defrosting (*)
For proper defrosting in a short time, proceed as follows:
• Turn the function selector knob (D) to the position.
• Turn the thermostat knob (A) to the “•” position.
• Turn the Timer knob (B) to the desired time.
• Place the flat wire rack (G) in the lower guide and rest the food to be defrosted on a tray on the wire
rack, then close the door.
Example of defrosting: 1 kg of meat, 80-90 minutes without turning it over.
Delicate cooking
Ideal for pastry and cakes with icing. Good results are also achieved when completing the cooking of the
bottom of the foods or for cooking that requires heat above all at the bottom.
• Place the wire rack (with a pan on it) in the lower guide, as shown in the figure on page 13.
• Turn the function selector knob (D) to the position.
• Select the required temperature using the thermostat knob (A).
• Turn the Timer knob (B) to the desired time. At the end of the set time, an audible signal will be emitted;
if cooking is complete before the end of the set time, turn the Timer knob (B) manually to the “0” position.
Keeping food warm
• Turn the thermostat knob (A) to the “60°C” position.
• Turn the function selector knob (D) to the position.
• Turn the Timer knob (B) to the desired time.
• Place the flat wire rack (G) in the lower guide and rest the dish with the food on the rack.
It is recommended not to leave the foods in the oven for too long, as these may dry out.
Convection oven cooking (*)
This function is ideal for baking excellent pizzas, lasagna, “au gratin” dishes, all types of meat dishes (apart
from small poultry), roast potatoes, cakes in general and bread.
It is also suitable for cooking different foods on two levels at the same time. Proceed as follows:
• Place the flat wire rack (G) in the position shown in the table.
• Turn the function selector knob (D) to the position.
• Select the required temperature by turning the thermostat knob (A).
• Turn the Timer knob (B) to the desired time.
• After having pre-heated the oven for 5 minutes, place the food to be cooked inside.
15
(*) only on some models

16
Pizza 500 g
Chicken 1 kg.
Roast pork 900 g
Meatballs 650 g
Roast potatoes 500 g
Jam tarts 700 g
Strudel 1 kg
Sponge cake 700 g
Biscuits (shortbread) 100 g
Bread 500 g
Use the dripping pan.
Use the dripping pan, turn the chicken
after about 50 min.
Use the dripping pan, turn the meat
after about 50 min.
Use the dripping pan, turn the meat after
about 30 min.
Use the dripping pan, mix twice.
Use the dripping pan.
Use the dripping pan.
Use a cake dish.
Use the dripping pan.
Use the dripping pan greased with
oil.
220°
220°
220°
200°
200°
180°
180°
160°
180°
200°
17 min.
70-80 min.
70 min.
55 min.
50 min.
40 min.
40 min.
45 min.
14 min.
25 min.
lower
“
“
“
“
“
“
“
“
“
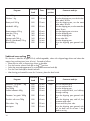
Program
Thermostat
knob
Times
wire rack
position
Comments and tips
Traditional oven cooking
This function is ideal for all types of fish, stuffed vegetables, cakes with whipped egg-whites and cakes that
require long cooking times (over 60 min.). Proceed as follows:
• Place the wire rack in the position shown in the table.
• Turn the function selector knob (D) to the position.
• Select the required temperature by turning the thermostat knob (A).
• Turn the Timer knob (B) to the desired time.
• After having pre-heated the oven for 5 minutes, place the food inside.
Macaroni “au gratin” 1 Kg.
Lasagna 1,5 kg.
Trout 500g
Stuffed calamari 450g
Tomatoes “au gratin” 550g
Zucchini with tuna 750g
Plum cakes 1 kg
Meringues
Use an ovenproof dish.
Use an ovenproof dish.
Use the dripping pan.
Use an ovenproof dish, turn halfway
through cooking.
Use the dripping pan greased with
oil.
Use the dripping pan; add oil, the
tomatoes and water.
Use a mold for plum cake.
Use the dripping pan greased with
oil. Let them rest for at least 1 day
before serving.
200°
200°
200°
200°
200°
200°
180°
120°
35 min.
35 min.
35 min.
30 min.
40 min.
40 min.
75 min.
50 min.
lower
“
“
“
“
“
“
“
Program
Thermostat
knob
Times
wire rack
position
Comments and tips

17
Use the pizza plate (if provided)
This plate has been designed for optimum cooking of fresh and frozen pizzas. The special holes enable the
moisture to escape, leaving the pizza crunchy even in the middle. In the case of fresh pizza, place the pizza
dough on the greased pizza plate. Frozen pizza can be placed directly on the plate. Heat the oven to the
required temperature, then place the plate directly on the wire rack in the bottom guide of the iron.
Recipe for fresh pasta dough
Ingredients: 500 g flour, 280 g water, 1 cube fresh yeast, 1 teaspoon salt, 2 teaspoons olive oil.
Method: dissolve the yeast cube in warm water, add the flour, salt and olive oil and knead well until it forms
a ball. Leave to stand for two hours.
The table below gives a number of cooking times:
283 - 565 gr
595 - 765 gr
795 - 1020 gr
15 minutes
20 minutes
25 minutes
220°C
220°C
220°C
Weight frozen pizza Temperature Cooking time *
283 - 425 gr
452 - 707 gr
25 minutes
30 minutes
220°C
220°C
Weight fresh pizza
Temperature Cooking time *
(*) Times are indicative only and may vary according to type of pizza.

18
“
“
“
“
“
Pork chops (2)
Frankfurters (3)
Fresh hamburgers (2)
Sausages (4)
Kebabs 500g
Toasted bread (4 slices)
Turn after 14 minutes.
Turn after 11 minutes.
Turn after 13 minutes.
Turn after 14 minutes.
Turn after 8, 15 and 21 minutes.
Turn after 6 minutes.
245° 26 min.
20 min.
25 min.
26 min.
26 min.
9 min.
upper
“
“
“
“
“
Program
Thermostat
knob
Times
wire rack
position
Comments and tips
NB: The dripping pan does not need to be placed inside the oven for toasting bread.
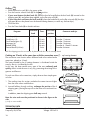
Cooking on 2 levels at the same time with the convection oven (*)
The convection oven function allows different foods to be cooked at the
same time, placed on 2 levels.
The heat provided by the 2 heating elements is distributed inside the
oven by the air, circulated by the fan.
In this way, the heat reaches every part of the oven uniformly and
quickly; the air inside the oven is very dry, preventing the mixing of fra-
grances and flavours.
To cook two dishes at the same time, simply observe these simple gene-
ral rules.
1. The cooking times for recipes cooked at the same time are higher
than the times when cooked alone.
2. Around halfway through cooking, exchange the position of the 2
dripping pans, placing the top one on the lower wire rack and vice-
versa.
In addition, turn the dripping pans half-way around.
Note: the wire racks must be positioned as shown in the figure to the
side.
(*) only on some models
TECHNICAL DATA
Net weight 5.5 kg Absorbed power 1400 W
Frequency 50/60 Hz Voltage 220-240 V
top heating element
bottom heating element
Grilling
• Place the flat wire rack (G) in the upper guide.
• Turn the function selector knob (D) to the position.
• If your oven features the broil rack (O): place the food to be grilled on the broil rack (O) inserted on the
dripping pan (H), and place them together on the flat wire rack (G).
• If your oven does not feature the broil rack (O): place the food directly on the flat wire rack (G) (the drip-
ping pan (H) must be placed over the bottom heating element, to catch any fat that drips).
• Close the door.
• Turn the Timer knob (B) to the desired time.

19
FOR U.K. ONLY
Wiring instructions
This appliance must be earthed
Important: The wires in this lead are coloured in accordance with the following codes:
Green and yellow: Earth
Blue: Neutral
Brown: Live
Connect the green/yellow wire to the terminal in the plug marked “E” (or by the earth
symbol) or coloured green or coloured green and yellow.
Connect the brown wire to the terminal in the plug marked “L” or coloured red.
Connect the blue wire to the terminal in the plug marked “N” or coloured black.
A 13 amp fuse should be fitted when the appliance is connected to a BS 1363 plug.
Seek professional advice if you are unsure of the correct procedure for the above.
About your factory fitted plug (supplied with certain models only)
The lead is already fitted with a plug incorporating a 13 amp fuse. If the plug does not fit your socket outlet,
see next paragraph. Should you need to replace the fuse in the plug supplied, a 13 amp approved BS 1362
fuse must be used. (refer to wiring instructions for use rating) If the plug supplied does not fit your socket out-
let, it should be removed from the mains lead and disposed of safely. The flexible cord insulation should be
stripped back as appropriate and a suitable alternative plug fitted. The replacement plug must be equipped
with a 13 amp fuse.
Important: If the electrical cord of this appliance is damaged, it must only be replaced by an authorised
Service Dealer. The safety of this appliance complies with the technical regulations and standards in force.
Green and Yellow or green
Blue or
black
Fit13
amp
fuse
Brown
or red
Use cable
gripper
CLEANING AND MAINTENANCE
Frequent cleaning prevents the formation of smoke and bad odours
during cooking. Do not let fat accumulate inside the appliance.
Before any maintenance or cleaning operation, unplug the oven and
wait for it to cool down. Clean the door, the inside walls and the ena-
mel or painted surfaces of the oven with a soap and water solution; dry
thoroughly. To clean the aluminium surfaces on the inside of the oven,
never use products that corrode aluminium (detergents in spray cans)
and never scrape the walls with sharp objects. To clean the outside sur-
face always use a damp sponge. Avoid using abrasive products that
may damage the paintwork. Make sure water or liquid soap does not
seep into the slits on the top of the oven. Never immerse the applian-
ce in water; never wash it under a jet of water. All the accessories are
washed like normal dishes, either by hand or in the dishwasher.
If the oven has a crumb tray:
Remove the tray from the bottom (figure to the side); wash it by hand.
If the dirt is hard to remove, rinse the tray in hot soapy water and if
necessary rub it gently, without scratching it.
Important information for correct disposal of the product in accordance with EC Directive 2002/96/EC.
At the end of its working life, the product must not be disposed of as urban waste. It must be taken
to a special local authority differentiated waste collection centre or to a dealer providing this servi-
ce. Disposing of a household appliance separately avoids possible negative consequences for
the environment and health deriving from inappropriate disposal and enables the constituent
materials to be recovered to obtain significant savings in energy and resources.As a reminder
of the need to dispose of household appliances separately, the product is marked with a cros-
sed-out wheeled dustbin.
-
 1
1
-
 2
2
-
 3
3
-
 4
4
-
 5
5
-
 6
6
-
 7
7
-
 8
8
-
 9
9


Ask a question and I''ll find the answer in the document
Finding information in a document is now easier with AI
Related papers
-
DeLonghi EO 20792 Benchtop Oven Owner's manual
-
-
-
-
-
-
-
DeLonghi Oven EO12001 User manual
-
-
Other documents
-
De'Longhi EO 1270 User manual
-
Rubine RBO-IA6-56SS User manual
-
-
Whirlpool FO 87C/E IX AUS User guide
-
ARC AR5S User manual
-
ARC Appliances ACPG User manual
-
-
Hotpoint FM 10 RK.C (WH) GB User guide
-
 Merloni FB 51 IX GB Owner's manual
-
Ariston FB 52 AUS Owner's manual
