
Su ueva sierra circular ha sido diseñado y fabricado de conformidad
con nuestras estrictas normas para brindar fiabilidad, facilidad
de uso y seguridad para el operador. Con el debido cuidado, le
brindará muchos años de sólido funcionamiento y sin problemas.
ADVERTENCIA: Para reducir el riesgo de lesiones,
el usuario debe leer y comprender el manual del operador antes
de usar este producto. Guarde este manual del operador y
estúdielo frecuentemente para lograr un funcionamiento seguro
y continuo de este producto.
Your circular saw have been engineered and manufactured to our high standard for dependability, ease of operation, and
operator safety. When properly cared for, it will give you years of rugged, trouble-free performance.
WARNING: To reduce the risk of injury, the user must read and understand the operator’s manual before using this
product. If you do not understand the warnings and instructions in the operator’s manual, do not use this product.
Cette scie circulaire a été conçu et fabriqué conformément à
nos strictes normes de fiabilité, simplicité d’emploi et sécurité
d’utilisation. Correctement entretenu, cet outil vous donnera des
années de fonctionnement robuste et sans problème.
AVERTISSEMENT : Pour réduire les risques de
blessures, l’utilisateur doit lire et veiller à bien comprendre
le manuel d’utilisation avant d’employer ce produit. Si tous
les avertissements et toutes les consignes de sécurités et
instructions du manuel d’utilisation ne sont pas bien compris,
ne pas utiliser ce produit.
CONSERVER CE MANUEL POUR
FUTURE RÉFÉRENCE GUARDE ESTE MANUAL PARA
FUTURAS CONSULTAS
SAVE THIS MANUAL FOR FUTURE REFERENCE
OPERATOR’S MANUAL
MANUEL D’UTILISATION
MANUAL DEL OPERADOR
CIRCULAR SAW
SCIE CIRCULAIRE
SIERRA CIRCULAR
CS120L

2
TABLE OF CONTENTS
INTRODUCTION
This product has many features for making its use more pleasant and enjoyable. Safety, performance, and dependability
have been given top priority in the design of this product making it easy to maintain and operate.
WARRANTY
RYOBI® POWER TOOL - LIMITED TWO YEAR WARRANTY AND 30 DAY EXCHANGE POLICY
One World Technologies, Inc., warrants its RYOBI® power tools with the following conditions:
30-DAY EXCHANGE POLICY: During the first 30 days after date of purchase, you may either request service under this
warranty or you may exchange any RYOBI® power tool which does not work properly due to defective workmanship or
materials by returning the power tool to the dealer from which it was purchased. To receive a replacement power tool
or requested warranty service, you must present proof of purchase and return all original equipment packaged with the
original product. The replacement power tool will be covered by the limited warranty for the balance of the two year period
from the date of the original purchase.
WHAT THIS WARRANTY COVERS: This warranty covers all defects in workmanship or materials in your RYOBI® power
tool for a period of two years from the date of purchase. With the exception of batteries, power tool accessories are
warranted for ninety (90) days. Batteries are warranted for two years.
HOW TO GET SERVICE: Just return the power tool, properly packaged and postage prepaid, to an Authorized Service
Center. You can obtain the location of the Service Center nearest you by contacting a service representative at One
World Technologies, Inc., P.O. Box 1207, Anderson, SC 29622-1207, by calling 1-800-525-2579 or by logging on to www.
ryobitools.com. When you request warranty service, you must also present proof of purchase documentation, which
includes the date of purchase (for example, a bill of sale). We will repair any faulty workmanship, and either repair or replace
any defective part, at our option. We will do so without any charge to you. We will complete the work in a reasonable time,
but, in any case, within ninety (90) days or less.
WHAT’S NOT COVERED: This warranty applies only to the original purchaser at retail and may not be transferred. This
warranty only covers defects arising under normal usage and does not cover any malfunction, failure or defects resulting
from misuse, abuse, neglect, alteration, modification or repairs by other than Authorized Service Centers. One World
Technologies, Inc. makes no warranties, representations or promises as to the quality or performance of its power tools
other than those specifically stated in this warranty.
ADDITIONAL LIMITATIONS: Any implied warranties granted under state law, including warranties of merchantability or
fitness for a particular purpose, are limited to two years from the date of purchase. One World Technologies, Inc. is not
responsible for direct, indirect, or incidental damages, so the above limitations and exclusions may not apply to you. This
warranty gives you specific legal rights, and you may also have other rights which vary from state to state.
Introduction ..................................................................................................................................................................... 2
Warranty .......................................................................................................................................................................... 2
General Safety Rules .................................................................................................................................................... 3-4
Specific Safety Rules ....................................................................................................................................................4-5
Symbols ........................................................................................................................................................................6-7
Features ........................................................................................................................................................................... 7
Assembly ......................................................................................................................................................................8-9
Operation ....................................................................................................................................................................9-12
Adjustments ................................................................................................................................................................... 12
Maintenance .................................................................................................................................................................. 13
Accessories ................................................................................................................................................................... 13
Figure numbers (illustrations) ...................................................................................................................................14-16
Parts Ordering / Service ................................................................................................................................... Back page

3
GENERAL SAFETY RULS
WARNING!
Read all instructions. Failure to follow all instructions
listed below may result in electric shock, fire and/or
serious injury. The term “power tool” in all of the warnings
listed below refers to your mains-operated (corded)
power tool or battery-operated (cordless) power tool.
SAVE THESE INSTRUCTIONS
WORK AREA SAFETY
Keep work area clean and well lit. Cluttered or dark
areas invite accidents.
Do not operate power tools in explosive atmospheres,
such as in the presence of flammable liquids, gases
or dust. Power tools create sparks which may ignite the
dust or fumes.
Keep children and bystanders away while operating a
power tool. Distractions can cause you to lose control.
ELECTRICAL SAFETY
Power tool plugs must match the outlet. Never modify
the plug in any way. Do not use any adapter plugs with
earthed (grounded) power tools. Unmodified plugs and
matching outlets will reduce risk of electric shock.
Avoid body contact with earthed or grounded surfaces
such as pipes, radiators, ranges and refrigerators.
There is an increased risk of electric shock if your body
is earthed or grounded.
Do not expose power tools to rain or wet conditions.
Water entering a power tool will increase the risk of
electric shock.
Do not abuse the cord. Never use the cord for carrying,
pulling or unplugging the power tool. Keep cord away
from heat, oil, sharp edges or moving parts. Damaged
or entangled cords increase the risk of electric shock.
When operating a power tool outdoors, use an
extension cord suitable for outdoor use. Use of a
cord suitable for outdoor use reduces the risk of electric
shock.
Use battery only with charger listed.
shoes, hard hat, or hearing protection used for appropriate
conditions will reduce personal injuries.
Avoid accidental starting. Ensure the switch is in the
off-position before plugging in. Carrying power tools
with your finger on the switch or plugging in power tools
that have the switch on invites accidents.
Remove any adjusting key or wrench before turning
the power tool on. A wrench or a key left attached to
a rotating part of the power tool may result in personal
injury.
Do not overreach. Keep proper footing and balance
at all times. This enables better control of the power tool
in unexpected situations.
Dress properly. Do not wear loose clothing or jewelry.
Keep your hair, clothing and gloves away from moving
parts. Loose clothes, jewelry or long hair can be caught
in moving parts.
If devices are provided for the connection of dust
extraction and collection facilities, ensure these are
connected and properly used. Use of these devices can
reduce dust-related hazards.
Do not wear loose clothing or jewelry. Contain long
hair. Loose clothes, jewelry, or long hair can be drawn
into air vents.
Do not use on a ladder or unstable support. Stable
footing on a solid surface enables better control of the
power tool in unexpected situations.
POWER TOOL USE AND CARE
Do not force the power tool. Use the correct power tool
for your application.
The correct power tool will do the job
better and safer at the rate for which it was designed.
Do not use the power tool if the switch does not turn
it on and off. Any power tool that cannot be controlled
with the switch is dangerous and must be repaired.
Disconnect the plug from the power source and/or
the battery pack from the power tool before making
any adjustments, changing accessories, or storing
power tools. Such preventive safety measures reduce
the risk of starting the power tool accidentally.
Store idle power tools out of the reach of children and
do not allow persons unfamiliar with the power tool
or these instructions to operate the power tool. Power
tools are dangerous in the hands of untrained users.
Maintain power tools. Check for misalignment or
binding of moving parts, breakage of parts and any
other condition that may affect the power tool’s
operation. If damaged, have the power tool repaired
before use. Many accidents are caused by poorly
maintained power tools.
Keep cutting tools sharp and clean. Properly maintained
cutting tools with sharp cutting edges are less likely to
bind and are easier to control.
PERSONAL SAFETY
Stay alert, watch what you are doing and use common
sense when operating a power tool. Do not use a
power tool while you are tired or under the influence of
drugs, alcohol or medication. A moment of inattention
while operating power tools may result in serious personal
injury.
Use safety equipment. Always wear eye protection.
Safety equipment such as dust mask, non-skid safety
MODEL BATTERY PACK
CHARGER
CS120L CB120L (Li-Ion) CH120L,
C120D
CB120N (Ni-Cd) C120N, C120D

4
GENERAL SAFETY RULES
Use the power tool, accessories and tool bits etc., in
accordance with these instructions and in the manner
intended for the particular type of power tool, taking
into account the working conditions and the work
to be performed. Use of the power tool for operations
different from those intended could result in a hazardous
situation.
BATTERY TOOL USE AND CARE
Ensure the switch is in the off position before inserting
battery pack. Inserting the battery pack into power tools
that have the switch on invites accidents.
Recharge only with the charger specified by the
manufacturer. A charger that is suitable for one type
of battery pack may create a risk of fire when used with
another battery pack.
Use power tools only with specifically designated
battery packs. Use of any other battery packs may create
a risk of injury and fire.
When battery pack is not in use, keep it away from
other metal objects like paper clips, coins, keys, nails,
screws, or other small metal objects that can make a
connection from one terminal to another. Shorting the
battery terminals together may cause burns or a fire.
Under abusive conditions, liquid may be ejected from
the battery, avoid contact. If contact accidentally
occurs, flush with water. If liquid contacts eyes,
additionally seek medical help. Liquid ejected from the
battery may cause irritation or burns.
SERVICE
Have your power tool serviced by a qualified repair
person using only identical replacement parts. This will
ensure that the safety of the power tool is maintained.
WARNING!
To reduce the risk of injury, user must read instruction
manual.
When servicing a power tool, use only identical
replacement parts. Follow instructions in the
Maintenance section of this manual. Use of unauthorized
parts or failure to follow Maintenance instructions may
create a risk of shock or injury.
SPECIFIC SAFETY RULES
DANGER! Keep hands away from cutting area and the
blade.
Do not reach underneath the workpiece. The
guard cannot protect you from the blade below the
workpiece.
Adjust the cutting depth to the thickness of the
workpiece. Less than a full tooth of the blade teeth should
be visible below the workpiece.
Never hold piece being cut in your hands or across
your leg. Secure the workpiece to a stable platform.
It is important to support the work properly to minimize
body exposure, blade binding, or loss of control.
Hold power tool by insulated gripping surfaces when
performing an operation where the cutting tool may
contact hidden wiring or its own cord. Contact with
a “live” wire will also make exposed metal parts of the
power tool “live” and shock the operator.
When ripping always use a rip fence or straight edge
guide. This improves the accuracy of cut and reduces
the chance of blade binding.
Always use blades with correct size and shape
(diamond versus round) of arbor holes. Blades that
do not match the mounting hardware of the saw will run
eccentrically, causing loss of control.
Never use damaged or incorrect blade washers or
bolt. The blade washers and bolt were specially designed
for your saw for optimum performance and safety of
operation.
Do not crush, drop or damage battery pack. Do not
use a battery pack or charger that has been dropped
or received a sharp blow. A damaged battery is subject
to explosion. Properly dispose of a dropped or damaged
battery immediately.
CAUSES AND OPERATOR PREVENTION OF
KICKBACK:
Kickback is a sudden reaction to a pinched, bound, or
misaligned saw blade, causing an uncontrolled saw to lift
up and out of the workpiece toward the operator.
When the blade is pinched or bound tightly by the kerf
closing down, the blade stalls and the motor reaction drives
the unit rapidly back toward the operator.
If the blade becomes twisted or misaligned in the cut, the
teeth at the back edge of the blade can dig into the top
surface of the wood causing the blade to climb out of the
kerf and jump back toward the operator.
Kickback is the result of saw misuse and/or incorrect
operating procedures or conditions and can be avoided by
taking proper precautions, as given below:
Maintain a firm grip on the saw and position your
arms to resist kickback forces. Position your body to
either side of the blade, but not in line with the blade.
Kickback could cause the saw to jump backwards, but
kickback forces can be controlled by the operator, if
proper precautions are taken.
When blade is binding, or when interrupting a cut
for any reason, release the trigger and hold the saw
motionless in the material until the blade comes to a

5
SPECIFIC SAFETY RULES
complete stop. Never attempt to remove the saw from
the work or pull the saw backward while the blade
is in motion, or kickback may occur. Investigate and
take corrective actions to eliminate the cause of blade
binding.
When restarting a saw in the workpiece, center the
saw blade in the kerf and check that saw teeth are
not engaged into the material. If saw blade is binding,
it may walk up or kickback from the workpiece as the
saw is restarted.
Support large panels to minimize the risk of blade
pinching and kickback. Large panels tend to sag under
their own weight. Supports must be placed under the
panel on both sides, near the line of cut and near the
edge of the panel.
Do not use dull or damaged blades. Unsharpened
or improperly set blades produce narrow kerf causing
excessive friction, blade binding and kickback.
Blade depth and bevel adjusting locking levers must be
tight and secure before making cut. If blade adjustment
shifts while cutting, it may cause binding and kickback.
Use extra caution when making a “plunge cut” into
existing walls or other blind areas. The protruding blade
may cut objects that can cause kickback.
Check lower guard for proper closing before each
use. Do not operate the saw if lower guard does not
move freely and close instantly. Never clamp or tie the
lower guard into the open position. If saw is accidentally
dropped, lower guard may be bent. Raise the lower guard
with the retracting handle make sure it moves freely and
does not touch the blade or any other part, in all angles
and depths of cut.
Check the operation of the lower guard spring. If the
guard and the spring are not operating properly, they
must be serviced before use. Lower guard may operate
sluggishly due to damaged parts, gummy deposits, or a
buildup of debris.
Lower guard should be retracted manually only for
special cuts, such as “plunge cuts” and “compound
cuts.” Raise lower guard by retracting handle and as
soon as blade enters the material, the lower guard
must be released. For all other sawing, the lower guard
should operate automatically.
Always observe that the lower guard is covering the
blade before placing saw down on bench or floor. An
unprotected, coasting blade will cause the saw to walk
backwards, cutting whatever is in its path. Be aware
of the time it takes for the blade to stop after switch is
released.
Know your power tool. Read operator’s manual
carefully. Learn its applications and limitations, as
well as the specific potential hazards related to this
power tool. Following this rule will reduce the risk of
electric shock, fire, or serious injury.
Always wear eye protection marked with side shields
to comply with ANSI Z87.1. Failure to do so could result
in objects being thrown into your eyes resulting in possible
serious injury.
Protect your lungs. Wear a face or dust mask if the
operation is dusty. Following this rule will reduce the risk
of serious personal injury.
Protect your hearing. Wear hearing protection during
extended periods of operation. Following this rule will
reduce the risk of serious personal injury.
Battery tools do not have to be plugged into an
electrical outlet; therefore, they are always in
operating condition. Be aware of possible hazards when
not using your battery tool or when changing accessories.
Following this rule will reduce the risk of electric shock,
fire, or serious personal injury.
ADDITIONAL SAFETY RULES
Check damaged parts. Before further use of the
tool, a guard or other part that is damaged should
be carefully checked to determine that it will operate
properly and perform its intended function. Check for
alignment of moving parts, binding of moving parts,
breakage of parts, mounting, and any other conditions
that may affect its operation. A guard or other part that
is damaged should be properly repaired or replaced
by an authorized service center. Following this rule will
reduce the risk of shock, fire, or serious injury.
Inspect for and remove all nails from lumber before
using this tool. Following this rule will reduce the risk of
serious personal injury.
Do not operate tool while under the influence of drugs,
alcohol, or any medication. Following this rule will
reduce the risk of electric shock, fire, or serious personal
injury.
Do not place battery tools or their batteries near fire
or heat. This will reduce the risk of explosion and possibly
injury.
Batteries can explode in the presence of a source
of ignition, such as a pilot light. To reduce the risk of
serious personal injury, never use any cordless product
in the presence of open flame. An exploded battery can
propel debris and chemicals. If exposed, flush with water
immediately.
Do not charge battery tool in a damp or wet location.
Following this rule will reduce the risk of electric shock.
For best results, your battery tool should be charged
in a location where the temperature is more than
50°F but less than 100°F. Do not store outside or in
vehicles.
Under extreme usage or temperature conditions, bat-
tery leakage may occur. If liquid comes in contact with
your skin, wash immediately with soap and water, then
neutralize with lemon juice or vinegar. If liquid gets
into your eyes, flush them with clean water for at least
10 minutes, then seek immediate medical attention.
Following this rule will reduce the risk of serious personal
injury.
Save these instructions. Refer to them frequently and
use them to instruct others who may use this tool. If you
loan someone this tool, loan them these instructions also
to prevent misuse of the product and possible injury.

6
SÍMBOLOS
Some of the following symbols may be used on this product. Please study them and learn their meaning. Proper
interpretation of these symbols will allow you to operate the product better and safer.
SYMBOL NAME DESIGNATION/EXPLANATION
Safety Alert Precauciones para su seguridad.
Read The Operator’s Manual To reduce the risk of injury, user must read and understand
operator’s manual before using this product.
Eye Protection Always wear eye protection marked with side shields to comply
with ANSI Z87.1.
No Hands Symbol Failure to keep your hands away from the blade will result in serious
personal injury.
Wet Conditions Alert Do not expose to rain or use in damp locations.
V Volts Voltage
Hz Hertz Frequency (cycles per second)
W Watts Power
min Minutes Time
Direct Current Type or a characteristic of current
…/min Per Minute Revolutions, strokes, surface speed, orbits etc., per minute
The following signal words and meanings are intended to explain the levels of risk associated with this product.
SYMBOL SIGNAL MEANING
DANGER: Indicates an imminently hazardous situation, which, if not avoided, will result
in death or serious injury.
WARNING: Indicates a potentially hazardous situation, which, if not avoided, could result
in death or serious injury.
CAUTION: Indicates a potentially hazardous situation, which, if not avoided, may result in
minor or moderate injury.
CAUTION: (Without Safety Alert Symbol) Indicates a situation that may result in property
damage.

7
SYMBOLS
Some of the following symbols may be used on this product. Please study them and learn their meaning. Proper
interpretation of these symbols will allow you to operate the product better and safer.
SYMBOL NAME DESIGNATION/EXPLANATION
Li - Ion
Recycle Symbols
This product uses nickel- cadmium (Ni-Cd) and lithium-ion
(Li-ion) batteries. Local, state, or federal laws may prohibit disposal
of batteries in ordinary trash. Consult your local waste authority
for information regarding available recycling and/or disposal
options.
WARNING:
Some dust created by power sanding, sawing, grinding, drilling, and other construction activities con-
tains chemicals known to cause cancer, birth defects or other reproductive harm. Some examples of these
chemicals are:
•leadfromlead-basedpaints,
•crystallinesilicafrombricksandcementandothermasonryproducts,and
•arsenicandchromiumfromchemically-treatedlumber.
Your risk from these exposures varies, depending on how often you do this type of work. To reduce your exposure to
these chemicals: work in a well ventilated area, and work with approved safety equipment, such as those dust masks
that are specially designed to filter out microscopic particles.
FEATURES
PRODUCT SPECIFICATIONS
Motor ......................................................................12 V DC
Blade Diameter ......................................3-3/8 in. (85.7 mm)
Blade Arbor ..............................................................15 mm
Cutting Depth at 0º ................................................ 15/16 in.
Cutting Depth at 45º .................................................. 3/4 in.
No Load Speed ..................................... 2,000 r/min. (RPM)
KNOW YOUR CIRCULAR SAW
See Figure 1, page 14.
The safe use of this product requires an understanding of
the information on the product and in this operator’s manual
as well as a knowledge of the project you are attempt-
ing. Before use of this product, familiarize yourself with all
operating features and safety rules.
BEVEL ADJUSTMENT KNOB
The bevel adjustment knob allows you to set the circular
saw for bevel cuts from 0° to 45°.
BLADE WRENCH STORAGE
Convenient wrench storage for quick blade changes.
DEPTH ADJUSTMENT KNOB
The depth adjustment knob adjusts the depth of cut from
0 in. to 15/16 in.
LOCK-OFF BUTTON
The lock-off button reduces the possibility of accidental
starting.
SPINDLE LOCK BUTTON
The spindle lock button allows you to secure the blade when
turning the blade screw.
WIDTH OF CUT SCALE
When making straight cross cuts or rip cuts, the scale can
be used to measure up to 2-3/4 in. on the right side of the
blade, and up to 1 in. on the left side of the blade.

8
ATTACHING THE BLADE
See Figure 2, page 14.
WARNING:
A 3-3/8 in. blade is the maximum blade capacity of the
saw. Never use a blade that is too thick to allow outer
blade washer to engage with the flats on the spindle.
Larger blades will come in contact with the blade guard,
while thicker blades will prevent blade screw from secur-
ing blade on spindle. Either of these situations could
result in serious personal injury.
Remove the battery pack from the saw.
Remove the blade wrench (4 mm hex key) from the stor-
age area.
Depress the spindle lock button and remove the blade
screw and outer blade washer.
NOTE: Turn the blade screw clockwise to remove.
CAUTION:
To prevent damage to the spindle or spindle lock, always
allow motor to come to a complete stop before engaging
spindle lock.
NOTE: Do not run the circular saw with spindle lock en-
gaged.
Wipe a drop of oil onto the inner blade washer and outer
blade washer where they contact the blade.
WARNING:
If inner blade washer has been removed, replace it before
placing blade on spindle. Failure to do so could cause an
accident since blade will not tighten properly.
Rotate the lower guard out of the way.
Fit the saw blade inside the lower blade guard and onto
the spindle.
NOTE: The saw teeth point upward at the front of the
saw.
Replace the outer blade washer.
Depress the spindle lock button, then replace the blade
screw. Tighten the blade screw securely by turning it
counterclockwise.
Return the blade wrench to the storage area.
UNPACKING
This product requires assembly.
Carefully remove the product and any accessories from
the box. Make sure that all items listed in the packing list
are included.
WARNING:
Do not use this product if any parts on Packing List are
already assembled to your product when you unpack it.
Parts on this list are not assembled to the product by the
manufacturer and require customer installation. Use of a
product that may have been improperly assembled could
result in serious personal injury.
Inspect the product carefully to make sure no breakage
or damage occurred during shipping.
Do not discard the packing material until you have care-
fully inspected and satisfactorily operated the product.
If any parts are damaged or missing, please call
1-800-525-2579 for assistance.
PACKING LIST
Circular Saw
3-3/8 in. Blade
Blade Wrench
Operator’s Manual
WARNING:
If any parts are damaged or missing do not operate this
product until the parts are replaced. Failure to heed this
warning could result in serious personal injury.
WARNING:
Do not attempt to modify this product or create acces-
sories not recommended for use with this product. Any
such alteration or modification is misuse and could result
in a hazardous condition leading to possible serious
personal injury.
WARNING:
To prevent accidental starting that could cause serious
personal injury, always remove the battery pack from the
product when assembling parts.
ASSEMBLY

9
WARNING:
Do not allow familiarity with products to make you
careless. Remember that a careless fraction of a second
is sufficient to inflict serious injury.
WARNING:
Always wear eye protection marked with side shields to
comply with ANSI Z87.1. Failure to do so could result in
objects being thrown into your eyes resulting in possible
serious injury.
WARNING:
Do not use any attachments or accessories not
recommended by the manufacturer of this product. The
use of attachments or accessories not recommended
can result in serious personal injury.
APPLICATIONS
You may use this product for the purposes listed below:
Cutting all types of wood products (lumber, plywood,
paneling, composition board, and hard wood)
NOTE: The use of abrasive cut-off wheels is not recom-
mended for this saw.
For complete charging instructions, refer to the Operator’s
Manual for the battery packs and chargers listed in the
General Safety Rules.
BATTERY PROTECTION FEATURES
Ryobi lithium-ion batteries are designed with features that
protect the lithium-ion cells and maximize battery life.
If the tool stops during use, release the trigger to reset and
resume operation. If the tool still does not work, the battery
needs to be recharged.
WARNING:
Always remove battery pack from your tool when you are
assembling parts, making adjustments, cleaning, or when
not in use. Removing battery pack will prevent accidental
starting that could cause serious personal injury.
REMOVING THE BLADE
See Figure 3, page 14.
Remove the battery pack from the saw.
Remove the blade wrench from the storage area.
Position the saw as shown, depress the spindle lock
button, and remove the blade screw by turning it clock-
wise.
OPERATION
ASSEMBLY
INSTALLING/REMOVING THE BATTERY
PACK
See Figure 4, page 15.
Align the stem on the battery pack with the battery
port.
Depress the latches on each side of the battery pack and
insert the pack.
Make sure the latches snap into place and the battery
pack is secure.
Depress the latches on each side of the battery pack to
release it.
WARNING:
Battery tools are always in operating condition. Therefore,
switch should always be locked when not in use or
carrying at your side.
KICKBACK
See Figures 5 - 7, page 15.
Kickback occurs when the blade stalls rapidly and the saw
is driven back towards you. Blade stalling is caused by any
action which pinches the blade in the wood.
DANGER:
Release switch immediately if blade binds or saw stalls.
Kickback could cause you to lose control of the saw. Loss
of control can lead to serious injury.
To guard against kickback, avoid dangerous practices such
as the following.
Setting blade depth incorrectly.
Sawing into knots or nails in workpiece.
Twisting the blade while making a cut.
Making a cut with a dull, gummed up, or improperly set
blade.
Supporting the workpiece incorrectly.
Forcing a cut.
Cutting warped or wet lumber.
Operating the tool incorrectly or misusing the tool.
Remove the outer blade washer.
Retract the lower blade guard out of the way.
Remove the blade.

10
To lessen the chance of kickback, follow these safety
practices.
Keep the blade at the correct depth setting. Less than a
full tooth of the blade teeth should be visible below the
workpiece.
Inspect the workpiece for knots or nails before cutting.
Never saw into a knot or nail.
Make straight cuts. Always use a straight edge guide
when rip cutting. This helps prevent twisting the blade.
Use clean, sharp, and properly set blades. Never make
cuts with dull blades.
Support the workpiece properly before beginning a cut.
Use steady, even pressure when making a cut. Never
force a cut.
Do not cut warped or wet lumber.
Hold the saw firmly and keep your body in a balanced
position so as to resist the forces if kickback should
occur.
WARNING:
When using the saw, always stay alert and exercise
control. Do not remove the saw from the workpiece while
the blade is moving.
SAW BLADES
The best of saw blades will not cut efficiently if they are not
kept clean, sharp, and properly set. Using a dull blade will
place a heavy load on the saw and increase the danger of
kickback. Keep extra blades on hand, so that sharp blades
are always available.
Gum and wood pitch hardened on blades will slow the
saw down. Remove saw blade from the saw and use gum
and pitch remover, hot water, or kerosene to remove these
accumulations. DO NOT USE GASOLINE.
BLADE GUARD SYSTEM
See Figure 8, page 15.
The lower blade guard attached to the circular saw is there
for your protection and safety. Do not alter it for any reason.
If it becomes damaged, do not operate the saw until you
have the guard repaired or replaced. Always leave guard in
operating position when using the saw.
DANGER:
When sawing through work, lower blade guard does not
cover blade on the underside of work. Since blade is
exposed on underside of work, keep hands and fingers
away from cutting area. Any part of your body coming in
contact with moving blade will result in serious injury.
OPERATION
CAUTION:
Never use saw when guard is not operating correctly.
Check the guard for correct operation before each use.
The guard is operating correctly when it moves freely and
readily returns to the closed position. If you drop the saw,
check the lower blade guard and bumper for damage at
all depth settings before reuse.
LOCK-OFF BUTTON
See Figure 9, page 15.
The lock-off button reduces the possibility of accidental
starting. The lock-off button is located on the handle above
the switch trigger. The lock-off button must be depressed
before you pull the switch trigger. The lock resets each time
the trigger is released.
NOTE: You can depress the lock-off button from either the
left or right side.
STARTING/STOPPING THE SAW
See Figure 9, page 15.
To start the saw:
Depress the lock-off button.
Depress the switch trigger.
Always let the blade reach full speed, then guide the saw
into the workpiece.
WARNING:
The blade coming in contact with the workpiece before
it reaches full speed could cause the saw to “kickback”
toward you resulting in serious injury.
To stop the saw: release the switch trigger.
After you release the switch trigger, allow the blade to come
to a complete stop. Do not remove the saw from the
workpiece while the blade is moving.
ADJUSTING BLADE DEPTH
See Figure 10, page 15.
Always keep correct blade depth setting. Less than a full tooth
of the blade teeth should be visible below the workpiece.
More blade depth will increase the chance of kickback and
cause the cut to be rough. For more depth of cut accuracy,
a scale is located on the upper blade guard.
Loosen the depth adjustment knob.
Determine the desired depth of cut.
Locate the depth of cut scale on the back of the upper
blade guard.
Hold the base flat against the workpiece and raise or
lower the saw until the index point on the bracket aligns
with the notch on the blade guard.
Tighten the depth adjustment knob securely.

11
OPERATING THE SAW
See Figures 11 - 12, pages 14 - 15.
It is important to understand the correct method for operating
the saw. Refer to the figures in this section to learn the correct
and incorrect ways for handling the saw.
WARNING:
To make sawing easier and safer, always maintain proper
control of the saw. Loss of control could cause an
accident resulting in possible serious injury.
DANGER:
When lifting the saw from the workpiece, the blade is
exposed on the underside of the saw until the lower blade
guard closes. Make sure the lower blade guard is closed
before setting the saw down.
To make the best possible cut, follow these helpful hints.
Hold the saw firmly.
Avoid placing your hand on the workpiece while making
a cut.
Support the workpiece so that the cut (kerf) is always to
your side.
Support the workpiece near the cut.
Clamp the workpiece securely so that the workpiece will
not move during the cut.
Always place the saw on the workpiece that is supported,
not the “cut off” piece.
Place the workpiece with the “good” side down.
Draw a guideline along the desired line of cut before
beginning your cut.
CROSS CUTTING/RIP CUTTING
See Figure 13, page 16.
When making a cross cut or rip cut, align the line of cut with
the outer blade guide notch on the base.
Since blade thicknesses vary, always make a trial cut in scrap
material along a guideline to determine how much, if any, you
must offset the guideline to produce an accurate cut.
NOTE: The distance from the line of cut to the guideline is
the amount you should offset the guide.
RIP CUTTING WITHOUT AN EDGE GUIDE
See Figure 14, page 16.
Use a guide when making long or wide rip cuts with the
saw.
NOTE: You may also use an edge guide to make rip cuts.
Refer to Rip Cutting with the Optional Edge Guide later
in this manual.
OPERATION
Secure the workpiece.
Clamp a straight edge to the workpiece using
C-clamps.
Saw along the straight edge to achieve a straight rip
cut.
NOTE: Do not bind the blade in the cut.
BEVEL CUTTING
See Figure 15 - 16, page 16.
Align the line of cut with the inner blade guide notch on
the base when making 45° bevel cuts.
Make a trial cut in scrap material along a guideline to
determine how much you should offset the guideline on
the cutting material.
Adjust the angle of the cut to any desired setting between
zero and 45°. Refer to Adjusting the Bevel Setting.
ADJUSTING THE BEVEL SETTING:
Loosen the bevel lock .
Raise the motor housing end of the saw until you reach
the desired angle setting on the bevel angle scale.
Tighten the bevel adjustment lock knob securely.
WARNING:
Attempting a bevel cut without having the bevel adjust-
ment lock knob securely tightened can result in serious
injury.
BEVEL CUTTING:
Hold the saw firmly as shown.
Rest the front edge of the base on the workpiece.
Start the saw and let the blade reach full speed.
Guide the saw into the workpiece and make the cut.
Release the trigger and allow the blade to come to a
complete stop.
Lift the saw from the workpiece.
POCKET CUTTING
See Figure 17, page 16.
WARNING:
Always adjust bevel setting to zero before making a
pocket cut. Attempting a pocket cut at any other setting
can result in loss of control of the saw possibly causing
serious injury.
Adjust the bevel setting to zero.
Set the blade to the correct blade depth setting.
Swing the lower blade guard up using the lower blade
guard handle.
NOTE: Always raise the lower blade guard with the handle
to avoid serious injury.

12
OPERATION
Hold the lower blade guard by the handle.
WARNING:
Never extend your fingers while holding the lower blade
guard handle. Extending your fingers may result in
contact with the blade, causing serious injury.
Rest the front of the base flat against the workpiece with
the rear of the handle raised so the blade does not touch
the workpiece.
WARNING:
Always check to insure that your fingers are clear of the
blade before depressing the switch trigger. Contact with
the blade will cause serious injury.
Start the saw and let the blade reach full speed.
Guide the saw into the workpiece and make the cut.
WARNING:
Always cut in a forward direction when pocket cutting.
Cutting in the reverse direction could cause the saw to
climb up on the workpiece and back toward you.
Release the trigger and allow the blade to come to a
complete stop.
Lift the saw from the workpiece.
Clear corners out with a hand saw or sabre saw.
WARNING:
Never tie the lower blade guard in a raised position. Leav-
ing the blade exposed could lead to serious injury.
RIP CUTTING WITH THE OPTIONAL EDGE GUIDE
See Figure 18, page 16.
Use the optional edge guide (not included), part no. 670957005
when making long or wide rip cuts with the saw.
To assemble the edge guide:
Remove the battery pack from the saw.
Place edge guide through holes in base as shown in the
figure.
Adjust edge guide to the width needed.
Tighten edge guide lock knob securely.
To use edge guide:
Securetheworkpiece.
Position the face of the edge guide firmly against the edge
ofworkpiece.
Guide the saw along the edge to achieve a straight rip
cut.
NOTE: The guiding edge of the workpiece must be
straight for the cut to be straight. Use caution to prevent
the blade from binding in the cut.
ADJUSTMENTS
WARNING:
To prevent accidental starting that could cause serious
personal injury, always remove the battery pack from the
product when making adjustments.
0° BEVEL STOP
See Figure 19, page 16.
The saw has a 0° bevel stop that has been factory adjusted
to assure 0° angle of the saw blade plate when making 90°
cuts.
CHECKING 0° BEVEL STOP
Place the saw in an upside down position on a work-
bench.
Check the squareness of the saw blade plate to the base
of the saw using a carpenter’s square.
ADJUSTING 0° BEVEL STOP
Loosen bevel adjustment lock knob.
Loosen 7 mm hex nut.
Turn adjustment screw with Phillips screwdriver and
adjust base until it is square with the saw blade plate.
Tighten 7 mm hex nut, taking care not to move the adjust-
ment screw.
Tighten bevel adjustment lock knob securely.
WARNING:
Attempting a bevel cut without having the bevel adjust-
ment lock knob securely tightened can result in serious
injury.

13
WARNING:
Do not at any time let brake fluids, gasoline, petroleum-
based products, penetrating oils, etc., come in contact
with plastic parts. Chemicals can damage, weaken or
destroy plastic which may result in serious personal
injury.
Only the parts shown on the parts list are intended to be
repaired or replaced by the customer. All other parts should
be replaced at an Authorized Service Center.
BATTERY PACK REMOVAL AND PREPARATION
FOR RECYCLING
WARNING:
Upon removal, cover the battery pack’s terminals with
heavy-duty adhesive tape. Do not attempt to destroy or
disassemble battery pack or remove any of its compo-
nents. Batteries must be recycled or disposed of properly.
Also, never touch both terminals with metal objects and/
or body parts as short circuit may result. Keep away from
children. Failure to comply with these warnings could
result in fire and/or serious injury.
MAINTENANCE
WARNING:
When servicing, use only identical replacement parts.
Use of any other parts may create a hazard or cause
product damage.
WARNING:
Always wear eye protection with side shields marked to
comply with ANSI Z87.1. during maintenance or when
blowing dust. Failure to do so could result in objects
being thrown into your eyes resulting in possible serious
injury. If operation is dusty, also wear a dust mask.
WARNING:
To avoid serious personal injury, always remove the
battery pack from the product when cleaning or
performing any maintenance.
GENERAL MAINTENANCE
Avoid using solvents when cleaning plastic parts. Most
plastics are susceptible to damage from various types of
commercial solvents and may be damaged by their use. Use
clean cloths to remove dirt, dust, oil, grease, etc.
NOTE: FIGURES (ILLUSTRATIONS) START ON PAGE 14 AFTER
FRENCH AND SPANISH LANGUAGE SECTIONS.
ACCESSORIES
Look for these accessories where you purchased this product:
Edge Guide ............................................................................................................................................................670957005
WARNING:
Current attachments and accessories available for use with this product are listed above. Do not use any attachments
or accessories not recommended by the manufacturer of this product. The use of attachments or accessories not
recommended can result in serious personal injury.

2 — Français
TABLE DES MATIÈRES
Introduction ..................................................................................................................................................................... 2
Garantie ........................................................................................................................................................................... 2
Règles de sécurité générales .......................................................................................................................................3-4
Règles de sécurité particulières ...................................................................................................................................4-5
Symboles ......................................................................................................................................................................6-7
Caractéristiques .............................................................................................................................................................. 7
Assemblage ..................................................................................................................................................................8-9
Utilisation ....................................................................................................................................................................9-12
Réglages ........................................................................................................................................................................ 12
Entretien ........................................................................................................................................................................ 13
Accessoires ................................................................................................................................................................... 13
Figure numéros (illustrations) ....................................................................................................................................14-16
Commande de pièces / réparation ..................................................................................................................Pag. arrière
OUTILS ÉLECTRIQUES RYOBI® – GARANTIE LIMITÉE DE DEUX ANS ET POLITIQUE D’ÉCHANGE DE 30 JOURS
One World Technologies, Inc., garantit ses outils électriques dans les conditions suivantes :
POLITIQUE D’ÉCHANGE DE 30 JOURS : En cas de défaillance due à des vices de matériaux ou de fabrication au cours des 30
jours suivant la date d’achat, l’acheteur pourra faire réparer tout outil électrique RYOBI® au titre de cette garantie ou le retourner
l’établissement où il a été acheté. Pour obtenir un outil en échange ou demander la réparation en garantie, l’équipement
complet devra être retourné, dans son emballage d’origine, accompagné d’une preuve d’achat. L’outil fourni en échange sera
couvert par la garantie limitée pour le restant de la période de validité de deux ans à compter de la date d’achat
.
CE QUI EST COUVERT PAR LA GARANTIE : Cette garantie couvre tous les vices de matériaux et de fabrication de cet
outil électrique RYOBI®, pour une période de deux ans, à compter de la date d’achat. À l’exception des batteries, les
accessoires sont garantis pour une période de quatre-vingt-dix (90) jours. Les batteries sont garanties deux ans.
RÉPARATIONS SOUS GARANTIE : Il suffit de retourner l’outil, correctement emballé, en port payé, à un centre de
réparations agréé. L’adresse du centre de réparations agréé le plus proche peut être obtenue en contactant un représentant
du service après-vente par courrier, à l’adresse One World Technologies, Inc., P.O. Box 1207, Anderson, SC 29622-1207,
par téléphone au 1-800-525-2579 ou par courriel, à l’adresse Internet www.ryobitools.com. Lors de toute demande de
réparation sous garantie, une preuve d’achat datée (par exemple un reçu de vente) doit être fournie. Nous nous engageons
à réparer tous les défauts de fabrication et à réparer ou remplacer, à notre choix, toutes les pièces défectueuses. Les
réparations et remplacements seront gratuits. Les réparations sous garantie seront effectuées dans un délai raisonnable,
ne dépassant en aucun cas quatre-vingt-dix (90) jours.
CE QUI N’EST PAS COUVERT : La garantie ne couvre que l’acheteur au détail original et n’est pas transférable. Cette
garantie ne couvre que les défauts résultant d’une utilisation normale. Elle ne couvre pas les problèmes de fonctionnement,
défaillances ou autres défauts résultant d’un usage incorrect ou abusif, de la négligence, de la modification, de l’altération
ou de réparations effectuées par quiconque autre qu’un centre de réparations agréé. One World Technologies, Inc. ne fait
aucune autre garantie, représentation ou promesse concernant la qualité et les performances de cet outil électrique, autres
que celles expressément indiquées dans le présent document.
AUTRES LIMITATIONS : Toutes les garanties implicites accordées par les lois en vigueur, y compris les garanties de valeur
marchande ou d’adéquation à un usage particulier, sont limitées à une durée de deux ans, à compter de la date d’achat.
One World Technologies, Inc. déclinant toute responsabilité pour les dommages directs ou indirects, les limitations et
exclusions peuvent ne pas s’appliquer à chaque acheteur. Cette garantie donne au consommateur des droits spécifiques,
et celui-ci peut bénéficier d’autres droits, qui varient selon les états ou provinces.
INTRODUCTION
Cet produit offre de nombreuses fonctions destinées à rendre son utilisation plaisante et plus satisfaisante. Lors de la
conception de ce produit, l’accent a été mis sur la sécurité, les performances et la fiabilité, afin d’en faire un outil facile à
utiliser et à entretenir.
GARANTIE

3 — Français
Utiliser l’équipement de sécurité. Toujours porter
une protection oculaire. L’équipement de sécurité, tel
qu’un masque filtrant, chaussures de sécurité, casque ou
protection auditive, utilisé dans des conditions appropriées
réduira le risque de blessures.
Éviter les démarrages accidentels. S’assurer que le
commutateur est en position d’arrêt avant de brancher
l’outil. Porter un outil avec le doigt sur son commutateur ou
brancher un outil dont le commutateur est en position de
marche peut causer un accident.
Retirer les clés de réglage avant de mettre l’outil en
marche. Une clé laissée sur une pièce rotative de l’outil
peut causer des blessures.
Ne pas travailler hors de portée. Toujours se tenir bien
campé et en équilibre. Ceci permettra de mieux contrôler
l’outil en cas de situation imprévue.
Porter une tenue appropriée. Ne porter ni vêtements
amples, ni bijoux. Garder les cheveux, les vêtements
et les gants à l’écart des pièces en mouvement. Les
vêtements amples, bijoux et cheveux longs peuvent se
prendre dans les pièces en mouvement.
Si les outils sont équipés de dispositifs de dépoussiérage,
s’assurer qu’ils sont connectés et correctement utilisés.
L’usage de ces dispositifs peut réduire les dangers présentés
par la poussière.
Ne porter ni vêtements amples, ni bijoux. Attacher
ou couvrir les cheveux longs. Les vêtements amples,
bijoux et cheveux longs peuvent se prendre dans les ouïes
d’aération.
Ne pas utiliser l’outil sur une échelle ou un support
instable. Une bonne tenue et un bon équilibre permettent
de mieux contrôler l’outil en cas de situation imprévue.
UTILISATION ET ENTRETIEN DES OUTILS
MOTORISÉS
Ne pas forcer l’outil. Utiliser l’outil approprié pour
l’application. Un outil approprié exécutera le travail mieux
et de façon moins dangereuse s’il est utilisé dans les limites
prévues.
Ne pas utiliser l’outil si le commutateur ne permet pas
de le mettre en marche ou de l’arrêter. Tout outil qui ne
peut pas être contrôlé par son commutateur est dangereux
et doit être réparé.
Débrancher l’outil et/ou retirer le bloc de piles avant
d’effectuer des réglages, de changer d’accessoire ou
de remiser l’outil. Ces mesures de sécurité préventives
réduisent les risques de démarrage accidentel de l’outil.
Ranger les outils motorisés hors de la portée des enfants
et ne laisser personne n’étant pas familiarisé avec l’outil
ou ces instructions utiliser l’outil. Dans les mains de
personnes n’ayant pas reçu des instructions adéquates, les
outils sont dangereux.
Entretenir les outils motorisés. Vérifier qu’aucune pièce
mobile n’est mal alignée ou bloquée, qu’aucune pièce
n’est brisée et s’assurer qu’aucun autre problème ne
risque d’affecter le bon fonctionnement de l’outil. En cas
de dommages faire réparer l’outil avant de l’utiliser de
nouveau. Beaucoup d’accidents sont causés par des outils
mal entretenus.
Garder les outils bien affûtés et propres. Des outils
correctement entretenus et dont les tranchants sont bien
affûtés risquent moins de se bloquer et sont plus faciles à
contrôler.
AVERTISSEMENT !
Lire toutes les instructions. Le non-respect de toutes les
instructions ci-dessous peut entraîner un choc électrique, un
incendie et/ou des blessures graves. Le terme « outil motorisé »,
utilisé dans tous les avertissements ci-dessous désigne tout
outil fonctionnant sur secteur (câblé) ou sur piles (sans fil).
CONSERVER CES INSTRUCTIONS
SÉCURITÉ DU LIEU DE TRAVAIL
Garder le lieu de travail propre et bien éclairé. Les endroits
encombrés ou sombres sont propices aux accidents.
Ne pas utiliser d’outils électriques dans des atmosphères
explosives, par exemple en présence de liquides, gaz ou
poussières inflammables. Les outils électriques produisent
des étincelles risquant d’enflammer les poussières ou
vapeurs.
Garder les enfants et badauds à l’écart pendant
l’utilisation d’un outil motorisé. Les distractions peuvent
causer une perte de contrôle.
SÉCURITÉ ÉLECTRIQUE
Les fiches des outils électriques doivent correspondre
à la prise secteur utilisée. Ne jamais modifier la fiche,
de quelque façon que ce soit. Ne jamais utiliser
d’adaptateurs de fiche avec des outils mis à la terre. Les
fiches et prises non modifiées réduisent le risque de choc
électrique.
Éviter tout contact du corps avec des surfaces mises
à la terre, telles que tuyaux, radiateurs, cuisinières et
réfrigérateurs. Le risque de choc électrique est accru
lorsque le corps est mis à la terre.
Ne pas exposer les outils électriques à l’eau ou l’humidité.
La pénétration d’eau dans ces outils accroît le risque de choc
électrique.
Ne pas maltraiter le cordon d’alimentation. Ne jamais
utiliser le cordon d’alimentation pour transporter l’outil et
ne jamais débrancher ce dernier en tirant sur le cordon.
Garder le cordon à l’écart de la chaleur, de l’huile, des
objets tranchants et des pièces en mouvement. Un
cordon endommagé ou emmêlé accroît le risque de choc
électrique.
Pour les travaux à l’extérieur, utiliser un cordon
spécialement conçu à cet effet. Utiliser un cordon conçu
pour l’usage extérieur pour réduire les risques de choc
électrique.
Ne recharger les piles qu’avec le chargeur indiqué.
SÉCURITÉ PERSONNELLE
Rester attentif, prêter attention au travail et faire preuve
de bon sens lors de l’utilisation de tout outil motorisé. Ne
pas utiliser cet outil en état de fatigue ou sous l’influence
de l’alcool, de drogues ou de médicaments. Un moment
d’inattention pendant l’utilisation d’un outil motorisé peut
entraîner des blessures graves.
RÈGLES DE SÉCURITÉ GÉNÉRALES
MODÈLE BLOC-PILE CHARGEUR
CS120L CB120L (Li-Ion) CH120L,
C120D
CB120N (Ni-Cd) C120N, C120D

4 — Français
RÈGLES DE SÉCURITÉ GÉNÉRALES
RÈGLES DE SÉCURITÉ PARTICULIÈRES
Utiliser l’outil, les accessoires et embouts, etc.,
conformément à ces instrutions pour les applications pour
lesquelles ils sont conçus, en tenant compte des conditions
et du type de travail à exécuter. L’usage d’un outil motorisé
pour des applications pour lesquelles il n’est pas conçu peut
être dangereux.
UTILISATION ET ENTRETIEN DE LA BATTERIE
S’assurer que le commutateur est en position d’arrêt avant
d’insérer le bloc de piles. L’insertion du bloc de piles dans
un outil dont le commutateur est en position de marche peut
causer un accident.
Ne recharger qu’avec le chargeur spécifié par le fabricant.
Un chargeur approprié pour un type de batterie peut créer un
risque d’incendie s’il est utilisé avec un autre type de batterie.
Utiliser exclusivement le bloc de piles spécifiquement
indiqué pour l’outil. L’usage de tout autre bloc peut créer un
risque de blessures et d’incendie.
Lorsque le bloc de piles n’est pas en usage, le garder à
l’écart d’articles tels qu’attaches trombones, pièces de
monnaie, clous, vis et autres petits objets métalliques
risquant d’établir le contact entre les deux bornes. La mise
en court-circuit des bornes de piles peut causer des étincelles,
des brûlures ou un incendie.
En cas d’usage abusif, du liquide peut s’échapper des
piles. Éviter tout contact avec ce liquide. En cas de contact
accidentel, rincer immédiatement les parties atteintes avec
de l’eau. En cas d’éclaboussure dans les yeux consulter un
médecin. Le liquide s’échappant des piles peut causer des
irritations ou des brûlures.
DÉPANNAGE
Les réparations doivent être confiées à un technicien
qualifié, utilisant exclusivement des pièces identiques à
celles d’origine. Ceci assurera le maintien de la sécurité de
l’outil.
AVERTISSEMENT !
Pour réduire les risques de blessures, l’utilisateur doit lire le
manuel d’utilisation
Utiliser exclusivement des pièces identiques à celles
d’origine pour les réparations. Se conformer aux instructions
de la section Entretien de ce manuel. L’usage de pièces non
autorisées ou le non-respect des instructions peut présenter
des risques de choc électrique ou de blessures.
DANGER! Garder les mains à l’écart de la zone de coupe et
de la lame.
Ne pas passer les mains au-dessous de la pièce à couper.
La garde de lame n’offre aucune protection au-dessous de la
pièce à couper.
Régler la profondeur de coupe à l’épaisseur de la pièce de
travail. Moins d’une dent de lame complète doit être visible
sous la pièce de travail.
NE JAMAIS tenir une pièce en train d’être coupée à la main
ou posée sur la jambe. Il est essentiel de soutenir correcte-
ment la pièce à couper pour éviter les risques de coupure, de
blocage de la lame et de perte du contrôle.
Lorsque l’outil motorisé est utilisé pour un travail
risquant de le mettre en contact avec des fils électriques
cachés ou son propre cordon d’alimentation, le tenir par
les surfaces de prise isolées. En cas de contact avec un
fil sous tension, les parties métalliques exposées de l’outil
seraient mises sous tension, exposant l’opérateur à un choc
électrique.
Ne pas écraser faire tomber ou endommager le bloc de
piles. Ne jamais utiliser un bloc de piles ou un chargeur
qui est tombé, a été écrasé, a reçu un choc violent ou a
été endommagé de quelque façon que ce soit. Une batterie
endommagée risque d’exploser. Éliminer immédiatement toute
batterie endommagée, selon une méthode appropriée.
Pour la refente, toujours utiliser un guide longitudinal ou une
règle. Ceci accroît la précision de la coupe et réduit le risque
de blocage de la lame.
Toujours utiliser des lames de la taille correcte, dont le
trou d’axe est approprié (losange au lieu de rond). Une
lame incompatible avec la quincaillerie de montage de la scie
tournerait en faux rond, causant la perte du contrôle.
Ne jamais utiliser de rondelles ou boulons de lame incorrects
ou endommagés. Les rondelles et boulons de lame fournis
sont conçus spécialement pour assurer une efficacité et une
sécurité maximum.
CAUSES DU REBOND ET PRÉCAUTIONS À
PRENDRE :
Le rebond est une réaction soudaine, causée par une lame coincée,
bloquée ou mal alignée et projetant la scie hors de la pièce coupée
vers le haut, en direction de l’opérateur.
Lorsque la lame est pincée ou bloquée par la fermeture du trait
de coupe, elle se bloque et la force du moteur projette la scie en
direction de l’opérateur.
Si la lame dévie dans le trait de coupe, les dents de l’arrière risquent
de mordre la surface de la planche, causant la projection de la lame
hors du bois, en direction de l’opérateur.
Le rebond est causé par une utilisation et/ou des méthodes de
travail incorrectes et il peut être évité en prenant les précautions
suivantes :
Tenir fermement la scie à deux mains et positionner le
corps et les bras de manière à pouvoir résister à la force
du rebond. S’il prend les précautions nécessaires, l’opérateur
peut contrôler la force du rebond.
Si la lame se bloque ou si la coupe est interrompue pour une
raison quelconque, relâcher la gâchette et maintenir la lame
dans le trait de coupe jusqu’à ce qu’elle ait complètement
cessé de tourner. Pour éviter un rebond, ne jamais essayer
de retirer la scie de la pièce ou de la tirer en arrière pendant
que la lame est en rotation. Déterminer et éliminer la cause
du blocage de la lame.
Avant de remettre la scie en marche lorsqu’elle est engagée

5 — Français
RÈGLES DE SÉCURITÉ PARTICULIÈRES
dans le bois, centrer la lame dans le trait de scie et s’assurer
que les dents ne mordent pas dans le bois. Si la lame est
bloquée, elle peut causer un rebond et l’éjection de la pièce
lorsque la scie est remise en marche.
Soutenir les planches de grande taille afin d’éviter les risques
de pincement de la lame et de rebond. Les planches de grande
taille ont tendance à ployer sous leur propre poids. Des supports
doivent être placés sous la planche, de chaque côté, près du trait
de coupe et du bord de la planche.
Ne pas utiliser de lames émoussées ou endommagées.
Une lame émoussée ou incorrectement réglée produit un trait
de scie étroit, causant le pincement de la lame et le rebond.
Les leviers de réglage de profondeur et d’angle de coupe
doivent être fermement serrés et assujettis avant de
commencer la coupe. Si la lame se dérègle en cours de coupe,
elle peut se bloquer et causer un rebond.
Redoubler de prudence lors de la découpe d’évidements
dans des cloisons ou autres endroits sans visibilité. La lame
peut heurter des objets ou matériaux causant un rebond
.
La garde inférieure ne doit être rétractée manuellement
que pour des coupes spéciales telles que des coupes
d’évidement ou des coupes composées. Relever la garde
inférieure en rétractant la poignée et dès que la lame pénètre
la matériau, la garde inférieure doit être libérée. Pour toutes
les autres coupes, la garde inférieure doit fonctionner
automatiquement.
Toujours veiller à ce que la garde inférieure recouvre la
lame avant de poser la scie sur un établi ou sur le sol. Une
lame non protégée, tournant en roue libre cause un retour
de la lame, coupant tout sur son passage. Être conscient
du temps nécessaire à la lame pour s’arrêter après avoir
relâché le commutateur.
Avant chaque utilisation, s’assurer que la garde inférieure
se ferme correctement. Ne pas utiliser la scie si la garde ne
fonctionne pas librement ou ne se ferme pas instantanément.
Ne jamais bloquer la garde inférieure en position ouverte.
En cas de chute accidentelle de la scie, la garde inférieure
peut se déformer. Relever la garde inférieure, au moyen de
la poignée de rétraction vérifier qu’elle fonctionne librement
et ne touche ni la lame, ni aucune autre pièce, quel que soit
l’angle ou la profondeur de coupe.
Vérifier l’état et le fonctionnement du ressort de la garde
inférieure. Tout problème de fonctionnement de la garde
et du ressort doit être corrigé avant d’utiliser la scie.
Des pièces endommagées, des résidus gommeux et les
accumulations de débris peuvent ralentir le fonctionnement
de la garde inférieure.
Apprendre à connaître l’outil. Lire attentivement le manuel
d’utilisation. Apprendre les applications et les limites
de l’outil, ainsi que les risques spécifiques relatifs à son
utilisation. Le respect de cette consigne réduit les risques
d’incendie, de choc électrique et de blessures graves
.
Toujours porter une protection oculaire certifiée conforme
à la norme ANSI Z87.1. Si cette précaution n’est pas prise,
des objets peuvent être projetés dans les yeux et causer des
lésions graves.
Protection respiratoire. Porter un masque facial ou un
masque anti-poussière si le travail produit de la poussière.
Le respect de cette consigne réduit les risques de blessures
graves.
Protection auditive. Porter une protection auditive durant les
périodes d’utilisation prolongée. Le respect de cette consigne
réduit les risques de blessures graves.
Les outils fonctionnant sur piles n’ayant pas besoin d’être
branchés sur une prise secteur, ils sont toujours en état
de fonctionnement. Tenir compte des dangers possibles
lorsque l’outil n’est pas en usage et lors du remplacement
des piles. Le respect de cette consigne réduit les risques
d’incendie, de choc électrique et de blessures graves.
RÈGLES SUPPLÉMENTAIRES POUR LA SÉCURITÉ DU
FONCTIONNEMENT
Vérifier l’état des pièces. Avant d’utiliser l’outil de nouveau
examiner soigneusement les pièces et dispositifs de
protection qui semblent endommagés afin de déterminer
s’ils fonctionnent correctement et s’ils remplissent les
fonctions prévues. Vérifier l’alignement des pièces mobiles,
s’assurer qu’aucune pièce n’est bloquée ou cassée, vérifier
la fixation de chaque pièce et s’assurer qu’aucun autre
problème ne risque d’affecter le bon fonctionnement
de l’outil. Toute protection ou pièce endommagée doit
être correctement réparée ou remplacée dans un centre
de réparations agréé. Le respect de cette consigne réduit
les risques de choc électrique, d’incendie et de blessures
graves.
Inspecter la pièce et retirer les clous éventuels avant
d’utiliser cet outil. Le respect de cette consigne réduit les
risques de blessures graves.
Ne pas utiliser un outil sous l’influence de drogues, d’alcool
ou de médicaments. Le respect de cette consigne réduit
les risques de chocs électriques, d’incendie ou de blessures
graves.
Ne pas placer d’outils fonctionnant sur piles à proximité de
flammes ou d’une source de chaleur. Ceci réduit les risques
d’explosion et de blessures.
Les piles peuvent exploser en présence d’une source
d’allumage, telle qu’une veilleuse. Pour réduire les risques
de blessures graves, ne jamais utiliser un appareil sans fil, quel
qu’il soit, en présence d’une flamme vive. En explosant, une
batterie peut projeter des débris et des produits chimiques. En
cas d’exposition, rincer immédiatement les parties atteintes avec
de l’eau.
Ne pas recharger un outil fonctionnant sur piles dans un
endroit humide ou mouillé. Le respect de cette règle réduit
les risques de choc électrique.
Pour un résultat optimal, le piles de l’outil doivent être
rechargées dans un local où la température est de 10 à 38
°C (50 à 100 °F). Ne pas ranger l’outil à l’extérieur ou dans
un véhicule.
Si l’outil est utilisé de façon intensive ou sous des
températures extrêmes, des fuites de batterie peuvent se
produire. En cas de contact du liquide avec la peau, rincer
immédiatement la partie atteinte avec de l’eau savonneuse,
puis neutraliser avec du jus de citron ou du vinaigre. En
cas d’éclaboussure dans les yeux, les rincer à l’eau fraîche
pendant au moins 10 minutes, puis contacter immédiatement
un médecin. Le respect de cette consigne réduit les risques de
blessures graves.
Conserver ces instructions. Les consulter fréquemment et
les utiliser pour instruire les autres utilisateurs éventuels. Si cet
produit est prêté, il doit être accompagné de ces instructions.

6 — Français
Les termes de mise en garde suivants et leur signification ont pour but d’expliquer le degré de risques associé à l’utilisation
de ce produit.
SYMBOLE SIGNAL SIGNIFICATION
DANGER : Indique une situation extrêmement dangereuse qui, si elle n’est pas évitée,
aura pour conséquences des blessures graves ou mortelles.
AVERTISSEMENT : Indique une situation potentiellement dangereuse qui, si elle n’est pas
évitée, pourrait entraîner des blessures graves ou mortelles.
ATTENTION : Indique une situation potentiellement dangereuse qui, si elle n’est pas
évitée, pourraît entraîner des blessures légères ou de gravité modérée.
ATTENTION : (Sans symbole d’alerte de sécurité) Indique une situation pouvant entraîner
des dommages matériels.
Certains des symboles ci-dessous peuvent être présents sur le produit. Veiller à les étudier et à apprendre leur signification.
Une interprétation correcte de ces symboles permettra d’utiliser l’outil plus efficacement et de réduire les risques.
SYMBOLE NOM DÉSIGNATION / EXPLICATION
Symbole d’alerte de sécuritét Précautions destinées à assurer la sécurité.
Lire le manuel d’utilisation
Pour réduire les risques de blessures, l’utilisateur doit lire et
veiller à bien comprendre le manuel d’utilisation avant d’utiliser
ce produit.
Protection oculaire Toujours porter une protection oculaire certifiée conforme à la
norme ANSI Z87.1 lors de l’utilisation de produit
Symbole Garder les mains
à l’écart
Le non respect de cette mise en garde peut entraîner des
blessures graves.
Avertissement concernant
l’humidité Ne pas exposer l’outil à la pluie ni à l’humidité.
V Volts Tension
Hz Hertz Fréquence (cycles par seconde)
W Watt Power
min Minutes Heure
Courant continu Type ou caractéristique du courant
…/min Par minute Tours, coups, vitesse périphérique, orbites, etc., par minute
SYMBOLES

7 — Français
Certains des symboles ci-dessous peuvent être présents sur le produit. Veiller à les étudier et à apprendre leur signification.
Une interprétation correcte de ces symboles permettra d’utiliser l’outil plus efficacement et de réduire les risques.
SYMBOLE NOM DÉSIGNATION / EXPLICATION
Li - Ion
Symbole recycler
Ce produit utilise les piles de nickel-cadmium (Ni-Cd) ou lithium-
ion (Li-ion). Les réglementations locales ou gouvernementales
peuvent interdire de jeter les piles dans les ordures ménagères.
Consulter les autorités locales compétentes pour les options
de recyclage et/ou l’élimination.
AVERTISSEMENT :
La poussière dégagée lors du ponçage, sciage, meulage, perçage de certains matériaux et lors d’autres opérations
de construction contient des produits chimiques reconnus causer le cancer, des malformations congénitales ou des
lésions de l’appareil reproducteur. Voici certains exemples de ces produits chimiques :
• le plomb contenu dans la peinture au plomb,
• la silice cristalline contenue dans les briques, le béton et d’autres produits de maçonnerie, ainsi que
• l’arsenic et le chrome contenus dans le bois de construction traité par produits chimiques.
Le risque présenté par l’exposition à ces produits varie en fonction de la fréquence de ce type de travail. Pour réduire
l’exposition à ces produits chimiques : travailler dans un endroit bien aéré et utiliser des équipements de sécurité
approuvés tels que masques antipoussière spécialement conçus pour filtrer les particules microscopiques.
CARACTÉRISTIQUES
FICHE TECHNIQUE
Moteur ................................................................. 12 V C.C.
Diamètre de la lame..............................85,7 mm (3-3/8 po)
Axe de lame ..............................................................15 mm
Profondeur de coupe à 0° ................. 28,23 mm (15/16 po)
Profondeur de coupe à 45° ................... 19,05 mm (3/4 po)
Vitesse à vide ........................................2 000 r/min (RPM).
POUR SE FAMILIARISER AVEC LA SCIE
CIRCULAIRE
Voir la figure 1, page 14.
La sécurité d’utilisation de ce produit exige la compréhension
des informations apposées sur l’outil et contenues dans ce
manuel d’utilisation, ainsi que la connaissance du travail à
exécuter. Avant d’utiliser ce produit, se familiariser avec toutes
ses fonctions et règles de sécurité.
BOUTON DE RÉGLAGE DE BISEAU
Ce dispositif permet d’effectuer des coupes en biseau de
0 à 45º.
RANGEMENT DE CLÉ DE LAME
Rangement commode permettant de changer de lame
rapidement.
BOUTON DE RÉGLAGE DE PROFONDEUR
Régler la bouton de coupe pour l’action de coupe la plus
efficace, 0 - 28,23 mm (0 po à 15/16 po).
BOUTON DE VERROUILLAGE
Cette scie est équipée d’un bouton de verrouillage pour
réduire le risque de démarrage accidentel.
BOUTON DE VERROUILLAGE DE BROCHE
Le bouton de verrouillage de broche permet de bloquer la
lame lors du serrage ou du desserrage de sa vis.
ÉCHELLE DE LARGEUR DE COUPE
Lors des coupes transversales et longitudinales, cette échelle
peut êtr utilisée pour mesurer jusqu’a 69 mm (2-3/4 po) à droite
de la lame et 25 mm (1 po) à gauche de la lame.
SYMBOLES

8 — Français
DÉBALLAGE
Cet produit doit être assemblé.
Avec précaution, sortir l’outil et les accessoires de la
boîte. S’assurer que toutes les pièces figurant sur la liste
de contrôle sont incluses.
AVERTISSEMENT :
Ne pas utiliser le produit si, en le déballant, vous con-
statez que des éléments figurant dans la liste de contrôle
d’expédition sont déjà assemblés. Certaines pièces
figurant sur cette liste n’ont pas été assemblées par le
fabricant et exigent une installation. Le fait d’utiliser un
produit qui a été assemblé de façon inadéquate peut
entraîner des blessures.
Examiner soigneusement l’outil pour s’assurer que rien
n’a été brisé ou endommagé en cours de transport.
Ne pas jeter les matériaux d’emballage avant d’avoir
soigneusement examiné l’outil et avoir vérifié qu’il
fonctionne correctement.
Si des pièces sont manquantes ou endommagées,
appeler le 1-800-525-2579.
LISTE DE CONTRÔLE
Scie circulaire
Lame de 3-3/8 po
Clé de lame
Manuel d’utilisation
AVERTISSEMENT :
Si des pièces manquent ou sont endommagées, ne pas
utiliser cet outil avant qu’elles aient été remplacées. Ne pas
prendre cette précaution pourrait entraîner des blessures
graves.
AVERTISSEMENT :
Ne pas essayer de modifier cet produit ou de créer des
accessoires non recommandés pour l’produit. De telles
altérations ou modifications sont considérées comme un
usage abusif et peuvent créer des conditions dangereuses,
risquant d’entraîner des blessures graves.
AVERTISSEMENT :
Pour empêcher un démarrage accidentel pouvant entraîner
des blessures graves, toujours retirer le batterie de l’produit
avant d’assembler des pièces.
ASSEMBLAGE
INSTALLATION DE LA LAME
Voir la figure 2, page 14.
AVERTISSEMENT :
La taille maximum de lame pouvant être utilisée sur cette
scie est de 85,7 mm (3-3/8 po). Ne jamais utiliser une lame
trop épaisse pour permettre à la rondelle extérieure de la
lame de s’engager sur les méplats de la broche. Des lames
de plus grand diamètre toucheraient la garde et des lames
trop épaisses ne pourraient pas être maintenues sur la
broche par le boulon. Ces deux situations peuvent causer
un accident grave.
Retirer le bloc de piles de la scie.
Retirer la clé de lame (clé hexagonale de 4 mm) du
compartiment de rangement.
Appuyer sur le bouton de verrouillage de la broche retirer
le boulon de lame et la rondelle extérieure.
NOTE : Tourner le boulon de lame vers la droite pour le
retirer.
ATTENTION :
Pour éviter des dommages à la broche et à son verrouillage,
toujours laisser le moteur s’arrêter complètement avant
d’engager le verrouillage.
NOTE : Ne pas utiliser la scie circulaire avec le verrouillage
de broche engagé.
Appliquer une mince couche d’huile sur la surface de contact
des rondelles intérieure et extérieure avec la lame.
AVERTISSEMENT :
Si la rondelle de lame intérieure a été retirée, la remettre en
place avant d’installer la lame sur la broche. L’absence de
cette pièce pourrait causer un accident, car la lame ne serait
pas correctement serrée.
Faire pivoter le protège-lame inférieur afin qu’il n’encombre
pas.
Engager la lame dans la garde inférieure et sur la broche.
NOTE : Les dents doivent être orientées vers le haut à l’avant
de la scie.
Remettre la rondelle de lame extérieure en place.
Appuyer sur le bouton de verrouillage de la broche et réin-
staller le boulon de lame. Serrer fermement le bouton en le
tournant vers la gauche.
Retirer la clé de lame de son compartiment.
Page is loading ...
Page is loading ...
Page is loading ...
Page is loading ...
Page is loading ...
Page is loading ...
Page is loading ...
Page is loading ...
Page is loading ...
Page is loading ...
Page is loading ...
Page is loading ...
Page is loading ...
Page is loading ...
Page is loading ...
Page is loading ...
Page is loading ...
Page is loading ...
Page is loading ...
Page is loading ...
Page is loading ...
Page is loading ...
-
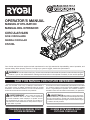 1
1
-
 2
2
-
 3
3
-
 4
4
-
 5
5
-
 6
6
-
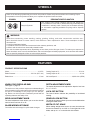 7
7
-
 8
8
-
 9
9
-
 10
10
-
 11
11
-
 12
12
-
 13
13
-
 14
14
-
 15
15
-
 16
16
-
 17
17
-
 18
18
-
 19
19
-
 20
20
-
 21
21
-
 22
22
-
 23
23
-
 24
24
-
 25
25
-
 26
26
-
 27
27
-
 28
28
-
 29
29
-
 30
30
-
 31
31
-
 32
32
-
 33
33
-
 34
34
-
 35
35
-
 36
36
-
 37
37
-
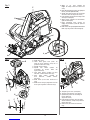 38
38
-
 39
39
-
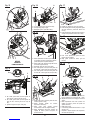 40
40
-
 41
41
-
 42
42


Ask a question and I''ll find the answer in the document
Finding information in a document is now easier with AI
in other languages
- français: Ryobi CS120L Manuel utilisateur
- español: Ryobi CS120L Manual de usuario