MODEL# SLD "SNAP - LOCK"
IN-POOL DECK LADDER
IMPORTANT INSTRUCTIONS: Read all instructions carefully & completely to become familiar with
parts, assembly, safety and proper use of this product. Failure to follow these instructions
may result in serious personal injury. SWIM RESPONSIBLY & SAFELY !
TOOLS REQUIRED: 7/16" socket, nut driver & wrench, measuring tape, Phillips (star) screwdriver,
1/8" + 1/4" drill bits & drill, pencil or marker, rubber mallet and a hole saw.
SAFETY INSTRUCTIONS & PROPER USE - ASSEMBLY & INSTALLATION
• This pool ladder has a 300 lb load capacity - one person - when properly assembled & installed
• This pool ladder is designed & intended for use with an above ground pool only and for pool
decks measuring a maximum of 60" high (from the floor of the pool to the floor of the deck)
• Your pool has shallow water - absolutely NO DIVING or NO JUMPING into the pool
• This product conforms to the latest revisions of the ANSI/APSP/ICC recommended standards
for above ground / on ground swimming pool ladders
• For entry & exit of the pool, face ladder at all times. Utilize handrails for safe climbing
• Warning: To prevent entrapment or drowning, do not swim through, behind or around ladder
• Locate ladder solidly on bottom / floor of pool and free from high traffic areas on your pool
deck. Use of a ladder pad is highly recommended to protect pool liner
• Ladder must be secured to pool deck for stability & safety as outlined in this assembly manual
• Keep all ladder parts free from obstructions to avoid possible injury. Do not secure any items to
the ladder. Such objects (eg. thermometers, play toys, ropes) may create a potential for
tripping or entrapment
• NEVER ALLOW CHILDREN TO SWIM UNATTENDED - Nothing replaces parental supervision
• Assemble & install this pool ladder as per the manufacturer’s instructions. Do not deviate from
these instructions
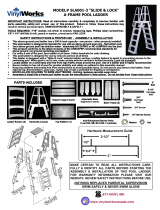
IDENTIFY PARTS
MAKE CERTAIN TO READ ALL INSTRUCTIONS CAREFULLY &
IDENTIFY ALL PARTS BEFORE STARTING THE ASSEMBLY &
INSTALLATION OF THIS POOL LADDER. FOR WARRANTY
INFORMATION PLEASE VISIT OUR WEBSITE. REVIEW SAFETY
INSTRUCTIONS BEFORE USE TO PREVENT INJURY.
FOR ALL REPLACEMENT PARTS VISIT OUR WEBSITE
WWW.VINYLWORKSCANADA.COM
877-VINYL WK
www.vinylworkscanada.com
MODEL # SLD
RIGHT
SUPPORT
LEG
LEFT
SUPPORT
LEG
Identify all parts (ladder & hardware) to make certain you have everything and that they are
free of any damage. Contact manufacturer without delay if something is missing or damaged.
Note: for part identification
and assembly, LEFT & RIGHT
are always determined as if
you are facing the ladder
about to climb.
TREADS
x 6
TREAD
LOCK PINS
BASE
TREAD
x 2
DECK
MOUNT
FLANGE
LEFT
HANDRAIL
RIGHT
HANDRAIL
x 4