Sharp MXM4071 Operating instructions
- Category
- Multifunctionals
- Type
- Operating instructions

Box Connector Guide

2
Box Connector Guide
TABLE OF CONTENTS
ABOUT THIS GUIDE
This guide explains the functions of "Box Connector" such as uploading scanned data and printing files from the cloud,
which become possible by linking the machine with the online storage service "Box" provided by Box, Inc.
Please note
• This guide assumes that the persons who install and use this product have a working knowledge of their computer
and web browser.
• For information on your operating system or web browser, please refer to your operating system guide or web browser
guide, or the online Help function.
• The explanations of screens and procedures are primarily for Internet Explorer
®
. The screens may vary depending on
the version of the operating system or the software application.
• Wherever "MX-xxxx" appears in this guide, please substitute your model name for "xxxx".
• Considerable care has been taken in preparing this guide. If you have any comments or concerns about the guide,
please contact your dealer or nearest authorized service representative.
• This product has undergone strict quality control and inspection procedures. In the unlikely event that a defect or other
problem is discovered, please contact your dealer or nearest authorized service representative.
• Aside from instances provided for by law, SHARP is not responsible for failures occurring during the use of the
product or its options, or failures due to incorrect operation of the product and its options, or other failures, or for any
damage that occurs due to use of the product.
Warning
• Reproduction, adaptation or translation of the contents of the guide without prior written permission is prohibited,
except as allowed under copyright laws.
• All information in this guide is subject to change without notice.
Illustrations, the operation panel, the touch panel, and the Web page setup screen shown in
this guide
The peripheral devices are generally optional. However, some models include certain peripheral devices as standard
equipment.
For some functions and procedures, the explanations assume that devices other than the above are installed.
Depending on the content, and depending on the model and what peripheral devices are installed, this may not be
usable. For details, refer to the User’s Manual.
Box and the Box logo are trademarks or registered trademarks of Box, Inc.
ABOUT THIS GUIDE . . . . . . . . . . . . . . . . . . . . . . . . . . . . . . . . . . . . . . . . . . . . . . . . . . . . . . . . . . . . . . . . . . . . . . . . . . . . . . . . . . . 2
BEFORE USING Box Connector . . . . . . . . . . . . . . . . . . . . . . . . . . . . . . . . . . . . . . . . . . . . . . . . . . . . . . . . . . . . . . . . . . . . . . . . . 4
USING Box Connector . . . . . . . . . . . . . . . . . . . . . . . . . . . . . . . . . . . . . . . . . . . . . . . . . . . . . . . . . . . . . . . . . . . . . . . . . . . . . . . . . 5
The display screens, messages, and key names shown in the guide may differ from those on the actual machine due
to product improvements and modifications.
The information described in the guide assume a full-color multifunction machine is being used.
Some contents may not be available on a monochrome multifunction machine.

3
Box Connector Guide
Cautions when using the Box Connector function
• Print results using the Box Connector function may not have the same quality as print results using other print
methods (printer driver, etc.).
The contents of some files may cause incorrect printing or prevent printing.
• It may not be possible to use some or all Box Connector functions in some countries or regions where the machine is used.
• It may not be possible to use the Box Connector function in some network environments. Even when the Box
Connector function can be used, processing may require a longer time or may be interrupted.
• We do not extend any guarantees regarding the continuity or connection stability of the Box Connector function.
With the exception of instances provided for by law, we bear absolutely no responsibility for any damages or loss
suffered by the customer due to the above.

4
Box Connector Guide
BEFORE USING Box Connector
Before using Box Connector, the Box Connector application must be installed on the multifunction machine.
For how to install the Box Connector application, please contact your dealer or nearest authorized service representative.
Basic requirements and system requirements for Box Connector
Initial value settings on Box Connector
Click the [Detail] key on the page which will have been displayed after selecting
Box Connector
from the [System Settings]
→ [Sharp OSA Settings] → [Embedded Application Settings] under the "Setting (Administrator)" to configure the following
items.
Import or export the initial value file
The following explains how to export the initial values used on a Box Connector which a multifunction machine is using
in order to use them on another Connector that is on the other machine, and how to import an exported file which
contains an initial value setting.
Select Box Connector from the [
System Settings
] → [
Sharp OSA Settings
] → [
Embedded Application Settings
] under the
"Setting (Administrator)".
Import the initial value file to register the following items in the detailed settings of the Box Connector.
Item Description
Multifunction machine Sharp OSA (MX-AMX2) Required
Port Control The following ports are enabled.
•
Server Port:
Sharp OSA (Extended Platform): HTTP
• Client Port: HTTPS
Direct Print Expansion Kit Required when printing xlsx, docx, and pptx files.
Other Network Settings Change the settings such as the IP Address, Subnet Mask,
Default Gateway, DNS server, and Proxy Server as
necessary.
Item Description
File Name Sets the initial value of the scan data File Name to store.
Include Date in File Name Sets whether the date and time is included with the File Name.
Item Description
Items which Box
Connector exports
File Name Specify the initial value for the scan data File Name to store.
Include Date in File Name Sets whether the date and time is included with the File Name.

5
Box Connector Guide
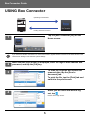
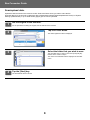
USING Box Connector
1
Tap the [Box Connector] key on the
Home screen.
If you cannot find the Box Connector icon on the Home Screen, register the Box Connector to the Home Screen in the
Home Screen Settings of the machine System Settings.
2
When the Box login screen is displayed, enter the login e-mail address and
password, and tap the [OK] key.
3
To scan the originals and upload the
scanned data, tap the [Scan a
document] tab.
To print the file, tap the [Print] tab and
switch to the print screen.
4
When you are done and wish to log
out, tap .
Returns to the login screen.
Printing data from the cloud
Uploading scanned data
Box
Toner
Quantity
Bk
C
M
Y
Operation
Guide
Enlarge
Display Mode
Settings Total Count Brightness
Adjustment
Job Status
File Name
Auto
200x200
PDF
Middle
Auto
1-Sided
Preview CA
Start
Scan a document Print
Folder Name
Duplex Setup
1-Sided Portrait
LandscapeTablet
Book
Image Orientation
MX-xxxx_20201010_101010
User
File Name
Auto
200x200
PDF
Middle
Auto
1-Sided
Preview CA
Start
Scan a document Print
Folder Name
Duplex Setup
1-Sided Portrait
LandscapeTablet
Book
Image Orientation
User
MX-xxxx_20201010_101010

6
Box Connector Guide
Print data
Select the files that you wish to print.
Up to 10 files can be printed simultaneously. Up to 16 print jobs can be reserved.
1
In the screen displayed after login,
switch to the print screen and select
the folder that contains the file that
you wish to print.
The files that are in the folder are displayed.
2
Tap the files that you wish to print.
Print settings can be changed from the menu on the right
side of the screen.
3
Tap the [Start] key.
The selected file will be printed.
User
User

7
Box Connector Guide
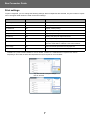
Print settings
To print a single file, you can change the following settings. When multiple files are selected, only the number of copies
can be changed. Initial values are used for the other settings.
* Installation of an inner finisher, a finisher or a saddle finisher is required to use "Staple Sort".
Installation of a punch module in addition to an inner finisher, a finisher or a saddle finisher is required to use "Punch".
Depending on the model, the Direct Print Expansion Kit may be required to use "Print What".
Item Initial values Description
No. of copies 1 1 to 9999 copies can be set.
Paper Size Auto Set the print size.
2-Sided Print Off Specify 2-sided printing.
N-Up Printing Off Specify N-Up Printing.
Staple Sort
*
Off Specify staple sorting.
Sort/Group Off Sorting and groups for output can be set.
Punch
*
Off Specify punching.
Print What
*
Selected Sheet Only displayed when printing an Excel file. Select whether to
print one sheet within a workbook or the entire workbook.
Fit To Page On Print with the file expanded to the full paper size.
B/W Print Off Prints the file in black and white.
User
User
Tap ▼ to view all of the print settings
that can be used.

8
Box Connector Guide
Scan/upload data.
Upload the data scanned on the machine to Box. Select the folder where you want to store the file.
Scanned data up to the size set in "Maximum Size of Data Attachments(FTP/Desktop/Network Folder)" of System
Settings (Administrator) or up to 9999 sheets (pages) per file can be uploaded.
1
Set the original in the machine.
For the procedure for setting the original, see the manual of the machine.
2
Tap the Folder Name.
The folder registered in Box is displayed.
3
Select the folder that you wish to save.
Tap the folder that you wish to save and tap the [OK] key.
Returns to the screen of step 2.
The name of the selected folder is displayed as the folder
name.
4
Tap the [Start] key.
The selected file will be scanned.
File Name
Auto
200x200
PDF
Middle
Auto
1-Sided
Preview CA
Start
Scan a document Print
Folder Name
Duplex Setup
1-Sided Portrait
LandscapeTablet
Book
Image Orientation
MX-xxxx_20201010_101010
User
User
File Name
CA
Scan a document Print
Folder Name
Duplex Setup
Us
Us
s
Us
N
N
N
ame
Scan a
S
Scan a
Scan a
docum
docum
docum
ent
ent
ent
Print
P
P
r
r
n
Print
Print
e
e
er
r
r
r
r
r
Name
Name
Name
e
e
ex
x
x
x
Setup
etup
p
Stored to
Folder Name

9
Box Connector Guide
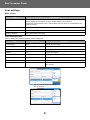
Scan settings
Base screen
Scan setting screen
When scanning, the following settings can be configured.
Item Description
File Name Sets the file name.
Initially, displays the "File Name" set in the detailed settings of Box Connector.
Displays the scanned date and time in the File Name entry box when the "Include Date in File
Name" is enabled.
Folder Name Sets the folder to store a file.
Duplex Setup Performs the settings for a 2-sided scanning.
Image Orientation Sets the orientation of the image.
Item Initial values Description
Colour Mode Auto Specify the color mode.
Resolution 200 dpi Specify the resolution.
File Format PDF Set the file format of the data to be saved.
Original Auto Specify the originals.
Exposure Auto Specify the density of the image.
Job Build Off Set the use of Job Build.
Blank Page Skip Off Set the use of Blank Page Skip.
Preview - A preview of the scanned data is displayed before the originals
are scanned.
User
File Name
Auto
200x200
PDF
Middle
Auto
1-Sided
Preview CA
Start
Scan a document Print
Folder Name
Duplex Setup
1-Sided Portrait
LandscapeTablet
Book
Image Orientation
User
File Name
Auto
200x200
PDF
Middle
Auto
Auto
1-Sided
Off
Job Build
Off
Scan a document Print
Folder Name
Duplex Setup
1-Sided Portrait
LandscapeTablet
Book
Image Orientation
Tap ▼ to view all of the scan settings
that can be used.

2020J-EN2
-
 1
1
-
 2
2
-
 3
3
-
 4
4
-
 5
5
-
 6
6
-
 7
7
-
 8
8
-
 9
9
-
 10
10


Sharp MXM4071 Operating instructions
- Category
- Multifunctionals
- Type
- Operating instructions
Ask a question and I''ll find the answer in the document
Finding information in a document is now easier with AI
Related papers
-
Sharp BOX User guide
-
Sharp MX7090N Owner's manual
-
Sharp MX-M905 Operating instructions
-
Sharp MXM6570 Operating instructions
-
Sharp MX-M4071 Operating instructions
-
Sharp MX-7580N Owner's manual
-
Sharp MXM5070 Operating instructions
-
Sharp MX7081 Operating instructions
-
Sharp MX-6070N Operating instructions
-
Sharp MX-5070V Operating instructions