Chamberlain MyQ-G0201 User manual

Type
User manual

This manual is also suitable for

MyQ Garage
TM
Universal Smartphone
Garage Door Controller
USER’S GUIDE
(affi x serial number label)
Serial Number
2
To reduce the risk of SEVERE INJURY to persons:
DO NOT enable the Chamberlain Universal Smartphone Garage Door Controller if
operating either one-piece or swinging doors. To be enabled ONLY on a sectional
door.
Read instructions thoroughly BEFORE beginning.
If using this product with residential door openers, this product
must be used only with door openers manufactured after 1993 that
utilize photoelectric sensors. The photoelectric sensors are always
located on or near the bottom of the door track.
STOP
WHAT'S IN THE BOX
Wi-Fi Hub
Door Sensor
Power Supply
Hardware for Wi-Fi Hub
(5/32", long screws)
Bracket for Wi-Fi Hub
Hardware for Door Sensor
(5/32", short screws)
Fastening Strips for
Door Sensor
User’s Guide
Warning Placard
NOTE: The Wi-Fi hub can control up to 2 garage doors, however an additional door
sensor is required. Follow the instructions included with the new door sensor for
programming instructions.
3
BEFORE STARTING YOU MUST HAVE...
A mobile device, used during setup
Router with Wi-Fi
®
Broadband Internet Connection
Wi-Fi Hub Serial Number (located in this User's Guide and on the Wi-Fi Hub)
Compatible Garage Door Opener (www.chamberlain.com/MyQGarage)
Make sure your mobile device is connected to the Wi-Fi network.
Make sure there is a strong Wi-Fi
®
signal in the garage where the Wi-Fi Hub will
be mounted. To verify, place your mobile device in the location where the Wi-Fi
Hub will be installed. You mobile device should display two or more bars. If not,
move the router closer to the garage or purchase a Wi-Fi range extender (refer to
the Help section of this User's Guide).
Wi-Fi Hub
Door Sensor
The LEDs are visible
when directly facing
the Wi-Fi Hub.
Light
Blue LED
Green LED
Yellow LED
LED
Test Button
4
MyQ
Wi-Fi
Home
MyQ
Bluetooth Devices
My Car
i
i
Blue LED
OR
Select MyQ
1
CONNECT TO NETWORK
Make sure the Wi-Fi signal in the garage is strong and your mobile device is
connected to your home Wi-Fi network.
Connect with mobile device
1. Plug in the Wi-Fi Hub. The blue LED will blink, the Wi-Fi Hub is ready to be
connected to your home Wi-Fi network.
2a. iPhone
®
or iPod touch
®
*: Go to Settings > Bluetooth
®
and turn on Bluetooth.
Select the Bluetooth device with the "MyQ" prefi x. Click "Allow" to share Wi-Fi
settings then proceed to App store to download MyQ App.
OR
2b. All other mobile devices: Go to settings, select Wi-Fi, then select the network with
the “MyQ” prefi x and select connect. Once connected, launch the mobile device's
web browser and go to "setup.myqdevice.com". Follow the on-screen instructions
to connect to your home network and download the App.
NOTE: Do not operate the garage door opener until installation has been completed.
3. If the green LED is glowing solid, proceed to step 2 Installation. If the green LED is
not glowing solid, repeat the steps above or proceed to Alternate Method: Connect
with WPS (Wi-Fi Protected Setup).
*Made for:
iPhone 3GS, iPhone 4, iPhone 4S, and iPhone 5
iPod touch (4th and 5th generation)
5
ALTERNATE METHOD: Connect with WPS (Wi-Fi Protected Setup)
If your router is using WEP security setting, change it to WPA or WPA2.
1. Plug in the Wi-Fi Hub. The blue LED will blink, the Wi-Fi Hub is ready to be
connected.
2. Press and release the BUTTON on the Wi-Fi Hub. The blue LED will turn solid.
3. Press the router’s WPS button to activate WPS mode. It may take a few minutes for
the Wi-Fi Hub to connect to the router. The Wi-Fi Hub’s green LED will turn solid
when the Wi-Fi Hub is connected to your network.
4. Download the Chamberlain MyQ
®
Home Control App from the App Store or Google
Play. NOTE: Do not operate the garage door opener until installation has been
completed.
5. If the green LED is glowing solid, proceed to step 2 Installation.
Blue LED
WPS Mode
BUTTON
6
INSTALLATION
2
1. Choose a location to install the Wi-Fi Hub:
Wi-Fi Hub light MUST be visible if you're standing in the doorway of the garage
Wi-Fi Hub MUST be a minimum of two feet away from the garage door opener
2. Place the Wi-Fi Hub in its mounting location, plug it in, and verify the Green LED
turns on solid. NOTE: If the Green LED does not turn on solid, move the router
closer to the garage or install a Wi-Fi range extender.
3. Use the Wi-Fi Hub bracket as a template to drill 5/32" pilot holes. Attach the bracket.
Slide the Wi-Fi Hub onto the bracket.
4. Attach the door sensor vertically on the top panel of the garage door using
fastening strips or screws (provided).
5. Attach the warning placard to the wall next to the door control.
Wi-Fi Hub
(ceiling)
(mounting area)
Door Sensor (with screws)
“TOP” MUST always
face UP
Press
Door Sensor
“TOP” MUST always face UP
Fastening
Strips
Warning
Placard
Door Control
7
The Wi-Fi Hub will not connect.
Use your mobile device to verify there is a strong Wi-Fi signal in the garage near the
Wi-Fi Hub. If the Wi-Fi signal strength is weak, the connection may fail. If there is
weak or no signal, move the router closer to the garage or install a Wi-Fi extender.
iPhone
®
or iPod touch
®
: Go to Settings > Bluetooth
®
and forget the MyQ
®
device.
Repeat the steps or try connecting using the alternate method (WPS).
All other mobile devices: If blue LED is not blinking, reset the Wi-Fi Hub to factory
default then repeat the steps or try connecting using the alternate method (WPS).
Alternate Method (WPS): If the blue LED on the Wi-Fi Hub is fl ashing, repeat the
alternate method or try connecting with a mobile device. If the blue and green LEDs
are fl ashing, reset the Wi-Fi Hub, then try connecting with a mobile device.
Reset the Wi-Fi Hub to Factory Default
1. Press and hold the BUTTON on the Wi-Fi Hub until the blue LED blinks.
2. While the blue LED is blinking, press and hold the BUTTON again until the blue
LED pauses then blinks. The Wi-Fi Hub is set to factory default.
What are the buttons on the Wi-Fi Hub for?
The BUTTON is used to reset the Wi-Fi Hub to factory default. Button 1 and 2 are
used to program compatible remote controls and other compatible accessories. For
additional information go to the help section in the App.
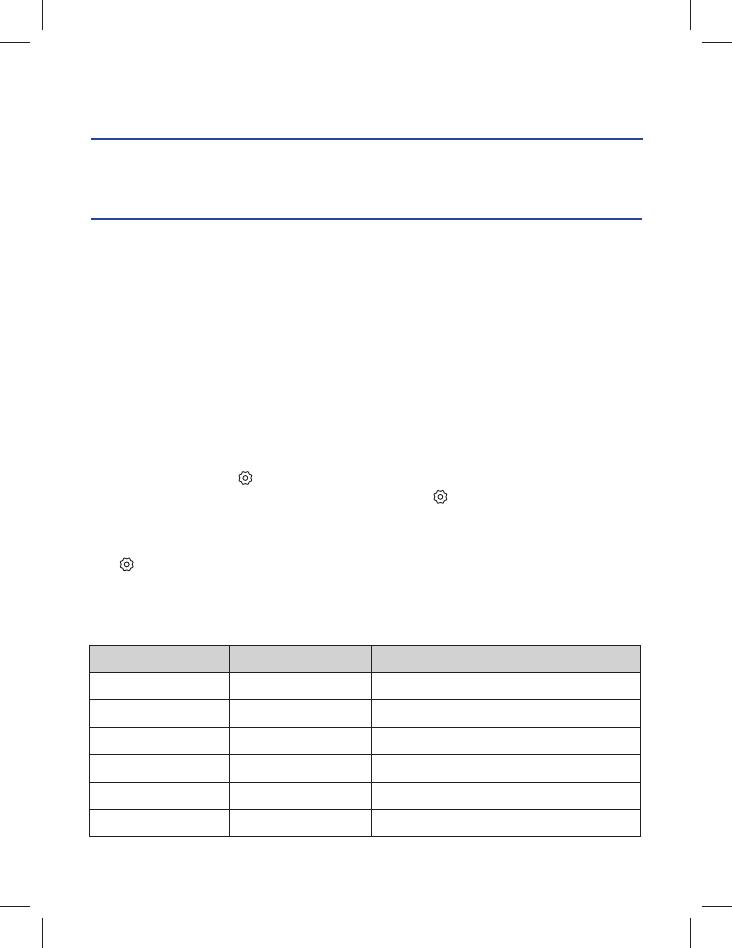
What do the LEDs on the Wi-Fi Hub mean?
NEED HELP?
LED COLOR LED STATE WI-FI HUB STATUS
Blue Blinking Wi-Fi needs to be setup
Green and Blue Blinking NO router communication
Blue
Solid
Wi-Fi setup active
Green Blinking
Internet connection failed
Yellow and Green Blinking Programming mode
Green
Solid
Wi-Fi Connected
REGISTER AND TRY IT
3
Open the App and sign up for an account. Follow the on-screen prompts in the App to
complete your setup. Once setup is complete, use the App to control your garage door.
Apple, iPhone, and iPod touch are trademarks of Apple Inc., registered in the U.S. and other countries.
The Bluetooth
®
word mark and logos are registered trademarks owned by Bluetooth SIG, Inc. and any use of such
marks by The Chamberlain Group, Inc. is under license. Other trademarks and trade names are those of their
respective owners. Wi-Fi
®
is a registered trademark of Wi-Fi Alliance.
“Made for iPod” and “Made for iPhone” mean that an electronic accessory has been designed to connect specifi cally
to iPod or iPhone respectively, and has been certifi ed by the developer to meet Apple performance standards. Apple
is not responsible for the operation of this device or its compliance with safety and regulatory standards. Please note
that the use of this accessory with iPod or iPhone may affect wireless performance.
NOTICE: To comply with FCC and/or Industry Canada (IC) rules, adjustment or modifi cations of
this transceiver are prohibited. THERE ARE NO USER SERVICEABLE PARTS.
This device complies with Part 15 of the FCC rules and IC RSS-210. Operation is subject to
the following two conditions: (1) this device may not cause harmful interference, and (2) this
device must accept any interference received, including interference that may cause undesired
operation. This device must be installed in a way where a minimum 8" (20 cm) distance is
maintained between users/bystanders and device.
ONE YEAR LIMITED WARRANTY
The Chamberlain Group, Inc. warrants to the fi rst retail purchaser of this product that is
free from defect in materials and/or workmanship for a period of 1 year from the date of
purchase.
REPLACEMENT PARTS
Description Part Number
Door Sensor 041D7924
Power Supply 041D0270
SOFTWARE AGREEMENT
Use of this product and the software embedded within the product is subject to the
copyright notices, terms, and conditions available at:
http://www.mychamberlain.com/agreement
Need more help?
Go to the Help section at www.mychamberlain.com,
or call 1-800-528-9131.
  • Page 1 1
  • Page 2 2
  • Page 3 3
  • Page 4 4
  • Page 5 5
  • Page 6 6
  • Page 7 7
  • Page 8 8
  • Page 9 9
  • Page 10 10
  • Page 11 11
  • Page 12 12
  • Page 13 13
  • Page 14 14
  • Page 15 15
  • Page 16 16

Chamberlain MyQ-G0201 User manual

Type
User manual
This manual is also suitable for

Ask a question and I''ll find the answer in the document

Finding information in a document is now easier with AI

in other languages