Page is loading ...

OWNER’S MANUAL
JACKSON 5PC FAUX MARBLE DINING SET
C
A
UTION: Read owner's manual completely before assembly and use.
Product code: 0-06124818-3
UPC code: 729437124393
Date of purchase: / /

1
1. Use the long end of the Allen wrench to fasten Allen bolts loosely and quickly.
2. Use the short end of the Allen wrench for final tightening.
1. Chair-maximum load weight per chair is 300 pounds.
2. Table-maximum load weight on table top is 350 pounds.
1. Please read the assembly instructions prior to assembling this product.
2. To avoid damage, assemble this product on a non-abrasive surface such as carpet.
3. Make sure all bolts, nuts, and screws are tightly fastened before the product is used.
4. Not for commercial use.
5. Care: Wipe with a damp cloth. Use furniture polish or lemon oil on the wood as needed.
Avoid prolonged exposure to moisture.
! WARNING: After a few days of initial assembly and chairs have acclimated to new
environment, retighten all hardware. Periodically check and
retighten the screws every few months.
Please make sure you have all parts before beginning assembly. Please wait until all steps are
completed before tightening bolts, nuts, and screws. We recommend using two people for
assembly.
GENERAL INFORMATION &TIPS
MAXIMUM RECOMMENDED WEIGHT CAPACITY
A Phillips head screwdriver is necessary for assembly. It’s not
included in hardware list.

2
Please do not return to the store. Contact VLG using the below information should
you need to order any missing or replacement hardware. All parts except for the
tabletop are replaceable.
A. Table Top – Not Replaceable B. Table Leg
QTY: 1 pc QTY: 4 pcs
1. Nut 2. Spring Washer 3. Flat Washer
QTY: 8 pcs QTY: 8 pcs QTY: 8 pcs
4. Open-End Wrench
QTY: 1 pc
PARTS LIST - Table
HARDWARE LIST - Table
CUSTOMER SERVICE INFORMATION
Victory Land Group, Inc
1350 Munger Rd
Bartlett, IL 60103
WEB:
http://www.victorylandgroup.com
PHONE: 1-800-933-0527
FAX: 1-630-540-7099
8:30 am to 5:00 pm CST, Mon. thru Fri.
EMAIL:

3
Diagram #1
Diagram #2
A
SSEMBLY INSTRUCTIONS - Table
A
B
B
B
B
A
4
1
2
3
1
2
3
Step 1
1. Place table top (A) upside down on a
non-abrasive surface such as carpet.
2. Attach table legs (B) to the table top (A)
using nuts (1) spring washers, (2) and
flat washers (3) as shown.
Note: Do not tightly fasten the nuts at this
step.
Step 2
3. Turn the table upright, making sure
the table is level. Tightly fasten all
nuts using open-end wrench (4).
The Table is now ready for use.

4
C. Chair Seat D. Seat Frame E. Chair Back Frame
QTY: 4 pcs QTY: 4 pcs QTY: 4 pcs
F. C h a i r L e g
QTY: 8 pcs
1. Nut 2. Spring Washer 3. Flat Washer
QTY: 16 pcs QTY: 44 pcs QTY: 44 pcs
4. Open-End Wrench 5. Long Bolt 6. Short Bolt
1/4 Dia x 3-1/8 inch L 1/4 Dia x 1-5/8 inch L
QTY: 1 pc QTY: 16 pcs QTY: 12 pcs
7. Wood Screw 8. Allen Wrench
QTY: 24 pcs QTY: 1 pc
PARTS LIST - Chair
HARDWARE LIST - Chair

5
Diagram #3
E
Step 1
1. Attach seat frame (D) to chair back frame (E) using spring washers (2), flat
washers (3), long bolts (5), and short bolts (6) as shown in inset (a) and (b).
Note: Do not tighten the bolts at this step.
D
a
b
D
E
6
2
3
E
5
2
3
5
2
3
A
SSEMBLY INSTRUCTIONS -Chair
8
6
6
2
2
3
3
8
D
a
b

6
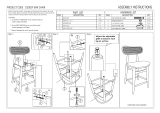
Diagram #4
A
SSEMBLY INSTRUCTIONS -Chair
Step 2
2. Attach chair legs (F) to the seat frame (D) using four nuts (1), four spring
washers (2) and four flat washers (3) as shown.
Note: Do not tightly fasten the nuts at this step.
a
E
D
G
F
D
1 2 3
F
F
4

7
Diagram #5
A
SSEMBLY INSTRUCTIONS -Chair
a
Step 3
4. Place chair seat (C) upside down on a non-abrasive table surface. The rear
(tapered end) on the chair seat (C) should be near the table edge.
Hint: Protect the non-abrasive table surface and chair seat (C) by laying a towel
in-between the chair seat and table.
5. Place the assembled chair frame on the chair seat (C) as shown in inset (a).
Attach with six wood screws (7) as shown in inset (b).
6. Turn the chair upright. Make sure the assembled chair unit is level and square.
Tightly fasten all nuts and bolts with the open-end wrench (4) and Allen Wrench
(8)
.
C
D
F
C
D
7
F
E
b
E
C

8
Diagram #6
The Chair is now ready for use.
Repeat diagram #3 to #6 to assemble the other chairs.
A
SSEMBLY INSTRUCTIONS -Chair

9
Please refer to part numbers when reordering
For questions or comments about product:
Email: [email protected] or Call toll-free: 1-800-933-0527
Made in / Hecho en VIETNAM for Kmart Corporation, Hoffman Estates, IL 60179
SHOP kmart.com
/