Page is loading ...

(2)(2)
(2)(2)
(2)
PLEASE READ BEFORE USING APPLIANCE,
IMPORTANT WARNING & SAFETY INSTRUCTIONS!
CAUTION
RISK OF ELECTRICAL SHOCK
DO NOT OPEN!
READ INSTRUCTIONS: All the safety and operating instructions should be read
before the product is operated.
RETAIN INSTRUCTIONS: The safety and operating instructions should be retained for
future reference.
HEED WARNINGS: All warnings on the product and in the operating instructions
should be adhered to.
FOLLOW INSTRUCTIONS: All operating and use instructions should be followed.
CLEANING: The product should be cleaned only with a polishing cloth or a soft dry
cloth. Never clean with furniture wax, benzine, insecticides or other volatile liquids
since they may corrode the cabinet.
ATTACHMENTS: Do not use attachments not recommended by the product
manufacturer as they may cause hazards.
WATER AND MOISTURE: Do not use this product near water, for example, near a
bathtub, wash bowl, kitchen sink, or laundry tub; in a wet basement; or near a
swimming pool; and the like.
ACCESSORIES: Do not place this product on an unstable cart, stand, tripod, bracket,
or table. The product may fall, causing serious injury to a child or adult, and serious
damage to the product. Use only with a cart, stand, tripod, bracket, or table
recommended by the manufacturer, or sold with the product. Any mounting of the
product should follow the manufacturer’s instructions, and should use a mounting
accessory recommended by the manufacturer.
CART: A product and cart combination should be moved with care. Quick stops, excessive
force, and uneven surfaces may cause the product and cart combination to overturn.
See Figure A.
VENTILATION: Slots and openings in the cabinet are provided for ventilation and to
ensure reliable operation of the product and to protect it from overheating, and
these openings must not be blocked or covered. The openings should never be
blocked by placing the product on a bed, sofa, rug, or other similar surface. This product
should not be placed in a built-in installation such as a bookcase or rack unless proper
ventilation is provided or the manufacturer’s instructions have been adhered to.
POWER SOURCES: This product should be operated only from the type of power
source indicated on the marking label. If you are not sure of the type of power
supply to your home, consult your product dealer or local power company.
LOCATION: The appliance should be installed in a stable location.
NON-USE PERIODS: The power cord of the appliance should be unplugged from the
outlet when left unused for a long period of time.
GROUNDING OR POLARIZATION:
• If this product is equipped with a polarized alternating current line plug (a plug
having one blade wider than the other), it will fit into the outlet only one way. This is
a safety feature. If you are unable to insert the plug fully into the outlet, try reversing
the plug. If the plug should still fail to fit, contact your electrician to replace your
obsolete outlet. Do not defeat the safety purpose of the polarized plug.
• If this product is equipped with a three-wire grounding type plug, a plug having a
third (grounding) pin, it will only fit into a grounding type power outlet. This is a
safety feature. If you are unable to insert the plug into the outlet, contact your
electrician to replace your obsolete outlet. Do not defeat the safety purpose of the
grounding type plug.
POWER-CORD PROTECTION: Power-supply cords should be routed so that they are
not likely to be walked on or pinched by items placed upon or against them, paying
particular attention to cords at plugs, convenience receptacles, and the point where
they exit from the product.
OUTDOOR ANTENNA GROUNDING: If an outside antenna or cable system is
connected to the product, be sure the antenna or cable system is grounded so as
to provide some protection against voltage surges and built-up static charges.
Article 810 of the National Electrical Code, ANSI/NFPA 70, provides information
with regard to proper grounding of the mast and supporting structure, grounding of
the lead-in wire to an antenna discharge unit, size of grounding conductors, location
of antenna-discharge unit, connection to grounding electrodes, and requirements for
the grounding electrode. See Figure B.
LIGHTNING: For added protection for this product during a lightning storm, or when it
is left unattended and unused for long periods of time, unplug it from the wall outlet
and disconnect the antenna or cable system. This will prevent damage to the
product due to lightning and power-line surges.
POWER LINES: An outside antenna system should not be located in the vicinity of
overhead power lines or other electric light or power circuits, or where it can fall into
such power lines or circuits. When installing an outside antenna system, extreme
care should be taken to keep from touching such power lines or circuits as contact
with them might be fatal.
OVERLOADING: Do not overload wall outlets, extension cords, or integral
convenience receptacles as this can result in a risk of fire or electric shock.
OBJECT AND LIQUID ENTRY: Never push objects of any kind into this product
through openings as they may touch dangerous voltage points or short-out parts
that could result in a fire or electric shock. Never spill liquid of any kind on the product.
SERVICING: Do not attempt to service this product yourself as opening or removing
covers may expose you to dangerous voltage or other hazards. Refer all servicing
to qualified service personnel.
DAMAGE REQUIRING SERVICE: Unplug this product from the wall outlet and refer
servicing to qualified service personnel under the following conditions:
• When the power-supply cord or plug is damaged.
• If liquid has been spilled, or objects have fallen into the product.
• If the product has been exposed to rain or water.
• If the product does not operate normally by following the operating instructions. Adjust only
those controls that are covered by the operating instructions as an improper adjustment of
other controls may result in damage and will often require extensive work by a qualified
technician to restore the product to its normal operation.
• If the product has been dropped or damaged in any way.
• When the product exhibits a distinct change in performance, this indicates a need for service.
REPLACEMENT PARTS: When replacement parts are required, be sure the service
technician has used replacement parts specified by the manufacturer or have the
same characteristics as the original part. Unauthorized substitutions may result in
fire, electric shock, or other hazards.
SAFETY CHECK: Upon completion of any service or repairs to this product, ask the
service technician to perform safety checks to determine that the product is in
proper operating condition.
WALL OR CEILING MOUNTING: The product should not be mounted to a wall or ceiling.
HEAT: The product should be situated away from heat sources such as radiators,
heat registers, stoves, or other products (including amplifiers) that produce heat.
CAUTION: THIS PRODUCT SATISFIES FCC REGULATIONS WHEN SHIELDED CABLES AND
CONNECTORS ARE USED TO CONNECT THE UNIT TO OTHER EQUIPMENT. TO PREVENT
ELECTROMAGNETIC INTERFERENCE WITH ELECTRIC APPLIANCES SUCH AS RADIOS AND
TELEVISIONS, USE SHIELDED CABLES AND CONNECTORS FOR CONNECTIONS.
THE EXCLAMATION POINT WITHIN AN EQUILATERAL TRIANGLE IS INTENDED TO ALERT
THE USER TO THE PRESENCE OF IMPORTANT OPERATING AND MAINTENANCE
(SERVICING) INSTRUCTIONS IN THE LITERATURE ACCOMPANYING THE APPLIANCE.
THE LIGHTNING FLASH WITH ARROWHEAD SYMBOL, WITHIN AN EQUILATERAL
TRIANGLE, IS INTENDED TO ALERT THE USER TO THE PRESENCE OF UNINSULATED
“DANGEROUS VOLTAGE” WITHIN THE PRODUCT’S ENCLOSURE THAT MAY BE OF
SUFFICIENT MAGNITUDE TO CONSTITUTE A RISK OF ELECTRIC SHOCK TO PERSONS.

(3)(3)
(3)(3)
(3)
UU
UU
U
X-X-
X-X-
X-
1616
1616
16
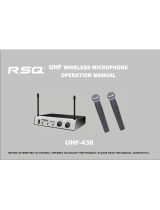
UX-16 RECIEVER
XM-16 HANDHELD MICROPHONE XB-16 BODYPACK TRANSMITTER

(4)(4)
(4)(4)
(4)
(4)ANTENNA: Fixed-length UHF antenna permanently mounted either on
the front or on rear panel.
(5)UNBALANCED OUTPUT: Unbalanced 1/4” mono jack audio output
provides unbalanced low-impedance output
(6)SQUELCH ADJ.: The squelch adjusts the output level to prevent from
the external noise. Setting the squelch too high will reduce the range of
the system. Set the squelch to minimum before turning the receiver on.
(7)CHANNEL SELECTOR: 16 different selectable frequencies as below.
(8)DC JACK: DC input connector for the supplied AC adapter.
XM-16 HANDHELD MICROPHONE:
The handheld microphone operates in UHF band frequency with PLL
synthesized control. UHF 16 preprogrammed selectable frequencies to
avoid interference. Uni-directional dynamic or uni-directional electret
condenser capsules with different characters for various choices. Use
1.5V x 2 AA size batteries for low operating cost.
(1)GRILLE: Protects the microphone capsule and helps reduce breath
sounds and wind noise. The grille for the various microphone capsules
differ in appearance.
(2)LOW BATTERY LED: LED indicates battery status. Switching the power
to “ON”, the LED flashing once indicates that the transmitter has
sufficient power. If the LED stays on, it indicates that the battery has
insufficient power and should be changed soon. If the status LED fails to
flash, the battery is either dead or not positioned correctly, and you
should correct the positioning or change the battery.
(3)ON/OFF SWITCH: Turns transmitter power on and off.
(4)BATTERY COMPARTMENT: Insert two AA batteries into the
compartment and make sure that the polarity of batteries is correct.
(5) CHANNEL SELECTOR: Changes transmitter channel setting.
(6)BATTERY COVER: Push to expose battery compartment and channel selector.
(7) ANTENNA: Built-in high gain helical antenna.
XB-16 BODYPACK TRANSMITTER:
The bodypack transmitter operates in UHF band frequency with PLL
synthesized control. UHF 16 preprogrammed selectable frequencies to
avoid interference. Various uni-directional electret condenser capsule
options. Use 1.5V x 2 AA size batteries for low operating cost.
(1)CONNECTOR: 1/8” miniplug microphone connector
(2)ON/OFF SWITCH: Turns transmitter power on and off.
(3)LOW BATTERY LED: LED indicates battery status. Switching the power
to “ON”, the LED flashing once indicates that the transmitter has
sufficient power. If the LED stays on, it indicates that the battery has
insufficient power and should be changed soon. If the status LED fails to
flash, the battery is either dead or not positioned correctly, and you
should correct the positioning or change the battery.
(4)ANTENNA: Permanently connected, helical antenna.
(5)CHANNEL SELECTOR: Changes transmitter channel setting.
(6)GAIN: The rotary control adjusts the sensitivity of the transmitter’s audio
to the level of the connected lapel microphone or instrument.
(7)BATTERY COMPARTMENT: Insert two AA batteries into the
compartment and make sure that the polarity of batteries is correct.
SETTING UP:
Prior to setting up, check that the transmitter and receiver are tuned to
the same frequency. Two or above transmitters operating in the same
frequency can not be used at the same time and area, so please select
the different frequencies which can be used simultaneously at local area.
INTRODUCTION:
Congratulations on your purchase of a GEMINI wireless system. This
state of the art unit includes all the latest features backed by a three
year limited warranty. Prior to use, we suggest that you carefully read
the instructions.
SYSTEM FEATURES:
• UX-16 M includes UX-16 receiver & XM-16 handheld microphone
• UX-16 H includes UX-16 receiver, XB-16 body pack transmitter & HSM-1 headset
• UX-16 L includes UX-16 Receiver, XB-16 body pack transmitter & LAV-1 lavalier
• 16 band UHF synthesizer controlled frequencies
• Phase locked loop (PLL) circuitry
• Super high sensitivity with extremely low noise transmission & reception
• Stable & quality SMT assembled PCB module
• XM-16 has a uni-directional dynamic microphone
• HSM-1 has an electret condenser unit microphone
• LAV-1 has an electret condenser unit microphone
CAUTIONS:
1. All operating instructions should be read before using this equipment.
2. To reduce the risk of electrical shock, do not open the unit. THERE ARE
NO USER REPLACEABLE PARTS INSIDE. Please refer servicing to a
qualified service technician.
3. Do not expose this unit to direct sunlight or to a heat source such as a radiator or stove.
4. Dust, dirt and debris can interfere with the performance of this unit. Make
an effort to keep the unit away from dusty, dirty environments, and cover
the unit when it is not in use. Dust it regularly with a soft, clean brush.
5. When moving this equipment, it should be placed in its original carton
and packaging. This will reduce the risk of damage during transit.
6. DO NOT EXPOSE THIS UNIT TO RAIN OR MOISTURE.
7. DO NOT USE ANY SPRAY CLEANER OR LUBRICANT ON ANY
CONTROLS OR SWITCHES.
8. REMEMBER, ANY CHANGES MADE TO THE UNIT WITHOUT
AUTHORIZATION FROM GEMINI WILL VOID YOUR WARRANTY.
FCC RULES AND REGULATIONS:
This device complies with part 15 of the FCC rules. Operation is subject
to the following two conditions: (1)This device may not cause harmful
interference and (2) This device must accept any interference received,
including interference that may cause undesired operation
Notice: The changes or modifications not expressly approved by the
party responsible for compliance could void the user’s authority to
operate the equipment.
Important note, to comply with the FCC RF exposure compliance
requirements, no change to the antenna or the device is permitted. Any
change to the antenna or the device could result in the device exceeding
the RF exposure requirements and void user’s authority to operate the device.
UX-16 WIRELESS SYSTEM:
The UX-16 wireless system is a high quality audio product that provides
excellent performance under most operating conditions. The different
systems available all operate on a UHF high band frequency between
WIRELESS NOTES:
• Before setting up, make sure that the transmitter and receiver are tuned
to the same frequency.
• Do not use two transmitters in the same frequency. Use good quality
batteries to avoid the damage resulting from a defective leaking battery.
• Turn the volume control on the receiver to adjust receiver output level to
match input level requirements of an audio mixer or amplifier.
• While checking sound, move the transmitter around the area where you
use the system to look for dead spots. If you find any dead spot, change
the receiver position. If it does not work, avoid such places.
• To avoid interference, do not put the receiver too near metal object and
avoid obstructions between transmitter and receiver.
• Avoid the interference from TV, radio, other wireless appliances and etc.
FUNCTION DESCRIPTIONS:
UX-16 RECEIVER:
This is a stationary receiver for use with our 16-channel selectable
transmitters. The receiver operates in UHF band frequency with PLL
synthesized control. Powered by 12V DC.
(1) POWER INDICATOR: The indicator LED lights when the receiver is ready to operate.
(2)RF LEVEL INDICATORS: This LED lights to indicate that signal is being received.
(3) LEVEL CONTROL: This rotary control adjusts the receiver’s output level from the
microphone to line level for matching the input sensitivity of the mixer or amplifier.
USA: 682 ~ 698 MHz Euroupe: 863 ~ 865

(5)(5)
(5)(5)
(5)
BASIC CONNECTIONS:
Connect the receiver output to the audio mixer or amplifier input, using a
standard audio cable with the 1/4” phone plugs.
CONNECTING THE RECEIVER TO POWER:
• Point the antennas upward.
• Check that the voltage of the supplied AC adapter (AC110 or AC220)
conforms to the voltage available in local area. Using the wrong AC
adapter may cause irreparable damage to the unit.
• Plug the feeder cable of the supplied AC adapter into DC IN socket on
the receiver. Then plug the AC adapter into a power outlet.
CONNECTING THE RECEIVER TO AN AUDIO MIXER
OR AN AMPLIFIER:
In order to make sure the sound quality and avoid distortion, please
adjust the volume level according to following instructions.
INSERTING BATTERIES INTO THE HANDHELD/
BODYPACK TRANSMITTER:
• Push to open the battery cover and insert batteries into the battery
compartment conforming to the polarity (+)(-) marks. The transmitter can
not work with incorrectly inserted batteries.
• When push the ON/OFF switch to “ON” to switch the power on, the LED
will flash momentarily. If the battery has sufficient power, the LED flashes
once. If the LED stayed on, it indicates that the battery has insufficient
power and should be changed soon. If the status LED fails to flash, the
battery is either dead or not positioned correctly, and you should correct the
positioning or change the battery.
• Push back the battery cover to click it shut.
SETTING UP THE HANDHELD TRANSMITTER:
• Switch the receiver power on and check the frequency and volume level.
• Switch the transmitter and hi-fi appliance (amplifier, tape deck etc.) power on.
• Test the microphone and adjust the levels on your mixer or amplifier.
• When using a standard audio cable with 1/4” phone plugs to plug into
the MIC IN on the audio mixer or on the amplifier, please turn the Volume
Level Control on the receiver to around 1 o’clock position, the output
level for balanced and unbalanced output is about at 77mV.
• When using a standard audio cable with 1/4” phone plugs to plug into
the LINE IN on the mixer, please turn the Volume Level Control on the
receiver to around MAX position, the output level for unbalanced and
balanced output is about at 770mV.
SETTING UP THE BODYPACK TRANSMITTER:
CONNECTING A MICROPHONE:
• Open the battery cover. Push the MIC/LINE switch to “MIC” and use the
supplied screwdriver to adjust the GAIN at appropriate position.
• Plug the mini XLR connector end of the microphone cable into the audio
input connector on the bodypack transmitter.
• Switch the transmitter and hi-fi appliance (amplifier, tape deck etc.) power on.
• Test the microphone and adjust the levels on your mixer or amplifier.
CONNECTING AN INSTRUMENT
• Open the battery cover. Push the MIC/LINE switch to “LINE” and use the
supplied screwdriver to adjust the GAIN at appropriate position.
• Plug the 1/4” phone plug of the optional guitar cable to the output jack
on the instrument and the 1/8” mini plug into audio input connector
on the bodypack transmitter.
• Switch the transmitter and hi-fi appliance (amplifier, tape deck etc.)
power on.
• Play the instrument for testing and adjust the levels on your mixer or amplifier.
TROUBLE-SHOOTING:
NO SOUND:
Check the power supply of the microphone and receiver.
Check that the transmitter and receiver are tuned to the same frequency.
Check whether the hi-fi appliance is switched on and the receiver output
is connected to mixer or amplifier input.
Check whether transmitter is too far away from receiver or SQUELCH
control set too high.
Check whether receiver is located too near metal object or there are
obstructions between transmitter and receiver.
SOUND INTERFERENCE:
Check the antenna location.
When using 2 or above microphone sets simultaneously, make sure
that the chosen frequencies are not interfered.
Check whether the interference comes from other wireless microphones,
TV, radio and etc.
DISTORTION:
Check the volume level of the receiver is set too high or too low.
Check whether the interference comes from other wireless
microphones, TV, radio and etc.
SPECIFICATIONS:
UX-16:
Case.........................................................................................................................................Mini case
Receiving System..........................................................................................................PLL synthesized
Receiving Mode.............................................................................16CH, Single Channel, Non-diversity
Frequency Stability...................................................................................................................+/- 0.05%
Receiving Sensitivity................................................................................At 8 dBuV over 80dB S/N ratio
Image & Spurious Rej......................................................................................................80 dB minimum
Selectivity.....................................................................................................................................> 50dB
Modulation Mode................................................................................................................................FM
IF Frequency................................................................................................1st: 56MHz 2nd: 10.7MHz
Dynamic Range.............................................................................................................................>96dB
Tone Signal...........................................................................................................................32.768KHz
S/N Response..............................................Over 94dB, at 48KHz deviation and 60dBuV antenna input
AF Response......................................................................................................50Hz to 15KHz(+/-3dB)
T.H.D. ...............................................................................................................................<1%(at 1KHz)
Power Supply.......................................................................................................................DC 12 ~ 18V
Audio Output...........................................................................................Balanced & unbalanced output
Current Consumption.....................................................................................................130mA +/- 10mA
Dimension(mm)WxHxD......................................................................................................130 x 36 x 92
XM-16:
Mic Type.....................................................................................................16CH, Handheld microphone
RF Power Output.................................................................................................................10mW(max.)
Oscillation Mode............................................................................................................PLL synthesized
Frequency Stability.................................................................................................................+/- 0.005%
Maximum Deviation............................................................................+/-48KHz with limiting compressor
Spurious Emission..................................................................................>60 dB below carrier frequency
T.H.D. ...............................................................................................................................<1%(at 1KHz)
Battery................................................................................................DC 3V(1.5v x 2 AA size batteries)
Tone Key................................................................................................................................32.768KHz
Mic Unit........................................................................................................Uni-directional dynamic unit
LED Indicator.........................................................................................Power ON-OFF and low battery
Current Consumption.............................................................................................................65 +/- 5mA
Dimension(mm)WxH..................................................................................................................272 x 62
XB-16
Mic Type......................................................................................................16CH, Bodypack transmitter
RF Power Output.................................................................................................................10mW(max.)
Oscillation Mode............................................................................................................PLL synthesized
Frequency Stability.................................................................................................................+/- 0.005%
Maximum Deviation............................................................................+/-48KHz with limiting compressor
Spurious Emission..................................................................................>60 dB below carrier frequency
T.H.D. ...............................................................................................................................<1%(at 1KHz)
Battery................................................................................................DC 3V(1.5v x 2 AA size batteries)
Tone Key................................................................................................................................32.768KHz
Mic Unit....................................................................................................Uni-directional condenser unit
LED Indicator.........................................................................................Power ON-OFF and low battery
Current Consumption.............................................................................................................65 +/- 5mA
Dimension(mm)WxHxD........................................................................................................66 x 97 x 25
DESIGN AND SPECIFICATIONS SUBJECT TO CHANGE WITHOUT NOTICE.
Frequency range................................................................USA: 682 – 698MHz/Europe: 863 – 865MHz
Frequency range................................................................USA: 682 – 698MHz/Europe: 863 – 865MHz
Frequency range................................................................USA: 682 – 698MHz/Europe: 863 – 865MHz

(9)(9)
(9)(9)
(9)
(7) ALOJAMIENTO DE BATERIA: Inserte dos baterías AA en el
compartimiento y asegúrese de la polaridad.
PUESTA EN MARCHA:
Antes de utilizarlo, compruebe que el transmisor y el receptor están
sintonizados en la misma frecuencia. Dos o mas transmisores operando
en la misma frecuencia no pueden utilizarse en la misma zona, por lo
tanto seleccione distintas frecuencias para unidades operando
conjuntamente.
CONEXIONES BASICAS:
Conecte el receptor a su mesa de mezclas o amplificador, usando
cables estándar de audio con jack 1/4".
CONECTANDO LA ALIMENTACION:
• Apunte las antenas hacia arriba.
• Compruebe que el voltaje es correcto (AC110 o AC220). Si utiliza un
voltaje erróneo puede dañar irreversiblemente los aparatos.
• Conecte el cable del adaptador de alimentación a la toma de corriente.
CONECTANDO EL RECEPTOR AL MEZCLADOR O
AMPLIFICADOR:
Para asegurar la calidad del sonido y evitar distorsiones, por favor
ajuste el volumen de acuerdo con las siguientes instrucciones.
INSERTE BATERIAS EN EL MICROFONO/
TRANSMISOR DE PETACA:
• Pulse para abrir el compartimiento de las baterías e inserte las mismas
de acuerdo con la polaridad marcada (+)(-). El transmisor puede ahora
funcionar correctamente.
• Al pulsar el interruptor de encendido ON/OFF, el LED ara flash
momentáneamente. Si las baterías están correctas, el LED flash una vez. Si el
LED queda encendido, indica que la batería esta baja. Si el LED no hace
flash, la batería esta agotada o la polaridad no es la correcta.
• Coloque de Nuevo la tapa de las pilas.
AJUSTANDO EL TRANSMISOR DE MANO:
• Encienda el aparato y compruebe la frecuencia y volumen.
• Encienda el amplificador donde este conectado.
• Compruebe el micrófono y ajuste niveles en el micro y amplificador.
• Cuando utilice una conexión estándar de audio 1/4" en la entrada MIC
IN de su mezclador o amplificador, por favor ajuste el volumen a lo que
en un reloj serian la 1 que producirá una salida aproximada de 77mV.
• Cuando utilice una conexión estándar de audio 1/4" en la entrada LINE
IN de su mezclador o amplificador, por favor ajuste el volumen a
el nivel máximo que producirá una salida aproximada de 770mV.
AJUSTANDO EL TRANSMISOR DE PETACA:
CONECTANDO UN MICROFONO:
• Abrir la tapa de pilas. Pulse el selector MIC/LINE a “MIC” y use el
destornillador incorporado para ajustar la ganancia a la posición apropiada.
• Conecte el jack mini XLR del final del micrófono a al entrada del
transmisor de petaca.
• Encienda su fuente de sonido.
• Compruebe el micrófono y ajuste niveles en el micro y amplificador.
CONECTANDO UN INSTRUMENTO:
• Abrir la tapa de pilas. Pulse el selector MIC/LINE a “LINE” y use el
destornillador incorporado para ajustar la ganancia a la posición apropiada.
• Conecte el jack mini XLR del cable opcional para instrumentos a al
entrada del transmisor de petaca.
• Encienda su fuente de sonido.
• Compruebe el instrumento musical y ajuste niveles en el transmisor y amplificador.
COMPROBACION DE PROBLEMAS:
NO HAY SONIDO:
Compruebe la alimentación en receptor y transmisor.
Compruebe que receptor y transmisor están en la misma frecuencia.
Compruebe las conexiones con la fuente de sonido.
Compruebe que el transmisor no este muy lejos o el squelch muy alto.
Compruebe que el receptor no este muy cerca de objetos metálicos ni
interferencias.
INTERFERENCIAS SONORAS:
Compruebe la colocación de la antena.
Si utiliza dos micrófonos compruebe que las frecuencias no se
interfieren.
Compruebe si recibe interferencias de otras Fuentes inalámbricas,
TV, radio, etc.
DISTORSION:
Compruebe el volumen del receptor por si es demasiado alto o bajo.
Compruebe si recibe interferencias de otras Fuentes inalámbricas,
TV, radio, etc.
ESPECIFICACIONES:
UX-16:
Case.........................................................................................................................................Mini case
Receiving System..........................................................................................................PLL synthesized
Receiving Mode.............................................................................16CH, Single Channel, Non-diversity
Frequency Stability...................................................................................................................+/- 0.05%
Receiving Sensitivity................................................................................At 8 dBuV over 80dB S/N ratio
Image & Spurious Rej......................................................................................................80 dB minimum
Selectivity.....................................................................................................................................> 50dB
Modulation Mode................................................................................................................................FM
IF Frequency..................................................................................................1st: 56MHz, 2nd: 10.7MHz
Dynamic Range.............................................................................................................................>96dB
Tone Signal............................................................................................................................32.768KHz
S/N Response..............................................Over 94dB, at 48KHz deviation and 60dBuV antenna input
AF Response......................................................................................................50Hz to 15KHz(+/-3dB)
T.H.D. ...............................................................................................................................<1%(at 1KHz)
Power Supply.......................................................................................................................DC 12 ~ 18V
Audio Output...........................................................................................Balanced & unbalanced output
Current Consumption.....................................................................................................130mA +/- 10mA
Dimension(mm)WxHxD......................................................................................................130 x 36 x 92
XM-16:
Mic Type.....................................................................................................16CH, Handheld microphone
RF Power Output.................................................................................................................10mW(max.)
Oscillation Mode............................................................................................................PLL synthesized
Frequency Stability.................................................................................................................+/- 0.005%
Maximum Deviation............................................................................+/-48KHz with limiting compressor
Spurious Emission..................................................................................>60 dB below carrier frequency
T.H.D. ...............................................................................................................................<1%(at 1KHz)
Battery................................................................................................DC 3V(1.5v x 2 AA size batteries)
Tone Key................................................................................................................................32.768KHz
Mic Unit...................................................Uni-directional dynamic unit Or uni-directional condenser unit
LED Indicator.........................................................................................Power ON-OFF and low battery
Current Consumption.............................................................................................................65 +/- 5mA
Dimension(mm)WxH..................................................................................................................272 x 62
XB-16
Mic Type......................................................................................................16CH, Bodypack transmitter
RF Power Output.................................................................................................................10mW(max.)
Oscillation Mode............................................................................................................PLL synthesized
Frequency Stability.................................................................................................................+/- 0.005%
Maximum Deviation............................................................................+/-48KHz with limiting compressor
Spurious Emission..................................................................................>60 dB below carrier frequency
T.H.D. ...............................................................................................................................<1%(at 1KHz)
Battery................................................................................................DC 3V(1.5v x 2 AA size batteries)
Tone Key................................................................................................................................32.768KHz
Mic Unit....................................................................................................Uni-directional condenser unit
LED Indicator.........................................................................................Power ON-OFF and low battery
Current Consumption.............................................................................................................65 +/- 5mA
Dimension(mm)WxHxD........................................................................................................66 x 97 x 25
DISEÑO Y ESPECIFICACIONES SUJETOS A CAMBIO SIN PREVIO AVISO.
Frequency range................................................................USA: 682 – 698MHz/Europe: 863 – 865MHz
Frequency range................................................................USA: 682 – 698MHz/Europe: 863 – 865MHz
Frequency range................................................................USA: 682 – 698MHz/Europe: 863 – 865MHz

(12)(12)
(12)(12)
(12)
Worldwide Headquarters • 1 Mayfield Ave, NJ 08837 • USA
Tel: (732) 346-0061 • Fax (732) 346-0065
France • GCI-Technologies S.A.R.L • Parc de l’Evénement,1 Allée d’Effiat 91160 Longjumeau France
Tel: +33 (0) 1-69-79-97-70 • Fax +33 (0) 1-69- 79-97-80
UK • GCI-Technologies • Unit 44 The Brambles Enterprise Center,
Waterberry Drive, Waterlooville P07 7TH, UK.
Tel: 011-44-87-087-00880 Fax: 011-44-87-00990
Spain • GCI-Technologies S.A. • Caspe 172, 1A 08013 Barcelona, Spain
Tel: +34-93-436-37-00 • Fax +34-93-347-69-61
© GCI-Technologies 2009 All rights Reserved
WWW.GEMINIDJ.COM
In the U.S.A., if you have any problems with this
unit,call 1-732-346-0061 for customer service.
Do not return equipment to your dealer.
Parts of the design of this product may be protected by worldwide
patents. Information in this manual is subject to change without notice
and does not represent a commitment on the part of the vendor.
GCI-TECHNOLOGIES. shall not be liable for any loss or damage
whatsoever arising from the use of information or any error contained
in this manual. No part of this manual may be reproduced, stored in a
retrieval system or transmitted, in any form or by any means, electronic,
electrical, mechanical, optical, chemical, including photocopying and
recording, for any purpose without the express written permission of
GCI-TECHNOLOGIES. It is recommended that all maintenance
and service on this product is performed by GCI-TECHNOLOGIES.
or its authorized agents. GCI-TECHNOLOGIES. will not accept liability
for loss or damage caused by maintenance or repair
performed by unauthorized personnel.
/