Page is loading ...

Congratulations on your purchase of this ProMaster Scout tripod kit. Please read these instructions thoroughly
to ensure proper assembly, operation, and adjustment of your new tripod kit. With proper use and adjustments
your Scout tripod kit will provide many years of excellent service.
ASSEMBLY
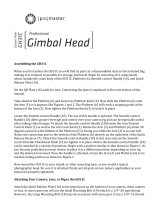
Ball head and tripod leg assembly
Your Scout tripod kit comes preassembled with the SCH30 ball head connected to the column Platform (4).
Note the small tightening bolt located in the column platform. It can be accessed from the underside of the
platform using the small allen wrench included with this kit. Check this bolt to be sure it is tight against the
bottom of the SCH30 head (it may have become loose during shipping). This tightening bolt prevents the
SCH30 ball head from coming loose from the column during photographic use.
If you wish to remove the SCH30 ball head from the column, loosen the small tightening bolt first. Then
rotate the ball head counterclockwise (when viewed from above) to unscrew it from the 3/8" mounting bolt in
the middle of the column Platform (4).
Mounting the Quick Release platform to your camera
Locate the Quick Release Plate (1). Notice it has a male ¼"-20 screw on one side. Align this screw with the
female threaded port on the bottom of your camera. Tighten the screw so the platform is snug. You can use
the fold out handle on the screw head or insert an allen wrench for more leverage while tightening. The quick
release plate can be mounted to your camera in any direction. The position of the plate will dictate the
direction in which you mount your camera to the ball head. It will either slide onto the ball head in a front-to-
back motion or a side-to-side motion.
Mounting your camera
Loosen the Quick Release Knob (2). This opens the jaws of the quick release receiver on the ball head. Slide
your camera onto the head by aligning the Quick Release Plate (1) and top of the ball head. Once the plate is
centered in the jaws tighten the Quick Release Knob (2). This quick release system uses a safety latch, which
will make a clicking noise as you slide the camera onto the head. It prevents your camera from falling off the
head when the jaws are loosened. Press the silver button on the top of the ball head when the jaws are open
and you are sliding the camera off to disengage the safety latch.
TRIPOD OPERATION
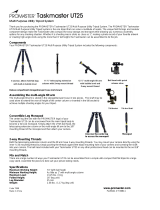
Adjusting and extending the legs
Your tripod should be in its travel position when you first remove it from the box (see FIGURE 2). This
means the legs are inverted from the position in which they are normally used for photography and the

Column (8) is fully extended. Start by rotating each leg a full 180 degrees so all 3 end up in the opposite
direction of the travel position. Then push in all 3 of the Leg Angle Adjustment Switches (7). Next, loosen the
Column Lock Knob (5) and slide the column down to its lowest position so the Column Platform (4) rests on
the main yoke of the tripod. Now pull out on each leg (in a direction away from the center column). This is
the normal position for the legs of your Scout Tripod. You can change the angle of the legs to a wider stance,
which is also good for low level photography near the ground, by pulling out on each of the 3 Leg Angle
Adjustment Switches, pulling each leg out to the next angle position and then pushing back in on the Leg
Angle Adjustment Switches (7). Notice each leg can be adjusted independently for stable positioning on
uneven terrain. Finally, you can pull out the Leg Angle Adjustment Switches (7) and rotate the legs all of the
way back up to the travel position when desired.
* Note: in the travel position the Leg Angle Adjustment Switches (7) remain open.
To extend the length of any leg flip open the Flip Locks (10), pull on the leg sections, and then push the Flip
Locks (10) closed. You can open each Flip Lock one at a time or all together.
Extending and reversing the column / Using the weight hook
Loosen the tripod Column Lock Knob (5) and slide the Reversible Column (8) up or down to the desired
position. Tighten the Column Lock Knob (5) to hold the column in place. Notice the Retractable Weight Hook
(9) at the bottom of the column. It is retracted with spring tension. Pull it away from the column and hang
something on the hook, such as a camera bag, to add weight and stability to your Scout Tripod.
The Reversible Column (8) is a 2-piece unit. You will see a small seam on the Column (8) near the Platform
(4). Place a hand on each side of the seam and twist to unscrew the two parts of the Reversible Column (8).
Now you have a short column, which can be used for low angle shots. Or, you can loosen the Column Lock
Knob (5) and slide the column completely out of the tripod. Turn the column upside down and reinsert it into
the tripod thereby reversing the column. Be sure to securely hold your camera when the column is reversed
and the Column Lock Knob (5) is loose to avoid having your camera slide too fast and hit the ground.
Please note, a tripod is always more stable when the legs are used to gain height rather than the column.
Practice using the 3 legs to achieve your desired height and only extend the column once the legs cannot go
any higher.
Adjusting the ball head
With your camera mounted to the ball head use the Tension & Panning Control Knob (3) to adjust the ball
head. Loosen it to move your camera. Tighten it to lock your camera in place. Notice you can move the ball
around and also rotate the head in circles using a panning motion when the Tension & Panning Control Knob
(3) is loose. The Tension & Panning Control Knob is repositionable. Simply pull out on it, repositioning it,
and let it snap back into place.
ONE YEAR UNCONDITIONAL WARRANTY
If for any reason, this ProMaster product fails within ONE YEAR of the date of purchase, return this product
to your ProMaster dealer and it will be exchanged for you at no charge. ProMaster products are guaranteed for
ONE FULL YEAR against defects in workmanship and materials. If at any time after one year, your
ProMaster product fails under normal use, we invite you to return it to ProMaster for evaluation.
Made in China
WWW.PROMASTER.COM | FAIRFIELD, CT 06825

/