Vax AIR User manual

Category
Vacuum cleaners
Type
User manual
User Guide
C88-AM-Be / C88-AM-Pe / C86-AM-Ce
C87-AM-Le / C87-AM-Te
AirCompact
Designed in the UK
vax.co.uk
Contents
Machine Overview
General Safety Information
Getting Started
Looking After Your Machine – Filters
FAQs
Other Information
Guarantee
1
2
3
4
5
6
7
8
9
NOTE: Some parts may vary according to model. Please check inside ap of box for more details.
Contents
Handle
Dirt container lid
Inner cyclones
Dirt container
Hose connector
Main body
Cord rewind button
Wheel outer
Base
Dirt container release button
On/O button
Wheel inner and lter housing
TurboTool
Upholstery tool
Dusting brush
Crevice tool
Combination oor head
Tool connector
1
2
3
4
5
6
7
8
9
10
11
12
13
14
15
16
17
18
1
2
3
4
6
8
7
Machine Overview
2vax.co.uk
1
5
10
11
9
12
13
15
14
16
17
18
Initial Setup for Normal OperationGeneral Safety Information
4vax.co.uk
3
This vacuum cleaner is intended for household use only and NOT for commercial or industrial use.
Please keep instructions for further use.
When using the vacuum cleaner basic safety precautions should always be observed, including the following:
1. Only use the vacuum cleaner indoors on dry surfaces.
2. Turn o the on/o switch on the vacuum cleaner controls before disconnecting or connecting
from the mains supply.
3. Always unplug the vacuum cleaner before connecting or disconnecting the vacuum hose and accessories.
4. Children should be supervised to ensure that they do not play with the appliance.
5. This appliance is not intended for use by children under eight years of age and persons with reduced
physical, sensory or mental capabilities or lack of experience and knowledge, unless they have
been given supervision or instruction concerning use of the appliance in a safe way and understands
the hazards involved.
6. Cleaning and maintenance shall not be made by children without supervision.
7. The appliance should only be used as described in the quick start guide or in the full online user guide.
8. Only Vax recommended attachments should be used with this appliance.
9. Do not use this vacuum cleaner if it has been dropped, damaged, left outdoors or dropped into water.
Do not use this vacuum cleaner with a damaged cord or plug. If the supply cord is damaged return the
vacuum cleaner to Vax or an authorised service agent for examination, repair or adjustment.
10. Do not pull or carry this appliance by the cord. Do not use the cord as a handle, close a door on the cord or
pull the cord around sharp edges or corners. Do not run the vacuum cleaner over the cord. Keep the cord
away from heated surfaces.
11. Do not handle the plug or the vacuum cleaner with wet hands.
12. Keep hair, loose clothing, ngers and all parts of the body away from openings and moving parts.
13. Do not pick up any hot coals, cigarette butts, matches or any hot, smoking or burning objects.
14. Do not pick up any ammable or combustible materials (lighter uid, petrol, kerosene etc.) or use in the
presence of explosive liquids or vapours.
15. Do not vacuum up harmful or toxic material (chlorine, bleach, ammonia, drain cleaner etc.).
16. Do not vacuum up hard or sharp objects such as glass, nails, screws, coins etc.
17. Store the vacuum cleaner in a cool, dry area.
18. Use only CE approved 13 amp extension cords. Non-approved cords may overheat. Care should be taken to
arrange the cord so that the cord cannot be tripped over.
19. Do not put any objects into openings. Do not use with any openings blocked and do not restrict airow.
Keep all openings free of dust, lint, hair or anything that might reduce airow.
20. Do not use without all of the lters in place.
21. Keep vacuuming area well lit.
Initial Setup for Normal Operation:
1. Use the base accessories.
a. Shortest Hose
b. Extension Tube set to shortest practicable length.
2. Clean Filters Installed.
3. Dust Receptacle Empty.
4. All Bleeds must be closed.
5. Variable Power set to Maximum.
6. Floor Heads/ Tools set to Carpet Mode for Carpet Cleaning.
7. Mechanical Agitation set turned ON for Carpet Cleaning.
8. Floor Heads/ Tools set to Hard Floor Mode for Hard Floor Cleaning.
9. Mechanical Agitation set turned OFF for Hard Floor Cleaning.
Emptying and cleaning the dirt container
T
A
P
Press dirt container release
button to remove the
dirt container.
Hold dirt container over a bin
and press dirt release button to
open, allowing dirt to fall out.
To remove the inner shroud,
hold the container and rotate the
shroud clockwise.
Hold the container and turn the
inner separator anti-clockwise.
Dislodge any excess dirt by
gently tapping the inner separator
over the bin.
WARNING: Always switch o and unplug the vacuum cleaner from the electrical socket before assembling, opening or emptying
the dirt container, or before connecting/disconnecting the attachments.
IMPORTANT: Filters need to be cleaned every time you empty the dirt container. Do not use your vacuum cleaner without all
of the lters in place.
IMPORTANT: The motor is equipped with a thermal cut-out. If for any reason the unit should overheat, the thermostat will
automatically turn the unit o.
Assembling your cylinder
Fully unwind the power
cord. A yellow mark on the
cord indicates the
recommended cord length.
Do not exceed the cord
beyond the yellow mark.
Slot the metal telescopic
extension tube and hose
handle together. All
accessories can be tted
to the end of the metal
telescopic extension tube.
Plug in and switch the unit on
by pressing the power button.
How to use
For use on carpets click
rocker switch forward. For
use on hard oors click rocker
switch back.
To vary the suction power
open/close the sliders on the
hose handle.
Hard Floors
Carpets
Storage
Cable rewind button is
located at the rear of the
machine. After unplugging
press the cable rewind until
the cord is fully retracted.
For convenience there is a parking slot located at the rear of
the vacuum cleaner where the oor head and tubes can be
attached for storage and carrying
Insert the end of the hose
into the unit. Ensure the
hose has clicked into place.
PLEASE READ SAFETY INFORMATION BEFORE USE (p3)
Before plugging the cord into the electrical outlet, make sure the switch is in the ‘o’ position. Hold the vacuum cleaner rmly when starting and in use.
5 6vax.co.uk
Looking After Your Machine – FiltersGetting Started
FAQs
Warning: To reduce the risk of personal injury, unplug the vacuum cleaner before performing maintenance/troubleshooting checks.
Is there an accessory missing?
• Check the ‘Getting Started’ page in this guide or the box that the machine came in to make sure that the part is denitely included in
your unit.
• If it is missing, we’re here to help. Simply call us on 0844 412 8455
Why won’t the vacuum cleaner pick up?
• The lters may need cleaning, please refer to the ‘Looking After Your Machine – Filters’ page of this user guide (p5-6)
• The separator may be clogged, please refer to the ‘Looking After Your Machine – Filters’ page of this user guide (p5-6)
• There may be a blockage in the hose, please check the hose and remove the blockage
• The dirt container may be full or blocked, please refer to the ‘Looking After Your Machine – Emptying and cleaning dirt container’ page of
this user guide (p5)
• The dirt container may be incorrectly installed, please ensure the dirt container is locked in place
Why won’t the accessories pick up properly?
• The TurboTool may be blocked, please refer to the ‘Looking After Your Machine – Removing Blockages’ page in this user guide (p6)
The accessory may be broken
What do I do if an accessory/the unit becomes damaged or broken?
• Please check if the damage is with the accessory or the unit. To do this, rstly remove the accessory from the unit and check if there
is suction from the hose. If there is suction from the hose this conrms that the damage is with the accessory. Please visit ‘spares shop
website’ – vax.co.uk/support
• If having done the above checks, checked the hose for blockages and cleaned the lters there is still no suction/limited suction from the
hose, please call our Vax Careline 0844 412 8455
Why is dust escaping from the vacuum?
• The lters may not be installed correctly, please refer to the ‘Looking After Your Machine – Filters’ page of the user guide (p5-6)
• The dirt container may be full or blocked, please refer to the ‘Looking After Your Machine – Emptying and cleaning dirt container’
page of this user guide (p5)
The lters may need cleaning, please refer to the ‘Looking After Your Machine – Filters’ page of this user guide (p5-6)
There may be a blockage in the hose, please check the hose and remove the blockage
Why does my vacuum cleaner have no power?
It may not be plugged into the electrical socket correctly. Ensure that the plug is pushed into the electrical socket securely
The electrical socket may not be working. Check the fuse or breaker and consult an electrician
The motor thermostat may have tripped. Switch o and unplug the vacuum cleaner. Check the unit for blockages, clean the lters – please
refer to the ‘Looking After Your Machine – Filters’ page of this user guide (p6) and clean the separator – please refer to the ‘Looking After
Your Machine – Emptying and cleaning dirt container’ page of this user guide (p5). Leave the vacuum cleaner for 24 hours before switching
the vacuum cleaner back on
Why does the vacuum cleaner cut out?
The motor is equipped with a thermal cut-out. If for any reason the unit should overheat, the thermostat will automatically turn the unit o.
Should this occur, unplug the vacuum cleaner from the electrical socket and turn o the switch. Remove and empty the dirt container.
Check the hose for blockages. Clean the lters. Allow the unit to cool for approximately 1 hour (if you have cleaned the lters you will need
to wait 24 hours for the lters to dry before putting them back in the machine)
What do I do if the unit becomes damaged or broken?
• We’re here to help. Simply call 0844 412 8455 or visit vax.co.uk
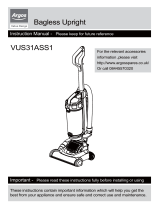
Cleaning the pre-motor lter
Hold the dirt container and
twist the lid anti-clockwise.
Lift the lid to reveal the
pre-motor lter.
Lift out the pre-motor lter.
Tap excess dirt from the lter rinse under a tap and leave to dry for 24 hours.
1
2
3
!
40C Max
5
24hr
6
4
4
Post-motor lter is located
in the right side wheel.
Hold the centre of the
wheel and twist wheel
cover anti-cl ockwise.
With the wheel cover o
the post-motor lter is
easily removed.
Tap all excess dirt o the
lter. Do not wash.
1
2
3
Cleaning the HEPA post-motor lter
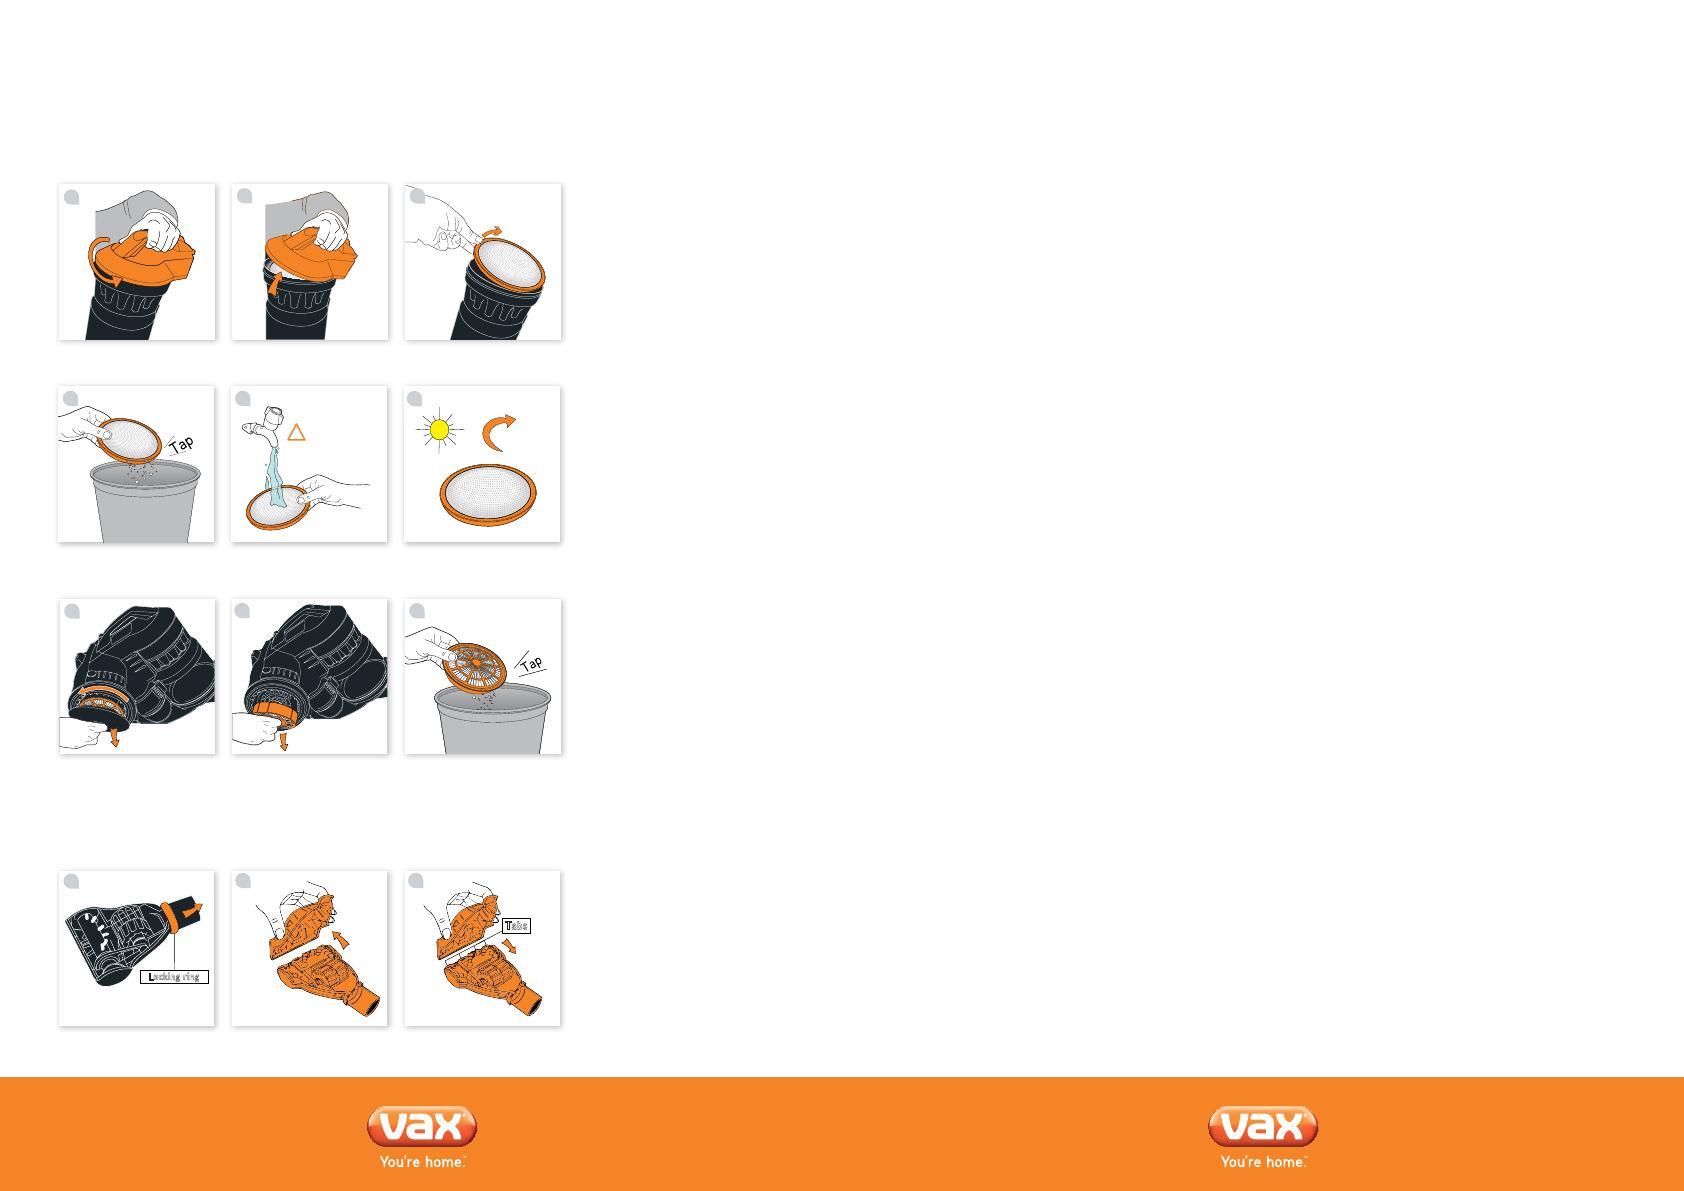
Turn the TurboTool over and
slide o the locking ring.
Detach lower housing and
remove blockage.
To re-assemble the
TurboTool, ensure that
the tabs are engaged
and pivot the lower
housing closed.
Slip the locking ring
over the neck of the
TurboTool and into
the groove to nish.
Locking ring
1
2
Tabs
3
Removing blockages from the TurboTool (Some models only)
7 8vax.co.uk
Looking After Your Machine – Filters
FREE 6 year guarantee
Instead of taking me back to the shop, simply visit:
vax.co.uk/support or call (UK) 0844 412 8455 (ROI) 1-800 928 308
Let us know what you think @VaxUK
we’re here if you need us
UK based customer care centre — Open 7 days a week
Monday-Friday 8:30am-6:30pm
Saturday 9:00am-5:00pm
Please retain your original receipt for proof of purchase.
It’s quick and easy to register for your
online at: vax.co.uk/guarantees
Designed in the UK
Guarantee
vax.co.uk
UK Service & Help
Any queries or concerns about using your Vax, simply visit; vax.co.uk/support – vaxireland.ie or call the
Vax Careline. Calls are charged at the UK local rate. Please make a note of the serial number and model
number of the vacuum cleaner before calling.
Vax Careline:
(UK) 0844 412 8455
(ROI) 1-800 928 308
Monday .- Friday 8.30am to 6.30pm
Saturday - 9.00am to 5.00pm
Consumables
To purchase spares and accessories, please visit vax.co.uk
The use of genuine vax spare parts helps to maintain optimised
performance and validates your guarantee
Filter kit (Type 93): 1-1-134230-00
2-in-1 Tool (Type 2): 1-1-132115-00
Upholstery tool (Type 3): 1-1-132116-00
TurboTool
Flexi crevice tool (Type 1): 1-1-131393-00
Stretch hose (Type 1): 1-1-130429-00
Dusting Brush (Type 5): 1-9-127512-00
Technical Specication
Voltage: 220-240V -50Hz
Wattage: 850W
Cable: 6m
Capacity: 2L
Filters: Pre-motor lter (washable)
HEPA MEDIA Post-motor lter
Subject to technical change without notice.
EEC Statement of Compliance
Manufacturer/EEC importer: Vax Limited, hereby on our own responsibility, declare that the
C88-AM-Be, C88-AM-Pe, C86-AM-Ce, C87-AM-Le, C87-AM-Te, series is manufactured in compliance with
the following Directives:
Safety: 2006/95/EC Low Voltage Directive
EMC: 2004/108/EC Electromagnetic Compatibility Directive
Waste electrical products should not be disposed of with household waste. Please recycle where facilities exist.
Check with your Local Authority or retailer for recycling advice.
Other Information
9
Vax Ltd., Kingswood Road, Hampton Lovett, Droitwich, Worcestershire, WR9 0QH, UK
email: inf[email protected] website: vax.co.uk
  • Page 1 1
  • Page 2 2
  • Page 3 3
  • Page 4 4
  • Page 5 5
  • Page 6 6
  • Page 7 7

Vax AIR User manual

Category
Vacuum cleaners
Type
User manual

Ask a question and I''ll find the answer in the document

Finding information in a document is now easier with AI