Page is loading ...

SouthernLINC
i9 Phone
User’s Guide
Dummy Page - To be discarded before printing


DECLARATION OF CONFORMITY
Per FCC CFR 47 Part 2 Section 2.1077(a)
Responsible Party Name: Motorola, Inc.
Address: 8000 West Sunrise Boulevard
Plantation, FL 33322 USA
Phone Number: 1 (800) 453-0920
Hereby declares that the product:
Product Name: i9
Model Number: H07XAN6JR7AN
FCC-ID: IHDT56JQ1
Conforms to the following regulations:
FCC Part 15, subpart B, section 15.107(a), 15.107(d) and section
15.109(a)
FCC Notice to Users
The following statement applies to all products that have
received FCC approval. Applicable products bear the FCC logo,
and/or an FCC ID in the format FCC-ID: IHDT56JQ1 on the
product label.
Motorola has not approved any changes or modifications to this device
by the user. Any changes or modifications could void the user’s
authority to operate the equipment. See 47 CFR Sec. 15.21.
Class B Digital Device
As a personal computer peripheral, this device complies with part 15 of
the FCC Rules. Operation is subject to the following two conditions: (1)
This device may not cause harmful interference, and (2) this device
must accept any interference received, including interference that may
cause undesired operation. See 47 CFR Sec. 15.19(3).
Note:
This equipment has been tested and found to comply with the limits
for a Class B digital device, pursuant to part 15 of the FCC Rules. These
limits are designed to provide reasonable protection against harmful
interference in a residential installation. This equipment generates, uses
and can radiate radio frequency energy and, if not installed and used in
accordance with the instructions, may cause harmful interference to radio
communications. However, there is no guarantee that interference will not
occur in a particular installation.
If this equipment does cause harmful interference to radio or television
reception, which can be determined by turning the equipment off and
on, the user is encouraged to try to correct the interference by one or
more of the following measures:
•
Reorient or relocate the receiving antenna.
•
Increase the separation between the equipment and receiver.
•
Connect the equipment into an outlet on a circuit different
from that to which the receiver is connected.
•
Consult the dealer or an experienced radio/TV technician for
help.


1
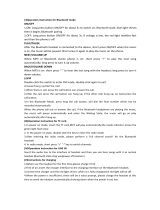
HELLOMOTO
Introducing your new Motorola i9 wireless phone. Here’s a quick anatomy lesson.
Left Soft Key
Perform function
in lower left
display.
Right Soft Key
Perform function
in lower right
display.
End/Power Key
End calls, exit
menu system,
turns phone on/off.
Talk Key
Make &
answer calls.
OK Key
In menus & lists,
press to select
highlighted option.
4-Way Navigation
Key
Web Key
Menu Key
From home screen,
open main menu.
Speaker
On/Off Key
Volume Key
PTT Button
Mini USB
Connector
Connects charger
Camera Key
Smart Key
Lock
Antenna
For clear calls.
(Back side beneath battery)
Morphing Keys

2
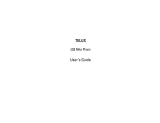
check it out
up, down, left or right ( )
1
2
Press and hold the
Power Key
for a
few seconds, or until
the screen lights up,
to turn on your
phone.
3
4
Press the
O
key
to select the feature.
Press the Navigation Key
to highlight a menu feature.
Press the
Menu Key
to access the main menu.
Contcs Mesgs
SOUTHERN LINC
7/16/08
10:00
AM
Multimedia
Exit
BA
C
E
G
H
T
S
U

3
Motorola, Inc.
Consumer Advocacy Office
1307 East Algonquin Road
Schaumburg, IL 60196
www.hellomoto.com
Note:
Do not ship your phone to the above address. If you need to
return your phone for repairs, replacement, or warranty service,
please contact the Motorola Customer Support Center at:
1-800-453-0920 (United States)
1-877-483-2840 (TTY/TDD United States for hearing impaired)
Certain mobile phone features are dependent on the capabilities
and settings of your service provider’s network. Additionally,
certain features may not be activated by your service provider,
and/or the provider's network settings may limit the feature’s
functionality. Always contact your service provider about feature
availability and functionality. All features, functionality, and other
product specifications, as well as the information contained in this
user's guide are based upon the latest available information and
are believed to be accurate at the time of printing. Motorola
reserves the right to change or modify any information or
specifications without notice or obligation.
MOTOROLA and the Stylized M Logo are registered in the US
Patent & Trademark Office. All other product or service names are
the property of their respective owners. Java and all other Java-
based marks are trademarks or registered trademarks of Sun
Microsystems, Inc. in the U.S. and other countries.
© Motorola, Inc., 2008.
Manual Number: NNTN7527A

4

5
contents
contents
check it out . . . . . . . . . . . 2
menu map. . . . . . . . . . . . 7
use and care . . . . . . . . . . 9
essentials . . . . . . . . . . . 10
about this guide . . . . . 10
SIM card. . . . . . . . . . . . 11
memory card . . . . . . . . 11
battery . . . . . . . . . . . . 13
turn it on & off . . . . . . 18
enable security . . . . . . 18
make a phone call. . . . 19
answer a phone call . . 19
make a Push To Talk
call . . . . . . . . . . . . . . . 19
answer a Push To Talk
call . . . . . . . . . . . . . . . 20
store a phone number
or PTT ID . . . . . . . . . . 21
call a stored phone
number or PTT ID. . . . 22
your phone number
and PTT ID . . . . . . . . . 23
text messages . . . . . . 23
manage memory . . . . 26
use your phone as USB
mass storage device . 27
using your handset
as a modem . . . . . . . . 28
main attractions . . . . . . 30
multimedia . . . . . . . . . 30
my music . . . . . . . . . . 34
my images . . . . . . . . . 42
my videos. . . . . . . . . . 44
camera . . . . . . . . . . . . 45
use PTT features . . . . 50
one touch PTT . . . . . . 58
PTT features . . . . . . . . 59
Bluetooth
®
. . . . . . . . . 60
clock screen saver . . . 65
basics. . . . . . . . . . . . . . . 67
display. . . . . . . . . . . . . 67
main menu . . . . . . . . . 68
text entry . . . . . . . . . . 68
navigation key. . . . . . . 71
handsfree speaker . . . 71
transmitters . . . . . . . . 71
use GPS with map
software . . . . . . . . . . . 72
features for the
hearing impaired. . . . . 74
features for the
vision impaired . . . . . . 75
calls . . . . . . . . . . . . . . . . 77
turn off a call alert. . . . 77

6
contents
recent calls . . . . . . . . . 77
redial . . . . . . . . . . . . . . 78
caller ID . . . . . . . . . . . . 78
call forward . . . . . . . . . 78
voice names . . . . . . . . 79
emergency calls . . . . . 80
international calls. . . . . 80
speed dial . . . . . . . . . . 81
voicemail . . . . . . . . . . . 81
talkgroup calls . . . . . . . 82
group calls . . . . . . . . . . 83
LINCaround
TM
. . . . . . . . 88
switching to
LINCaround . . . . . . . . . 89
exiting LINCaround . . . 89
channels and codes . . . 89
private LINCaround
calls . . . . . . . . . . . . . . . 92
making emergency calls
while in LINCaround
TM
mode . . . . . . . . . . . . . . 93
setup options. . . . . . . . 94
customize. . . . . . . . . . . . 97
volume. . . . . . . . . . . . . 97
ring tones . . . . . . . . . . 97
wallpaper . . . . . . . . . . . 99
datebook . . . . . . . . . . . 99
hide or show location
information . . . . . . . . 100
other features . . . . . . . 102
advanced calling . . . . 102
alarm clock. . . . . . . . . 103
contacts. . . . . . . . . . . 104
datebook . . . . . . . . . . 105
GPS . . . . . . . . . . . . . . 106
handsfree . . . . . . . . . 107
memory card . . . . . . . 108
pc applications. . . . . . 109
personalize . . . . . . . . 109
TTY . . . . . . . . . . . . . . 110
security . . . . . . . . . . . 110
Safety and General
Information . . . . . . . . . 114
Service & Repairs . . . . 121
Specific Absorption
Rate Data . . . . . . . . . . . 122
Limited Warranty Motorola
Communications Products
(International) . . . . . . . 124
Hearing Aid
Compatibility . . . . . . . . 128
Information From the
World Health
Organization . . . . . . . . 130
Patent and Trademark
Information . . . . . . . . . 132
Privacy and Data
Security . . . . . . . . . . . . 133
Smart Practices While
Driving . . . . . . . . . . . . . 134
index. . . . . . . . . . . . . . . 136

7
menu map
S
Push To Talk
• Call Alert
• PTT Features
• PTT Options
• LINCaround
C
Tools
•My Info
•My Name
• Line 1
• Line 2
• Private ID1
• Private ID2
• Group ID
• Carrier IP
• IP1 Address
• IP2 Address
•Profiles
• [New Profile]
•Standard
•Car
• Meeting
•Office
• Outdoors
• Headset
• Alarm Clock Plus
• Bluetooth
• Audio Devices
• Pair to Devices
• Device History
• Setup
• Find Me
•GPS
• Position
•Privacy
• Interface
• Datebook
•Call Timers
•Last Call
• Phone Reset
• Phone Lifetime
•Prvt/Grp Reset
• Prvt/Grp Lifetime
• Kbytes Reset
•Memo
j
Multimedia
• Downloads
• Media Center
• My Images
• My Music
• My Videos
•Camera
• Camcorder
• Ring Tones
•VoiceRecord
1
Web
u
Settings (see next page)
H
Games and Apps
•Buy More
• Alarm Clock Plus
• My Images
• Music Player
• My Videos
• Download Apps
• Java System
L
Contacts
• [New Contact]
B
Recent Calls
E
Messages
• [Create Message]
•Voice Mail
• Inbox
•Drafts
• Outbox
• Fax Mail
• Net Alert
This is the standard main menu layout. Your
phone’s menu may be a little different.
main menu

Display/Info
• Wallpaper
• Buy Wallpapers
• Internal
• External
•Text Size
• Theme
• Home Icons
• Backlight
•Timer
• Java Timer
• Lighting Effect
• Sensor
• PTT Backlight
• Bluetooth LED
• Logo Flash
•Clock
•Display
• Screen Saver
•Time Format
• Date Format
•Year
• Menu View
• Icon View
•List View
•Tab View
• Large Dialing
• Language
Phone Calls
• Set Line
•Any Key Ans
• Auto Redial
• Call Waiting
• Auto Ans
• Flip Activation
• Minute Beep
• Call Duration
•TTY
• Hearing Aid
• Notifications
• DTMF Dialing
• Call Forward
• Prepend
Personalize
• Reorder Menu
• Shortcuts
•Up Key
•Down Key
•Left Key
• Right Key
• Center Key
•Left Softkey
• Right Softkey
•Power Up
Volume
• Ringers/Alerts
• Speaker
• Earpiece
• Multimedia
•Keypad
Voice Playback
• Speak Text
• Speak Caller
•Voice
• Multimedia Volume
Memory Card
• Remove Card
• Store Media
• Format Card
•Help
Security
• Phone Lock
• SIM PIN
• GPS PIN
• Change Passwords
Advanced
• Alert Timeout
• Headset/Spkr
• Connectivity
• Reset Defaults
• Return to Home
•Transmitters
• Phone Only
Connections
• Bluetooth
•USB
• Memory Card Access
• Data Modem
• Application Access
• GPS NMEA
•Help
Check for Update
8
settings menu

9
use and care
Use and Care
To care for your Motorola phone, please keep it away from:
liquids of any kind dust and dirt
Don’t expose your phone to
water, rain, extreme humidity,
sweat, or other moisture.
Don’t expose your phone to
dust, dirt, sand, food, or other
inappropriate materials.
extreme heat or cold cleaning solutions
Avoid temperatures below
-10°C/14°F or above 45°C/113°F.
To clean your phone, use only a
dry soft cloth. Don’t use alcohol
or other cleaning solutions.
microwaves the ground
Don’t try to dry your phone in a
microwave oven.
Don’t drop your phone.

10
essentials
essentials
Caution:
Before using the phone for the first
time, read the Important Safety and Legal
information included in the gray-edged pages
at the back of this guide.
about this guide
This guide shows how to locate a menu
feature as follows:
Find it:
/
>
u
>
Phone Calls
This means that, from the home screen:
1
Press the menu key
/
and then press
the
Settings
menu option.
2
Press the navigation keys
;
to scroll to
Phone Calls
, and press the center key
S
to
select it.
symbols
This means a feature is network or
subscription dependent and may
not be available in all areas, or might
not be offered by your service
provider. Contact customer service
for more information.
This means a feature requires an
optional accessory.

11
essentials
SIM card
insert the SIM card
Turn off your phone and remove your battery
before you install or remove a SIM card.
Carefully slide the SIM card into your phone,
until it lies flat in the SIM card holder.
Warning:
To avoid loss or damage, do not
remove your SIM card from your phone
unless absolutely necessary.
memory card
Your handset may come with a memory
card, memory card adapter, and memory card
reader
1
.
A memory card is a removable flash memory
card that you can use to store pictures,
videos, and audio files. The memory card can
be inserted in your phone or connected to
your computer using the memory card reader.
Many types of pictures, videos, and audio
files stored on the memory card can be
1. Depending on your service provider, the memory card,
memory card adapter, and memory card reader may not
be included with your phone. Your handset can be used
with a Transflash or MicroSD memory card.

12
essentials
viewed or played using your phone’s media
center. Music files can be played using the
music player.
You can connect your phone using a
Motorola data cable directly to your
computer, access the memory card
loaded in the phone to save or delete music,
images, videos, or audio files.
Find it:
/
>
u
>
Connections > USB
insert the memory card
1
Remove the battery door, lift the black
plastic indicator and then slide the
memory card in place. Return the battery
cover when you are done.
Note:
The first time you insert a memory card
in your phone, you will see the following
options:
[Do Nothing]
,
Go To Audio Player
,
Go To Camera
,
and
Go To Media Center
. Select the option of your
choice and continue.
remove the memory card
Warning:
Do not remove the memory card
before selecting the
Remove Card
option under
Settings
. Removing the memory card before

13
essentials
selecting the
Remove Card
option could result in
loss of data.
1
From the home screen press
/ >
u
>
Memory Card > Remove Card
.
2
Once the handset confirms that it is safe
to remove the SD card, press
-
under
OK
.
3
Remove the battery door.
4
Lift the black plastic indicator and, with
your fingernail, slide the memory card out
of the slot.
5
Close the memory card slot cover.
battery
Battery Use & Battery Safety
• Motorola recommends you always
use Motorola-branded batteries and
chargers.
The warranty does not cover
damage caused by non-Motorola
batteries and/or chargers.
Caution:
Use of an unqualified battery
or charger may present a risk of fire,
explosion, leakage, or other hazard.
Improper battery use, or use of a
damaged battery, may result in a fire,
explosion, or other hazard.
•
Battery usage by children should be
supervised.
• Important
: Motorola mobile devices
are designed to work best with

14
essentials
qualified batteries. If you see a
message on your display such as
Invalid
Battery
or
Unable to Charge
, take the
following steps:
•
Remove the battery and inspect it to
confirm that it bears a Motorola
“Original Equipment” hologram.
•
If there is no hologram, the battery
is not a qualified battery.
•
If there is a hologram, replace the
battery and retry charging it.
•
If the message remains, contact a
Motorola Authorized Service Center.
•
New batteries or batteries stored for a
long time may take more time to
charge.
• Charging precautions:
When charging
your battery, keep it near room
temperature. Never expose batteries to
temperatures below 0°C (32°F) or
above 45°C (113°F) when charging.
Always take your mobile device with
you when you leave your vehicle.
•
When storing your battery, keep it in a
cool, dry place.
•
It is normal over time for battery life to
decrease, and for the battery to exhibit
shorter runtime between charges or
require more frequent or longer
charging times.
• Avoid damage to battery and mobile
device.
Do not disassemble, open,
crush, bend, deform, puncture, shred,
or submerge the battery or mobile
device. Avoid dropping the battery or
mobile device, especially on a hard
surface. If your battery or mobile
device has been subjected to such
damage, take it to a Motorola
Authorized Service Center before
using.
Do not
attempt to dry it with an

15
essentials
appliance or heat source, such as a hair
dryer or microwave oven.
• Use care when handling a charged
battery:
Particularly when placing it
inside a pocket, purse, or other
container with metal objects. Contact
with metal objects (e.g., jewelry, keys,
beaded chains) could complete an
electrical circuit (short circuit), causing
the battery to become very hot, which
could cause damage or injury.
Promptly dispose of used batteries in
a
ccordance with local regulations.
Contact your local recycling center for
proper battery disposal.
Warning:
Never dispose of batteries in a fire
because they may explode.
battery installation
1
Slide the battery door upwards until it is
released from the phone.
2
Remove the battery door.

16
essentials
battery charging
New batteries are not fully charged.
charge using the charger
1
Pull out the connector cover, and insert
the charger into the micro USB connector
on your phone as shown.
2
Plug the other end of the charger into the
appropriate electrical outlet.
When you charge the battery, the battery level
ind
icator at the upper right of the screen
shows charging progress. At least one
3
Push the battery down until it snaps in
place
.
4
Replace the battery door and slide it
down while pressing gently until you
hear a click.
/