
GXA-13 Density Determination Kit
1WMPD4003565B

© 2017 A&D Company, Limited. All rights reserved.
No part of this publication may be reproduced, transmitted, transcribed, or translated
into any language in any form by any means without the written permission of A&D
Company, Limited.
The contents of this manual and the specifications of the instrument covered by this
manual are subject to change for improvement without any notice and obligation on
the part of the manufacturer.

3
Contents
1. Introduction ............................................................................................................................................ 4
1.1. Precautions ....................................................................................................................................... 4
2. Packing List ........................................................................................................................................... 5
3. Density Measurement Principle ........................................................................................................... 6
3.1. Density .............................................................................................................................................. 6
3.2. Specific Gravity ................................................................................................................................. 6
3.3. Density Measurement Principle ...................................................................................................... 6
3.4. Density of a Solid .............................................................................................................................. 6
3.5. Density of a Liquid ............................................................................................................................ 6
4. Error Factors .......................................................................................................................................... 7
4.1. Buoyancy of Air ................................................................................................................................. 7
4.2. Temperature of a Liquid ................................................................................................................... 7
4.3. Volume of Float ................................................................................................................................. 7
4.4. Influence of Wire ............................................................................................................................... 7
4.5. Surface Tension ................................................................................................................................ 8
4.6. Bubbles ............................................................................................................................................. 8
5. Measuring the Density of a Solid ......................................................................................................... 9
5.1. Assembling the Kit ............................................................................................................................ 9
5.1.1. Assembling the Kit Using Glass Breeze Break (GXA-10) ..................................................... 10
5.2. Measuring the Density of a Solid ................................................................................................... 11
5.2.1. Density of Water ........................................................................................................................ 11
6. Measuring the Density of a Liquid...................................................................................................... 12
6.1. Assembling the Kit .......................................................................................................................... 12
6.2. Measuring the Density of a Liquid ................................................................................................. 12
7.
Density Measurement Using the GX
-
A
/
GF
-
A Balance
............................................................................... 13
7.1. Preparation Before Measurement (Settings of the Function Table) ......................................... 14
7.2. Measuring Solid Density (Specific Gravity), Function Table .............................................. 20
7.3. Specifying Liquid Density ............................................................................................................... 23
7.4. Measuring Liquid Density (Specific Gravity), Function Table ............................................ 26
7.5. Specifying Volume of Float ............................................................................................................ 29
8. Frequently Asked Questions and Answers ....................................................................................... 31

4
1. Introduction
Thank you for your A&D purchase! This is the instruction manual for the density determination kit.
The density determination kit can be easily used to measure the density of solid or liquid when it is
combined with the following electronic balances.
GX-203A, GX-303A, GX-403A, GX-603A, GX-1003A, GX-1603A,
GF-203A, GF-303A, GF-403A, GF-603A, GF-1003A, GF-1603A
Before using the density determination kit, please read this instruction manual thoroughly.
1.1. Precautions
This density determination kit allows the density or specific gravity of a solid or liquid to be measured.
However, the results of measurements may be affected by various factors that could cause errors,
therefore we cannot guarantee them to be 100 % accurate.
Do not use the density determination kit for measuring the density of chemically active substances.
After using the density determination kit, clean all surfaces to remove rust and oxides.
The balance is precision instrument, so avoid shocks or excessive loads.
To improve measuring accuracy, allow the temperature of liquid (water) and sample (solid) to
equalize to the ambient room temperature and perform measurement in a stable environment.
The breeze break provided with the balance cannot be used with the density determination kit.
To perform an accurate density measurement, use the glass breeze break available as an option
( GXA-10).

5
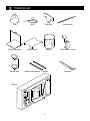
2. Packing List
φ0.2
Float Wire Float hook Thermometer
Density pan stand Beaker stand Beaker Thermometer clamp
Density pan Beaker stand spacer 2 pieces Tweezers
Kit box

6
3. Density Measurement Principle
3.1. Density
Density means the amount of mass of a sample per unit volume. ( Unit [g/cm3] and others )
ρ = ρ: Density [g/cm3] M: Mass [g] V: Volume [cm3]
3.2. Specific Gravity
Specific gravity means the ratio of the density of a sample to the density of pure water (with the same
volume as that of the sample) at 4 °C at 1013.25 hPa.
ρ = ρ: Specific gravity [ No unit ] M: Mass [g] V: Volume [cm3]
ρ4: Density of water at 4 [°C], 0.99997 [g/cm3] ≒ 1.000 [g/cm3]
3.3. Density Measurement Principle
The GXA-13 combined with an authorized balance can measure the density of a sample based on
the Archimedes’ principle.
Archimedes’ Principle of Density Measurement
A body immersed in a liquid (gas) is subject to an upward force equal to the weight of the
liquid (gas) it displaces. The upward force is buoyancy.
3.4. Density of a Solid
The density of a solid can be obtained according to the sample weight in air, sample weight in liquid
and the density of the liquid.
ρ = ×ρ0 ρ: Density of sample [g/cm3] A: Sample weight in air [g]
ρ0: Density of liquid [g/cm3] B: Sample weight in liquid [g]
3.5. Density of a Liquid
The density of a liquid can be obtained according to the weight of the float in air, the weight of the
float in a liquid, and the known volume of the float.
ρ = +d ρ: Density of liquid [g/cm3] A: Weight of the float in air [g]
V: Volume of the float [cm3] B: Weight of the float in liquid [g]
d: Density of air ( approximately 0.001 [g/cm3] )
M
V
M
V•ρ
4
A
A - B
A - B
V

7
4. Error Factors
There are several error factors that may affect the accuracy of a density measurement.
4.1. Buoyancy of Air
When the liquid density is measured, an upward force, 0.0010 to 0.0014 [g/cm3], is exerted in
proportion to the volume of the liquid. The buoyancy in air per 1 [cm3] is found by:
d = × d: Air density [g/cm3] t: Air temperature [°C]
P: Air pressure [hPa]
When obtaining measurement results down to the third decimal place, 0.001 [g/cm3] is added to
the measured value to compensate for an error in air density.
4.2. Temperature of a Liquid
When taking a density measurement using a liquid, the density measurement will change depending on
the temperature. Obtain the density of a liquid by comparing its temperature with the values in “Table 1
Temperature and Density of Water” for distilled water or provided in other reference documents for other
liquids.
4.3. Volume of Float
The tolerance of the measured value of the volume of the float is ±0.01 [cm3].
4.4. Influence of Wire
When a solid sample is placed on the density pan for measurement, which is immersed in a liquid,
the liquid surface position rises. At this time, the wire (φ1 mm) connecting the upper and lower pans
is subject to the buoyancy whose magnitude is equal to the weight of the raised liquid. 1 mm raise of
the liquid surface exerts a buoyancy of approx. 0.8 mg to the wire. To minimize a measurement error
caused by the buoyancy, adjust the sample size so that it will not raise the liquid surface, or perform
a mathematical correction.
When measuring the density of a liquid, the float-suspending wire (φ2 mm) immersed in the liquid
affects the measurement. Immersing the wire by 10 mm exerts a buoyancy of approx. 0.3 mg to the
wire. However, this buoyancy can be ignored because it is divided by the volume of the float when
the density of the liquid is obtained.
0.0012932
1+0.0036728×t
P
1013.25

8
4.5. Surface Tension
When the density of a solid is measured, a force of approx. 5 mg (surface tension) is applied to the
density pan, between the wire (φ1 mm) of the density pan and the surface of the liquid.
The surface tension can be reduced to approx. 1 mg by adding a surfactant (for example, a water
droplet preventive solution as used for developing photographs). Adding 0.1 mL (1.2 [g/cm3] density)
of a surfactant to 200 mL of water will increase the density of the water by approx. 0.0001 [g/cm3].
When the density of a liquid is measured, a force of about 1 mg is exerted by the wire of 0.2 mm in
diameter. However, this force can be ignored because it is divided by the volume of the float.
4.6. Bubbles
The buoyancy of a bubble of 1 mm in diameter is approx. 0.5 mg. Stickiness of bubbles depends on
the shape and material of a sample. Make measurements considering the characteristic of bubbles.
When the density of a solid is measured, we recommend adding a surfactant to reduce the influence
of surface tension and bubbles.

9
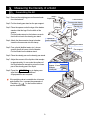
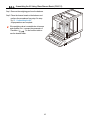
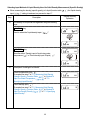
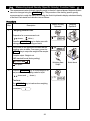
5. Measuring the Density of a Solid
5.1. Assembling the Kit
Step 1.
Remove the weighing pan and breeze break
from the balance.
Step 2.
Put the density pan stand on the pan support.
Step 3.
Place the spacer under the legs of the beaker
stand so that the legs fit to the ditch of the
spacer.
Put the beaker stand on the balance as such
that it will not touch the density pan stand.
Step 4.
Attach the thermometer clamp to beaker.
Insert the thermometer into the clamp.
Step 5.
Pour a liquid (distilled water, etc.), whose
specific gravity is known, into the beaker.
Put the beaker on the beaker stand.
Step 6.
Place the density pan on the density pan stand.
Step 7.
Adjust the amount of the liquid so that sample
is approximately 10 mm under the surface of
the liquid when the sample is put on the lower
pan of the density pan in the liquid.
Step 8.
Press the RE-ZERO key to display zero
after the weighed value stabilized.
All preparations are complete.
If the weighing value is unstable due to breeze
and vibration, etc., increase the parameter of
"Condition ( )" in the function table or
use the breeze break.
Thermometer
Thermometer clamp
Beaker stand
Density pan
Spacer to
prevent slipping
Step 6.
Step 4.
Liquid
Step 5.
Beaker
Step 5.
Step 3.
Density pan stand
Pan support
Weighing pan
Step 2.
Step 1.
Step 7. Adjust liquid surface.
Approx. 10 mm
Sample
Lower pan

10
5.1.1. Assembling the Kit Using Glass Breeze Break (GXA-10)
Step 1.
Remove the weighing pan from the balance.
Step 2.
Place the breeze break on the balance and
perform the procedures from step 2 to step
8 in “5.1. Assembling the Kit”.
All preparations are complete.
If the weighing value is unstable due to breeze
and vibration, etc., increase the parameter of
"Condition ( )" in the function table or
use the breeze break.

11
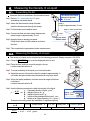
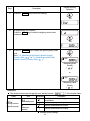
5.2. Measuring the Density of a Solid
The density of a solid can be obtained by averaging the measured values.
Display example is GX-603A.
Step 1.
Start the measurement after the water
temperature becomes stable.
Step 2.
Press the RE-ZERO key to display zero.
Step 3.
Put sample on the upper pan of the density pan
and record the measurement value A in air.
Step 4.
After removing the sample from the upper pan of the
density pan, press the RE-ZERO key to display
zero.
Step 5.
Put sample on the lower pan of the density pan
and record measurement value B in liquid.
Adjust the amount of the liquid so that
sample is approximately 10 mm under the
liquid surface when the sample is put on
lower pan in the liquid.
Step 6.
Obtain the water density using the water temperature and
"Table-1, temperature and density of water". Acquire liquid density
using the following formula substituted the measured value.
ρ : Calculated sample density [g/cm3]
ρ = x ρ0 ρ0 : Water density [g/cm3]
A : Measurement value in air [g]
B : Measurement value in water [g]
Example of recording sheet and calculation (3 significant figures).
Measurement value
in air A
4.810 [g]
Measurement value
in water B
4.215 [g] Water temperature
26 °C
Water density ρ0
0.99678 [g/cm3]
Calculated sample density ρ
8.06 [g/cm3]
x 0.99678 = 8.06 [g/cm3]
5.2.1. Density of Water
At sea level (1 atmosphere pressure), the density of water reaches a maximum at 3.98 [°C].
Table 1, Temperature and Density of Water Unit: g/cm3
°C
+0
+1
+2
+3
+4
+5
+6
+7
+8
+9
0
0.99984
0.99990
0.99994
0.99996
0.99997
0.99996
0.99994
0.99990
0.99985
0.99978
10
0.99970
0.99961
0.99949
0.99938
0.99924
0.99910
0.99894
0.99877
0.99860
0.99841
20
0.99820
0.99799
0.99777
0.99754
0.99730
0.99704
0.99678
0.99651
0.99623
0.99594
30
0.99565
0.99534
0.99503
0.99470
0.99437
0.99403
0.99368
0.99333
0.99297
0.99259
40
0.99222
0.99183
0.99144
0.99104
0.99063
0.99021
0.98979
0.98936
0.98893
0.98849
A
A - B
4.810
4.810 – 4.215
Step 2.
Step 3. Sample
Put the sample on the
lower pan after step 4.
Step 4.
Step 5. Adjust liquid surface.
Approx. 10 mm
Sample
Lower pan

12
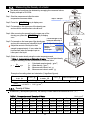
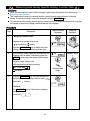
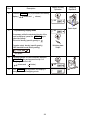
6. Measuring the Density of a Liquid
6.1. Assembling the Kit
Assemble the kit as described in the procedure below.
Step 1.
Refer to “5.1. Assembling the Kit” up to
assembling the beaker stand.
Step 2.
Attach the thermometer clamp to beaker.
Insert the thermometer through this clamp.
Step 3.
Put the beaker on the beaker stand.
Step 4.
Connect the float and hook using stainless wire
whose length is approximately 50 mm.
Step 5.
Hang the hook to density pan stand.
Check that it does not hit the beaker, and lower
the float.
Step 6.
This completes the preparations before measurement.
6.2. Measuring the Density of a Liquid
The density of a liquid can be obtained by the following procedure. Display example is GX-603A.
Step 1.
Press the RE-ZERO key to set the displayed value to zero.
Step 2.
Place the float, and then record its weight in the air.
Let the measured value be A.
Step 3.
To measure density of the liquid, pour it into the beaker.
Adjust the amount of the liquid so that the sample is approximately 10
mm under the liquid surface when the sample is hung in the liquid.
Step 4.
When the display stabilizes, and then record its weight of the float
in the liquid.
Let the measured value be B.
Step 5.
Use the following equations to obtain the density of the liquid.
ρ : Calculated density of liquid [g/cm3]
ρ = + d A : Weight of float in air [g]
B : Weight of float in liquid [g]
V : Volume of float (stamped on the hook) [cm3]
d : Density of air (Approximately 0.001 [g/cm3])
Example of recording sheet and calculation (3 significant figures).
Measurement value
A - B
9.970 g Volume of float V 10.01 cm3 Density of air d 1.184x10⁻³ g/cm3
Temperature
25 °C
Atmospheric pressure
1013.25 hPa
Calculated density of liquid ρ
0.997 g/cm3
+ 0.001 = 0.997 [g/cm3]
A - B
V
9.970
10.01
The volume of the float is
stamped on the hook.
Ex. 10.01 cm
3
Step 4.
Length is approximately 50 mm
Float
Step 5. Hook of the float
Density pan stand
Beaker stand
Liquid surface
Approx. 10 mm
Step 3. Float

13
7.
Density Measurement Using the GX
-
A
/
GF
-
A Balance
The GX-A / GF-A balances are equipped with a density function (specific gravity mode).
When this density determination kit GXA-13 is used with density function of the following balances,
the density of a solid and liquid can be measured.
GX-203A, GX-303A, GX-403A, GX-603A, GX-1003A, GX-1603A,
GF-203A, GF-303A, GF-403A, GF-603A, GF-1003A, GF-1603A
Caution
The density function ( ) of the balance cannot be selected when using factory
settings.
The density function of the balance does not display in the function table when the specific gravity
( ) of the weighing unit ( ) is inactive. To use the specific gravity of the weighing
unit, register "specific gravity" of "weighing unit" in the "function table" at first, and then select the
specific gravity ( ) of the weighing unit using the MODE key in weighing mode.
When the liquid density input ( ) is active, the liquid density input ( ) or density of solid
( ) is displayed. Refer to the instruction manual of balance for operation method of the "function
table".
The measurement value of density (specific gravity) is fixed to 3 decimal places.

14
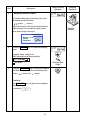
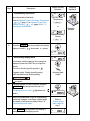
7.1. Preparation Before Measurement (Settings of the Function Table)
Set the function table of the balance before the density function (specific gravity mode) is used.
Enabling the Unit of Specific Gravity ( )
Register the specific gravity ( ) of the weighing unit ( ).
The following is an example of registering units in the order of (grams) → ( Specific
Gravity ).
Step Description
Display and Key
Operation
1.
Press and hold (for about 2 seconds) the SAMPLE key in
weighing mode.
of the function table is displayed.
Press and hold
(for about 2 seconds)
2.
Press the SAMPLE key several times to display the
weighing unit .
Press several times
3.
Press the PRINT key to display .
4.
Press the RE-ZERO key to specify the unit and display the
unit specification mark “ ” .

15
Step Description
Display and Key
Operation
5.
Press the SAMPLE several times to display .
Press several times
6.
Press the RE-ZERO key to specify the unit and display the
unit specification mark “ ” .
7.
Press the PRINT key to register the specified unit.
8.
Press the CAL key to return to weighing display.
9.
Each time you press the MODE key, the units will switch in
the specified order.
Order from to *.
* In the specific gravity mode, the unit is when calculating the
density.
The display unit is when measuring weight in air ( shows
at the top left and the “ ” mark blinks) and when measuring
weight in water ( shows at the top left, “ ” mark shows).

16
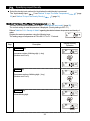
Selecting Substance ( Solid or Liquid )
Select a substance which is either solid or liquid. It can be specified at “substance selection
( )” of “density function ( )” in the function table.
Step Description
Display and Key
Operation
10.
Press and hold (for about 2 seconds) the SAMPLE key
while the scale is in weighing mode.
of the function table is displayed.
Press and hold
(for about 2 seconds)
11.
Press the SAMPLE key several times to display the
“ density function ( ) ”.
Press several times
12.
Press the PRINT key to enter the item.

17
Step Description
Display and Key
Operation
13.
Select substance using the following keys.
SAMPLE key
Used to select "substance selection ( )".
RE-ZERO key
Selects either "solid density measurement ( )" or "liquid
density measurement ( )".
14.
Description of settings is as follows.
“Solid ( )”
Proceeds to “7.2. Measuring Solid Density (Specific Gravity),
Function Table ” after step 18.
“Liquid ( )"
Proceeds to “7.4. Measuring Liquid Density (Specific Gravity),
Function Table ” after step 18.

18
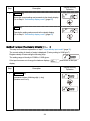
Selecting Input Method of Liquid Density Used for Solid Density Measurement (Specific Gravity)
When measuring the density (specific gravity) of a liquid (function table ), the “liquid density
input ( ) ” setting is irrelevant, so proceed to step 17.
Step Description
Display and Key
Operation
15.
The density of a liquid can be registered using the following
keys.
SAMPLE key
Used to select the “liquid density input ( )”.
RE-ZERO key
Specifies either “Density input of liquid using water
temperature ( )” or “Direct density input of liquid ( )”.
16.
Description of settings is as follows.
“Water temperature input ( )”
Proceeds from step 7 of “7.2. Measuring Solid Density
(Specific Gravity), Function Table ” to “Method To
Input The Water Temperature ( )” of “7.3.
Specifying Liquid Density”.
“Direct density input ( ) ”
Proceeds from step 7 of “7.2. Measuring Solid Density
(Specific Gravity), Function Table ” to “Method To
Input The Density Directly ( )” of “7.3. Specifying
Liquid Density".

19
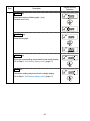
Step Description
Display and Key
Operation
17.
Press the PRINT key to store the settings.
18.
All preparations are complete.
Press the CAL key to enter the weighing mode to start
measurement.
19.
Press the MODE key to display the specific gravity mode
units.
Go to “7.2. Measuring Solid Density (Specific Gravity),
Function Table ” or “7.4. Measuring Liquid Density
(Specific Gravity), Function Table ”.
Measuring Solid
Density
( )
or
Measuring Liquid
Density
( )
Reference
The density function (specific gravity) uses “density function ( )" of the function table.
Class
Item
Parameter
Description
Density function
(Specific gravity)
Liquid density input
Density input of a liquid using water
temperature
Direct density input of a liquid
Substance
selection
Density measurement of a solid
Density measurement of a liquid
indicates factory settings.

20
7.2. Measuring Solid Density (Specific Gravity), Function Table
Cautions
When the temperature or type of liquid changes, register again the density of the liquid using “7.3.
Specifying Liquid Density”.
The measurement value of the density function (specific gravity mode) is fixed to 4 decimal
places. The minimum division cannot be changed using the SAMPLE key.
The procedure of the density (specific gravity) measurement is to weigh the sample in air, to weigh
the sample in liquid and to display calculated density of the sample.
Procedure
Step Description
Display and Key
Operation
Weighing
Operation
1.
Weighing mode for in air
Preparation for measurement in air.
( shows and blinks )
Press the RE-ZERO key to display zero with
nothing is put on the upper pan and lower pan.
2.
Put the sample on the upper pan and wait until the
weighing value is stable. If necessary, press the
PRINT key to output the weight of the sample.
Example output: Weight in air
A&D standard format (factory setting)
is a space
Weighing data
output
Sample in the air
3.
Press the SAMPLE key to record weight in air
and proceed to the weighing mode for liquid (
shows and shows ).
Cautions
The SAMPLE key is inactive when weighing
value
is overload .
Page is loading ...
Page is loading ...
Page is loading ...
Page is loading ...
Page is loading ...
Page is loading ...
Page is loading ...
Page is loading ...
Page is loading ...
Page is loading ...
Page is loading ...
Page is loading ...
Page is loading ...
Page is loading ...
Page is loading ...
-
 1
1
-
 2
2
-
 3
3
-
 4
4
-
 5
5
-
 6
6
-
 7
7
-
 8
8
-
 9
9
-
 10
10
-
 11
11
-
 12
12
-
 13
13
-
 14
14
-
 15
15
-
 16
16
-
 17
17
-
 18
18
-
 19
19
-
 20
20
-
 21
21
-
 22
22
-
 23
23
-
 24
24
-
 25
25
-
 26
26
-
 27
27
-
 28
28
-
 29
29
-
 30
30
-
 31
31
-
 32
32
-
 33
33
-
 34
34
-
 35
35


