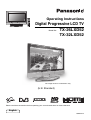
Panasonic TX32LXD52 Operating instructions
- Category
- LCD TVs
- Type
- Operating instructions
This manual is also suitable for

Operating Instructions
Digital Progressive LCD TV
Model No.
Please read these instructions before operating your set and retain them for future reference.
English
TQB0E0219
123
456
789
0
OK
C
IDTV
N
MODE
PULL
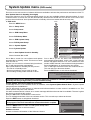
TX-26LXD52
TX-32LXD52
The image shown is for illustration only.
(U.K. Standard)

2
Welcome
Dear Panasonic Customer,
We hope that you have many years of enjoyment from your new TV. The Quick Start Guide section at the beginning
of this instruction book will allow you to use the TV as quickly as possible. We recommend that you then read the
complete instruction book, and keep it to refer to as you explore the range of advanced features that this LCD TV
offers.
Contents
Analogue and Digital television – what are they?
Analogue transmission is the system that has been used for many years for broadcasting television programmes.
With continuous improvements in technology it is now possible to transmit programmes in a digital format, allowing
clearer pictures, more stations and other services to be displayed on screen. Digital television is provided in three
different ways; it can be sent along a cable connection direct to your house, broadcast from a satellite, or broadcast
using traditional land based (terrestrial) transmitters. The first two options require you to have an extra “set top box”
decoder and in the case of satellite, a receiving dish mounted outdoors. While allowing you to receive traditional
analogue transmissions in the usual way, this television can also receive terrestrial digital services using an integrated
(Digital Video Broadcasting) decoder. This allows you to enjoy the new era of digital terrestrial television, including
interactive services, without the need for a “set top box” or satellite dish – an adequate roof or loft mounted antenna
is all you need.
Warnings and Precautions ........................................ 3
Accessories ............................................................... 4
Fitting remote control batteries ................................. 4
Cable cover removal and fitting ................................ 5
How to open the front cover ...................................... 5
How to use the LCD stand ........................................ 5
Quick Start Guide ...................................................... 6
Basic controls: front panel and remote control .......... 9
Using the On Screen Displays ................................ 10
Picture menu ............................................................ 11
Sound menu ............................................................ 12
Setup menu ............................................................. 13
Tuning menu – overview ......................................... 14
Tuning menu – Programme edit .............................. 15
Adding / deleting a programme channel .............. 15
Moving a programme channel ............................. 15
Renaming a programme channel ........................ 16
Locking a programme channel ............................ 16
Copying programme information to
a recording device .................................... 16
Tuning menu – Auto setup ...................................... 17
Tuning menu – Manual tuning ................................. 18
Manual tuning (via front panel) ............................... 18
Owner ID ................................................................. 19
Shipping condition ................................................... 20
DVB Setup Menu – overview .................................. 21
Timer Programming menu ...................................... 22
Profile Edit menu ..................................................... 24
Child Lock menu ..................................................... 25
DVB Tuning Menu ................................................... 26
DVB System Setup ................................................. 27
Common Interface Module menu ............................ 28
System Update menu ............................................. 29
TV Guide - Electronic Programme Guide (EPG) .... 30
Information banner .................................................. 31
Subtitles ON / OFF .................................................. 31
Q-Link...................................................................... 32
Aspect Controls ....................................................... 33
Still .......................................................................... 34
VCR / DVD operation .............................................. 35
Teletext operation .................................................... 36
Connections ............................................................ 39
How to connect the Headphones / AV3 terminals
.. 39
How to connect the Audio Output terminals ........ 40
How to connect the AV1 / 2 / 4 Scart terminals .... 40
How to connect the Component Input terminals .. 40
How to connect the HDMI Input terminal ............. 41
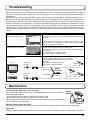
Troubleshooting ...................................................... 42
Maintenance ........................................................... 43
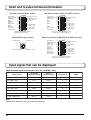
Scart and S-video terminal information ................... 44
Input signal that can be displayed ........................... 44
Specifications .......................................................... 45

3
Warnings and Precautions
• This TV set is designed to operate on AC 220-240 V, 50 /
60 Hz.
•To prevent damage which might result in electric shock
or fire, do not expose this TV set to rain or excessive
moisture. This TV must not be exposed to dripping or
splashing water and objects filled with liquid, such as
vases, must not be placed on top of or above the TV.
• Keep unneeded small parts and other objects out of the
reach of small children. These objects can be accidentally
swallowed. Also, be careful about packaging materials
and plastic sheets.
• WARNING : HIGH VOLTAGE!!!
Do not remove the rear cover as live parts are accessible
when it is removed. There are no user serviceable parts
inside.
Ensure that the mains plug is easily accessible.
• TV Games / Home Computers
Extended use of TV games or home computers with any
television set can cause a ‘shadow’ on the screen. This
type of LCD panel phenomenon, can be limited by
observing the following points:
• Reduce the brightness and contrast levels to a minimum viewing
level.
• Do not allow a still picture to be displayed for an extended period,
as this can cause a permanent after-image to remain on the
LCD TV screen.
•
Examples of still pictures include logos, video games, computer
images, teletext and images displayed in 4:3 mode.
•
This type of LCD panel damage, is not an operating defect, and
as such is not covered by the Panasonic warranty.
• The On / Off switch on this model does not fully disconnect
the TV from the mains supply. Remove the mains plug
from the wall socket before connecting or disconnecting
any leads, or if the TV set is not used for a prolonged
period of time.
Note:
If the set is not switched off when the TV station stops
transmitting, it will automatically go to Standby mode after
30 minutes. This function will not operate when the TV is in
AV mode.
• Cabinet and LCD panel care
Remove the mains plug from the wall socket. The cabinet
and LCD panel can be cleaned with a soft cloth moistened
with mild detergent and water. Do not use solutions
containing benzol or petroleum.
• When ambient temperature is cool, the picture may take
a short time to reach normal brightness, but this is not a
malfunction. (After brief moment, the picture will have
normal brightness.)
•
Adequate ventilation is essential to prevent failure of
electrical components, we recommend that a gap of at least
10 cm is left all around this television receiver even when
it is placed inside a cabinet or between shelves.
•Avoid exposing the TV set to direct sunlight and other
sources of heat. To prevent fire, never place any type of
candle or naked flame on top or near the TV set.
•Ventilation should not be impleded by covering the
ventilation openings with items such as newspapers,
tablecloths and curtains.
FOR YOUR SAFETY PLEASE READ THE FOLLOWING TEXT CAREFULLY
This appliance is supplied with a fitted three pin mains plug for your safety and convenience. A 5 amp fuse is fitted in
this plug. If the fuse is replaced then the replacement fuse must be 5 amp rated and should be approved by ASTA or
BSI to BS1362.
Check for the ASTA mark
ASA
or the BSI mark on the body of the fuse.
If the fitted plug has a removable fuse cover you must ensure that it is refitted when the fuse is replaced. If you lose the
fuse cover the plug must not be used until a replacement cover is obtained. Replacement fuse covers can be purchased
through your local Panasonic dealer.
The plug fitted to this appliance incorporates a mains filter circuit. If this is removed or replaced
with a non– filtered plug this television will no longer meet the European standards for
Electromagnetic Compatibility (EMC). If the fitted plug is unsuitable for the socket outlet in
your home an appropriate adapter should be used.
Nonetheless, if the fitted plug is replaced, the fuse should be taken out and the cut- off plug
disposed of safely. There is danger of severe electrical shock if the cut off plug is inserted
into any 13 amp socket.
If a new plug is to be fitted please observe the wiring code as shown below.
If in any doubt please consult a qualified electrician.
How to replace the fuse (for plug type shown in example 1):
Lift out the removable fuse compartment with a screwdriver and replace the fuse, then refit securely
into the mains plug (see example 1).
How to replace the fuse (for plug type shown in example 2):
Lift open the fuse compartment, in the mains plug, with a screwdriver, and replace the fuse, then press the fuse cover
down securely (see example 2).
Example 1
Example 2
IMPORTANT : – The wires in the mains lead of this appliance are coloured in accordance with the following code :–
BLUE : NEUTRAL BROWN : LIVE
As the colours of the wires in the mains lead of this appliance may not correspond to the markings identifying the terminals
in your plug, proceed as follows :–
1. The BLUE wire must be connected to the terminal marked ‘N’ or coloured black.
2. The BROWN wire must be connected to the terminal marked ‘L’ or coloured red.
IMPORTANT NOTE : Under no circumstances should either of these wires be connected to the Earth terminal of the three
pin plug, marked with the letter ‘E’ or the earth symbol .

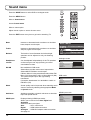
4
123
456
789
0
OK
C
IDTV
N
MODE
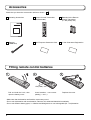
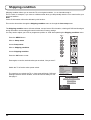
Check that you have the accessories and items shown
Accessories
+
+
-
-
Fitting remote control batteries
Pull and hold the hook, then
open the battery cover.
Insert batteries - note correct
polarity ( + and
-
).
“R6 (UM3)” size
Replace the cover.
1 2 3
• Make sure that the batteries are fitted the correct way round.
• Do not mix old batteries with new batteries. Remove old, exhausted batteries immediately.
• Do not mix different battery types, i.e. Alkaline and Manganese or use rechargeable (Ni - Cad) batteries.
Operating Instructions
Batteries for the Remote
Control Transmitter
(2 × R6 (UM3) size)
Clamper
(TMME203)
1 Year Guarantee Registration
Remote Control Transmitter
(EUR7651080)
Pan European Guarantee Card

5
Cable cover removal and fitting
Removal
Fitting
1. Insert the claws (at 3 points) at the bottom end.
2. Push until it clicks.
How to use the LCD stand
Note:
To avoid interference appearing on the screen, do not bundle the RF cable and mains lead together.
1. Push down hooks and pull the cover slightly
towards yourself to disengage the claws (at 3
points).
2. Slowly pull out in the downward direction.
(View from the top)
PULL
PULL
How to open the front cover
Raise the lower part of the door
marked “PULL”.
Adjust the LCD panel to your desired angle.
The LCD panel can be swiveled the following direction:
20 ° Right
20 ° Left

6
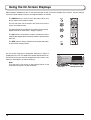
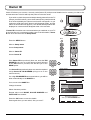
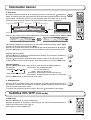
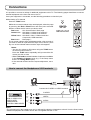
Quick Start Guide
Scart cables
(Not supplied)
Satellite Receiver
RF cable
(Not supplied)
Connection and setting up options
Note:
Please ensure that the unit is disconnected from the mains before
attaching or disconnecting any leads.
Scart Connections
• The VCR / DVD Recorder can be connected to the TV using a Scart cable, if you are using a Scart equipped VCR
/ DVD Recorder.
• Use the TV’s any Scart terminal for any VCR. Always use a “fully wired” Scart cable.
• Use the TV’s AV1 or AV4 Scart terminal for any DVD Recorder. Always use a “fully wired” Scart cable.
• Use the TV’s AV1 or AV4 Scart terminal for Satellite Receiver. Always use a “fully wired” Scart cable.
RF Connection
• Connect the RF cable to the “Aerial In” terminal of the VCR / DVD Recorder and an RF cable from the VCR / DVD
Recorder “Aerial Out” terminal to the TV Aerial terminal (
).
Notes:
• If using a “Q-Link” VCR / DVD Recorder, then the AV1 Scart of the VCR / DVD Recorder must be connected to the
AV2 or AV4 terminal of the TV. If your VCR or DVD Recorder is not a “Q-Link” device, please consult the operating
instruction book for that product. Further information on Q-Link can be found on page 32.
• Further details of Audio / Video connections can be found on page 39-41.
• Additional equipment and cables are not supplied.
RF cable (Not supplied)
VCR / DVD Recorder
OR
RGB
VIDEO
VIDEO
S-VIDEO
L
Y
P
B
P
R
R
AUDIO
RGB
VIDEO
S-VIDEO
VIDEO
COMPONENT
AV1 AV2 AV4

7
Quick Start Guide
Programmes will appear immediately if your dealer has programmed
the TV for you.
If the TV has not been programmed for you then Auto setup will begin.
The TV will search for DVB stations and Analogue stations:
TV stations will be located, sorted into order and stored ready for use.
Stations are sorted into the following order:
• DVB Stations: Are sorted by their logical channel number sent by
the broadcasters, which can be made the favourites list by Profile
Edit. See page 24.
• Analogue Stations: Are sorted into channel order, but can be
changed to your preference. See page 15.
In this setup, usually Analogue auto setup screen may not be
displayed. The sorted programme order depends upon the TV signal,
the broadcasting system, and reception conditions.
2
1
Connect the mains plug to the wall socket.
Press the [
] switch on the TV set to turn
the set on.
To switch the TV set to Standby mode, press
the
button on the remote control.
The TV set can be switched on by pressing
the
button again if it was in Standby mode.
Note:
This TV will still consume some power even
in the Off mode, as long as the mains plug is
still connected to a live mains socket.
PULL
123
456
789
0
IDTV
N
MODE
OK
C
Remote control signal sensor
CH44
AUTO SETUP IN PROGRESS
SEARCHING : PLEASE WAIT
21 68
Exit
DOWNLOAD IN PROGRESS
PLEASE WAIT
Programme : 63
Remote control unavailable
Please Wait !
DVB Aute Setup
Prog. Channel Service Name NetID. TS ID. Quality
This will take about 3 mins.
Exit
4
5
6
7
8
30
30
30
30
30
12302
12302
12302
12302
12302
4158
4158
4158
4158
4158
9
9
9
9
9
BBC NEWS 24
BBCI
CBBC Channel
BBC Radio Wales
BBC Radio Cymru
68 21
TV to VCR or DVD Recorder Download
If a “Q-Link”, “NEXTVIEWLINK” or compatible recording device has
been connected to a Scart terminal (AV2 or AV4) before starting Step
1, programme information will be downloaded to that device.
Only the analogue programme positions will be downloaded to the
recording device, in the same order as stored in the TV. See page 32.
Not all VCRs / DVD Recorders support this download of programme
information, some may require to be started manually.
3
Refer to the recording device’s operating instruction book.
If a recording device other than those described above has been connected, then there will be no download operation.
Notes:
• If the recording device has not accepted download data from the TV, you may need to select the Download
option from the device’s menu system. Refer to the recording device’s operating instruction book.
• If Q-Link is not operating correctly, check the following:
The Scart cable is connected to the TV’s Scart terminal, AV2 or AV4, and correctly setup in the menu.
The Scart cable is connected to the recording device’s compatible (Q-Link, NEXTVIEWLINK or similar
technology) Scart terminal.
The Scart cable is a “fully wired” type.
• For further information on Q-Link and connecting equipment, see page 32, 40, 44.
Power Indicator
Standby : Red
On : No Light
C.A.T.S. sensor
LCD C.A.T.S. (Contrast Automatic Tracking System)
automatically senses the ambient light conditions and
adjusts the brightness and gradation accordingly, to
optimize contrast. C.A.T.S. is in effect when Viewing
mode is set to Auto. See page 11.
DVB Indicator
DVB system active during Timer
recording or Direct TV Recording
: Orange (flash)
Timer Recording On : Orange
Otherwise : No Light

8
Owner ID
As an added feature, this TV has the option of adding a security
code (Owner ID) and personal details into its memory, so that in the
unfortunate event of theft it will help the Police to trace the owner.
Using the numeric buttons to enter required 4 digit Owner ID PIN
NUMBER.
If a 4 digit PIN NUMBER was entered, you will be taken automatically
to the NAME line.
If not, using the left or right cursor buttons move to the NAME line.
Change character using the up or down cursor buttons.
Select the character position using the left or right cursor buttons.
Repeat above until NAME, HOUSE NUMBER and POSTCODE
are entered.
Press the OK button to store the details.
Press the OK button again, when you are asked “Are you sure ? ”.
4
Quick Start Guide
For further information on Owner I.D., see page 19.
A space is provided on page 19 to write down the PIN NUMBER
for future reference.
To view a list of the stations that have been found, press the GUIDE button.
Use the cursor buttons to move the cursor bar.
Use the programme change button to step through the guide page
by page.
To view the selected programme, move the cursor to the channel
and then press the OK button.
The guide can be cleared from the screen using the EXIT button.
DVB TV Guide (DVB mode) See page 30.
To make stations easier to find, specific stations can be listed by
category; press the Yellow button to show a category.
The chosen category name is shown on screen.
For example, if you select Free TV and press the OK button, only
‘free-to-air’ stations will be listed – you can view any of these now.
If you select Pay TV and press the OK button, only subscription
stations will be listed – you will need to contact the service provider
to find out how to subscribe to these stations.
5
0123456789
Yo u now have the opportunity
to enter your details and
help the police crack crime
see instruction book
Exit
Select character
Change character
Store Owner ID
PIN NUMBER :
NAME :
POSTCODE :
Owner ID
HOUSE NO :
∗ ∗ ∗ ∗ ∗ ∗ ∗ ∗ ∗ ∗ ∗ ∗ ∗ ∗
∗ ∗ ∗ ∗ ∗ ∗ ∗ ∗ ∗ ∗ ∗
∗ ∗ ∗ ∗ ∗ ∗ ∗ ∗ ∗ ∗ ∗
∗ ∗ ∗ ∗
OK
VCR
123
456
789
0
C
123
456
789
0
IDTV
N
MODE
OK
GUIDE
OK
C
123
456
789
0
MODE
OK
Your LCD TV is now ready for use.
EXIT
Analogue Programme Guide
Prog. Name Chan.
VCR :
1 :
2 :
3 :
4 :
5 :
6 :
7 :
8 :
9 :
10 :
11 :
12 :
CH21
CH44
CH51
CH41
CH47
CH23
CH26
CH58
-
-
-
-
-
BBC1
BBC2
ITV
S4C
Prog. Name Chan.
13 :
14 :
15 :
16 :
17 :
18 :
19 :
20 :
21 :
22 :
23 :
24 :
-
-
-
-
-
-
-
-
-
-
-
-
Analogue mode
Exit
Info
Change display mode
Select channel
Select Programme
Timer Programming
Category Prog. type
-24 Hr +24 Hr
DVB TV Guide
:Landscape
Thu 05/08/04 18:50
BBC1
BBC2
ITV1
Channel4
five
ITV2
SC4
1
2
21
44
122
142
144
Eastender
Hot Wars
Emmerdal.
10 O’ clock News BBC
Panoroma
I’m A Celebrlty
Rugby
Red Cap
The Bill
Good bye
Terminator
News
The Bill
So
Hell
The
Fri 6th
DIY SOS
Coronation Street
Sex And The City
15 To1
The Bill
Hollday Program
Pepsi Char.
Pop Idol
20:00-21:00
Time: 19:30 20:00
Coronation Steet:We open in the Battersdy’s
Prog. type
Category
All Services
20:30 21:00 21:30
All Types
Page up
Page down
Category
All Services
DVB mode

9
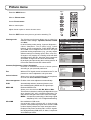
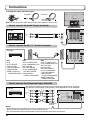
Basic controls: front panel and remote control
IDTV
REC
VCR DVD
VCR
TEXT
N
MODE
EXIT
TV/AVGUIDE
STTL INDEX HOLD
123
456
789
C
0
PROGRAMME
DIRECT
TV REC
DVB
Analogue
ASPECT
MENU
OK
STR
Used to store tuning in
analogue mode.
F (Function select)
Press repeatedly to select from the available
functions through the On Screen Display:
- Volume, Contrast, Brightness, Colour,
Sharpness, Tint (in NTSC mode), Bass,
Treble, Balance and Manual Tuning (analogue
mode only - see page 18).
TV/AV button (see page 39)
Press either button to change TV programme up or down.
Also used for changing various settings in conjunction with
the F button.
Press either button to switch the TV On from Standby mode.
Headphones jack
(see page 39)
AV3 terminals
(see page 39)
Standby On / Off button
Switches TV On or Off (Standby mode).
GUIDE button
Displays the DVB and Analogue TV
Guide. (see page 30).
Menu button
Press to access the Picture, Sound and
Setup menus. (see page 10-13)
Press to select a function or store a setting.
Press after selecting programme positions
to quickly change programme.
Coloured buttons used for the selection,
navigation and operation of various
functions.
Teletext button (see page 36-38)
STTL button
Text F.P. button (Analogue mode)
Subtitle On/Off (DVB mode)
(see page 31, 37)
Direct channel access
Available in Analogue mode.
During normal TV viewing or when
in the Tuning, Programme edit or
Manual tuning menus, press and then
enter channel number using the numeric
buttons.
Programme up / down button
ASPECT control button
(see page 33, 34)
MODE button (see page 12, 13)
Switch between viewing DVB and
Analogue modes.
DIRECT TV Record button
(see page 32)
Switch between viewing TV or AV input.
(see page 39)
Cursor buttons to make selections and
adjustments.
Exit the mode.
Text Hold / Picture Still button
(see page 34, 36)
Text Index button (see page 38)
Programme / channel change buttons (0-
9) and Teletext page buttons.
(see page 36-38)
When in Standby mode, switches TV On.
Information button
Press to display status information for
the current Programme position.
(see page 31)
Volume up / down button
N (Normalize) button
Resets all settings to their default levels.
Sound mute On / Off
VCR / DVD buttons
(see page 35)
On / Off switch

10
Bass
Treble
Balance
Headphone volume
NICAM
Mode
Ambience
Sound menu
Off
Music
Off
Exit
Adjust
Select
Return
OK
MENU
123
456
789
0
IDTV
N
MODE
OK
C
EXIT
Using the On Screen Displays
Many features available on this TV can be accessed via the On Screen Display menu system. Use the remote
control as shown below to access and adjust features as desired.
The MENU button is used to open the main menus and
also to return to the previous menu.
The up and down cursor buttons are used to move the
cursor and select menus.
The left and right cursor buttons are used to access menus,
adjust levels or to select from a range of options.
The OK button is used with a number of features to store
settings after adjustments have been made or options have
been set.
The EXIT button is used to exit the menu system and return
to the normal viewing screen.
An On Screen Help box is displayed whenever a menu is
displayed on the TV. This Help box indicates which buttons on
the remote control are used to navigate the menu shown, see
above for descriptions of button functions.
ON SCREEN HELP
‘Instructions’ box
Note:
The Help box is not shown in the menu pictures in this
instruction book due to space limitations.

11
MENU
123
456
789
0
N
MODE
OK
C
EXIT
Main menu
Picture menu
Setup menu
Sound menu
Viewing mode
Contrast
Brightness
Colour
Sharpness
Tint
Colour balance
Colour management
P-NR
MPEG NR
Normal
On
Off
Off
Picture menu
Dynamic
3D-COMB On
Viewing mode
Contrast
Brightness
Colour
Sharpness
Tint
Colour balance
Colour management
P-NR
MPEG NR
Normal
On
Off
Off
3D-COMB On
Picture menu
Dynamic
Viewing mode
Contrast
Brightness
Colour
Sharpness
Tint
Colour balance
Colour management
P-NR
MPEG NR
Normal
On
Off
Off
Picture menu
Dynamic
3D-COMB On
Picture menu
Press the MENU button.
Move to Picture menu.
Access Picture menu.
Move to menu option.
Adjust chosen option or access chosen menu.
Press the EXIT button at any time to go back to watching TV.
Viewing mode The Viewing mode menu allows you to select four
different screen settings - Dynamic, Normal, Cinema
and Auto.
In each Viewing mode setting, Contrast, Brightness,
Colour, Sharpness, Tint (in NTSC only), Colour
balance, Colour management, P-NR, MPEG NR and
3D-COMB can be adjusted and stored to suit your
particular viewing requirement. (e.g., you may require
different settings for viewing sports, films, news etc.)
Changes to any settings in a viewing mode will affect
all signal sources: RF, AV1, AV2, AV3, AV4, Component
and HDMI. Changes will be stored automatically.
By analysing and processing the incoming picture, all
four modes feature automatic enhancement.
Increase or decrease the levels of these options
according to your personal preference.
With an NTSC signal source connected to the TV, the
picture hue can be adjusted to suit your taste.
Allows you to set the overall colour tone of the picture.
Choose from Cool, Normal and Warm.
Enables vivid colour adjustment automatically.
Automatically reduces unwanted picture noise.
Not available during HDMI and HD signal input.
Reduces MPEG noise.
Allows you to choose from Off, Min, Mid and Max.
This function is effective in reducing the digital block noise
when viewing DVD, VCD or digital broadcasting. The
effect will be changed based on the scene and image.
MPEG: Compression technology of the image signal
adopted by DVD, VCD or digital broadcasting.
Not available in DVB mode.
Occasionally, whilst viewing still or slow moving
pictures, colour patterning may be seen. Set 3D-COMB
to On to display sharper and more accurate colours.
Displayed only when receiving PAL or NTSC signals.
Not displayed during RGB Video, S-Video, Component
and HDMI input mode.
Contrast, Brightness, Colour, Sharpness
Tint
Colour balance
Colour management
P-NR
MPEG NR
3D-COMB

12
MENU
Main menu
Picture menu
Setup menu
Sound menu
Sound menu
Press the MODE button to select DVB or Analogue mode.
Press the MENU button.
Move to Sound menu.
Access Sound menu.
Move to menu option.
Adjust chosen option or access chosen menu.
Press the EXIT button at any time to go back to watching TV.
Bass
Treble
Balance
Headphone
volume
NICAM
Mode
Ambience
HDMI input
Increase or decrease level to enhance or minimise
lower, deeper sound output.
Increase or decrease level to enhance or minimise
sharper, higher sound output.
The levels of sound between the left and right
speakers can be adjusted to suit your listening
position.
Can be adjusted independently of the TV speakers
so that everyone can enjoy listening at a level
comfortable for them.
Not available in DVB mode.
Select On to provide stereo sound reproduction.
Select Off for FM Mono sound output.
If Nicam Mono is being transmitted select either FM
Mono (Off), Nicam Mono I (M1) or Nicam Mono II (M2).
The options depend upon the signal being
transmitted.
If reception deteriorates it is advisable to switch to
FM Mono (Off).
Sound quality can be improved when watching music
scene or drama by selecting the appropriate Music
or Speech mode.
Ambience provides a dynamic enhancer to simulate
improved spatial effects.
Displayed during HDMI input mode.
Allows you to choose from Auto, Digital and
Analogue.
Select to fit the input signal.
Auto : Set in normal use
Digital : HDMI cable connection
Analogue : HDMI-DVI adapter cable connection
See page 41.
123
456
789
0
IDTV
N
OK
C
MODE
MODE
DVB
A
nalogue
Bass
Treble
Balance
Headphone volume
NICAM
Mode
Ambience
Sound menu
Off
Music
Off
Bass
Treble
Balance
Headphone volume
Mode
Ambience
Sound menu
Music
Off
DVB mode
Analogue mode
EXIT
Bass
Treble
Balance
Headphone volume
NICAM
Mode
Ambience
Sound menu
Off
Music
Off
HDMI input
Auto
HDMI input mode

13
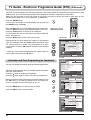
Main menu
Picture menu
Setup menu
Sound menu
Setup menu
Press the MODE button to select DVB or Analogue mode.
Press the MENU button.
Move to Setup menu.
Access Setup menu.
Move to menu option.
Adjust chosen option or access chosen menu.
Press the EXIT button at any time to go back to watching TV.
MODE
DVB
A
nalogue
Q-Link
AV2 / AV4 out
Teletext
Off timer
Power on
preference
Tuning Menu
DVB Setup Menu
Owner ID
Shipping condition
Volume correction
Allows you to select which AV terminal is to be used
for data communication between this TV and a
compatible recording device. Choose from AV2 and
AV4. See page 32.
Offers a choice of signals to send to the Scart terminal
selected in the Q-Link option. You can choose from
the current TV (Analogue, DVB) programme position,
the signal entering AV1 / AV2 / AV3 / AV4 or Monitor
- the picture displayed on screen.
Component signal input cannot be output to these
Scart terminals.
Allows you to choose between FASTEXT or List mode.
See page 36-38.
Switches the TV off within a preset time which you
can choose from between 0 to 90 minutes in 15 minute
intervals.
Set to TV to view picture from TV tuner.
Set to AV to view input from an external equipment
connected to a Scart socket, e.g. satellite receiver.
Note:
The external equipment must be switched on and
MENU
EXIT
sending a control signal for automatic switching at power on to occur.
Provides access to many other features including Programme edit and Auto setup. See
page 15-17.
Provides access to setup the DVB operations. See page 21.
Allows you to enter a security code and address information. See page 19.
Allows you to clear all tuning information and reset all control levels back to factory settings.
See page 20.
During AV and HDMI mode, Volume correction is displayed.
You can adjust volume level of AV and HDMI mode. Volume level is memorised.
AV mode
Q-Link
AV2 out
Off timer
Power on preference
Setup menu
AV2
Monitor
Off
TV
Volume correction
Teletext
FASTEXT
123
456
789
0
IDTV
N
OK
C
MODE
Q-Link
AV2 out
Off timer
Tu ning Menu
Owner ID
Shipping condition
Setup menu
AV2
Monitor
Off
Power on preference
TV
Teletext
FASTEXT
Analogue TV mode
AV2 out
Setup menu
AV2
Q-Link
Off
Monitor
TV
Power on preference
DVB Setup Menu
Owner ID
Shipping condition
Off timer
DVB mode

14
Tuning menu – overview (Analogue mode)
In Analogue mode
Press the MENU button.
Move to Setup menu.
Access Setup menu.
Move to Tuning Menu.
Access Tuning Menu.
Move to menu option.
Adjust chosen option or access chosen menu.
Press the EXIT button at any time to go back to watching TV.
Press the OK button after having adjusted some features to store
the new settings as the default (replacing the factory setting).
Programme edit
Auto setup
Manual tuning
Access in order to customize your programme settings
(e.g., adding or deleting a programme position). See
page 15, 16.
Allows you to automatically retune the TV. Useful if
you move house and wish to retune your TV to the
local stations. See page 17.
Allows individual programme positions to be tuned
manually. See page 18.
MENU
123
456
789
0
IDTV
N
MODE
OK
C
EXIT
OK
Main menu
Picture menu
Setup menu
Sound menu
Access
Q-Link
AV2 out
Off timer
Tu ning Menu
Owner ID
Shipping condition
Setup menu
AV2
Monitor
Off
Power on preference
TV
Teletext
FASTEXT
Programme edit
Auto setup
Manual tuning
Tuning Menu
Access
Delete Add Move Download
Programme edit
Prog. Chan. Name Lock
1 :
2 :
3 :
4 :
5 :
CH44
CH51
CH41
CH47
CH37
ABC
XYZ
FTP
123
456
Off
Off
Off
Off
Off

15
Tuning menu – Programme edit (Analogue mode)
In Analogue mode
Press the MENU button.
Move to Setup menu.
Access Setup menu.
Move to Tuning Menu.
Access Tuning Menu.
Move to Programme edit.
Access Programme edit.
Move to choose programme position (e.g., Prog. 3).
Make required change, e.g., moving a programme channel
(see the relevant procedure below).
Press the EXIT button at any time to go back to watching TV.
Press the OK button after having adjusted some features to
store the new settings.
Move the cursor to the programme to be deleted or added.
Press the Green button to add a programme channel to
the programme position, or the Red button to delete one.
Press the same button again to confirm your decision.
Adding / deleting a programme channel
Moving a programme channel
Move the cursor to the programme to be moved.
Press the Yellow button.
Choose the new position for the programme channel.
Press the Yellow button again to confirm your decision.
123
456
789
0
IDTV
N
MODE
OK
C
MENU
EXIT
OK
Add Cancel
Programme edit
Prog. Chan. Name Lock
1 :
2 :
3 :
4 :
5 :
CH44
CH51
CH41
CH47
CH37
Off
Off
Off
Off
Off
ABC
XYZ
FTP
123
456
Confirm Cancel
Programme edit
Prog. Chan. Name Lock
1 :
2 :
3 :
4 :
5 :
CH44
CH51
CH41
CH47
CH37
ABC
XYZ
FTP
123
456
Off
Off
Off
Off
Off
GreenRed
Yel low

16
Tuning menu – Programme edit (Analogue mode)
Renaming a programme channel
Move to the Name column.
Choose the new character. The box at the bottom of the
screen shows the character currently selected.
Move to the next character position.
Continue until renaming is done.
Press the OK button to store the new name.
OK
Programme edit
Prog.
ABCDEFGHIJKLMNOPQRST
UVWXYZ+
-
. 0123456789
Chan. Name Lock
1 :
2 :
3 :
4 :
5 :
CH44
CH51
CH41
CH47
CH37
Off
Off
Off
Off
Off
XYZ
FTP
123
456
Locking a programme channel
You may wish to lock a programme channel to prevent
access to it.
Move to the Lock column.
Choose between Lock On or Lock Off.
Press the OK button to store the new setting.
Note:
When a programme position is locked, Direct Channel
Access using the C and numeric buttons on the remote
control is not available.
OK
Programme edit
Prog. Chan. Name Lock
1 :
2 :
3 :
4 :
5 :
CH44
CH51
CH41
CH47
CH37
ABC
XYZ
FTP
123
456
Off
Off
Off
Off
Off
Copying programme information to a recording device
You can copy programme information to a compatible
recording device connected to AV2 / AV4. See page 40 for
connection information.
Press the Download (Blue) button.
Programme data will now be sent to the recording device(s).
This might take a few seconds, depending on the number of
stations stored. If the message “Feature not available”
appears on the screen, the television is unable to send the
programme information to the recording device(s). See the
device’s instruction book for further information.
DOWNLOAD IN PROGRESS
PLEASE WAIT
Programme : 63
Remote control unavailable
Download
(Blue)

17
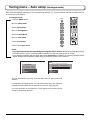
Tuning menu – Auto setup (Analogue mode)
Auto setup automatically retunes your TV. This feature is useful if, e.g., you move house and wish to retune your TV
to receive the local stations.
In Analogue mode
Press the MENU button.
Move to Setup menu.
Access Setup menu.
Move to Tuning Menu.
Access Tuning Menu.
Move to Auto setup.
Access Auto setup.
Press to start Auto setup.
The TV will search for, locate, store and then sort into order your local
stations.
If compatible recording device is connected via the AV2 / AV4 terminal,
programme data will be sent to the device via Q-Link. See page 32.
Once this operation is completed the TV will display the programme now
stored on programme position 1.
All analogue tuning
data will be erased
WARNING
Exit
Return
Start Auto Setup
CH44
AUTO SETUP IN PROGRESS
SEARCHING : PLEASE WAIT
21 68
Exit
Return
Notes:
• If you proceed with the next step analogue tuning data will be erased (all stations and their programme
positions stored in your TV’s memory will be wiped out so the new settings can be stored).
• If you exit the procedure after this point and before Auto setup is complete, no station information will be
stored. Restart and complete the Auto setup procedure so that the TV is retuned.
123
456
789
0
IDTV
N
MODE
OK
C
MENU
OK

18
Tuning menu – Manual tuning (Analogue mode)
In Analogue mode
Press the MENU button.
Move to Setup menu.
Access Setup menu.
Move to Tuning Menu.
Access Tuning Menu.
Move to Manual tuning.
Access Manual tuning.
Select the programme position to be tuned.
Press repeatedly until required station is found.
When the desired station is found, press the OK button to store.
The programme position will flash.
Press the EXIT button at any time to go back to watching TV.
It is possible to retune individual programme positions:
It is also possible to use the control panel buttons on the front of your TV to tune individual programme positions:
Press the F button until Tuning mode is reached.
Press the
–
/ or +/ button to access Tuning mode.
Press the TV/AV button to move between Change
programme and Search.
Press the –
/ or +/
button to change programme
position or start search.
When the desired station is found, press the STR
button to store.
The programme position will flash.
Repeat above procedure to tune additional
programme positions.
Press the F button at any time to go back to watching
TV.
Note:
If your VCR is connected to this TV by an RF cable only, choose programme position “0” to tune to the VCR
signals.
Manual tuning (via front panel) (Analogue mode)
CH44
1
Manual tuning
21 68
-
, + : Search
TV / AV : Move cursor
STR : To store
F : To exit
STR F
-
/ + / TV / AV
STR F TV/AV
Manual tuning
21 68
CH44
1
Exit
Search down/up
Return
Direct entry
Store
C
0 9
MENU
EXIT
OK
123
456
789
0
IDTV
N
MODE
OK
C

19
Owner ID allows you to enter a security code(Owner ID) and personal details into its memory, so that in the
unfortunate event of theft it will help the police to trace the owner.
STR F TV/AV
MENU
OK
OK
VCR
123
456
789
0
VCR
123
456
789
0
C
123
456
789
0
IDTV
N
MODE
OK
0123456789
Yo u now have the opportunity
to enter your details and
help the police crack crime
see instruction book
Exit
Select character
Change character
Return
Store Owner ID
PIN NUMBER :
NAME :
POSTCODE :
Owner ID
HOUSE NO :
∗ ∗ ∗ ∗ ∗ ∗ ∗ ∗ ∗ ∗ ∗ ∗ ∗ ∗
∗ ∗ ∗ ∗ ∗ ∗ ∗ ∗ ∗ ∗ ∗
∗ ∗ ∗ ∗ ∗ ∗ ∗ ∗ ∗ ∗ ∗
∗ ∗ ∗ ∗
Q-Link
AV2 out
Off timer
Tu ning Menu
Owner ID
Shipping condition
Setup menu
AV2
Monitor
Off
Power on preference
TV
Access
Teletext
FASTEXT
For future reference,
write your PIN NUMBER here
:
Press the MENU button.
Move to Setup menu.
Access Setup menu.
Move to Owner ID.
Access Owner ID.
If the Owner ID has previously been set, enter the PIN
NUMBER (using 0 to 9 on the remote control) followed
by the OK button to proceed, this will take you to the
NAME option.
If no Owner ID has previously been set, enter the required
4 digit Owner ID PIN NUMBER (using 0 to 9 on the
remote control).
If a 4 digit PIN NUMBER was entered above, you will be
taken automatically to the NAME line.
If not, move to the NAME line.
Change character.
Select character position.
Repeat above until NAME, HOUSE NUMBER and
POSTCODE are entered.
Press the OK button to store the details.
Press again when you are asked, “Are you sure?”.
Owner ID
If you wish to check the personal details already entered into the TV
(except your PIN number), press the F button(Front panel) and hold
for 6 seconds(initially the volume level function will appear, as you
continue to hold down the F button it will disappear again, and the
Owner ID information will appear). The details already entered are
displayed on screen and will disappear after a few seconds.
If Owner ID information was not entered when you switched on your TV
for the first time or it is necessary to alter some of the information, Owner
ID can be re-accessed via the Setup menu.

20
MENU
OK
Press the MENU button.
Move to Setup menu.
Access Setup menu.
Move to Shipping condition.
Access Shipping condition.
Press the OK button to start.
Press again, to confirm, each time that you are asked, “Are you sure?”.
Switch the TV off at the mains power switch.
The next time you switch the TV on, Auto setup will begin. DVB and
Analogue stations will be located, sorted and stored ready for use.
See page 7.
Shipping condition allows you to reset the TV to its original condition, i.e. no channels tuned in.
This is useful, for example, if you move to a different area when you will probably want the TV to tune itself to your
new local stations.
Note:
Owner ID information will not be affected by this function.
This can be done either through the Shipping condition menu or through the Auto setup menu.
The Shipping condition menu will reset all data, except Owner ID information, clearing all DVB and Analogue
tuning information and resetting all control levels back to factory settings.
You may need to adjust your VCR or programme position ‘0’ VCR after operating the Shipping condition menu.
Q-Link
AV2 out
Off timer
Tu ning Menu
Owner ID
Shipping condition
Setup menu
AV2
Monitor
Off
Power on preference
TV
Access
Teletext
FASTEXT
All tuning data will be erased
Are you sure ?
Are you sure ?
Shipping condition
Exit
Return
Start
Shipping condition
123
456
789
0
IDTV
N
MODE
OK
C
Page is loading ...
Page is loading ...
Page is loading ...
Page is loading ...
Page is loading ...
Page is loading ...
Page is loading ...
Page is loading ...
Page is loading ...
Page is loading ...
Page is loading ...
Page is loading ...
Page is loading ...
Page is loading ...
Page is loading ...
Page is loading ...
Page is loading ...
Page is loading ...
Page is loading ...
Page is loading ...
Page is loading ...
Page is loading ...
Page is loading ...
Page is loading ...
Page is loading ...
Page is loading ...
Page is loading ...
Page is loading ...
-
 1
1
-
 2
2
-
 3
3
-
 4
4
-
 5
5
-
 6
6
-
 7
7
-
 8
8
-
 9
9
-
 10
10
-
 11
11
-
 12
12
-
 13
13
-
 14
14
-
 15
15
-
 16
16
-
 17
17
-
 18
18
-
 19
19
-
 20
20
-
 21
21
-
 22
22
-
 23
23
-
 24
24
-
 25
25
-
 26
26
-
 27
27
-
 28
28
-
 29
29
-
 30
30
-
 31
31
-
 32
32
-
 33
33
-
 34
34
-
 35
35
-
 36
36
-
 37
37
-
 38
38
-
 39
39
-
 40
40
-
 41
41
-
 42
42
-
 43
43
-
 44
44
-
 45
45
-
 46
46
-
 47
47
-
 48
48


Panasonic TX32LXD52 Operating instructions
- Category
- LCD TVs
- Type
- Operating instructions
- This manual is also suitable for
Ask a question and I''ll find the answer in the document
Finding information in a document is now easier with AI
Related papers
-
Panasonic TXP42S10B FAQ
-
-
-
-
-
-
-
-
-
Other documents
-
Electrolux ETV45000X User manual
-
John Lewis JLBITV21 User manual
-
Sony KV-32DX20U User manual
-
Akura AP281 User manual
-
Sanyo CE19LD95-B User manual
-
-
-
Hitachi 32LD8D20U A Instructions For Use Manual
-
-
Sansui TV19PL120DVD A User manual