Page is loading ...

This manual contains important safety information.
Please read carefully before product installation or use.
Round EU44959 — ROUND FRONT
Elongated EV77959 — ELONGATED FRONT
OWNER’S MANUAL
Refresh
Personal Hygiene System™
EX93000 Refresh Installation Manual 10/06

Important Safeguards
1
Mounting plate
Refresh
Remote Control,
Mount Kit, Batteries
T-Valve with
Filter and Bidet Hose
Standard Mounting
Hardware
Universal Wrench
Alternate Mounting
Hardware
Model
Rated Power Source
Tap Water Pressure
Rated Power Consumption
Seat Temperature
Maximum Spray Volume
Seat & Lid
Water Temperature
Dryer Temperature
Electrical Safety Protection
Power Cord Length
Product Dimensions
Product Weight
120VAC , 15 Amp GFCI (1400W)
7–106 psi (0.5-7.5 kgf/cm)
1.5 kwh
OFF: room temperature LOW: 97°F (35°C) MED: 100°F (38°C) HIGH: 104°F (40°C)
0.2 gal/min (0.72 liter/min)
Soft Closing
OFF: room temperature LOW: 97°F (35°C) MED: 100°F (38°C) HIGH: 104°F (40°C)
LOW / MED / HIGH
15mA – GFCI
4 ft (1.2m)
15"W x 19"L x 6"H
(383 mm W x 483 mm L x 153 mm H)
9.5 lbs (4.3 kg)
15"W x 20.1"L x 6"H
(383 mm W x 511 mm L x 153 mm H)
9.7 lbs (4.4 kg)
Danger - Possibility of electric shock!
Use the correct voltage according to the specifications and
connect to a three-prong GFCI grounded outlet.
NOTE: This GFCI outlet
should be installed
prior to performing
this installation.
Do not use harsh brushes or abrasive detergents to clean
the Refresh Personal Hygiene System™. Use only mild soap
and a soft cloth
for cleaning.
Please use caution and avoid spraying water directly on the
Refresh Personal Hygiene System™ or power cord. This could
result in electric
shock or fire.
Do not disassemble or modify the Refresh Personal Hygiene
System™. Only a authorized service representative should
perform repairs.
For safety reasons, please read this entire manual before installation or use.
GFCI
grounded
outlet
T-Valve
Water
Supply Line
Water
Shut-Off
Valve
Bidet Hose
Remote
Control
Remote
Mount
Front Nozzle
Back Nozzle
Heated Seat
Installed
Configuration
Filter
Typical install time: 30-60 minutes
EV77959 — ELONGATED FRONT
EU44959 — ROUND FRONT
CAUTION CAUTION
Specifications
Parts & Configuration
EX93000 Refresh Installation Manual 10/06

Before Installation
2
• Flat head screwdriver • Universal wrench (included)
• Phillips head screwdriver • Measuring tape
NOTE: The included Universal Wrench will work for most applications. Depending on your toilet
confi guration, an adjustable wrench may also be needed.
Tools Needed
Alternate Mounting Hardware
Check Water Supply Line
Some toilets may not provide adequate access to the seat mounting holes preventing proper
installation of the Standard Mounting Hardware.
In this case you will need to use the Alternate Mounting Hardware and follow the enclosed instructions.
Check the line that connects the toilet tank to the water shut-off valve. If it is rigid pipe, you may need
to purchase a flexible hose to replace it before installing the Refresh Personal Hygiene System™. The
length of the hose and the size of the connectors will vary.
CAUTION CAUTION
Installation
Please read these carefully before installing the Refresh Personal Hygiene System™.
Failure to do so could result in flooding, leaking, or damage to the Refresh Personal Hygiene System™.
1) Remove Toilet Seat
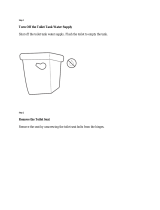
2) Turn OFF Water and Flush Toilet
Steps may vary by type of seat.
a) Lift hinge covers and use a screwdriver to
remove the mounting bolts.
b) Remove the toilet seat.
You may wish to place a container under the
tank to catch any leaking that could occur
during installation.
a) Turn water valve OFF completely. If the water valve
does not shut OFF completely, STOP. Repair the
water shut-off valve before proceeding.
b) Flush the toilet to empty the tank.
c) Disconnect water supply line from toilet tank.
IMPORTANT: Do not continue without completing these
steps! Failure to do so could result in flooding, leaking, or
damage to the Refresh Personal Hygiene System™.
3) Install Mounting Plate
NOTE: These instructions are for Standard Mounting Hardware. See
Alternate Mounting Hardware at the top of this page for further details.
a) Place Mounting Plate over mounting holes, flat side down,
curve toward the back of the toilet.
b) Insert bolts through the Mounting Plate and finger
tighten the wing nuts. Make sure the crush washer and
metal flat washer are put on in the correct order (see
graphic).
Mounting Holes
Crush Washer
Metal Flat Washer
1a
1b
2a
2b
2c
3b
3a
EX93000 Refresh Installation Manual 10/06

Installation (continued)
3
4) Connect T-Valve and Hoses
3) Install Mounting Plate (continued)
c) Adjust mounting plate so length (L) between the front of the toilet
bowl and the back of the mounting plate is as follows:
Round (EU44959): L=18¼" (465 mm)
Elongated (EV77959): L=20½"(495 mm)
d) Tighten Mounting Bolts with screwdriver until the mounting plate is
securely fastened to the toilet.
NOTE: If your water supply line is rigid pipe,
you may need to replace it before installing
the Refresh Personal Hygiene System™.
a) Install the T-Valve between the water supply line
and the toilet tank.
b) Place the Refresh on or beside the toilet and
connect the Bidet Hose to the Refresh.
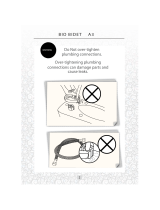
IMPORTANT: Use wrench to tighten all
connections before continuing. Failure to
do so could result in flooding, leaking, or
damage to the Refresh Personal Hygiene
System™. Do not overtighten!
5) Attach the Refresh
a) Slide the Refresh onto the mounting plate.
You will hear a “click” indicating the seat has
been properly attached.
Confirm that the seat switch is in full
contact with the toilet bowl rim.
To Release the Refresh:
Unplug the power plug and turn the water
supply valve OFF.
Push the button located on the right corner
of the seat and gently pull.
6) Turn ON Water & Connect Power
CAUTION: Use only a grounded
15 Amp GFCI outlet!
a) Turn the water supply valve ON slowly.
Ensure the connections are not leaking
before continuing.
IMPORTANT! Make sure work area is dry
and hands are dry before continuing.
b) Insert power plug into a grounded 15 Amp
GFCI outlet. The blue power LED on the
Refresh Display Panel will illuminate.
IMPORTANT! Make sure the power plug is
removed and the water supply is shut-off
before removing the Refresh.
7) Battery Installation
a) Remove battery cover from Remote Control
and insert two (2) AAA batteries (included)
as shown.
b) Refasten battery cover with screw.
CAUTION: Use only a
grounded GFCI outlet!
Press to
Release
Water Supply Line
T-Valve
L
5
4a
4b
3c
6a
6b
Bidet Hose
7
power
power save
seat heat
seat sensor
EX93000 Refresh Installation Manual 10/06

Installation (continued)
4
9) Filling the Reservoir
8) Remote Control Installation
a) Identify a location for the Remote Control that is visible and reachable from the
toilet and that does not obstruct the IR signal.
Depending on your wall type, you can install the screws directly or use anchor
mounts (provided) as shown.
b) If you prefer to not drill holes in your wall, you may use double sided foam
tape to adhere bracket to wall. In this case, make sure to choose a tape with an
adhesive that will not damage wall upon removal.
a) Place a plastic sheet (not provided) over the seat. Sit on the Refresh to activate the seat switch. Press one
of the wash functions on the Remote Control. The reservoir will begin to fill. It will take between 5 and 10
seconds for the reservoir to completely fill.
When the reservoir is full the wash wand will extend and begin to spray. Push STOP to cancel the wash
function. Remove the plastic sheet and discard.
b) Your Refresh bidet seat is now ready for use! Refer to the Operation section of this manual for programming
and operation instructions.
Troubleshooting
Issue
Possible Causes
Solution
1
2
3
4
5
6
7
8
9
1) Clogged filter
2) Twisted hose
3) Household water pressure low
1) Nozzles are dirty
2) Clogged filter
3) Water pressure is too low
1) User not properly seated
2) Seat switch is not contacting toilet
fixture properly
1) Washing time exceeding 5 minutes
2) Power failure
1) Clean filter
2) Straighten hose
3) Increase water pressure to Refresh
1) Clean the nozzles
2) Clean the filters
3) Adjust water pressure
1) Adjust your sitting position
2) Make sure the seat switch is contacting
toilet bowl rim (switch is in seat foot)
1) Repeat cleaning function
2) Check power and/or unplug the cord
to reset
Low water flow or
pressure
Nozzles do not function
properly
Washing feature does not
work or fails to spray
Product shuts OFF
during use
Dryer only operates when activated
by weight of person on seat
Water flow sporadic or
inconsitent
Nozzles fail to react
Seat not heated
Water not heating
Dryer not working
Seat temperature set to OFF
Water temperature set to OFF
Nozzles are dirty
Pulsating / Spa mode activated
Reset heated seat temperature
Reset heated water temperature
Reset to normal washing mode
Sit on Refresh to operate Dryer
Clean nozzles
EX93000 Refresh Installation Manual 10/06

Operation
5
Some features of the Refresh Personal Hygiene System™ are designed to function only when the seat is occupied.
Using the Refresh Remote Control
Adjusting Seat, Water, and Dryer Temperature
Warm Water Washing
Sit on the seat and press the FRONT or BACK (either HIM or HER) button to begin water
flow. Press STOP button to discontinue water flow.
Water Flow/Pressure Adjustment
While water is flowing, press the button to increase pressure or the
button to decrease pressure. Repeat until desired pressure is reached. There
are five (5) levels of water pressure. Each wider bar on the LCD graphic
display represents one level increase.
Pulsating Water Mode
To change to Pulsating Mode; While water is flowing, press the FRONT or BACK (either HIM or HER) button for over
three (3) seconds. To deactivate and return to normal washing mode, repeat the above step.
Warm Air Dryer
Press the WARM AIR button to start dryer. Press STOP to stop the dryer.
LCD Panel
Adjusting Seat Temperature
Press SEAT TEMP button to adjust temperature. Repeat until desired level is achieved. There are
four (4) temperature levels: low>medium>high>off. Each wider bar on the LCD graphic display
represents one level increase. No LCD graphic indicates seat heating is OFF.
Adjusting Water Temperature
Press WATER TEMP button to adjust temperature. Repeat until desired level is achieved. There are
four (4) temperature levels: low>medium>high>off. Each wider bar on the LCD graphic display
represents one level increase. No LCD graphic indicates water heating is OFF.
Adjusting Dryer Temperature
Press WARM AIR button to adjust temperature. Repeat until desired level is achieved. There are three
(3) temperature levels: low>medium>high. Each wider bar on the LCD graphic display represents
one level increase.
You must be sitting on the seat for these functions. The last entered temperature settings are stored in memory.
AUXILIARY CONTROLS
(backup for Remote)
AUX Stop
AUX Wash
REMOTE CONTROL PANEL
WARM WATER WASH
Posterior (Rear)
Cleansing
Feminine (Vaginal)
Cleansing
Water Temperature
Low>Med>High>Off
Seat Temperature
Low>Med>High>Off
Warm Air Dryer
On
Low>Med>High
Water Pressure
Adjustment
Decrease Increase
Stop
(for Wash and Dryer)
Powersave
Function
LCD Panel
INDICATOR LIGHTS
power
power save
seat heat
seat sensor
View of
LCD Panel
EX93000 Refresh Installation Manual 10/06

Operation (continued)
6
Setting the Clock
Remote Control Beeping/Silent Modes
Auxiliary Controls
Power Save Mode
The Refresh Personal Hygiene System™ includes a power saving feature to reduce electrical
consumption when not in use. Once set, the Power save function turns the Refresh ON and OFF each
day according to your programmed time settings.
Setting the Power save Start and End Times
a) Press and hold the Power save button for 5 seconds. “POWER SAVE START” on the
Remote and the Power save LED on the Refresh will flash.
b) Adjust the Power save Start time using the
WATER FLOW button to set the HOUR
and the
WATER FLOW button to set the MINUTES. When the desired Start time is
displayed on the Remote, press the Power save button again.
c) “POWER SAVE END” on the Remote and the Power save LED on the Refresh will flash.
d) Adjust the Power save End time using the
WATER FLOW button to set the HOUR
and the
WATER FLOW button to set the MINUTES. When the desired End time is
displayed on the Remote, press the Power save button again.
The remote LCD will show “POWER SAVE ON” and the Power save LED on the Refresh will be green. Power
save function is now ON and the unit will go into Power save mode at the programmed start time.
Enabling and Disabling the Power save
a) Press the Power save button to toggle between Power save ON and Power save OFF.
b) To change Power save Start and End Times refer to the procedure above.
When Power save is Operating
a) When the Refresh is in Power save mode, the Power save LED on the seat will glow ORANGE.
b) Sitting on the Refresh while it is in Power save mode returns the unit to normal operation. The Refresh will
not re-enter the Power save mode until the next day’s scheduled start time.
a) Press and hold the STOP button on the remote Control for over 5 seconds until the Clock flashes.
b) Use the
button to set the HOUR and the button to set the MINUTES.
There are two (2) buttons on the rear, right corner of the
Refresh for use when the Remote Control is unavailable.
Rear Wash: Sit on the seat and press the AUX WASH button
to begin water flow (only posterior cleaning is available when using Auxiliary Controls).
(For each of the operations below you must start in the Rear Wash mode.)
Water Pressure: Press the AUX WASH button again until the desired water pressure is achieved. Press the AUX
STOP button to discontinue the water flow.
Warm Air Dryer: Press the AUX STOP button to activate Warm Air Dryer. It will automatically be set to the
medium temperature level. Press the AUX STOP button again to turn OFF the dryer.
Seat Temperature: To adjust the Seat Temperature, press and hold the AUX STOP button for more than 5
seconds. Press the AUX STOP button again to change seat temperature: low>medium>high>off.
Water Temperature: To adjust the Water Temperature, press and hold the AUX WASH button for more than 5
seconds. Press the AUX WASH button again to change water temperature: low>medium>high>off.
AUXILIARY CONTROLS
(backup for Remote)
AUX Stop
AUX Wash
The remote control has two (2) operational modes: Beeping Mode and Silent Mode. Beeping mode
beeps to confirm when a command from the remote has successfully been received by the seat.
To change modes, press and hold the WATER TEMP button on the remote for 5 seconds.
EX93000 Refresh Installation Manual 10/06
power
power save
seat heat
seat sensor

Maintenance
7
12
34
5
6
1
2
3
4
5
6
T-VALVE FILTER:
BIDET-HOSE FILTER:
1) Turn water supply valve OFF
completely.
2) Flush toilet to empty the water
tank. (Failure to do so could result
in leaking or flooding!)
3) Unscrew the filter from the T-Valve.
(the end not connected to a hose)
4) Gently brush and clean the filter
with water to remove build-up.
5) Reconnect the filter to the T-Valve.
6) Turn the water supply back ON
and check for leaks.
1) Turn water supply valve OFF
completely.
2) Flush toilet to empty the water
tank. (Failure to do so could result
in leaking or flooding!)
3) Disconnect the Bidet Hose from
the Refresh.
4) Gently brush and clean the filter
with water to remove build-up.
5) Reconnect the Bidet Hose to the
Refresh.
6) Turn the water supply back ON
and check for leaks.
CAUTION CAUTION
Always unplug the Refresh before cleaning!
Seat Cleaning and Removal
Nozzle Cleaning
Filter Cleaning
Use a soft, damp cloth and mild cleanser (such as
dish soap) to wipe down the seat. DO NOT scrub
or use harsh, abrasive products to clean the Refresh
bidet seat.
For a more thorough cleaning, you may remove
the Refresh bidet seat. To release, push the button
located on the back right side of the seat and pull
the Refresh bidet seat forward.
It is recommended that you clean the retractable nozzles monthly or as necessary.
To clean the nozzles, pull them out gently and use a soft, damp brush or cloth to
wipe down. DO NOT use soap or detergents to clean nozzles.
For proper Refresh bidet seat function, it is important to occasionally clean the water filter. Frequency
of cleaning depends on your local water supply. Clogged filters cause decreased water flow, affecting
operation. Remove filters by hand. DO NOT operate with filters removed.
Press to
Release
For other issues or questions, contact Jacuzzi Customer Service:
1-800-288-4002
Contact Information Warranty
Jacuzzi Whirlpool Bath
Customer Service
14801 Quorum Dr., Suite 400
Dallas, TX 75254
PHONE: 1-800-288-4002
WEB: www.jacuzzi.com
The Refresh Personal Hygiene System™ is covered by
a limited one year warranty, valid from the original
date of purchase for original purchaser.
Please complete and return the enclosed product
registration card to receive important product
updates.
EX93000 Refresh Installation Manual 10/06
1/8