
Installation Instructions / Warranty
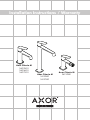
Axor Citterio M
34010XX1
34016XX1
34017XX1
Axor Citterio M
34120XX1
34127XX1
Axor Citterio M
34210XX1

2
34010XX1 34017XX1
34016XX1 34210XX1
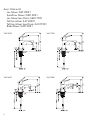
Axor Citterio M
Lav Mixer 34010XX1
Small Lav Mixer 34016XX1
Lav Mixer less Drain 34017XX1
Tall Lav Mixer 34120XX1
Tall Lav Mixer less Drain 34127XX1
Bidet Mixer 34210XX1

3
Installation Considerations
For best results, Hansgrohe recom-
mends that this unit be installed by
a licensed, professional plumber.
Please read over these instructions
thoroughly before beginning instal-
lation. Make sure that you have
all tools and supplies needed to
complete the installation.
This faucet can be used with a
continuous flow water heater if the
flow pressure is at least 20 psi.
•
•
•
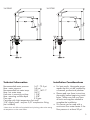
Technical Information
Recommended water pressure 14.7 - 72.5 psi
Max. water pressure 145 psi
Recommended hot water temp. 120� - 140� F*
Max. hot water temp 165�F*
Hole size in mounting surface 1 3/8"
Max. mounting surface depth 1 5/8"
Flow rate 2.2 gpm
Cartridge with high temperature limit stop
3/8" supply hoses - requires 3/8" compression fitting
(not included)
*Please know and follow all applicable local plumbing codes when setting
the temperature on the water heater.
34120XX1 34127XX1

4
Installation
Install the drain pull rod*.
Position the faucet and sealing gasket on the mounting
surface.
Install the fiber washer, friction washer, and mounting
nut.
Tighten the mounting nut by hand.
Tighten the tensioning screws.
*Drain and pull rod not included with models
34017XX1 or 34027XX1.

5
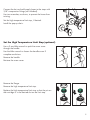
Connect the hot and cold supply hoses to the stops with
3/8" compression fittings (not included).
Use two wrenches, as shown, to prevent the hoses from
twisting.
Set the high temperature limit stop, if desired.
Install the pop-up drain.
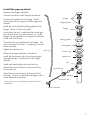
Set the High Temperature Limit Stop (optional)
Use a 3 mm Allen wrench to push the screw cover
through the handle.
Use the Allen wrench to loosen the handle screw 2
complete revolutions.
Remove the handle.
Retrieve the screw cover.
Remove the flange.
Remove the high temperature limit stop.
Replace the high temperature limit stop so that the pin on
the cartridge is in the desired slot on the limit stop.
3 mm
2 x

6
Replace the flange.
Replace the handle.
Tighten the handle screw.
Replace the screw cover.
Note: the temperatures given in the diagram assume
a water heater temperature of 140
°
F, a cold water
temperature of 50
°
F and a water pressure of 45 PSI.

7
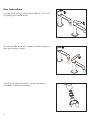
Install the pop-up drain*
Remove the plunger assembly.
Unscrew the drain outlet flange from the tee.
Unscrew the tailpiece from the tee. Wrap
the threads with two layers of Teflon tape and
replace.
Install the white, flexible sealing gasket to the
flange. Place it in the sink outlet.
From under the sink, install the black mack gas-
ket, white friction ring and retainer nut to the
flange. Do not tighten the nut against the bottom
of the sink at this time.
Thread the tee and tailpiece to the flange. The
pivot must face the faucet. If necessary, turn the
drain assembly.
Tighten the retainer nut.
Place the plunger assembly in the drain.
Install the horizontal rod so that the end goes
through the loop in the bottom of the height
adjuster.
Install and hand tighten the pivot ball nut.
Attach the swivel connector to the end of the
horizontal rod.
Attach the swivel connector to the end of the
pull rod. Position as desired and tighten with a
small, flathead screwdriver.
*Drain and pull rod not included with models 34017XX1
or 34027XX1.
plunger
flange
sealing gasket
mack gasket
friction ring
retainer nut
horizontal rod
height adjuster
pivot ball nut
swivel connector
pull rod
tee
tailpiece

8
User Instructions
Turn the water on by pushing the handle up. Turn it off
by pushing the handle down.
Pivot the handle to the left to make the water warmer, to
the right to make it cooler.
If the flow of water diminishes, use the service key
(included) to remove the aerator.

9
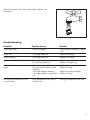
Problem Possible Cause Solution
Insufficient water - Aerator clogged - Clean aerator, replace if neces-
sary
Mixer stiff - Cartridge defective - Replace cartridge
Mixer dripping - Cartridge defective - Replace cartridge
Water leaks below handle - Cartridge defective
- O-ring/rings defective
- Replace cartridge
- Replace O-ring/rings
Water leaks at the connection
hoses
- Connection hose defective
- O-ring at the connection hose
defective.
- Cartridge adapter defective
- Cartridge adapter o-ring defec-
tive
- Replace connection hose
- Replace O-ring
- Replace cartridge adapter
- Replace O-ring
Hot water temperature too low,
no cold water.
- High temperature limit stop in-
correctly set
- Set high temperature limit stop
Troubleshooting
Flush the aerator with clear water, then replace it on
the faucet.

10
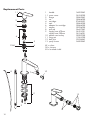
1 handle 34093XX0
1.1 screw cover 96762000
2 flange 98863XX0
3 nut 98864000
4 cartridge 97685000
5 seal 98865000
6 adapter for cartridge 98866000
7 aerator 98926000
8 pull rod 96657XX0
9 supply hose 470mm 96321001
supply hose 900mm 96316001
10 aerator service key 98987000
11 fixing set 13961000
12 ball joint 92036XX0
13 spray former 94005XX0
XX = colors
00 = chrome
82 = brushed nickel
13
7
1
5
4
1.1
3
2
9
8
6
11
12
10
23x2
Replacement Parts

11
Limited Lifetime Consumer Warranty
This product has been manufactured and tested to the highest quality standards by Hansgrohe, Inc. (“Hansgrohe”). This
warranty is limited to Hansgrohe products which are purchased by a consumer in the United States after March 1, 1996, and
installed in either the United States or Canada.
WHO IS COVERED BY THE WARRANTY
This warranty extends to the original consumer purchaser only. This warranty is non-transferable.
WHAT IS COVERED BY THE WARRANTY
This warranty covers only your Hansgrohe manufactured product. Hansgrohe warrants this product against defects in material
or workmanship as follows: Hansgrohe will repair at no charge for parts only or, at its option, replace any product or part of
the product that proves defective because of improper workmanship and/or material, under normal installation, use, service
and maintenance. If Hansgrohe is unable to provide a replacement and repair is not practical or cannot be timely made,
Hansgrohe may elect to refund the purchase price in replace for the return of the product.
LENGTH OF WARRANTY
Replacement or repaired parts of products will be covered for the term of this warranty as stated in the following two sentenc-
es. If you are a consumer who purchased the product for use primarily for personal, family, or household purposes, this war-
ranty extends for as long as you own the product and the home in which the product is originally installed. If you purchased
Cleaning Recommendation for Hansgrohe Products
Modern lavatory faucets, kitchen faucets, and showers consist of very different materials to comply with the needs of the
market with regard to design and functionality. To avoid damage and returns, it is necessary to consider certain criteria when
cleaning.
Cleaning Materials for Faucets and Showers
Acids are a necessary ingredient of cleaning materials for removing lime, however please pay attention to the following points
when cleaning faucets and showers:
Only use cleaning materials which are explicitly intended for this type of application.
Never use cleaning materials which contain hydrochloric, formic, phosphoric, or acetic acid, as they cause considerable
damage.
Never mix one cleaning material with another.
Never use cleaning materials or appliances with an abrasive effect, such as unsuitable cleaning powders, sponge pads,
or micro fiber cloths.
Cleaning Instructions for Faucets and Showers
Please follow the cleaning material manufacturer’s instructions. In addition, pay attention to the following points:
Clean the faucets and showers as and when required
Use the amount of cleaning product and the amount of time recommended by the manufacturer. Do not leave the cleaner
on the fixture longer than necessary.
Regular cleaning can prevent calcification.
When using spray cleaners, spray first onto a soft cloth or sponge. Never spray directly onto the faucet as droplets can
enter openings and gaps and cause damage.
After cleaning, rinse thoroughly with clean water to remove any cleaner residue.
Important
Residues of liquid soaps, shampoos, and shower foams can also cause damage, so rinse with clean water after using.
Please note: if the surface is already damaged, the effect of cleaning materials will cause further damage.
Components with damaged surfaces must be replaced or injury could result.
Damage caused by improper treatment is not covered under the warranty.
•
•
•
•
•
•
•
•
•

Hansgrohe, Inc. • 1490 Bluegrass Lakes Parkway • Alpharetta, GA 30004
Tel. 770-360-9880 • Fax 770-360-9887
www.hansgrohe-usa.com
US - Installation Instructions • Part No. 90438021 • Revised 03/2008
the product for use primarily for any other purpose, including, without limitation, a commercial purpose, this warranty extends
only (i) for 1 year, with respect to Hansgrohe and Commercial products, and (ii) for 5 years, with respect to AXOR products.
THIS WARRANTY DOES NOT COVER, AND HANSGROHE WILL NOT PAY FOR:
A. Conditions, malfunctions or damage not resulting from defects in material or workmanship.
B. Conditions, malfunctions or damage resulting from (1) normal wear and tear, improper installation, improper mainte-
nance, misuse, abuse, negligence, accident or alteration, or (2) the use of abrasive or caustic cleaning agents or “no-
rinse” cleaning products, or the use of the product in any manner contrary to the product instructions. (3) Conditions in the
home such as excessive water pressure or corrosion.
C. Labor or other expenses for the disconnection, deinstallation, or return of the product for warranty service, or for installa-
tion or reinstallation of the product (including but not limited to proper packaging and shipping costs), or for installation or
reinstallation of the product.
D. Accessories, connected materials and products, or related products not manufactured by Hansgrohe.
TO OBTAIN WARRANTY PARTS OR INFORMATION
Contact your Hansgrohe retailer, or contact Technical Service at:
Hansgrohe Inc.
1492 Bluegrass Lakes Parkway
Alpharetta GA 30004
Toll-free (800) 334-0455.
In requesting warranty service, you will need to provide
1. The sales receipt or other evidence of the date and place of purchase.
2. A description of the problem.
3. Delivery of the product or the defective part, postage prepaid and carefully packed and insured, to Hansgrohe Inc. 1492
Bluegrass Lakes Parkway, Alpharetta, Georgia 30004, Attention: Technical Service, if required by Hansgrohe.
When warranty service is completed, any repaired or replacement product or part will be returned to you postage prepaid.
EXCLUSIONS AND LIMITATIONS
REPAIR OR REPLACEMENT (OR, IN LIMITED CIRCUMSTANCES, REFUND OF THE PURCHASE PRICE) AS PROVIDED UNDER
THIS WARRANTY IS THE EXCLUSIVE REMEDY OF THE PURCHASER. HANSGROHE NEITHER ASSUMES NOR AUTHORIZES
ANY PERSON TO CREATE FOR IT ANY OBLIGATION OR LIABILITY IN CONNECTION WITH THIS PRODUCT.
HANSGROHE SHALL NOT BE LIABLE TO PURCHASER OR ANY PERSON FOR ANY INCIDENTAL, SPECIAL, OR CONSE-
QUENTIAL DAMAGES, ARISING OUT OF BREACH OF THIS WARRANTY OR ANY IMPLIED WARRANTY (INCLUDING
MERCHANTABILITY).
Some States do not allow the exclusion or limitation of incidental or consequential damages, so the above limitation or exclu-
sion may not apply to you. This warranty gives you specific legal rights, and you may have other rights which vary from State
to State. You may be required by law to give us a reasonable opportunity to correct or cure any failure to comply before you
can bring any action in court against us under the Magnuson-Moss Warranty Act.
PRODUCT INSTRUCTIONS AND QUESTIONS
Upon purchase or prior to installation, please carefully inspect your Hansgrohe product for any damage or visible defect.
Prior to installing, always carefully study the enclosed instructions on the proper installation and the care and maintenance of
the product. If you have questions at any time about the use, installation, or performance of your Hansgrohe product, or this
warranty, please call or write to us or call us toll-free at 800 334 0455.
-
 1
1
-
 2
2
-
 3
3
-
 4
4
-
 5
5
-
 6
6
-
 7
7
-
 8
8
-
 9
9
-
 10
10
-
 11
11
-
 12
12


Ask a question and I''ll find the answer in the document
Finding information in a document is now easier with AI
Related papers
-
Hans Grohe 15180XX1 User manual
-
-
-
GROHE Axor Citterio 39115XX1 Installation Instructions Manual
-
-
-
-
Other documents
-
Axor Steel 35002801 Installation Instructions Manual
-
Hansgrohe 04071000 Installation guide
-
-
-
-
-
-
-
-