Genie 1200 User manual

Category
Garage Door Opener
Type
User manual
Includes INTELLICODE
®
2 Remote Control. Safe-T-Beam
®
System must be installed to close door.
For use only with residential sectional or one piece overhead garage doors.
Homelink
®
and Car2U
®
compatible.
For Answers and Assistance:
1.800.354.3643
or visit www.geniecompany.com
WARNING: To reduce the risk of injury to persons or damage to property – Use this opener only with a one piece
or sectional door.
SAVE THIS MANUAL FOR FUTURE REFERENCE.
INSTALLER: LEAVE THIS MANUAL WITH HOMEOWNER
GARAGE DOOR OPENER MODELS
POWERLIFT™ 900, GPOWER™ 900,
PowerMax™1200/1500, TriloG™1200/1500
Genie, Genie logo, Intellicode, Safe-T-Beam are registered trademarks of, and SilentMax
is a registered trademark of GMI Holdings, Inc., dba The Genie Company.
Homelink is a registered trademark of Johnson Controls Technology Company. Car2U is a registered trademark of Lear Corporation. © The Genie Company 2011 PN# 38082501312, 09/2011
OPERATION & MAINTENANCE MANUAL
SCREW DRIVE
THIS PAGE LEFT BLANK
TABLE OF CONTENTS
Section ..............................................................Page
Safety Information 2....................................................................
Important Safety Instructions .2
Safety Features / Opener Features .3
G-1 etting Started
Overview of Powerhead Controls ............................... 4
Programming Overview ................................................... 4
Poster Review/Infrared Protection Function ...........
OPENER MUST BE INSTALLED WITH THE INCLUDED
WALL CONSOLE.
Safe-T-Beam® SAFETY REVERSE SYSTEM MUST BE
INSTALLED TO CLOSE DOOR.
SAFETY INFORMATION
IMPORTANT SAFETY INSTRUCTIONS
READ AND FOLLOW ALL INSTRUCTIONS
SAVE THESE INSTRUCTIONS
CONVENTIONS USED IN THESE INSTRUCTIONS
Garage doors are large, heavy objects that mov
of springs under high tension and electric motors. Since moving
objects, springs under tension, and electric mot
injurie
e with the help
s, your safety and the safety of others depend on you
reading
the information in this manual. If you have questions or
ors can cause
formation presented, call your nearest
trained
door system technician or visit our website.
The following Safety Alert symbol and signal words are used
throughout this manual to call attention to and identify different
levels of hazard and special instructions.
This is the safety alert symbol. This symbol alerts you
potential hazards that can kill or hurt you and others.
to
All safety messages will follow the safety aler
and the
t symbol
word "DANGER", "WARNING", or "CAUTION"
DANGER indicates an imminently hazardous situation which,
NOT avoide
if
d, will result in death or serious injury.
WARNING indicates a potentially hazardous situation which,
NOT avoided, could result in death or serious injury.
if
CAUTION indicates a potentially hazardous situation which,
NOT a
if
voided, may result in injury or property damage.
The word NOTE is used to indicate important steps to be
followed or important considerations.
Do NOT allow children to
play with Door Opener.
Keep people clear of opening
while door is moving.
Do NOT operate a door that
jams or has a broken spring.
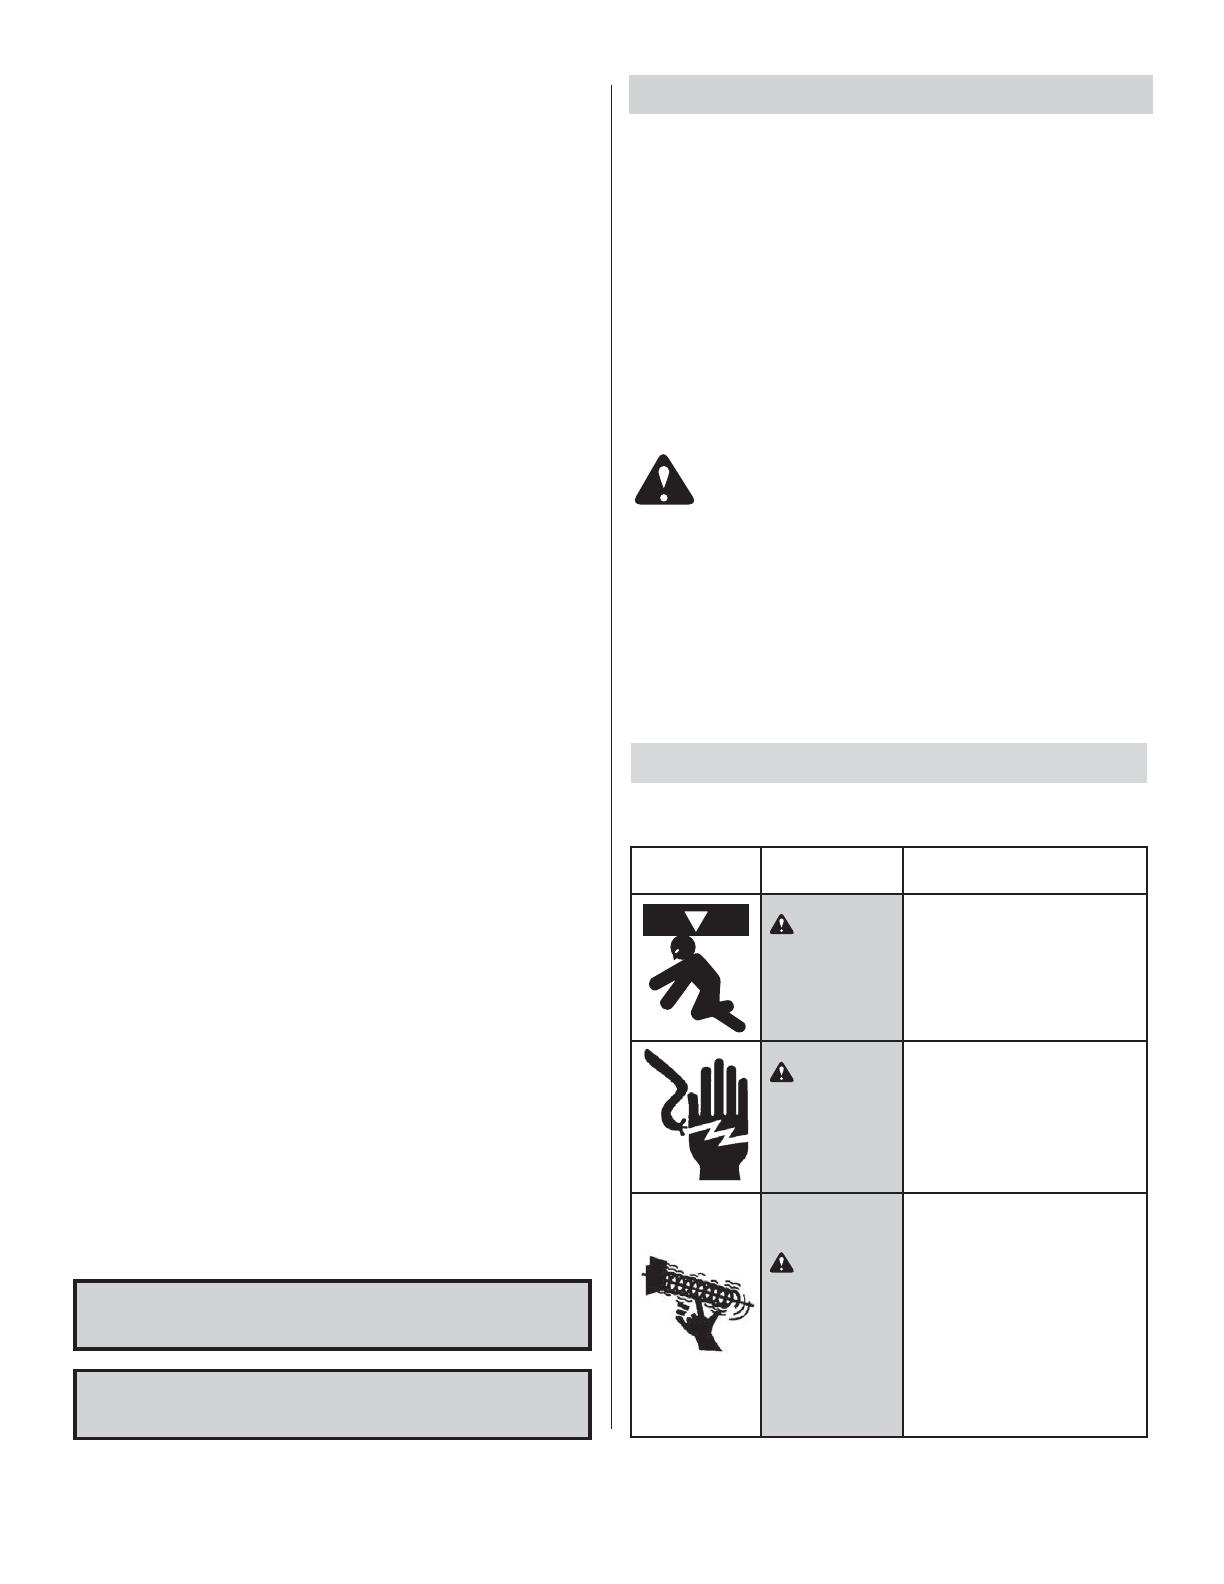
OVERVIEW OF POTENTIAL HAZARDS
READ
THIS SAFETY INFORMATION
PreventionEffect
Potential
Hazard
WARNING
Could result in
Death or
Serious Injury
Could result in
Death or
Serious Injury
Could result in
Death or
Serious Injury
WARNING
WARNING
Turn OFF power before
removing opener cover.
When replacing cover, make
sure wires are NOT pinched or
near moving parts.
Opener must be fully grounded.
Do NOT try to remove, install,
repair or adjust springs or
anything to which door springs
are
fastened, such as, wood
blocks, steel brackets, cables
or other like items.
Installations, repairs and
adjustments must be done
by a trained door systems
technician using proper
tools and instruction
do not understand the in
2
©2011 The Genie Company
9/2011
P-2 rogramming
Limits and Force ...................................................................5
Optional Programming Powerhead
to HomeLink®, Car2U®, Intellicode® 1 Remotes
or Wireless Keypads
...........................................................
6
Contact Reverse Test ......................................................... 5
3-Maintenance & Troubleshooting
Monthly Routine...................................................................8
Important Safety Instructions 8........................................
Corrective Maintenance...................................................9
Adjustment Guide.............................................................10
Troubleshooting Guide ............................................11-12
Warranty............................................................................... 12
REFERENCE-Wiring Diagram .........................................13
8 Safe-T-Beam® System Check...........................................
8 Door Balance (Spring Tension).......................................
8 Contact Reverse Test (Reference)..................................
9 Changing Light Bulbs ........................................................
9 Remote Battery Replacement.........................................
10 Changing Force Setting..................................................
10Changing Speed Setting ................................................
9 Belt Tensioning Adjustment ...........................................
9Travel Limit Reset ...............................................................
9Engage & Disengage Carriage........................................
Programming Intellicode® 2 Remote
to Powerhead
........................................................................ 6
........................................................6
........................... 3
Transmitter Compliance Statement
....................................................7
Lost or Stolen Remote
....................................................6
FCC and IC Certification
....................................................7
Wall Console Overview
Programming New Remotes to
Previously Installed Genie® Intellicode® 1
Garage Door Openers
.........................................
................................
4
SAFETY FEATURES
Safe-T-Beam® (STB) Non-Contact Reversing System
Puts an invisible beam across the door opening. The door stops
and reverses to the full open position if anything
th
passes
rough the beam. LED indicator lights on the powerhead and
on the STBs provide a self diagnostic code if an operational
problem exists.
Safe-T-Reverse® Contact Reversing System
Automatically stops and reverses a closing door within two
seconds of contact with an object.
Automatic ForceGuard™ Control
Automatically sets the force required to fully open and close the
door for maximum safety.
Watch Dog™ Monitoring System
Monitors the Safe-T-Beam® system to ensure proper function-
ality and will automatically stop and reverse a closing door if a
problem is detected.
Manual Emergency Release
Manually releases door from door opener. Used during a power
failure or other emergency to allow manual opening and closing
of door.
SmartSet™ Electronic Programming
Easily adjust the programming to reduce opening speed to a
desired rate, vary limits and force, and program new remotes.
Automatic Lighting System
Two bulb lighting system supplies up to 200 Watts of light for
safer evening exits and entries. Turns ON when door is activated
and automatically turns OFF 4 minutes later.
Integrated Motion Detection (Not available on all models)
Select units have motion detection built into the powerhead.
Lights automatically turn ON when motion is detected for much
safer movement through the garage. Lights will turn OFF after
4 minutes of no motion.
3
INTELLICODE® 2 Access Security System
A new generation superior encryption system that enhances
the security of the door opener by continuously changing the
access code each time the remote is used. The door opener
esponds to each new code only once.
An access code copied
from a working system and tried again will not control the
door opener.
OPENER FEATURES
Wall Console, Series III
Operates door opener from inside garage. The Wall Console has
an Indicator Light with: Open/Close, Sure-Lock™, and
Independent Light Control buttons.
©2011 The Genie Company
9/2011
r
TRANSMITTER COMPLIANCE STATEMENT
Transmitters comply with all United States and Canadian legal
requirements as of the date of manufacture.
No warranty is made
that they comply with all legal requirements of any other jurisdiction.
If transmitters are to be used in another country, the importer
must determine compliance with any local laws and
which m
regulations
ay differ from United States and Canadian requirements
prior to use.
Los transmisores cumplen con todas las reglamentaciones legales
de los Estados Unidos y del Canadá, en la fecha de fabricación.
Ninguna garantía se da que cumplan con todas las reglamentaciones
legales de
ninguna otra jurisdicción. Si los transmisores se van a
utilizar en otro país, el importador debe determinar si cumplen con
las reglamentaciones y leyes locales que puedan ser diferentes a las
reglamentaciones de los Estados Unidos y del Canadá, antes de usar
los mismos.
Les émetteurs sont conformes à la réglementation américaine et
canadienne à compter de leur date de fabrication.
Aucune garantie
n’est stipulée indiquant qu’ils sont conformes à toutes les
prescriptions juridiques d’autres autorités. Si les émetteurs sont
utilisés dans d’autres pays, il incombe à l’importateur d’en
déterminer leur conformité aux lois et règles locales pouvant
différer de celles des États-Unis et du Canada avant toute utilisation
desdits émetteurs.
Sendegeräte entsprechen allen gesetzlichen Bestimmungen in den
USA und Kanada zum Zeitpunkt der Herstellung. Wir übernehmen
keine Gewährleistung für die Einhaltung aller gesetzlichen
Bestimmungen in anderen Ländern. Sollen Sendegeräte in anderen
Ländern eingesetzt werden, so muss der Importeur
vor dem
Gebrauch sicherstellen, dass die Sendegeräte auch solchen lokalen
Bestimmungen entsprechen, welche von den Bestimmungen der
USA und Kanadas abweichen.
and Car2U® compatible. Refer to the programming
instructions on page 6.
HomeLink®
4
©2011 The Genie Company
9/2011
SET
PROGRAM
Open
Travel
ROUND LED
Indicator
Facing
Garage Door
Close
Travel
Button
OVERVIEW OF POWERHEAD CONTROLS
This section describes the simple programming
functions. Use this page to familiarize yourself with the
buttons and LED indicators used to program the opener.
NOTE: These
and buttons are for programming use
only. Do NOT use these buttons to operate the opener.
There are three programming buttons and two lights
(LEDs) on the powerhead.
Each of the buttons are used to enter and complete
the setup programming. The LEDs indicate status or a
function change by illuminating ON, OFF, or ON flashing
in one of three different colors: BLUE, RED, or PURPLE.
PROGRAM
SET
Enters into and selects programming menus.
Programming Overview
There are four Powerhead program menus:
Remote Program (Default menu)
Limits Program
Speed Program**
Force Program*
*
Force settings are set at the factory and do not normally
require operator programming but can require minor
**
Speed settings are set at the factory and are self-
adjusting when needed. Speed Settings do not normally
require manually initiated changes.
1
Located on bottom of Powerhead.
Begin here ONLY AFTER
dna ylbmessa gnitelpmoc
installation of the
opener.
Review the
Assembly &
Installation
Poster to
ensure all steps
have
been performed.
There are no assembly or installation
steps included in this manual. Contact
your Genie® Professional Dealer for an
installation poster, if needed, or call
1-800 35-GENIE. You may also visit
www.geniecompany.com to download
a pdf. file.
Before you begin Programming,
check to make sure there are no
objects in the garage
door opening.
INFRARED PROTECTION FUNCTION
1. The Safe-T-Beam® has no effect on the door
during an opening cycle.
2. If the Safe-T-Beam® detects an obstruction
when trying to close the door, it will not allow
the door to move.
3. When the garage door is closing, if Safe-T-Beam
®
is interrupted by person or obstacle, the garag
e
door will stop its downward travel and reverse
automatically to its fully opened position.
4.
If the Safe-T-Beam® System fails, loses power, or
is installed improperly, press and hold the wall
console "open/close" button until the door
reaches its fully closed position. If you release the
"open/close" button on the wall console during
the closing movement the door will reverse
automatically to its fully opened position.
adjustment under certain conditions.
See Troubleshooting.
LONG LED
Indicator
Multi-function; move door during programming
& advance through menus
Both LEDs can be Red, Blue, Purple or off, depending on the
programming step you are performing.
ADJUSTMENT OF FORCE & SPEED SETTINGS IS ON PAGE 10
IN THE MAINTENANCE & TROUBLESHOOTING SECTION.
©2011 The Genie Company 9/2011
5
WARNING
s Make sure doorway is in view and clear of obstacles and
people to avoid injury or damage to property.
s DO NOT operate this unit from wall console before LIMITS
and FORCE are set. Severe damage to the opener can occur.
s The bullet MUST be engaged to carriage BEFORE setting
limits. See Installation Poster (if provided) or call
Customer Service at 800-35-GENIE or visit
www.geniecompany.com.
NOTE: If bullet has NOT been engaged to
the carriage, do so no .
PROGR
2
Please note that there is a 30 second timeout between
each programming step.
If you see two flashing RED LEDs, you have initiated
a timeout.
In the ev
w See page 9.
CONTACT REVERSE TEST
The
Force and Limit settings MUST be COMPLETED
before performing Contact Reverse Test.
1.
Test.
Place a 2" x 4"
board (laid flat)
under center of
door opening.
2. Adjustment, if needed.
s
If the door stops before it contacts the board
WARNING
A moving door can cause serious injury or death.
1. Keep people clear of opening while door is moving.
2. Do NOT allow children to play with opener, including
wall console, remote, or wireless keypad.
3. During programming, door opener could begin to run,
so stay away from moving door and its parts.
Once the Contact Revese Test is complete,
continue with programming Remotes.
or it does not reverse, it may be due to an improperly set
down limit. Repeat TRAVEL LIMITS program and Test again.
Repeat as needed until door passes test. For further help
refer to Maintenance &Troubleshooting, page 13.
ent of a timeout you must restart at beginning.
Press & hold
2 seconds or until
LEDs react. Release.
Press & hold
2 seconds or until
LEDs react. Release.
Long LED turns Blue,
Round LED OFF.
Then Long LED OFF
Round LED Flashing.
Long LED turns Blue, then flashes.
Press & hold
until door is fully
open. Then release.
Press &
Release.
DOOR LIMITS ARE SET
SET FORCE NEXT
PROGRAM
SET
FLASHING
DOOR FULLY OPEN
DOOR FULLY CLOSED
OFF
O
RED
RED
FF
Press &
Release.
PROGRAM
SET
Press &
Release the
Open/Close
button.
DOOR CLOSES.
s When door contacts board,
it must stop and reverse direction
(within 2 seconds) to the fully
open position.
OFF OFF
AMMING LIMITS
TRAVEL LIMITS
UP LIMIT
DOWN LIMIT
Door fully closes.
Door fully opens.
FORCE CONTROL
Press &
Release
Open/Close
button.
ACTION INDICATION/RESULT
Press &
Release
Open/Close
button.
ON WALL CONSOLE
Press &
Release the
Open/Close
button.
FORCE CONTROL IS SET
1
2
1
2
1
3
4
5
6
2
3
DOOR OPENS.
ACTION LED INDICATION/RESULT
OFF
OFF
ON
BLUE
BOTH FLASH BLUE
FLASHING
Press & hold
until door is fully
closed. Then release.
B
During the initial setting
of the limits- the LEDs will
turn to RED—NOT OFF
oth BLUE then LEDs Off confirms limit set.
OFF
OFF
BOTH FLASH BLUE
Both BLUE then LEDs Off confirms limit set.
©2011 The Genie Company
9/2011
6
PROGRAMMING REMOTES
to New Intellicode® 2 Openers.
All type remotes program in the same way.
Bring remote(s) to powerhead location. For Car2U® and
HomeLink®, park car outside the garage with the ignition
key in the “ACCESSORY” position. Each button must
be programmed individually following steps below.
NOTE: For additional openers—repeat the steps above
using a different remote button for each.
The default setting of Intellicode® 2 must be changed.
The LED color displayed on the remote indicates
the IntelliCode® mode.
Red = IntelliCode® 1 / Green = IntelliCode® 2
FCC and IC CERTIFIED
This device complies with FCC Part 15 and RSS 210 of Industry Canada.
This equipment has been tested and found to comply with the limits
for a Class B digital device, pursuant to Part 15 of the FCC Rules. These
limits are designed to provide reasonable protection against harmful
interference in a residential installation. This equipment generates,
uses and can radiate radio frequency energy and, if not installed and
used in accordance with the instructions, may cause harmful
interference to radio communications. However, there is no guarantee
that interference will not occur in a particular installation. If this
equipment does cause harful interference to radio or television
reception, which may be determined by turning the equipment OFF
and ON, the user is encouraged to try to correct the interference by
one or more of the following measures:
s Re-orient or relocate the receiver antenna.
s Increase the separation between the opener and receiver.
s Connect the opener into an outlet on a circuit different from that to
which the receiver is connected.
s Consult your local dealer.
P
ROGRAM
SET
DOOR MOVES
DOOR MOVES
Press & Hold for
2 seconds or until
round LED turns blue.
Press & Release that same
button again.
REMOTE BUTTON IS PROGRAMMED
OFF
Both LEDs Off.
OFF
OFF
BLUE
OFF
Select a button
NOT prorammed
to a new
Intellicode®2
opener
Press & hold that button
for until both the
RED & GREEN LEDs are ON.
Release.
Press the same remote
button 3 times.
Press the same
remote button
twice.
Press the
Lean Code
Button
REMOTE BUTTON IS PROGRAMMED TO OPENER
PROGRAMMING INTELLICODE® 2 REMOTES
to Intellicode® 1 (previous model) Openers.
Press the same
remote button
again.
RED WHEN BUTTON PRESSED
Find the Learn Code Button and
Learn Code Indicator LED on your
door opener.
–If Door Opener does not have an
Antenna, you have an External
Receiver. The External Receiver
cover must be removed to
access the Learn Code Button
and Indicator LED.
Red Indicator
LED
Learn
Code
Button
Located
on Opener
Housing
If your Door Opener has a black
antenna wire and the serial
number does not start with
10 or higher, the Learn Code
Button and Indicator LED are
located near the antenna. (The
light lens may need to be
opened. If you use an external
receiver, it may need to be
opened to access the Learn
Code Button and Indicator LED.
Red Indicator LED BLINKS
Red Indicator LED OFF
1
2
3
4
5
6
1
ACTION LED INDICATION/RESULT
Choose a button on your
remote device. Press &
release it twice.
2
3
(Follow the TOP 2 steps above to shift back to Intellicode®2)
STAYS ON RED & GREEN
REMOTE BUTTON IS INTELLICODE® 1
PURPLE
FLASHING
OFF
PURPLE
STEADY
7
©2011 The Genie Company
9/2011
IntelliCode® 1 or 2 wireless keypad
Door moves.
(To verify memory is cleared—try to operate the garage door
using one of your remote devices. The opener should
not respond.)
Both LEDs OFF confirms communication
is established with operator.
Round LED BLUE then OFF, Long LED FLASHING
PROGRAM
SET
Press & hold
2 seconds.
Release.
ACTION LED INDICATION/RESULT
BLUE
OFF
OFF
OFF
OFF
OFF
BOTH BLUE
FLASHING
Release.
OFF
PURPLE
FLASHING
Clearing remotes from powerhead memory will
clear ALL programmed remotes and wireless
keypad.
NOTE:
All remotes and wireless keypads
must be reprogrammed.
Your door opener will no longer recognize any
signal received from a missing remote.
Press & hold
BOTH open
and close
buttons
together.
REMOTE CLEARED FOR REPROGRAMMING
LOST OR STOLEN REMOTE - CLEARING MEMORY
OPTIONAL PROGRAMMING
1
2
3
Enter your PIN
on the wireless keypad.
OFF
BLUE
OFF
Press & release 2 times.
Press &
release
ACTION LED INDICATION/RESULT
Genie® Intellicode® 2 Wireless Keypad comes
with a complete set of instructions.
Independent Light Control Button
Controls door opener lights from inside garage
Sure-Lock™ Button
retfa slortnoc selbasid KCOL
.desolc yletelpmoc si rood
– UNLOCK allows controls to
work normally
Indicator Light
Red indicator light is always ON
When Sure-Lock™ is ON the
indicator light flashes
Open/Close Button
Open and closes door from inside garage.
WALL CONSOLE - OVERVIEW
Use only the Series III wall console provided with this unit.
Wall console has three buttons and one indicator light.
Indicator Light
Indicator light will display Red when wall console is
properly wired and Sure-Lock
is OFF. When Sure
is ON indica
Lock
tor light flashes.
Open/Close Button
Use this button to open or close garage door. When
Sure-Lock™ is ON the Open/Close button will CLOSE
door only. Note: Constant button pressure in the
CLOSE mode will override error responses in the
powerhead and close door.
Independent Light Control Button
Use this button to turn powerhead lights ON.
Powerhead lighting will remain ON until this button
is pressed again or a door action has been completed.
Note: If opener has a Motion Detector sensor, it will
keep powerhead lights ON as long as motion is detected
Sure-Lock™ Button
When Sure-Lock™ is ON the powerhead cannot be
activated by the wall console or a remote.
s Press and hold for 5 seconds (or until Indicator
Light flashes) to activate Sure-Lock™.
s Press and release to turn Sure-Lock™ OFF.
Tip:
If the Wall Console is energized (LED ON), but the
door does not
respond to the
OPEN/CLOSE
button-verify
the Console is
wired to the
BWC terminals
on the powerhead.
STB BWC IWC
NOT
USED
NOT
USED
NOT
USED
NOT
USED
FROM STBs
FROM WALL
CONSOLE
STB
BWC
IWC
FROM STBs
FROM WALL
This opener has a Serial Number sticker in which the serial
numbers begin with 10 or higher.
MODEL AC SR3 THE GENIE COMPANY
FCC ID: B8Q AC SR3 Residential Door Operator
IC: 2133A-CSD1D 120V. 60HZ. 5A
FOR H LP CAL 1-800-35GENIE OR WWW.GENIECOMPANY.COM
S/N:10XXXX XXXXXXX
Wall consoles from other manufacturers may not work with
openers of these serial number groups. Genie® Series I wall
buttons and Series II wall consoles will not work with openers
of this serial number group.
ROGRAM
SET
Press & Hold for
2 seconds or until
round LED turns blue
then OFF.
Then Long LED flashes purple
.
1
2
4
5
PURPLE
FLASHING
CONSOLE
8
©2011 The Genie Company
9/2011
s With the door closed, pull
release handle
DOWN and let go to release door carriage assembly
from drive system.
sR
sRaise and lower the door manually—it should move
freely and smoothly.
d let go.na teef 4ot 3 about yllaunam rood esia
– Door should remain stationary or move very slowly.
– If door moves quickly, CONTACT A TRAINED
DOOR SYSTEM TECHNICIAN.
s#LOSETHEDOOr.
s Verify shuttle release lever is in the ENGAGED (up)
position (pull release handle toward opener and let go).
– Operate door using a remote or wall console.
– Door will re-attach itself to carriage assembly.
Check that both the RED and GREEN LEDs are ON steady.
This indicates the system is working properly. If both LEDs
are not ON steady, check the appropriate items below.
If the system appears to be working properly, perform the
check as follows:
1. Start the door closing.
2. Pass on object through the beam, the door should
stop and reverse to the fully open position.
Perform the check as follows:
DOOR BALANCE (SPRING TENSION)
Safe-T-Beam® (STB) SYSTEM CHECK
s34"2ED,%$FLASHES
– Check for obstruction.
– Check alignment.
Verify wire routing from STBs to STB connection
in powerhead.
– Check for signal interference
Safe-T-Beam® unit (For multiple door installations).
from another.
s.O34"2EDOR'reen LED displayed.
– Check wiring and wire connections.
MAINTENANCE &
TROUBLESHOOTING
3
If you have any questions, please do not hesitate to
contact customer service at: 1-800-35-GENIE or visit
IMPORTANT SAFETY
INSTRUCTIONS
WARNING:
To reduce the risk
of severe injury or death
1. READ AND FOLLOW ALL INSTRUCTIONS.
2. Never let children operate or play with the door controls.
Keep the remote away from children.
3. Always keep the moving door in sight and away from people
and objects until the door is completely closed. NO ONE
.ROOD GNIVOM EHT FO HTAP EHT SSORC DLUOHS
4. NEVER GO UNDER A STOPPED, PARTIALLY OPEN DOOR.
5. Test opener monthly. The door MUST reverse on contact
with a 1-1/2" high object (or a 2" x 4" board laid flat) at the
center of the doorway on the floor. After adjusting either the
force or the limit of travel, retest the door opener. Failure to
adjust the opener properly may cause severe injury or death.
6. When possible, use the emergency release only when the
door is closed. Use caution when using this release
door open
with the
. Weak or broken springs are capable of increasing
the rate of door closure and increasing the risk of severe
injury or death.
7. KEEP DOORS PROPERLY BALANCED. See your garage door
Owners Manual. An improperly balanced door increases the
risk of severe injury or death. Have a trained door system
technician make repairs to cables, spring assemblies, and
other hardware.
8.
SAVE THESE INSTRUCTIONS.
www.geniecompany.com.
WARNING
s ,stekcarb ,selbac ,sgnirps( erawdrah rood egaraG
pulleys, etc.) are under extreme pressure and
tension.
s DO NOT attempt to repair or adjust door springs or
any hardware, and DO NOT OPERATE garage door
automatically or manually if door is improperly
balanced or springs are broken.
CONTACT A TRAINED DOOR SYSTEM TECHNICIAN.
ROUTINE MONTHLY MAINTENANCE
Basic monthly maintenance tasks.
s Safe-T-Beam® System Check
s Door balan
s Lubricate Door Hardware
ce
s Contact reverse
WARNING
Use wall console supplied with opener. Other approved wall
consoles may be available. Unapproved or incompatible wall
consoles can cause the opener to operate unexpectedly.
CONTACT REVERSE
See page 5.
TEST
s Use silicone lubricant or lightweight oil.
LUBRICATE DOOR HARDWARE
Lubricate door rollers, bearings and hinges:
ENGAGED
DISENGAGED
OPENER
3’ - 4’
Sectional Door
3’ - 4’
One-Piece Door
ROUTINE YEARLY
Lubricate the drive screw:
s Wipe off old grease using a lint-free cloth.
s Apply a light coating of silicon based grease
(For best results, use Genie® GLU-R).
9
©2011 The Genie Company
9/2011
CORRECTIVE MAINTENANCE
TO ENGAGE, PULL
DOWN AND TOWARD
THE OPENER. THEN LET GO.
TO DISENGAGE, PULL
DOWN ON THE RELEASE
HANDLE AND LET GO.
DISENGAGING AND ENGAGING CARRIAGE
CHANGE LIGHT BULBS
WARNING
s When replacing light cover, make sure wires are
not pinched or near moving parts.
s Use extreme caution when working from a ladder
or step stool.
1. Disconnect power to door opener.
s/PENPowerhead light cover.
s2EMove light bulb(s).
s2EPLAce light bulb(s).
Do NOT use light bulbs with greater than
100 Watt rating.
s#LOSEPowerhead light cover.
2. Reconnect power to door opener.
s Test light operation.
RESET - OPEN/CLOSE TRAVEL LIMIT
Performing all ten (10) Limits/Force setting steps
(page 5) erases previous Limits/Force settings.
NOTE: The opener will not close the door
automatically unless the Safe-T-Beam® System is
installed and Limits are programmed.
REMOTE BATTERY REPLACEMENT
Replace remote battery with a
CR 2032 coin cell battery.
1. Open the remote case using a
washer or coin that fits into the
slot at the top of the remote.
2. Replace battery.
3. Align components and
snap case closed.
ENGAGED
DISENGAGED
OPENER
©2011 The Genie Company9/2011 10
ADJUSTMENT GUIDE - FORCE SETTINGS
Force settings are pre-programmed at the factory and
"learned" during the Open/Close Limit settings steps.
For normal use, these settings should not need adjustment
with this unit.
However, conditions possibly requiring adjustment are:
Doors with very stiff weather seals.
Doors that start down, STOP and reverse before closing.
Doors that start up, but STOP before they completely open.
CAUTION
Door closing force is FACTORY set and requires no
adjustment for normal operation.
s
Never adjust the force settings to compensate for damage,
including an unbalanced door, binding door track or
broken spring.
s
Perform monthly CONTACT REVERSE
LED indicator colors
OFF
Blue
Purple Red
1.
2.
3.
ADJUSTMENT GUIDE - SPEED SETTINGS
Speed settings are pre-programmed at the factory for the
maximum speed. Speed settings should not need adjustment
with this unit.
However, travel speed for the opener can be adjusted to a
slower speed in both the open and close directions, To
mimimize wear on heavier sectional doors.
NOTE: One-piece doors are automatically set to the slowest
speed during Limits programming and cannot be adjusted.
There are 3 speed settings available for sectional doors.
Please note that speed may be affected by door weight and
balance, along with condition of door components and tracks.
TEST. See page 7.
Press & hold
both up and
down buttons
2 seconds or until round
LED turns Red.
Press &
Release.
Press either
until you reach
desired setting.
FORCE SETTINGS DONE
PROGRAM
SET
Press &
Release.
PROGRAM
SET
FORCE ADJUSTMENT
1
2
3
4
5
USE CHART BELOW.
Press either
until you
reach the
desired setting.
USE CHART BELOW.
LOCKS IN SETTING.
LOCKS IN SETTING.
OFF
OFF
Speed Level
Powerhead LEDs
ROUND LED
LONG LED
LED indicator colors
OFF
Blue
Purple Red
High
Medium
Low
RED
RED
PURPLE
PURPLE
ACTION LED INDICATION/RESULT
Then the Current UP FORCE
SETTING will display. SEE CHART.
Then the Current
DOWN FORCE
SETTING will display.
Both LEDs TURN
BLUE then OFF
confirms Force
Settings are reset.
Both LEDs FLASH
BLUE to confirm setting.
Press &
Release.
Press twice.
FORCE SETTINGS DONE
PROGRAM
SET
Press & Hold for
about 10 seconds
or until both LEDs
turn Blue.
Then release.
PROGRAM
SET
Press &
Release.
PROGRAM
SET
SPEED ADJUSTMENT
1
2
3
4
5
Press &
Release.
PROGRAM
SET
Press either until
you reach the
desired setting.
LOCKS IN OPENING SETTING.
LOCKS IN CLOSING SETTING.
OFF
ACTION LED INDICATION/RESULT
Then the Current Speed setting
for OPENING travel will display.
SEE CHART BELOW.
Then the Current Speed setting
for CLOSING travel will display.
SEE CHART BELOW.
NOTE: Depending on the criteria
mentioned above, you may not
have the option to increase speed.
Press either until
you reach the
desired setting.
NOTE: Depending on the criteria
mentioned above, you may not
have the option to increase speed.
BLUE
OFF
RED
OFF
BLUE
FLASHES 3 TIMES
OFF
FLASHES BLUE 3 TIMES
BLUE
BLUE
BLUE
FLASH BLUE
FLASH BLUE
BLUE
BLUE
BLUE
BLUE
FLASHES
BLUE 3 TIMES
OFF
BLUE
FLASHING
BLUE BLUE
7
6
Force Level
Powerhead LEDs
ROUND LED
LONG LED
BLUE
BLUE
BLUE BLUE
Off
Off
Off
Off
PURPLE
PURPLE
PURPLE
PURPLE
Off
RED
RED
RED
RED
Off
11
©2011 The Genie Company
9/2011
REFERENCE - CIRCUIT WIRING DIAGRAM
FOR HELP-1-800-35-GENIE OR WWW.GENIECOMPANY.COM
Opener circuit wiring diagram. This wiring diagram is for reference only.
Opening Cover May Cause Electric Shock.
Disconnect power from opener prior to removing cover.
1 2 3 4 5 6
123
76
POWER CORD
CONNECTOR
WHITE
BLACK
GREEN
WHITE
WHITE
BLACK
RED BLACK
STRIPED WHITE
WALL CONSOLE
SCREW DRIVE MOTOR
STRIPED WHITE
SAFE-T-BEAM®
5432
1
(Purchased Separately)
INTELLIGENT WALL CONSOLE
4
BLACK
REDBLACK
CHAIN MOTOR
123
RED
BLACK
YELLOW
1234
OPTICAL SENSOR*
GREEN
RED
PRINTED CIRCUIT BOARD
CHOKE
*SOME MODELS DO NOT COME WITH THIS FEATURE
(IWC or AWC)BWCSTB
BLACK
MOTION DETECTOR*
WARNING
WARNING
ELECTRICAL SHOCK
Opener does NOT run
from wall console.
s Check power source,
Plug a lamp into outlet used for powerhead. If lamp works, power source is OK.
If not, check fuse or circuit breaker.
s If power is OK,
Check connections at powerhead terminals and at wall console.
Limits must be set with door arm connected to door.
s Check if wall console Sure-Lock™ is ON. Turn Sure-Lock™ OFF & check operation.
s Check for reversed, broken, or cut wires. Staples can cut insulation and short wires. Repair or replace.
Opener runs, but door
does NOT move.
s ot refeR .9 egap eeS .tellub tleb ro niahc ot degagne si egairrac erus ekaM
Installation poster or download poster from WWW.GENIECOMPANY.COM.
s .ye
llup sti FFO ro nekorb ton si tleb/niahc erus ekam ot kcehC
s .01 egap eeS .TNEMTSUJDA ECROF kcehC
Opener works from
wall console, but NOT
from remote.
s Check all remotes.
s Replace remote battery with good one. See page 9.
s Program remote to powerhead. See page 6.
Remote has less than
25 feet operating
range or no operation.
s Relocate remote inside car and or point remote at garage door.
s
Replace battery. See page 9.
s
Reposition door opener antenna.
s
Remote LED does not come ON with button push - replace battery. See page 9.
s
Eliminate possible competing signals (satellite radio, FiOS® TV).
Door starts down,
then STOPS and goes
back up.
OR
Safe-T-Beam® System
malfunction.
s If a NEW installation, check Door Arm position. Refer to Installation poster or download
poster from WWW.GENIECOMPANY.COM.
s Check if Limits are properly set. See page 5 & 9.
s Check if Safe-T-Beam® Red LED is flashing. See page 8.
s Check Safe-T-Beam® system for beam obstruction or misalignment of lenses. See page 8.
s Check garage door for binding.
s If an operational problem exists, and opener will not close. The opener can be forced to
close as follows; Press and hold the wall console button until door is completely closed.
s Check for interference from adjacent Safe-T-Beam® units.
s Contact The
Genie Company at 1-800-35-GENIE.
Door starts down,
then STOPS before it
is closed.
OR
Door will only open.
s Check Safe-T-Beam® wire connections at powerhead. See page 8, STB Instruction, Poster or website.
s
Check Limits are properly set. See page 5 & 9.
s
Check CONTACT REVERSE. See page 5.
s
Check garage door
for binding.
s
Check closing "FORCE" adjustment. See page 10 .
Door starts up, but
STOPS before it is
completely open.
s Check Limits are 0properly set. See page 5.
s Be sure door, opener, and springs are in good repair, properly lubrica
ted and balanced.
s Check opening "FORCE" adjustment. See page 10.
s
WARNING: If you suspect a problem with the garage door hardware or springs,
contact The Genie Company at 1-800-35-GENIE.
Door will only run
closed.
s Check Limits are properly set. See pages 5 & 9.
s
Check Sure-Lock™. Sure-Lock™ should be OFF for normal operation. See page 7.
s
Check door balance, condition, and door spring.
s
Check opening "FORCE" adjustment. See page 10.
s
WARNING: If you suspect a problem with the garage door hardware or springs,
c
ontact The Genie Company at 1-800-35-GENIE.
Door opener starts for
no reason.
s Button stuck on wall console or remote.
s Was a remote lost or stolen? Erase all remotes from powerhead memory and program
new remotes. S
TROUBLESHOOTING GUIDE -
FOR HELP—1-800-35-GENIE OR WWW.GENIECOMPANY.COM
OPERATION
Noisy operation.
s
Be sure all door fasteners are tight.
s
Be sure garage door is in good repai
r,
properly lubricated and balanced
.
s
Be sure opener is in good repair
.
Door opener runs
slow.
s .tnemtsujda/riaper lanoisseforp deen yam rooD .8 egap eeS .rood fo noitidnoc gni
tarepo kcehC
s
Is this opener installed on a one piece door? Normal speed for one piece door is
lowest speed setting.
s If carriage travel is less than 6 feet, opener configures programming for a one piece door.
s Contact The Genie Company at 1-800-35-GENIE concerning door speed.
ee page 7.
12
©2011 The Genie Company
9/2011
WHAT TO DOPROBLEM
13
©2011 The Genie Company
9/2011
TROUBLESHOOTING GUIDE -
POWERHEAD LEDs
FOR HELP-1-800-35-GENIE OR WWW.GENIECOMPANY.COM
Powerhead LED
Possible Problem Solution
Round LED Long LED
OFF OFF
Normal operation None required
No response from unit
Check power supply
Contact a trained door system
technician
ON/RED/
STEADY
ON/RED/
STEADY
Limits NOT set properly Reprogram Limits, see page 5
ON/RED/
FLASHING
ON/RED/
FLASHING
Program error Unplug unit, wait 5 seconds, plug in
Component failure
Contact a trained door system
technician
ON/BLUE/
FLASHING
OFF Remote NOT programmed Program remote, see page 6
ON/PURPLE/
FLASHING
OFF
IntelliCode® 1 remote NOT
programmed
Program remote using IntelliCode®
margorp neht , 6 egap ees ,etomer 2
IntelliCode® 1 remote using
instructions on page 6.
ON/RED/
FLASHING
OFF
Safe-T-Beam® physical
obstruction
Remove obstruction, recheck unit
Safe-T-Beam® signal
interference
Check alignment of Safe-T-Beam® pair
and nearest other Safe-T-Beam® pair
OFF
ON/RED/
FLASHING
Door contact in up or down
travel
Remove obstruction
Door component failure
detected
Check door spring, track, rollers, hinges
and fixtures
OFF
ON/RED/
STEADY
Thermal cutout
DO NOT unplug unit
Wait until LED clears before operating
*0,+ROGLQJV,QFGED7KH*HQLH&RPSDQ\6HOOHUZDUUDQWVWRWKHRULJLQDOSXUFKDVHURIWKHEHORZLGHQWLILHGJDUDJHGRRURSHQHU32:(5/,)7 *32:(53RZHU0D[RU7ULOR*
´3URGXFWµVXEMHFWWR

DOORIWKHWHUPVDQGFRQGLWLRQVKHUHRIWKDWWKH3URGXFWDQGDOOFRPSRQHQWVWKHUHRIZLOOEHIUHHIURPGHIHFWVLQPDWHULDOVDQGZRUNPDQVKLSIRUWKHIROORZLQJSHULRGVRIWLPHPHDVXUHGIURPWKHGDWHRISXUFKDVH
02725*($5%2;6HO
OHUZDUUDQWVWKHPRWRUJHDUER[IRUWKH/,)(7,0(RIWKHSURGXFW
%(/76HOOHUZDUUDQWVWKHEHOWIRUDSHULRGRI),)7((1<($56
&+$,16HOOHUZDUUDQWVWKHFKDLQIRUDSHULRGRI),9(<($56
&25(81,73$5766HOOHUZDUUDQWVDOORWKHUSDUWVDQGFRPSRQHQWVRIWKH&RUH8QLWIRUDSHULRGRI),9(<($56
$&&(6625,(66HOOHUZDUUDQWVDOODFFHVVRULHVIRUDSHULRGRI21(<($5
/LIHWLPHVKDOOPHDQIRUDVORQJDVWKHRULJLQDOSXUFKDVHURZQVWKHKRPHLQZKLFKWKHSURGXFWLVRULJLQ
DOO\LQVWDOOHG
7KH&RUH8QLWFRQVLVWVRIWKHSRZHUKHDGZLUHGZDO
OFRQWURO6DIH7%HDP
V\VWHP-$UPDQGUDLO
6HOOHU·VREOLJDWLRQXQGHUWKLVZDUUDQW\LVVSHFLILFDOO\OLPLWHGWRUHSDLULQJRUUHSODFLQJDWLWVRSWLRQWKH3URGXFWRUDQ\SDUWWKHUHRIZKLFKLVGHWHUPLQHGE\6HOOHUWREHGHIHFWLYHGXULQJWKHDSSOLFDEOHZDUUDQW\SHULRG
FKD
$Q\ODERU
UJHVDUHH[FOXGHGDQGZLOOEHWKHUHVSRQVLELOLW\RIWKHSXUFKDVHU 7KLVZDUUDQW\JLYHV\RXVSHFLILFOHJDOULJKWVDQG\RXPD\DOVRKDYHRWKHUULJKWVZKLFKYDU\IURPVWDWHWRVWDWH7KLVZDUUDQW\LVPDGHWRWKHRULJLQDOSXUFKDVHU
RIWKH3URGXFWRQO\DQGLVQRWWUDQVIHUDEOHRUDVVLJQDEOH7KLVZDUUDQW\DSSOLHVRQO\WR3URGXFWLQVWDOOHGLQDUHVLGHQWLDORURWKHUQRQFRPPHUFLDODSSOLFDWLRQ,WGRHVQRWFRYHUDQ\3URGXFWLQVWDOOHGLQFRPPHUFLDORULQGXVWULDO
EXLOGLQJDSSOLFDWLRQV 7KLVZDUUDQW\GRHVQRWDSSO\WRDQ\XQDXWKRUL]HGRULPSURSHULQVWDOODWLRQDOWHUDWLRQRUUHSDLURIWKH3URGXFWRUWRDQ\3URGXFWRUFRPSRQHQWZKLFKKDVEHHQGDPDJHGRUGHWHULRUDWHGGXHWRPLVXVHDEXVH
QHJOHFWDFFLGHQWIDLOXUHWRSURYLGHQHFHVVDU\PDLQWHQDQFHQRUPDOZHDUDQGWHDURUDFWVRI*RGRUDQ\RWKHUFDXVHEH\RQGWKHUHDVRQDEOHFRQWURORI6HOOHUDQGGRHV
RURSHQER[VDOHVRUUHSDLUVRUPDLQWHQDQFHWRGRRUFRPSRQHQWV
QRWFRYHUEDWWHULHVPLVVLQJRUGDPDJHGSDUWVIURPFOHDUDQFH
$//(;35(66$1',03/,(':$55$17,(6)257+(352'8&7,1&/8',1*%87127/,0,7('72$1<,03/,(':$55$17,(62) 0(5&+$17$%,/,7<$1'),71(66)25$3$57,&8/$5385326(
$5(/,0,7(',17,0(727+($33/,&$%/(:$55$17<3(5,2'5()/(&7('$%29(12:$55$17,(6:+(7+(5(;35(6625,03/,(':,//$33/<$)7(57+(/,0,7(':$55$17<3(5,2'
+$6(;3,5('6RPHVWDWHVGRQRWDOORZOLPLWDWLRQVRQKRZORQJDQLPSOLHGZDUUDQW\ODVWVVRWKHDERYHOLPLWDWLRQPD\QRWDSSO\WR\RX ,112(9(176+$//*0,+2/',1*6,1&25,763$5(1725$)),/,$7(6
%(5(63216,%/()2525/,$%/(72$1<21()2563(&,$/,1',5(&7&2//$7(5$/381,7,9(,1&,'(17$/25&216(48(17,$/'$0$*(6HYHQLI6HOOHUKDVEHHQDGYLVHGRIWKHSRVVLELOLW\RIVXFK
GDPDJHV6XFKH[FOXGHGGDPDJHVLQFOXGHEXWDUHQRWOLPLWHGWRORVVRIXVHFRVWRIDQ\VXEVWLWXWHSURGXFWRURWKHUVLPLODULQGLUHFWILQDQFLDOORVV6RPHVWDWHVGRQRWDOORZWKHH[FOXVLRQRUOLPLWDWLRQRILQFLGHQWDORUFRQVHTXHQWLDO
GDPDJHVVRWKHDERYHOLPLWDWLRQRUH[FOXVLRQPD\QRWDSSO\WR\RX
&ODLPVXQGHUWKLVZDUUDQW\PXVWEHPDGHSURPSWO\DIWHUGLVFRYHU\DQGZLWKLQWKHDSSOLFDEOHZDUUDQW\SHULRG7RREWDLQZDUUDQW\VHUYLFH\RXPXVWFRQWDFW
*HQLH
FXVWRPHUVHUYLFHDQGSURYLGHSURRIRIWKHGDWHDQGORFDWLRQRISXU
*HQLH
FXVWRPHUVHUYLFHDQGSURYLGHSURRIRIWKHGDWHDQGORFDWLRQRI
FKDVHDQGLGHQWLILFDWLRQDVWKHRULJLQDOSXUFKDVHU&DOO*HQLH
&XVWRPHU6HUYLFHWROOIUHHDWWRVSHDNZLWKDWUDLQHGUHSUHVHQWDWLYH
3XUFKDVHUPXVWDOORZVHOOHUDUHDVRQDEOHRSSRUWXQLW\WRLQVSHFW3URGXFWFODLPHGWREHGHIHFWLYHSULRUWRUHPRYDORUDOWHUDWLRQRILWVFRQGLWLRQ8SRQGHWHUPLQDWLRQE\6HOOHUWKDWWKH3URGXFWRUDQ\SDUWWKHUHRILVGHIHFWLYHGXULQJ
WKHDSSOLFDEOHZDUUDQW\SHULRGZKLFKPD\UHTXLUHSXUFKDVHUWRUHWXUQWKH3URGXFWWR6HOOHUDWSXUFKDVHU·VH[SHQVH6HOOHUZLOOVXSSO\WKHSXUFKDVHUZLWKUHSODFHPHQWSDUWVRUDWLWVRSWLRQDUHSODFHPHQW3URGXFWVKLSSLQJDQG
KDQGOLQJRIDQ\UHSODFHPHQWSDUWVRUUHSODFHPHQW3URGXFWDOVRDWSXUFKDVHU·VH[SHQVH6HOOHUPD\XVHQHZRUUHFRQGLWLRQHGSDUWVRUDQHZRUUHFRQGLWLRQHG3URGXFWRIWKHVDPHRUVLPLODUGHVLJQ
7KHUHDUHQRHVWDEOLVKHGLQIRUPDOGLVSXWHUHVROXWLRQSURFHGXUHVRIWKHW\SHGHVFULEHGLQWKH0DJQXVRQ0RVV:DUUDQW\$FW
385&+$6(5
,167$//$7,21$''5(66
'$7(385&+$6(' 6(5,$/180%(5
23(1(502'(/
5(027(&21752/02'(/
'($/(51$0(
'($/(5$''5(66
P900-228
Limited Warranty
POWERLIFT™ 900, GPOWER™ 900, PowerMax™1200/1500, TriloG™1200/1500
  • Page 1 1
  • Page 2 2
  • Page 3 3
  • Page 4 4
  • Page 5 5
  • Page 6 6
  • Page 7 7
  • Page 8 8
  • Page 9 9
  • Page 10 10
  • Page 11 11
  • Page 12 12
  • Page 13 13
  • Page 14 14

Genie 1200 User manual

Category
Garage Door Opener
Type
User manual

Ask a question and I''ll find the answer in the document

Finding information in a document is now easier with AI