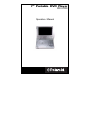
Polaroid PDV-0700 User manual
- Category
- DVD players
- Type
- User manual
This manual is also suitable for

7” Portable DVD Player
PDV-0700
Operation Manual

- 2 -
Contents
Safety Precautions ..................... 3
Precautions with Moisture .......... 4
Function Features ...................... 5
Parts Introduction ....................... 6
Remote Control .......................... 7
Connections ............................... 9
Playback Preparations ............... 10
■ Usage of Remote Control ..... 10
■ Disc Formats Supported ....... 11
■ Usage of Switch Adapter ...... 12
Power Supply ............................. 13
■ Using and Changing the
Battery Pack ............................... 13
■ Recommended Recharging
and Charging Times ................... 13
Detaching Battery Pack.............. 14
Using a Car Adapter................... 14
Using Headphones..................... 14
Basic Operations ........................ 15
■ Start of Playback................... 15
■ Pause.................................... 15
■ Zoom..................................... 15
■ Stop....................................... 16
■ Mode ..................................... 16
■ Title Menu ............................. 16
■ Previous and Next................. 16
System Setup ............................. 17
■ General Setup....................... 17
■ Speaker Setup ...................... 18
■ Dolby Digital Setup ............... 18
■ Video Setup .......................... 18
■ Preference Page ................... 19
■ Audio..................................... 19
■ Region Codes ....................... 19
Playback Functions .................... 21
■ Fast Forward and Rewind..... 21
■ Slow Forward and Rewind .... 21
■ Repeat .................................. 21
■ Subtitle .................................. 21
■ Angle..................................... 22
■ Search by Time..................... 22
■ Resume Playback ................. 22
■ Playing a MP3....................... 22
■ Playing a JPEG..................... 23
Care of Discs.............................. 24
About Rechargeable Battery ...... 25
Troubleshooting.......................... 26
Specifications ............................. 27

- 3 -
Thank you for buying this Polaroid DVD product. Please read operating instructions for
proper operation. Save these instructions for future reference.
________ _____________
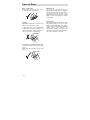
Sa fety Preca utions
WARNING: To reduce the risk of fire or shock hazard, do not expose this DVD player to rain or moisture.
To reduce risk of electrical shock, do not remove cover or back, no user serviceable parts
inside.
WARNING:
To reduce risks associated with heat build-up, do not charge battery for more than 4 hours;
do not leave battery attached when player is using an alternative power source, electrical adaptor
or car adaptor; and do not block any ventilation openings or holes.
CAUTION
: To prevent electric shock, match wide blade of plug with slot, insert.
CAUTION
: This product utilizes a laser. Use of controls or adjustments or performance of procedures other
than those specified herein may result in hazardous radiation exposure. Do not open cover
to view it, do not repair it yourself. Refer servicing to qualified personnel.
WARNING:
Any substitutions or modifications of this product without authorization from Polaroid or an
authorized dealer will void the warranty.
Impor t ant Sa fet y I n st r uct i on s
1. Read these instructions. Keep these instructions.
Heed all warnings, follow all instructions.
2. Do not use this product near water.
3. Clean only with dry cloth.
4. Do not block any ventilation openings or holes.
Install according to the manufacturer’s instructions.
Maintain well-ventilated conditions around the
product, avoiding heat. Do not put product on bed, sofa or anything that blocks ventilation.
5. Do not install near any heat sources such as radiators, heat registers, stoves or other apparatus
(including amplifiers) that produce heat.
6. Must be plugged into a polarized or grounding type plug. A polarized plug has two blades with one
wider than the other. A grounding type plug has two blades and a third grounding prong. The wide
blade or the third prong is provided for your safety. If the provided plug does not fit into your outlet,
consult an electrician for replacement of the obsolete outlet.
7. Protect the power cord from being walked on or pinched, particularly the plugs, convenience receptacles,
and the point where they exit from the machine.
8. Only use attachments/accessories specified by the manufacturer.
9. Use only with cart, stand, tripod, bracket, or table specified by manufacturer, or sold with product.
When cart is used, use caution when moving cart/product combination to avoid tip-over injury.
10. Unplug the product during lightning storms or when unused for long periods of time.
11. Servicing should be referred to qualified service personnel and is required when product has been
damaged in any way, such as; damaged power-supply cord or plug, objects have fallen into the product,
exposed to rain, moisture or spills, item was dropped or doesn’t operate normally.
12. Do not expose product to dripping or splashing. Objects filled with liquids, such as vases, should
IMPORTANT FOR LASER PRODUCTS
1. CLASS 1 LASER PRODUCT
2. DANGER: Visible laser radiation when open and
interlock failed or defeated. Avoid direct
exposure to beam.
3. CAUTION: Do not open the top cover. There
are no user service-able parts inside the unit.
Leave all servicin
g
to qualified service personnel.

- 5 -
Pr ecautio ns wit h Moisture
Under the following circumferences, moisture may appear on the lens of the product,
which is the most sensitive part of the DVD player.
- The DVD player is suddenly moved from a cold place to a warm place.
- A room is heated while the DVD player starts operating, or the DVD is placed by
an air-conditioner.
- In the hot summer season, the DVD player is moved from an air-conditioned room
to a hot, damp place to be used.
- The DVD player is being operated in a damp place.
If moisture appears on the player, discontinue use.
If the player is operated under said conditions, or the disc is loaded, certain interior
components could be damaged. Take disc out, plug power in, switch power button
on the DVD player for two to three hours to dry.

- 6 -
Function Features
1. EXCELLENT SOUND
Dolby Digital delivers great sound.
2. HIGH RES OL UT IO N
MPEG2 decoding format achieves more
than 500 lines of horizontal resolution.
3. S PE CIAL FU NC TI ON S
Supports multi-angle, excessive language
caption and parental-lock.
4. COMPATIBILITY
Pla ys DVD, CD, CD-R, CD-RW, PICTURE
CD and MP3 discs.
5. PARTICULAR PERFORMANCE
Multi-speed, fast forward, fast backward,
slow play and step playback, repeat
playback and programming playback.
6. SEARCH BY TIME
Search for a certain time on a disc.
7. LAST MEMORY PLAYBACK
Memorizes and continues playing from
place stopped.
8. ON-SCREEN DISPLAY
On-screen displays in your choice of
English/Spanish/French.
9. AUDIO OUT
Analog audio output and optical digital
audio outputs connect to any amplifying
equipment.
10. EARPHONE OUTPUT
Convenient for listening to movies or music
in private.
11. SWITCHING POWER ADAPTER
Automatically dapts to voltage
requirements in the U.S. and other
countries.
DVD players and discs are coded by region. These regional codes must
match the discs they play. If the codes don’t match, the disc won’t play.
This player’s code is region 1.
This product incorporates copyright protection technology that is protected by
method claims of certain U.S. patents and other intellectual property rights owned
by Macrovision Corporation and other rights owners. Use of this copyright protection
technology must be authorized by Macrovision Corporation, and is intended for
home and other limited viewing uses only unless otherwise authorized by Macrovision
Corporation. Reverse engineering or disassembly is prohibited.

- 7 -
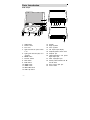
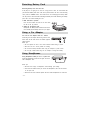
Parts Introduction
DVD Player
1. OPEN button
2. Remote sensor
3. Disc cover
4. Lights red when the power switch
is on.
5. Lights green when the player is in
operation.
6. ENTER button
7. Direction buttons
8. TITLE button
9. STOP button
10. MODE button
11. MENU button
12. NEXT SKIP button
13. PREV skip button
14. Speaker
15. Bright up/down
16. Color up/down
17. TFT Liquid Crystal Display
18. Earphone/speaker volume knob
19. Earphone jack
20. Audio/output/input and optical
digital output jack
21. Video output/input jack
22. Switch position between AV ‘IN’
and AV ‘OUT’
23. Direct current input jack
24. Power switch

- 8 -
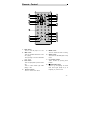
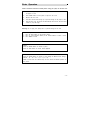
Re mote Contro l
1. PWR button
-Press to turn the player on or off.
2. INFO button
-Press for detailed information on the
disc playing.
-Keep pressing to remove information
from screen.
3. TITLE button
-Press to display titles if present on the
disc.
-Press to select random play when
playing a CD.
4.
Direction buttons
-Press to select menu items.
5. ENTER button
-Press to confirm the items or setting.
6. SETUP button
-Press to access the DVD player’s setup
menu.
7. 0-9 number buttons
-Select numbers by pressing these
buttons.
8.
PREV SKIP button
-Press to go to beginning of current
track. Press again quickly to go to
beginning of previous track.

- 9 -
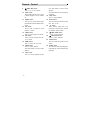
Re mote Contro l
9.
NEXT SKIP button
-Press to go to next chapter.
10. SUBT button
-When a DVD is playing, press to select
a subtitle language or to turn subtitles
off.
11. ANGLE button
-Press to access various camera angles
(if the DVD disc contains multiple camera
angles).
12. A
-B button
-Press to mark a segment to repeat
between A and B.
13. ZOOM button
-Press to cycle through zoom function.
14. REP button
-Press to repeat a chapter, track, title,
or all content.
15. MENU button
-Press to select the disc menu.
16. PAUSE button
-Press to pause playback.
-Press PLAY button to resume normal
playback.
17. STOP button
-Press once to stop playback and then
press PLAY button to resume normal
playback.
-Press the button twice to stop playback
completely.
18. PLAY button
-Press to begin playback.
19. GOTO button
-Press to select the desired disc starting
time, track or title.
20. +10 button
-Select numbers greater than 9 by
pressing the (+10) button first, and then
an additional number button.
21.
FWD SCAN button
-Press to search forward.
22.
REV SCAN button
-Press to search backward.
23. SLOW button
-Press to activate slow forward or slow
rewind.
24. AUDIO button
-Press to access various audio languages
(if the DVD disc contains multiple audio
languages).

- 10 -
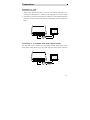
Connections
Connecting to a TV
Audio/video connections
1. Always ensure that the DVD player, TV and any other electrical equipment you are
connecting the DVD player to is switched off and unplugged from the power supply.
2. The easiest way to connect the DVD player to a television is via the supplied Audio/Video
connections. Connect the audio/video cable from the DVD player to the TV’s audio/video
inputs.
Connecting to an Amplifier with Dolby Digital Decoder
The DVD player can be connected to an AV amplifier of Dolby digital decoder via the
Digital Optical output. Please refer to your Audio equipment’s manual before connecting.

- 11 -
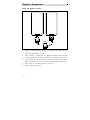
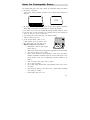
Playba ck Pre para tio ns
Using the Remote Control
1. Referring to the drawing above, take the back cover off of the remote control and
remove the empty battery receptacle.
2. Prior to shipping, a separating film was applied to the battery. Remove this film.
3. Insert the battery into the receptacle and insert the receptacle into the remote.
4. For best results, aim the remote directly at the player’s receiving window from a
range no greater than 15 feet, and at angles no greater than 60 degrees.
5. Under normal use the battery will last for one year.
6. Remove battery during storage

- 12 -
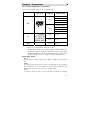
Playba ck Pre para tio ns
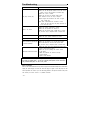
Disc Formats Supported by this Player
The unit can play discs bearing any of the following logos:
DISC LOGO DIAMETER
PLAYBACK TIME/
PLAYABLE SIDES
133 min( SS-SL)
242 min( SS-DL)
266 min( DS-SL)
12cm
484 min( DS-DL)
41 min ( SS-SL )
75 min ( SS-DL )
82 min (DS-SL)
DVD
8cm
150 min (DS-DL)
12cm 74 min
CD
8cm 20 min
MP3
12cm 600 min
The operating method of some DVD discs is specified by the software maker.
Please refer to the instruction manual of the disc.
The DVD Player will play most recordable (CD-R) or erasable (CD-RW) CDs,
but playback of CD-R or CD-RW discs created on a computer requires proper
formatting and finalization of the disc for audio playback. Some computers and/or
software programs may not be capable of creating compatible discs.
About Disc Terms
- Title
Generally, pictures or music compressed on a DVD are divided into several sections,
“title”.
- Chapter
The smaller section unit of picture or music in a DVD under the title, usually one
title is comprised of one or more chapters and each of them is numbered for easy
searching. But some discs may not have a recording chapter.
- Track
A segment of picture or music on a CD. Each track is numbered for searching.

- 13 -
Playba ck Pre para tio ns
Usage of Switching Power Adapter
The player is supplied with a switching power adapter.
1. Connect AC adaptor to the side of the DVD player in the slot marked “Power In”.
2. Connect the rabbit joint end of the AC adaptor to the power cord.
3. Plug the two-prong end of the power cord to a grounded electrical socket.
Note: Please turn player’s power off first and then unplug the power to prevent malfunction.
Pre-operation
1. Connecting to power.
2. Lift the main cover up to open the disc tray house.
3. Switch “POWER” to the “ON” position.
4. Adjust the volume with the “VOLUME” adjust knob (also adjusts earphone volume).
Loading a disc
1. Press the OPEN button to open the disc cover.
2. Put disc into the tray house with the printed side up.
3. Close the disc cover.
POWER ON/OFF

- 14 -
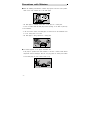
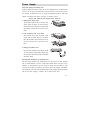
Power Supply
Using and Charging the Battery Pack
Charge the Battery Pack before using it the first time. Charging time is normally between
3-4 hours. Do not charge the Battery Pack more than 4 hours as it could reduce service
life. Normally, the Battery Pack can be charged approximately 300 times. When fully
charged, the Battery Pack delivers 3-4 hours of continuous power.
Battery Pack should be fully charged before initial use!
1. Attaching the Battery Pack
Turn the player upside down on a smooth, clean
surface. Direct the battery so that the battery
contacts and the five plastic tabs are aligned with
the matching contacts and tab recesses on the
player.
2. Lock the Battery Pack to the Player
With one hand on the player to prevent it from
moving, push the battery pack on to the player
then slide the Battery Pack toward the front of
the Player until you hear it click and lock into
place.
3. Charging the Battery Pack
Plug the Power Adapter into the Player’s DC-IN
12 V Jack (located on Right Side of Player). Plug
the other end of the Power Cord into a household
wall Power Outlet.
Recommended Recharging and Charging Times
Your new battery should be fully charged before it is used for the first time. Charging
time is normally between 3-4 hours. A fully charged battery delivers 3-4 hours of use.
Therefore, we recommend that you only charge the battery when the battery is down
to its last hour of charge or completely out of power. Unnecessary charging of the Battery
Pack will reduce service life. When the Battery Pack is being charged, the battery indicator
will turn red. After charging is complete, the red light will turn green.

- 15 -
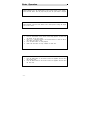
De tach ing Ba tter y Pa ck
Detaching Battery Pack from the unit:
If the player is not going to be used for a long period of time, we recommend that
you detach the Battery Pack. Even if the unit is powered down, the unit is still consuming
some power in STANDBY mode. This could lead to over discharging the battery. Make
sure the power is turned off before detaching the Battery Pack. After detaching the battery
pack, take care when handling the unit.
1. Slide and hold in position.
Press the tab towards the front of the unit. Hold
the tab in the up position.
2. Taking off the Battery Pack
Gently slide the Battery Pack toward the back of the
Unit. Carefully lift the Battery Pack from your player.
Using a Car Adapter
You can use Car Adapter while in a vehicle:
Connecting the Car Adapter Power Plug into the unit’s
Power Jack and the other end to the Vehicle Cigarette
Lighter Socket:
Quick Tips
• Do not operate the unit or view video software while driving a vehicle.
• Place the unit in a secure position for viewing.
• Do not leave battery attached when using car adaptor as power source.
• Do not play a DVD while using the car adaptor to charge the battery.
Using Headphones
Using Headphones while you are in a quiet area:
Connecting Headphone Connector into right side of the
unit’s Headphone Jack:
Quick Tips
• Excessive loud usage of headphones could damage your hearing
• Turn down the Volume before you connect the headphones, then raise the volume
to suit your level
• Sound from the unit’s external speaker will cease when headphones are connected

- 16 -
Ba sic Ope rati on
Please read these instructions carefully before using your player for the first time.
Warning: Do not play poor quality discs to prevent damage to the lens.
1. Turn on the player’s power by switching the POWER switch on the side of
the player to “ON”.
2. Press OPEN button on front panel to open the disc cover.
3. Remove the lens cover.
4. Load disc with the label facing up to prevent damage to the player or disc.
5. Close the disc cover. The player will automatically search for the disc and when
it finds it, play will begin.
Start to Playbac
k
1. Press the PLAY button on the remote control.
2. Press
(direction button) or the number buttons to select a scene.
3. Press ENTER or PLAY.
Pause
Press the PAUSE button on remote to pause.
Press the PLAY button to resume normal playback.
Zoom
Press the ZOOM button on remote to cycle through to different zoom settings.
Normal – 2x – 3x – 4x – 1/2 – 1/3 – 1/4.
While in zoom mode use direction keys to move around to different positions on
t
he
p
icture.

- 17 -
Basic Operation
Stop
During playback, press the STOP button on the remote control to stop playing.
Press the PLAY button, then the player will play from the point where it stopped.
T
itle Menu
1. Press the TITLE button on the remote control during payback. The title menu
will appear on the TFT screen.
2. Press (direction button) or the number buttons to select the title or
disc option you wish to play.
3. Press the PLAY button to start playback.
4. NOTE: Title and Menu are only available for DVD discs.
Previous and Next
1. Press the PREV button on the remote control, and playback will start from
the previous track.
2. Press the NEXT button on the remote control, and playback will start from
the next track.
Mode
During playback, press the mode button on the control panel to change the aspect
ratio on the screen.

- 18 -
Sy stem Se tup
GENERAL SET-UP
You can change the default settings to customize performance to your own preference.
1. Remove the disc from the DVD drive and press the ‘SETUP’ button on the remote
control, the settings menu will appear. It includes General Setup, Speaker Setup,
Dolby Digital Setup, Video Setup and Preference setup.
2. Press
(direction buttons) on the remote control to select a category.
3. All the i
t
ems in the category will appear on the TV screen. Press the ‘ENTER’
button to confirm your selection.
Category
1. When you enter a category all the items under this category will appear, and
the items placed in the middle (or highlighted) will be the current set up.
2. Press (right direction button on the remote control to select the correct category.
3. Press the direction button to select your preference. The item you select will
be highlighted.
4. Press the ‘ENTER’ button to confirm.
5. Press (left direction button) to enter the other setup menu.
General Setup
The general setup is shown as follows:
1. TV Display
Select NORAML/PS when a 4:3 TV is connected.
Display images with marking bars above and below the picture.
Select WIDE when a 16:9 wide screen TV is connected.
2. Angle Mark
If the scene was recorded from multiple angles, then you can easily change
the camera angle of the scene you are watching.
ON/OFF
With this switched on you will be notified if alternative viewing angles are available.

- 19 -
Sy stem Se tup
3. OSD Language
There are five kinds of different OSD languages for selection. You can select
it according to your preference.
4. SPDIF Output
This item is used to set the format of digital audio. ‘SPDIF OFF’ turns off the
digital audio; ‘SPDIF/RAW’ outputs the original. For example, if the disc being
played is Dolby Digital, then the digital audio output is also Dolby Digital.
5. Captions
You can choose captions on or off on screen during playback.
6. Screen Saver
When activated the screen saver automatically works if there has been no operation
for a period of time.
Dolby Digital Setup
1. Dual Mono
The function is used to set the output mode of channel left/right, stereo and
mixed sound.
2. Dynamic
Use this item to adjust linear dynamic compression rate to get different signal
compression effects.
Speaker Setup
1. Down Mix
Select “LT/RT” in DOWNMIX, then the player will output mixed audio in
a way prescribed by Dolby. Select “Stereo”, then the player will output
a stereo signal.
Video Setup
1. Sharpness
Use this item to adjust sharpness setting.

- 20 -
Sy stem Se tup
Preference Page
1. Audio, Subtitle, Disc Menu
This setting allows you to hear or read subtitles of a DVD in your choice of English,
Spanish or French.
2. Parental Control
DVD discs equipped with the child lock function are rated according to their contents
and settings vary from disc to disc. Depending on the disc, you can replace or
lock out violent scenes, or lock out playback of the disc altogether. Access parental
control on the sub-menu by pressing (direction buttons) on the remote
control, then press the OK button. An interactive menu will appear.
3. Password
Parental control features are password protected. Choose a password you will remember
easily or write it down. The default password is 1369.
4. Default Reset
Use this function to reset all the settings.
5. Version
Displays software version information.
NOTE: this menu function is not available while a disc is playing.
Video Setup
2. Brightness
Use this item to adjust brightness level.
3. Contrast
Use this item to adjust contrast level.
A
udio
DVD discs contain up
t
o 8 audio bit streams. For Example: English, French etc.
To select the audio bit stream you prefer press the AUDIO button on the remote
control during playback. The DVD player will play the next audio bit stream every
time you press the AUDIO button in succession.
NOTE: This function is only available for discs that several audio bit streams have
been recorded onto.

- 21 -
Sy stem Se tup
Region Code
The video industry encodes DVDs to contain Regional Codes which can be used
t
o prevent the playback of certain discs depending upon the geographical area it
is manufactured, purchased and played in. The PDV 0700 is set for Region 1.
For use when traveling outside of Region 1 and playing DVDs purchased outside
of Region 1 follow the steps listed below:
1. Remove DVD from player.
2. Turn the power On.
3. Using the remote control, press the “Set-up” button and use the arrow
key to advance to the far right-hand tab entitled Preferences.
4. Enter Code Number 1379 and then use the Up and Down arrows to
change the Region Code to match the DVD you want to play.
5. Once complete, press the “Enter” button to save.
Page is loading ...
Page is loading ...
Page is loading ...
Page is loading ...
Page is loading ...
Page is loading ...
Page is loading ...
-
 1
1
-
 2
2
-
 3
3
-
 4
4
-
 5
5
-
 6
6
-
 7
7
-
 8
8
-
 9
9
-
 10
10
-
 11
11
-
 12
12
-
 13
13
-
 14
14
-
 15
15
-
 16
16
-
 17
17
-
 18
18
-
 19
19
-
 20
20
-
 21
21
-
 22
22
-
 23
23
-
 24
24
-
 25
25
-
 26
26
-
 27
27


Polaroid PDV-0700 User manual
- Category
- DVD players
- Type
- User manual
- This manual is also suitable for
Ask a question and I''ll find the answer in the document
Finding information in a document is now easier with AI
Related papers
-
Polaroid PDV-0821T User manual
-
-
-
-
-
-
-
-
-
Other documents
-
Philips PET940/05 User manual
-
-
-
Audiovox D1750T User manual
-
COBY electronic TFDVD5600 User manual
-
 CyberHome Entertainment Cyber Home CHLDV712 User manual
-
Disney DP7000 User manual
-
 Nortech Systems nortech media 10.2 inch portable DVD player User manual
-
Hitachi PDV302 User manual
-
TEAC DV-P50 Owner's manual

