Page is loading ...

Installation and Care
Guide
Vanity
K-2604, K-5288, K-5289
M product numbers are for Mexico (i.e. K-12345M)
Los números de productos seguidos de
M corresponden a México (Ej.
K-12345M)
Français, page “Français-1”
Español, página “Español-1”
1267640-2-A

Tools and Materials
Before You Begin
CAUTION: Risk of property damage. Select 250 lb (113.4
kg) load bearing 5/16″ lag bolts with a length to clear
obstacles in the wall and 5/16″ washers. Calculate proper lag
bolt length by adding the following: 1-1/2″ (38 mm) backing
material + wallboard thickness + back rail thickness.
IMPORTANT! Risk of product damage. Do not modify the vanity.
Doing so will compromise structural stability.
IMPORTANT! Risk of product damage. Use care when moving the
vanity to avoid impacting, sliding, or side-loading the legs.
NOTICE: Siliconized acrylic caulk must be used to secure the sink
to the vanity. Do not use 100% silicone sealant which will damage
the finish of the vanity.
NOTICE: The finished wall must be straight and plumb to ensure
proper support of the vanity and alignment of the sink and door.
Plus:
• Wood Screws
• 2x6s
• 5/16" Lag Bolts and Washers
[Min 250 lb (113.4 kg) Load Bearing]
• Socket Wrenches
• Siliconized Acrylic Caulk
1267640-2-A 2 Kohler Co.

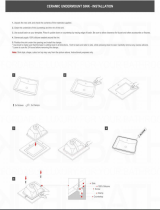
1. Prepare the Site
NOTICE: If the K-2607 bridge cabinet will also be installed, extend
the backing material a minimum of 12″ (305 mm) beyond the width
of the vanity on the side where the bridge will be installed.
NOTICE: To properly secure the vanity, the top of the required 2x6
backing material must be 32-1/2″ (826 mm) from the finished floor.
Measure and mark 32-1/2″ (826 mm) up from the finished floor.
This will be the height from the finished floor to the top of the
2x6 backing material.
Ensure there are no obstructions in the wall (such as wiring or
plumbing) from the marked height down to the floor. If there are
obstructions, select another area to install the vanity.
NOTICE: Extend the backing material beyond the width of the
vanity to the nearest stud to ensure proper support for the vanity.
Front-notch the studs 1-1/2″ (38 mm) to ensure the 2x6 backing
material is flush against the studs.
Secure the 2x6 backing material to the studs with framing nails.
Rough-in the water supply and drain lines into the rough-in
plumbing area of the vanity.
NOTICE: The finished wall must be straight and plumb to ensure
proper support of the vanity and alignment of the sink and door.
2x6
Backing
Material
32-1/2" (826 mm)
Kohler Co. 3 1267640-2-A

Prepare the Site (cont.)
Complete the finished wall. Make sure the finished wall is
straight and plumb, and the floor is flat and perpendicular to the
finished wall.
1267640-2-A 4 Kohler Co.

2. Secure the Vanity
CAUTION: Risk of property damage. Select 250 lb (113.4
kg) load bearing 5/16″ lag bolts with a length to clear
obstacles in the wall and 5/16″ washers. Calculate proper lag
bolt length by adding the following: 1-1/2″ (38 mm) backing
material + wallboard thickness + back rail thickness.
IMPORTANT! Risk of product damage. Use care when moving the
vanity to avoid impacting, sliding, or side-loading the legs.
With assistance, lift and place the vanity in position against the
finished wall. Do not drag the vanity into position.
Verify the vanity is level and the back rail is plumb against the
wall. If necessary, turn the leveler(s) to adjust the unit.
Using a 1/4″ drill bit, drill pilot holes through the back rail and
the finished wall. Verify the pilot holes are positioned to ensure
the lag bolts will engage the 2x6 backing material.
Secure the vanity to the wall with two 5/16″ lag bolts and
washers (not provided).
Install the Bridge Cabinet (Optional)
Refer to the installation instructions packed with the K-2607
bridge cabinet.
Pilot
Hole
Finished
Wall
Washer
Lag Bolt
Back Rail
Leveler
Kohler Co. 5 1267640-2-A

3. Install the Bathroom Sink
CAUTION: Risk of personal injury. Vitreous china sinks are
very heavy. Get help lifting and aligning the sink.
Install the faucet (if applicable) and drain to the sink. Refer to the
faucet and drain manufacturer’s installation instructions.
NOTICE: Siliconized acrylic caulk must be used to secure the sink
to the vanity. Do not use 100% silicone sealant which will damage
the vanity finish.
Run a 1/4″ (6 mm) continuous bead of siliconized acrylic caulk
around the top of the vanity, as illustrated.
NOTE: The sink is properly positioned when: (1) the back edge of
the sink is flush against the finished wall and (2) the overhang on
the left, right, and front side of the sink is equal on each side of the
vanity.
With assistance, lift and properly position the sink on top of the
vanity.
Immediately wipe away any excess caulk that contacts the vanity.
Run a 1/8″ (3 mm) bead of siliconized acrylic caulk along the top
edge of the sink where it contacts the finished wall.
Finished
Wall
1267640-2-A 6 Kohler Co.

4. Reverse Door Swing
(Optional - 24″ only)
NOTE: To ease installation, get assistance supporting the door.
NOTE: The vanity comes with hinges installed on the inside left. To
reverse the door swing, use the included template (1181754-7) to
mount the brackets to the opposite side of the vanity.
Align the hinge hooks with the cup of the top bracket.
Slide the hinge onto the top bracket.
Clip the hinge onto the bracket to secure.
Repeat for the lower hinge.
Hook
Bracket
Cup
Kohler Co. 7 1267640-2-A

5. Adjust the Drawers
Remove
Slide the drawer out until fully extended.
From underneath, pull the release latches toward the center of the
drawer.
Lift the front of the drawer and pull toward you to disengage
from the rails.
Once removed, lay the drawer on a flat, protective surface.
Reinstall
Fully extend the rails.
Align the holes in the back of the drawer with the rail hooks.
Rotate the drawer down onto the rails, engaging the front drawer
holes with the rail pins.
From underneath, push the release latches into the rails to secure
the drawer.
Latch
Rail
Hook
Holes
Pin
1267640-2-A 8 Kohler Co.

6. Recommended Hardware Placement
Measure and mark the dimensions for the hardware as shown
above.
Drill a 3/16″ (21 mm) pilot hole at each marking.
Drill a finished hole to size.
Insert a screw through each hole. Thread the knob onto the screw.
24” Vanity Installation
From the back side of the door, insert the screw through the
predrilled hole.
Thread the knob onto the screw. Tighten securely.
Repeat for the drawer.
K-5288: 6-1/16" (154 mm)
K-5289: 4-9/16" (116 mm)
4-3/4"
(121 mm)
1"
(25 mm)
Kohler Co. 9 1267640-2-A

Adjust the Door
Adjust
Refer to the illustration and note the screwdriver location for the
desired adjustment.
Remove
Apply a small amount of leverage to the door with one hand to
keep the door in the full open position.
With the other hand, press the clip to release the lower hinge
latch from the bracket.
Repeat for the upper hinge.
Move the door forward to slide the hinges off the brackets.
Reinstall
Apply a small amount of leverage to the door with one hand to
keep the door in the full open position.
With the other hand, align the top hinge with the top bracket.
Clip the hinge onto the bracket to secure.
Repeat for the lower hinge.
Open and close the door to ensure proper operation.
Care and Cleaning
Vitreous China and Fireclay
•
Use a mild detergent such as liquid dishwashing soap and warm
water for cleaning. Do not use abrasive cleaners that may scratch
or dull the surface.
Adjustments
Side
Depth
Height
Bracket
Clip
1267640-2-A 10 Kohler Co.

Care and Cleaning (cont.)
•
Carefully read the cleaner product label to ensure the cleaner is
safe for use on the material.
•
Always test your cleaning solution on an inconspicuous area
before applying to the entire surface.
•
Do not allow cleaners to sit or soak on the surface.
•
Wipe surfaces clean and rinse completely with water immediately
after cleaner application. Rinse and dry any overspray that lands
on nearby surfaces.
•
Use a soft, dampened sponge or cloth. Never use an abrasive
material such as a brush or scouring pad to clean surfaces.
Wood Surfaces
•
As with any smooth surface, avoid using abrasive cleaners as
they will scratch the surface. Wipe the wood surface regularly to
prevent buildup of soap and scum.
•
To protect against scratches, use felt, leather, or cork under all
items placed on the wood surface. To conceal scratches, a
touch-up marker is available for order. Contact a Kohler
distributor or call 1-800-4-KOHLER for ordering information.
•
Do not expose wood furniture to direct sunlight, drying heat
sources, or dampness.
•
Dust frequently with a soft cloth in the direction of the grain. Use
only products specifically made for cleaning wood. Avoid using
oily polishes or waxes, or products containing silicone. Blot spills
immediately with a soft, damp cloth.
•
Every six months, remove soil buildup by rubbing with a soft
cloth dampened in a 50/50 solution of warm water and an
ammonia-free detergent. Wipe clean with a cloth dampened in
warm water, then wipe dry.
For detailed cleaning information and products to consider, visit
www.kohler.com/clean. To order Care & Cleaning information, call
1-800-456-4537.
Kohler Co. 11 1267640-2-A

Warranty
ONE-YEAR LIMITED WARRANTY
KOHLER plumbing products are warranted to be free of defects in
material and workmanship for one year from date of installation.
Kohler Co. will, at its election, repair, replace or make appropriate
adjustment where Kohler Co. inspection discloses any such defects
occurring in normal usage within one (1) year after installation. Kohler
Co. is not responsible for removal or installation costs. Use of in-tank
toilet cleaners will void the warranty.
To obtain warranty service contact Kohler Co. either through your
Dealer, Plumbing Contractor, Home Center or E-tailer, or by writing
Kohler Co., Attn.: Customer Care Center, 444 Highland Drive, Kohler,
WI 53044, USA, or by calling 1-800-4-KOHLER (1-800-456-4537) from
within the USA and Canada, and 001-800-456-4537 from within Mexico,
or visit www.kohler.com within the USA, www.ca.kohler.com from
within Canada, or www.mx.kohler.com in Mexico.
IMPLIED WARRANTIES INCLUDING THAT OF
MERCHANTABILITY AND FITNESS FOR A PARTICULAR
PURPOSE ARE EXPRESSLY LIMITED IN DURATION TO THE
DURATION OF THIS WARRANTY. KOHLER CO. AND/OR
SELLER DISCLAIM ANY LIABILITY FOR SPECIAL, INCIDENTAL
OR CONSEQUENTIAL DAMAGES. Some states/provinces do not
allow limitations on how long an implied warranty lasts, or the
exclusion or limitation of special, incidental or consequential damages,
so these limitations and exclusions may not apply to you. This
warranty gives you specific legal rights. You may also have other
rights which vary from state/province to state/province.
This is Kohler Co.’s exclusive written warranty.
1267640-2-A 12 Kohler Co.

Guide d’installation et d’entretien
Meuble de toilette
Outils et matériel
Avant de commencer
ATTENTION: Risque de dommages matériels. Choisir des
tire-fonds de 5/16″ porteurs de 250 lb (113,4 kg) avec une
longueur adéquate pour dégager les obstacles dans le mur,
ainsi que des rondelles de 5/16″. Calculer une longueur de
tire-fonds adéquate en ajoutant les valeurs suivantes:
matériau de renfort de 1-1/2″ (38 mm) + épaisseur de
panneau mural + épaisseur de rail arrière.
IMPORTANT! Risque d’endommagement du produit. Ne pas
modifier le meuble de toilette. Ceci pourrait compromettre la
stabilité structurelle.
IMPORTANT! Risque d’endommagement du produit. Procéder
avec précaution lors du déplacement du meuble afin d’éviter d’avoir
un impact sur les pieds, ou de faire glisser ou de charger ceux-ci sur
le côté.
AVIS: Du mastic à l’acrylique siliconisé doit être utilisé pour
sécuriser le lavabo sur le meuble. Ne pas utiliser de mastic à la
silicone à 100%, car cela endommagera la finition du meuble.
AVIS: La finition murale doit être droite et d’aplomb afin d’assurer
un support adéquat du meuble et un alignement correct du lavabo
Plus:
• Vis à bois
• Lambourde de 2x6
• Tire-fonds de 5/16" et rondelles
[capacité de charge min 250 lb (113,4 kg)]
• Clés à douilles
• Mastic à l'acrylique siliconée
Kohler Co. Français-1 1267640-2-A

Avant de commencer (cont.)
et de la porte.
1267640-2-A Français-2 Kohler Co.

1. Préparer le site
AVIS: Si l’armoire pont K-2607 est également installée, prolonger le
matériau de renfort de 12″ (305 mm) minimum au-delà de la largeur
du meuble sur le côté où le pont sera installé.
AVIS: Pour bien fixer le meuble, le dessus du matériau de renfort
2x6 requis doit se trouver à 32-1/2″ (826 mm) du plancher fini.
Mesurer et marquer 32-1/2″ (826 mm) vers le haut à partir du
plancher fini. Ceci sera la hauteur entre le plancher fini et le
dessus du matériau de renfort 2x6.
S’assurer qu’il n’y ait pas d’obstructions dans le mur (comme un
câblage ou la plomberie) à partir de la hauteur marquée vers le
plancher. Si il y a des obstructions, choisir une autre zone dans
laquelle installer le meuble.
AVIS: Étendre le matériau de renfort au-delà de la largeur du
meuble jusqu’au montant le plus proche afin d’assurer un support
adéquat du meuble.
Encocher les montants à l’avant de 1-1/2″ (38 mm) afin d’assurer
que le matériau de renfort 2x6 soit à ras des montants.
Sécuriser le matériau de renfort 2x6 aux montants avec des clous
de cadrage.
Raccorder l’alimentation d’eau et les conduites d’écoulement dans
la zone de plomberie de raccordement du meuble.
Matériau de
renfort 2x6
32-1/2" (826 mm)
Kohler Co. Français-3 1267640-2-A

Préparer le site (cont.)
AVIS: La finition murale doit être droite et d’aplomb afin d’assurer
un support adéquat du meuble et un alignement correct du lavabo
et de la porte.
Terminer la finition murale. S’assurer que la finition murale est
droite et d’aplomb, et que le sol est plat et perpendiculaire à la
finition murale.
1267640-2-A Français-4 Kohler Co.

2. Sécuriser le meuble
ATTENTION: Risque de dommages matériels. Choisir des
tire-fonds de 5/16″ porteurs de 250 lb (113,4 kg) avec une
longueur adéquate pour dégager les obstacles dans le mur,
ainsi que des rondelles de 5/16″. Calculer une longueur de
tire-fonds adéquate en ajoutant les valeurs suivantes:
matériau de renfort de 1-1/2″ (38 mm) + épaisseur de
panneau mural + épaisseur de rail arrière.
IMPORTANT! Risque d’endommagement du produit. Procéder
avec précaution lors du déplacement du meuble afin d’éviter d’avoir
un impact sur les pieds, ou de faire glisser ou de charger ceux-ci sur
le côté.
Avec de l’assistance, lever et placer le meuble dans l’emplacement
prévu contre la finition murale. Ne pas faire glisser le meuble en
position.
Vérifier que le meuble est à niveau et que le rail arrière est
d’aplomb contre le mur. Si nécessaire, tourner le(s) vérin(s) de
calage pour ajuster l’ensemble.
Utiliser un foret de 1/4″ pour percer des trous pilotes à travers le
rail arrière et la finition murale. Vérifier que les trous pilotes sont
bien en place pour assurer que les tire-fonds seront engagés dans
le matériau de renfort 2x6.
Sécuriser le meuble sur le mur à l’aide de deux tire-fonds de
5/16″ et des rondelles (non fournis).
Orifice
pilote
Finition
murale
Rondelle
Tire-fond
Rail arrière
Vérin de calage
Kohler Co. Français-5 1267640-2-A

Sécuriser le meuble (cont.)
Installer l’armoire pont (optionnel)
Se référer aux instructions d’installation accompagnant l’armoire
pont K-2607.
1267640-2-A Français-6 Kohler Co.

3. Installer le lavabo
ATTENTION: Risque de blessures. Les lavabos en
porcelaine vitrifiée sont très lourds. Demander de l’aide pour
soulever et aligner le lavabo.
Installer le robinet (si applicable) et le drain sur le lavabo. Se
référer aux instructions d’installation du fabricant du robinet et
du drain.
AVIS: Du mastic à l’acrylique siliconisé doit être utilisé pour
sécuriser le lavabo sur le meuble. Ne pas utiliser de mastic
d’étanchéité à la silicone à 100%, car cela endommagera la finition
du meuble.
Faire passer un boudin continu de mastic à l’acrylique siliconé de
1/4″ (6 mm) autour du dessus du meuble, comme sur
l’illustration.
REMARQUE: Le lavabo est positionné correctement lorsque: (1) le
rebord arrière du lavabo est à ras contre la finition murale et (2) le
dépassement à gauche, à droite et à l’avant du lavabo est égal sur
chaque côté du meuble.
Avec de l’assistance, soulever et positionner correctement le
lavabo au-dessus du meuble.
Essuyer immédiatement tout excès de mastic en contact avec le
meuble.
Finition
murale
Kohler Co. Français-7 1267640-2-A

Installer le lavabo (cont.)
Poser un boudin continu de mastic à l’acrylique siliconé de 1/8″
(3 mm) le long du rebord supérieur du lavabo au point de contact
de celui-ci avec la finition murale.
1267640-2-A Français-8 Kohler Co.
/