Page is loading ...

1
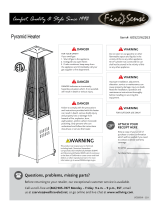
Flame Heater – PH08 SERIES
ASSEMBLY AND OPERATION INSTRUCTIONS
WARNING
Read this instruction before using this appliance. The
appliance must be installed in accordance with the
instructions and local regulations. The use of this
appliance in enclosed areas can be dangerous and is
PROHIBITED.
• Do the leak test after each changing LPG cylinder.
• Never check for leaks with a match or open flame
• Do not store or use gasoline or other flammable
vapors and liquids in the vicinity of this appliance.
IF YOU SMELL GAS
• Close the valve of the gas cylinder or regulator.
• Extinguish all naked flames; do not operate any
electrical appliances
• Check for leaks as detailed in this instructions
• If odor persists, contact your dealer or gas supplier
immediately
FOR OUTDOOR USE ONLY.
KEEP THE INSTRUCTIONS FOR FUTURE REFERENCE

2
PRECAUTIONS
3
· Installation and services should only be a qualified person.
· Do not use the heater in an explosive atmosphere.
· Before to use, check the hose.
· Disconnect LPG cylinder before moving the heater.
· Do not attempt to alter any parts of the heater.
Example: Using the heater without reflector or protection guard.
· The appliance shall not be used in basements or below ground level.
· It must always be placed on a solid and level surface.
· Never replace or substitute the regulator use only that one is suitabl
e both appliance category and
normal pressure of gas.
· Do not clean the heater with cleaners that are combustible or corrosive.
· Do not paint protection guard, control box or reflector.
· The LPG gas cylinder valve should be turned off when the heater is not in use.
· Don't not use the heater when it is raining, and do not let any liquid splash to the glass tube when
the heater is working.
· Keep the children away from the heater, always be carefully not to knock down the heater,
which will break the glass
tube and might cause injury.
· Do not move the appliance when in operation.
· After a long break of operation, the gas parts in the control box of the heater and the hose should
be inspected for spiders, spider webs or other insects.
· Check the heater immediately if any of the following exists:
1. There is smell of gas.
2. The heater is not enough effective.
3. The burner makes popping noise during use (a slight popping noise is normal when the
burner is extinguished after use).
· If you smell ga
s, turn off the valve immediately. If smell persists, contact the dealer or gas
supplier immediately.
· The hose with regulator assembly shall be stored on a safety place to avoid it’s accidental
damage.
· Children and adults should be aware of the high surface temperature hazard, and should keep a
safe distance away to avoid clothes burning or igniting.
· Young children should be carefully supervised when they are in the working area of the heater.
· Clothing or other flammable materi
al should not be hung from the heater, or placed on or near
the heater.
· Do not obstruct the flow of combustion products.
· Keep the ventilation opening of the cylinder enclosure free and clear of debris.
· Do not obstruct the ventilation holes of the cylinder housing.
· Shut off the valve of gas cylinder or the regulator before moving the appliance.
· The tubing or the flexible hose must be changed within the prescribed intervals.
· Use only the type of gas and the type of cylinder specified by the man
ufacturer.
· In case of violent wind particular attention must be taken against tilting of the appliance.

3
APPLIANCE STAND AND LOACTION
- The appliance is for outdoor use only. Do not use
it for indoor or in an enclosed area.
- Always maintain proper clearance from combustible
materials, i.e. top 800mm and sides 650mm minium.
LEAKAGE TEST
Gas connections on the appliance are leak tested at the factory prior to shipment. Possible
mishandling of the appliance during the shipment might contribute to product integrity as a whole.
A complete gas leakage test must be performed again at the i
nstallation site. Please follow the
procedure below for leakage test.
- Make a soap solution of one part liquid detergent and one part water. The soap solution can be
applied with spray bottle, brush or rag. Soap bubbles will appear where a leak is present.
- Make sure the control tap is in the “OFF” position (full disk = ●) on the control panel.
- Turn on the gas supply and check for bubbles from the hoses and connections. Presents of
bubble means that a leak path is present.
- If a leak is present, turn OFF the ga
s supply immediately, tighten any leaking fitting carefully,
turn gas again and recheck.
- Never leak test while smoking.
INSTALLATION
Important safety requirements:
THIS APPLIANCE OUTDOOR USE ONLY
1. This appliance shall not be installed or used indoors, in buildings, garages or any other
enclosed area.
2. DO NOT place articles on or against this appliance.
3. DO NOT use or store flammable materials near this appliance.
4. DO NOT operate this appliance unless it is fully assembled with reflector and protection
guard in place.
5. Installation and repair should be done by a qualified service person. The appliance must be
inspected before use and at least annually by a qualified service person. More frequent
cleaning may be required as necessary. It is imperative that control compartment, burners and
circulating air passages of the heater and light be kept clean.

4
PARTS LIST-1
Part NO. Part Name QTY Picture Remarks
Middle Plate 1
2 Control Box 1
3 Bottom Plate 1
4 Lower
Support
4
5 Upper support 4
6 Upper Plate 1
7 Plate cover 1 Preassembled in
the Middle plate
8 Glass tube 1
9 Damper 1 Preassembled in
upper plate
10 Reflector 1
1

5
PARTS LIST-2
Part NO. Part Name QTY Picture Remarks
11 Lower protection
guard
4
12 AA Battery 1
13 Scrwe 4x10 8
15 Side panel 3
16 Front panel 1 A chain is
preassembled in this
panel
17 Screw M3/16’’ 66 All preassembled in
relative parts
18 Knob 1
19 Chain 1 Preassembled in the
front panel
20 Mid-panel 1 Optional part
21 Water Tank 1 Optional part
22 Stability Ring 1 Optional part
14 Fixing
bracket
1
INJECTOR

6
HEATER ASSEMBLY
Tools Required:
1 Phillips head screwdriver, 1 adjustable spanner
1. Take the control box(2) and the plate
cover(7) out off the middle plate(1) by
unscrew the screws(17)
2.
plate. Connect and fix the 4 lower
supports(4) to bottom plate(3) and
middle plate(1) by the screws(17).
3. Connect 4 upper supports (5) to the
lower supports (4) and fixed by
screws(17), then fix the upper plate(6)
to 4 upper supports(5) by screws(17).
4. Fix the plate cover(7) onto the
middle plate(1) by screws(17).
Using M6 Screws to fix the water
tank and stability ring to the bottom

7
5. Install a AA battery(12) into the
control box, then, fix the control
box(2) underneath the middle plate(1)
by screws (17)
6. Carefully put the glass tube(8) up
through the center hole in the upper
plate(6), Make sure the rubber ring is
attached on the lower end of the glass
tube(8). Move and sit the glass tube(8)
through the hole of the plate cover(7)
on the middle plate(1), check and
ensure that the glass tube(8) cover the
center hole of the middle plate(1)
7. Fix the reflector (10) onto the damper
(9) by screws(17).
8. Attach the protection guards (11) onto
the frame by putting its hooks into the
holes of the frame. Fix the guards by
the fixing brackets(14)

8
13

9
OPERATION
Preparation:
You will need to purchase a LPG cylinder. You need a suitable
size LPG cylinder that can be installed to the compartment.
You have to use pressure regulator with an outlet pressure
comply with the appliance category. The flexible tube must be
approved also.
Connect the hose to the hose connector in the control box
Warning:
Always test the hose for leaks with soapy water at both of the
ends.
Warning:
Never use the heater while it is raining, the glass tube
would break when it suddenly met
water.
Always turn off the heater while there is a rain.
Never splash any liquid to the glass tube when the heater is working
The glass tube will be extremely hot when it is working, never try to touch it and Keep the
children away from the heater.
Always ensure the heater stands firmly, the glass tube may break if the heater was fell down
onto ground.
Never use the heater if the glass tube has any crack
LIGHTING INSTRUCTIONS
Check and en
sure that an AA
battery is inside the ignition
chamber and has power. Ensure the
fi
anode(+) faces outside.
1.Ensure that the control knob is OFF. Slowly open the gas
cylinder valve.
2.Press and turn the control knob to LIGHT position, push the
igniter to generate spark while keeping control knob in pressed
position
3.Check for pilot flame through glass tube. If pilot does not light,
turn control knob to ‘OFF’ position wait two minutes
minimum and try again from the start. Some attempts
may be
necessary.
4.If the pilot alight, keep control knob pressed for 15 seconds then
turn the control knob to ‘LOW’.
5.For maximum heat turn control knob to ‘HIGH’.
6.To turn heater off, turn control knob to ‘OFF’.
7.Close the vlave of the gas cylinder or the regulator after use.
OFF
LIGHT
LOW
HIGH
OF
F
LO
HI

10
CLEANING/MAINTENANCE/STORAGE
CLEANING AND MAINTENANCE:
●
To enjoy outstanding performance of your heater for years make sure to perform the following
maintenance activities on a regular basis:
●
Keep exterior surfaces clean.
-Use warm soapy water for cleaning. Never use flammable, corrosive or abrasive cleaners.
-While washing your unit, be sure to keep the area around the burner and pilot assembly dry at
all time. If the gas control is exposed to water
in any way, do NOT try to use it. It must be
replaced.
●
After a long break from operation, the unit should be inspected for spiders, spider webs or
other insects.
●
Air flow must be unobstructed. Keep controls. Burner and circulating air passageways clean.
Signs of possible blockage include:
-Gas odour with extreme yellow tipping of flame.
-Heater does NOT reach the desired temperature.
-Heater glow is excessively uneven.
-Heater makes popping noises.
●
Spider and insects can nest in burner or orifices.
This dangerous condition can damage heater and render it unsafe for use. Clean burner holes by
using a heavy-duty pipe cleaner.
Compressed air may help clear away smaller particles.
●
Carbon deposits may create a fire hazard. Clean reflector and glass tube inside with soapy
water if any carbon deposits develop. Always be careful when cleaning the glass tube.
STORAGE:
Between uses:
●
Turn the control knob to “OFF” position.
●
Turn LPG cylinder to “OFF” position.
●
Store heater upright in an area sheltered away from weather conditions (such as rain, sleet, hail,
snow).
●
If desired, cover heater to protect exterior surfaces and to help prevent dust and debris
collecting in air passages.
During periods of extended inactivity or when transporting:
●
Turn the control knob to “OFF” position.
●
Disconnect LPG Cylinder and move to a secure, well-ventilated location outdoors.
DO NOT store in a location that will exceed 50 degrees C.
●
Store heater upright in an area sheltered away from weather conditions (such as rain, sleet, hail,
snow).
●
If desired, cover heater to protect exterior surfaces and to help prevent dust and debris
collecting in air passages.
WARNING
FOR YOUR SAFETY:
DO NOT touch or move heater for at
Least 45 minutes after use.
Allow all burner elements to cool
before Touching.
NOTE
In a salt-air environment (such as
near an Ocean) corrosion occurs
more quickly than normal.
Frequently check for corroded areas
and Repair them promptly.
Wait until heater is cool before
covering.
●
●
●
●
●

11
Troubleshooting
PROBLEM PROBABLE CAUSE SOLUTION
Pilot will not light Gas valve may be OFF Turn the gas valve ON
LPG cylinder empty Refill LPG cylinder
Orifice blocked Clean or replace Orifice
Air in supply system Purge air from lines
Loose connection Check all fittings
Pilot will not stay
on
Debris around pilot Clean dirty area
Loose connection Tighten connection .
Thermocouple bad Replace Thermocouple
Gas leak in line Check connections
Lack of gas pressure LPG cylinder is near empty
Burner will not
light
Gas pressure is low LPG cylinder is near empty
Orifice blocked Remove, clean and replace
Control knob not ON Turn knob to ON .
Thermocouple bad Replace Thermocouple
Pilot light assembly bent Or not in
correct location .
Place pilot light in correct Position
and retry
• Any repairs to the patio heater must be carried out by a qualified person.
/