
ACHIM IMPORTING CO., INC.
Family of Home Furnishings
1
FLEX FLOR Loose Lay Planks Installation Instructions
Please review all instructions prior to the installation of Flex Flor Loose Lay Planks.
The installation area must be climate controlled for approximately 48 hours prior to and during installation. Ideal
conditions are above 65°F and less than 85°F. It is important to store the planks for at least 48 hours in the
climate controlled installation area, away from direct sunlight, heaters or air vents.
Pull planks from different cartons when installing to insure a pleasant blending of colors from possibly different
production runs. Slight color variations are normal and expected between print runs. Use the same part number
for each continuous surface.
Loose Lay Planks are ideal for installing in the interior of any building with minimal or no adhesives, as long as the
subfloor has been prepared as stated in Subfloor/Surface Preparations.
For best results, have a plan for installation. Prior to beginning installation, evaluate the area for the following:
Is the subfloor of the installation area clean and level? Additional instructions are under the
SUBFLOOR/SURFACE PREPARATION section.
Measure out the room and decide which direction and pattern the planks should run. There are
additional instructions under the PRODUCT INSTALLATION section.
Make sure there is molding or drywall that will “hold” the perimeter of the planks in place. Additional
instructions are under the INSTALLATION REQUIREMENTS section.
Tools Needed: Utility Knife, Carpenters Square or Straight Edge, Tape Measure, Chalk Line. If using adhesive,
please follow all of the manufacturer’s instructions for additional tools.
SUBFLOOR/SURFACE PREPARATION
Subfloor preparation is extremely important for a successful installation. The subfloor must be level, flat, clean,
free from marks (no felt pen, marker of any type, ballpoint pens, paint, etc., that could cause degradation or
discoloration due to migration), sound, dry, solid, hard, free of cracks, smooth and not exposed to moisture. All
subfloor and underlayment cement patching must be completely dry prior to proceeding with installation. Loose
Lay Planks can be installed over most existing hard-surface floor coverings provided the existing floor surface is
smooth or can be made smooth. Existing floors must be solid and free of any loose areas. Heavily embossed,
cushioned vinyl flooring or multiple layers of flooring are not suitable as an existing floor surface and should be
removed. If the subfloor is not stable due to contaminants like grease, oil, ink, sand or dust, use a primer or
sealant prior to installation. New concrete slabs must be thoroughly dry and completely cured. Any holes,
grooves or expansion joints must be filled with a cement based underlayment and feathered level with the
surrounding surface. Ceramic tile must be made smooth by applying a cement based patch or leveling compound.
All wood and wood composite panels, are acceptable subfloors if they are dry, smooth, flat, structurally sound
and free of any loose areas. Any imperfections of your subfloor or existing floor may be noticeable after
installation, so it is important to properly prepare the subfloor/existing surface.
This product is suitable with underfloor heating and cooling systems.

ACHIM IMPORTING CO., INC.
Family of Home Furnishings
2
The recommended relative humidity inside the room should be 35-65%.
Loose Lay Flooring is resistant to moisture, however constant saturation will be detrimental to the life and
appearance of the flooring. Also, if there is moisture within your subfloor it can affect the adhesive, if used, and
the overall results of your new Loose Lay floor.
PRODUCT INSTALLATION
It is advisable to layout your planks to better determine the direction, as well as, how many full planks will fit
within the area. Once the direction has been decided, measure and calculate the number of full plank rows you
will have and the amount of leftover space. If your leftover space is four inches or less, you may want to consider
keeping the partial width plank along a less conspicuous wall. Therefore, the first row would be a full width row
of planks and the starting point would be opposite the less conspicuous wall. However, if your leftover space is
greater than four inches you can avoid irregular plank widths along one wall by dividing the leftover space
measurement by two, this will be the width of your first and last row of planks.
Check if the wall is straight enough to place planks directly against it. If not, use a chalk line the width of your
first row (this will be either a full width plank or the width of a partial plank mentioned in the previous step).
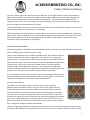
Using the chalk line, lay one full row that will be the second row from the wall, this will be your guide row. (see
image 1)
To cut the length of your final plank to size; use a carpenter’s square, tape
measure and utility knife. Simply score the face of the plank, bend and
cut through the backing of the plank. It is not necessary to cut completely
through the plank in one pass. Always abut factory edges together and
cut edges towards the walls. Double check that this completed guide row
is still aligned with the chalk line once all the planks are in place.
Next you will cut your partial planks along the wall. Throughout this
process, be sure to check that the second row has not shifted away from
the chalk line. It is important to cut all the partial pieces as snug to the
wall as possible. Stagger the joints by starting this row with a full-length
plank on the end of the guide row that contains a length-cut plank. Lay a
full plank face up directly on top of the guide row. This will be the plank
you will cut, plank A (image 2). Using another plank as a template, plank
B, turn it upside down and make sure it is snug against the wall and corner
(image 3). Mark directly on plank A with a pencil. Move plank A to the
subfloor, using a utility knife and straight edge, score along the pencil
mark for the entire length of the plank. It is not necessary to cut
completely through the plank, bend at the scored line and make and
additional clean cut though the backing of the plank. Continue this
process for the rest of your first row of partial width planks. Make sure all
planks are compact towards each other and the walls.
Each additional row should have staggered end joints from the previous rows. Working with one row at a time
layout and stagger the joints for as many full planks as possible. It is necessary for adjoining planks to have end
joints at least six or more inches from the previous row’s end joint. Prior to cutting your plank, make sure that
Guide Row
Plank A
Plank B
image 2
image 1
image 3

ACHIM IMPORTING CO., INC.
Family of Home Furnishings
3
you have a factory edge to join with the previously laid plank. All cut edges need to meet the wall and factory
edges meet each other. Do not place a cut edge to a factory edge. Measure and cut your partial length plank
with the same method used to cut the final plank of the guide row. The leftover partial length pieces can
typically be used in later rows. Periodically, during the installation, check to make sure all joints are snug and
there are no gaps or buckles between any of planks.
The final partial width row can be cut in the same fashion as the first partial width row, however be sure to cut on
another solid surface so the new flooring is not damaged.
When fitting planks around door jambs or irregular objects, it is important to make a template with cardboard or
poster board. Trace the template onto the flooring and carefully cut with a utility knife. This process may require
several passes with the utility knife, depending upon the complexity of the template. Utilize proper safety
precautions, like eye protection prior to beginning.
INSTALLATION REQUIREMENTS:
This Loose-Lay product is designed to be installed without adhesive. Great for any room smaller than 12’x12’ with
walls or molding suitable to hold the planks in place.
There are some situations when an adhesive should be used. Areas that are subject to
excessive temperature fluctuations, high traffic areas, commercial use, large areas
(greater than 12’ in any direction) or when walls or molding are not available to firmly
hold the planks in place. There are three types of recommended adhesive applications,
Tape perimeter, Tape Grid and Total Acrylic Liquid Adhesive. Perimeter adhesive
should be used in rooms larger than 160 sq.ft. or rooms with walls or molding not
sufficient to hold the planks. Grid or liquid adhesive applications should be used in any
commercial use setting or any room with multiple conditions listed above.
It is recommended that the Loose Lay Planks be fully installed without adhesive before
starting the adhesive process then stacked in order of row installation. It is essential to
follow all the manufacturer’s instructions for the chosen adhesive.
Perimeter Tape Adhesive:
The subfloor or existing floor needs to be clean and dry, please review the
Subfloor/Surface Preparation section. Using your chalk line as a guide, from the
Product Installation Section, lay two full length rows of adhesive tape that will fall
within the width of the second row of planks from the wall (the guide row of planks
from the Product Installation section). Make sure there are no creases or overlaps in
the tape. Push tape firmly onto the floor with your palm before peeling off the backing.
Peel off only enough backing for one length of plank at a time. Carefully line up your
guide row of planks with the chalk line. Push the planks firmly down into the tape and
floor, making sure all edges have been pressed down.
Next run a single length of adhesive tape along each side wall, but only remove the backing when you are ready
to place the row of planks for that area. Make sure there are no creases or overlaps in the tape. Continue placing
Loose Lay without adhesive
Perimeter Tape adhesive
Grid Tape adhesive

ACHIM IMPORTING CO., INC.
Family of Home Furnishings
4
all rows of planks making sure that all Planks fit firmly together, review the Product Installation Section if
necessary.
When there are only a few rows left to lay Planks, run two rows of adhesive tape for the last row of full width
planks, same process as with the guide row. Lastly, you will finish your floor by running a single row of adhesive
tape for each of the partial width plank rows.
Grid Tape Adhesive:
Installation is the same process as Perimeter Tape Adhesive, except after the guide row has been installed, single
runs of adhesive tape should be applied along each side wall and then diagonally in between each side wall tape
at every 20 inches. Then small strips in the opposite diagonal direction, in between the full run diagonal tape
strips creating a diamond-like grid. Make sure there are no creases or overlaps in the tape and only remove the
tape backing when you are ready to place the row of planks for that area. Continue placing all rows of planks
making sure that all Planks fit firmly together, review Product Installation Section if necessary.
Installation with liquid adhesive:
Completely review the manufacturer’s instructions for acrylic adhesive prior to beginning. Spread a thin even
layer of the adhesive along the wall in the manufacturer recommended area, being very careful to not cover the
chalk line. Wait the manufacturer recommended drying time before laying the planks of the guide row. Make
sure this row is perfectly aligned to the chalk line and firmly pressed into the adhesive before continuing to the
next row. Continue this process for all rows and consult manufacturer drying times.
AFTER INSTALLATION
Prevent excessive dirt and moisture from being tracked on the floor with mats outside each entrance.
Use non-staining mats on your floor. Do not use rubber or latex backed mats which may permanently stain vinyl
floors.
Routine cleaning is recommended to maintain the life of the floor. It is best to clean your new floor with an
appropriate vinyl floor cleaner and water. Any use of solvent material is strictly prohibited.
Avoid exposure to direct sunlight for prolonged periods. During peak sunlight hours, the use of window coverings
is recommended. Prolonged direct sunlight can result in discoloration and excessive temperature might cause
planks to expand.
Achim’s Family of Home Furnishings
www.achimonline.com
Customer Service # 1.800.54.ACHIM
CustomerService@Achimonline.com
-
 1
1
-
 2
2
-
 3
3
-
 4
4


Achim LSLYP10408 Installation guide
- Type
- Installation guide
- This manual is also suitable for
Ask a question and I''ll find the answer in the document
Finding information in a document is now easier with AI
Related papers
Other documents
-
Mohawk HCE54-72 User guide
-
-
Pergo LEW47-69 Installation guide
-
 STAINMASTER LSS4307BPS Installation guide
-
 Cali Bamboo 7904006000 Installation guide
-
-
Home Decorators Collection HL641H Installation guide
-
-
-
SMARTCORE LX55204008 User manual

