TR Industrial TR89200 User guide

Type
User guide

TR Industrial TR89200 Below you will find brief product information for TR Industrial TR89200 heat gun. It is a powerful tool with a 1500W motor and two fan settings, which allow you to adjust the airflow (300L/min and 500L/min) and temperature (122-1112°F) to your needs. The heat gun comes with a variety of accessories, including a fan nozzle, glass protector, cone nozzle, spool reflector, and handheld scraper, making it a versatile tool for a variety of tasks, such as loosening rusty nuts, heat-shrinking, welding plastics, and drying out damp wood.

TR Industrial TR89200 Below you will find brief product information for TR Industrial TR89200 heat gun. It is a powerful tool with a 1500W motor and two fan settings, which allow you to adjust the airflow (300L/min and 500L/min) and temperature (122-1112°F) to your needs. The heat gun comes with a variety of accessories, including a fan nozzle, glass protector, cone nozzle, spool reflector, and handheld scraper, making it a versatile tool for a variety of tasks, such as loosening rusty nuts, heat-shrinking, welding plastics, and drying out damp wood.

© Copyright 2015 TR Industrial
TR89200
WARNING: Please read and understand this manual in its entirety before using the product. Doing so can
reduce the risk of injury.
Your heat gun has been engineered and constructed to be easy to use, dependable, and safe. With the right care, it
can take care of your needs for years to come.
Contact Us via Email:
Contact Us via Phone:
M-F 9am-5pm | (888) 446-6088
Visit Our Website:
www.TRIndustrial.com
TM
HEAT GUN KIT
INSTRUCTION MANUAL
SAVE THIS MANUAL FOR FUTURE REFERENCE
12.5
AMP
POWERFUL
MOTOR
1500
POWER
WATT
2YEAR
LIMITED
WARRANTY
2
VER.08262015
© TR Industrial 2015
Features:
Use this 1500 watt heat gun to loosen rusty nuts, heat-shrink, weld plastics and dry out damp wood. It comes with two
fan settings and a temperature control dial to give you heat customizability options as well as an integrated support
stand so you can work hands-free. It also includes all the accessories you need to get started with a fan nozzle, glass
protector, cone nozzle, spool reector, and handheld scraper.
TABLE OF CONTENTS
SPECIFICATIONS
PACKING LIST
• Specifications ................................................................................................................................................................. 2
• Packing List .................................................................................................................................................................... 2
• General Safety Rules ................................................................................................................................................ 3 - 4
• Specific Safety Rules ................................................................................................................................................4 - 5
• Safety Symbols ............................................................................................................................................................. 5
• Electrical ........................................................................................................................................................................ 6
• Operation ...................................................................................................................................................................... 7
• Warranty ........................................................................................................................................................................ 8
• Warranty Card ............................................................................................................................................................... 9
Voltage ............................................................. 120V AC ~ 60 Hz
Motor Power ................................................ 1500W 12.5 Amps
Ratings ............................ Double Insulated, Class II Product
Temperature .......................................... Setting I: 122 - 842 °F
................................................................. Setting II: 194 - 1112 °F
Air Flow ......................................................Setting I: 300L / min
......................................................................Setting II: 500L / min
PRODUCT SPECIFICATIONS
CERTIFICATIONS
• UL/CUL Listed
• Conforms to UL STD No. 499 and No. 1097
• Certied to CAN/CSA STD C22.2 No. 122
• Heat Gun
• (1) Fan Nozzle
• (1) Glass Protector
• (1) Cone Nozzle
• (1) Spool Reector
• (1) Handheld Scraper
• (1) Instruction Manual
• (1) Carrying Case
The product and its individual parts are already assembled. Make sure that all items listed in the packing list are present.
WARNING: Using a product that might have been improperly assembled could result in injury.
• Inspect the tool carefully to make sure no breakage or damage occurred during shipping.
• Do not discard the packing material until you have carefully inspected and satisfactorily operated the tool.
• If any parts are damaged or missing, please contact TR Industrial customer support.
VER. 052015-IW
3
VER.08262015
© TR Industrial 2015
GENERAL SAFETY RULES
READ ALL INSTRUCTIONS
• IF UNDER THE INFLUENCE OF DRUGS, ALCOHOL OR
ANY MEDICATION, DO NOT OPERATE THE TOOL.
• FAMILIARIZE YOURSELF. Learn the applications and
limitations as well as the specic potential hazards
related to this tool by reading the operator’s manual
carefully.
• PREVENT BODY CONTACT WITH GROUNDED SUR-
FACES TO GUARD AGAINST ELECTRICAL SHOCK.
For example: pipes, radiators, ranges, and refrigerator
enclosures.
• MAINTAIN A CLEAN WORK AREA. Cluttered areas and
benches invite accidents. Do not leave tools or pieces
of wood on the tool while it is in operation.
• KEEP YOUR WORK AREA WELL LIT to better see the
work and to make sure that no obstructions will inter-
fere with safe operation before performing any work
using your tool.
• ONLY USE IN SAFE ENVIRONMENTS. Do not use
power tools in damp or wet locations or expose to rain.
Keep the work area well lit.
• DO NOT WORK NEAR BYSTANDERS AND/OR CHIL-
DREN. All bystanders should wear safety glasses and
be kept a safe distance from work area. Do not let by-
standers touch tool or extension cord while operating.
• CHILDPROOF YOUR WORKSHOP. Use padlocks, mas-
ter switches, and remove any starter keys.
• SECURE YOUR WORK IN PLACE. Use clamps or a vise
to hold work when practical; it is safer than using your
hand and frees both hands to operate the tool.
• DO NOT USE IN A POTENTIALLY EXPLOSIVE ENVI-
RONMENT. Normal sparking of the motor could ignite
fumes.
• AVOID OVERREACHING. Keep proper footing and bal-
ance at all times.
• DON’T PUSH THE TOOL BEYOND ITS LIMITS. It will
do the job better and safer at the capacity for which
it was designed.
• WEAR SAFETY GOGGLES WITH SIDE SHIELDS. Every-
day eyeglasses have only impact-resistant lenses; they
are no substitute for safety glasses/goggles.
• WEAR THE PROPER GEAR. Avoid wearing loose cloth-
ing, neckties or jewelry while working. Rubber gloves
and nonskid footwear are recommended when work-
ing outdoors. Also wear protective hair covering to
contain long hair above shoulder length.
• TAKE CARE OF YOUR LUNGS. Wear a face or dust
mask if the operation is dusty.
• TAKE CARE OF YOUR HEARING. Wear hearing protec-
tion if working with loud equipment and/or tools.
• TAKE CARE OF YOUR ELECTRICAL CORD. Never carry
tool by the cord or yank it to disconnect from recepta-
cle. Keep cord from heat, oil, and sharp edges. Carry the
tool via the carrying handle only.
• REGULARLY CHECK ON YOUR TOOL CORDS. If dam-
aged, have them repaired by a qualied service techni-
cian at an authorized service facility.
• UTILIZE THE RIGHT EXTENSION CORD. Make sure
your extension cord is in good condition. Use only a
cord heavy enough to carry the current your product
will draw. An undersized cord will cause a drop in line
voltage resulting in a loss of power and overheating. A
wire gauge size (A.W.G.) of at least 14 is recommend-
ed for an extension cord 25 feet or less in length. If in
doubt, use the next heavier gauge. The smaller the
gauge number, the heavier the cord.
• USE EXTENSION CORDS DESIGNED FOR OUTSIDE
USE. When tool is used outdoors, use only extension
cords with approved ground connection that are in-
tended for use outdoors and are marked as so.
• REGULARLY INSPECT YOUR EXTENSION CORDS. Be
sure to replace if damaged.
• ALWAYS TURN THE POWER OFF WHEN TOOL IS NOT
BEING USED. Don’t leave the tool until it comes to a
complete stop.
• UNPLUG FROM POWER SOURCE. When not in use,
before servicing or when changing attachments, all
tools should be disconnected from power source.
• BE AWARE OF THE POWER BUTTON. Be sure that the
switch is o when plugging in any tool.
• ALWAYS TAKE CARE OF YOUR TOOLS. Keep tools
sharp and clean for better and safer performance. Fol-
low instructions for lubricating and changing accesso-
ries.
• ONLY QUALIFIED REPAIR PERSONNEL SHOULD
PERFORM SERVICE ON THIS TOOL. Service or main-
tenance performed by unqualied personnel could
result in injury.
• DO NOT ALLOW ANYONE TO SIT OR RIDE ON THE
MACHINE.
WARNING: PLEASE READ AND UNDERSTAND
ALL INSTRUCTIONS. Electrical shock, re, and/or seri-
ous personal injury may result from failure to follow all
instructions listed below.
4
VER.08262015
© TR Industrial 2015
• CHECK IF ON/OFF SWITCH WORKS. Have defective
switches replaced by an authorized service center.
• CHECK PARTS FOR DAMAGE. Before further use of
the tool, any part that is damaged should be carefully
checked to determine that it will operate properly and
perform its intended function.
• ONLY USE IDENTICAL PARTS when replacing. Use of
any other parts may create a hazard or cause product
damage.
• ONLY USE THE ACCESSORIES recommended in the
manual. Use of accessories that are not listed may
cause injury.
• KEEP TOOL AWAY FROM OIL AND GREASE AND AS
DRY AS POSSIBLE. Always use a clean cloth when
cleaning. Never use brake uids, gasoline, petro-
leum-based products or any solvents to clean tool.
• STAY ALERT AT ALL TIMES! Do not allow familiari-
ty (gained from frequent use of your tool) to cause a
careless mistake. ALWAYS REMEMBER that a careless
fraction of a second is sucient to inict severe injury.
SPECIFIC SAFETY RULES
• ALWAYS keep in mind that behind walls, oors, ceilings,
and other panels, there could be ammable materials,
which could be ignited from the heat of this tool while
stripping paint. If something does catch re, it could be
behind the materials, which means you may not notice
it, but it can cause considerable damage. Keep in mind
that this gun can produce heat up to 1000° F or 538° C.
• THIS HEAT GUN is not a hair dryer. Please do not at-
tempt to use it as such.
• ALWAYS shut down and disconnect the heat gun, and
let it cool for 30 minutes before moving it or storing it.
Make sure the heat gun is on a at surface where the
nozzle tip can point upwards, so that it can cool prop-
erly.
• ALWAYS use high-quality paint stripping knives and
scrapers to use this tool eectively.
• DO NOT OBSTRUCT THE NOZZLE. Make sure the air
intake and main nozzle are always unobstructed.
• AIM. Always aim the gun directly at the work at hand,
and away from other people and ammable materials.
• DO NOT TOUCH the nozzle or allow it to touch other
objects during use or within a short time of use as it
becomes extremely hot.
• DO NOT poke or push anything inside the nozzle.
• KNOW your work environment well to avoid any un-
foreseen hazards.
• DRY PAINT should be cleaned o the nozzle after use
to make sure it doesn’t ignite.
• SCRAPER BLADE should also be cleaned frequently
during use so that it doesn’t ignite.
• DO NOT combine the use of this heat gun with chem-
ical strippers.
• ONLY USE scrapers for scraping, do not attempt to use
the attachments or other parts for scraping.
• DO NOT attempt to use this for heating foods.
• KEEP the nozzle far from the cord.
• NEVER forget that this gun can ignite ammable ma-
terials, and always be aware of the environment and
surrounding objects.
NOTES ABOUT THE HEAT GUN
1. Make sure the tool is o and disconnected from power
when it’s not being used.
2. Clean the scraper often when in use as the residue
build up can be ammable.
3. Try using the heat gun with the nozzle at dierent dis-
tances from the object being worked on to nd the
right amount of distance.
4. When stripping paint, there will be bits of paint around
the work area, be sure to clean them up as you work.
5. If you’re using the heat gun indoors, be sure to keep it
away from curtains, upholstery, papers, and other am-
mable materials.
6. This tool can do an excellent job if used properly, but
it’s recommended you practice on smaller projects rst
to gain the skill necessary to excel on bigger jobs.
PAINT REMOVAL
1. Its always best to do the work outdoors. If it’s not
possible to do outdoors, be sure to keep the area
ventilated. Keep windows open and make sure you
have a fan blowing the air out.
2. If there are any rugs, carpets, furniture, cooking uten-
sils or air ducts, be sure to remove them.
3. For safety reasons, be sure to wear protective cloth-
ing and place cloths on the ground to catch paint
chips and peelings.
4. Work areas should be well sealed away from the rest
of the room, and be sure to only do one room at a
time.
5. Pregnant women and nursing mothers should not
be present during the work due to potential health
hazards.
6. Wear a mask that has been approved by OSHA to
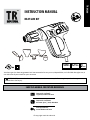
VER. 052015-IW
5
VER.08262015
© TR Industrial 2015
Read the users manual in its enrety before using this tool.
Always wear safety goggles.
Always use hearing protecon.
SAFETY SYMBOLS
prevent dust and fumes from entering.
7. Do not leave the heat gun in one spot for too long as
it can produce fumes, which might then be breathed
in.
8. Do not consume any food, drinks, tobacco or other
substances in the work area.
9. Make sure you wash your hands, arms, and face thor-
oughly before consuming anything.
10. Mop the oors well with detergent once the job is
complete.
11. Keep a double plastic bag handy to place paint chips
and debris into. Dispose of it properly.
12. Remove your protective clothing in the work area
after work is done to avoid bringing it into other en-
vironments.
WARNING: Some dust created by power sanding,
sawing, grinding, drilling, and other construction activ-
ities contains chemicals known to the State of Califor-
nia to cause cancer, birth defects or other reproductive
harm. Some examples of these chemicals are:
• Lead from lead-based paints,
• Crystalline silica from bricks and cement and
other masonry products, and
• Arsenic and chromium from chemically-treated
lumber.
Your risk from these exposures varies, depending on how
often you do this type of work. To reduce your exposure
to these chemicals: work in a well ventilated area, and
work with approved safety equipment, such as those dust
masks that are specially designed to lter out microscopic
particles.
Avoid prolonged contact with dust from power sanding,
sawing, grinding, drilling, and other construction activ-
ities. Wear protective clothing and wash areas with soap
and water. Allowing dust to get into your mouth, eyes or
lay on the skin may promote absorption of harmful chem-
icals.
WARNING: Use of this tool can generate and/or
disperse dust, which may cause serious and permanent
respiratory or other injury. Always use NIOSH/OSHA ap-
proved respiratory protection appropriate for the dust
exposure. Direct particles away from face and body.
WARNING: ALWAYS use safety glasses. Everyday
eye glasses are NOT safety glasses. Also use face or dust
mask if cutting operation is dusty.
ALWAYS WEAR CERTIFIED SAFETY EQUIPMENT:
• ANSI Z87.1 eye protection (CAN/CSA Z94.3)
• ANSI S12.6 (S3. 19) hearing protection
• NIOSH/OSHA/MSHA respiratory protection
SAVE THESE INSTRUCTIONS. These instructions will
likely come in handy at some point in the future, and it
is recommended that you refer to them often to keep the
information in mind.
6
VER.08262015
© TR Industrial 2015
ELECTRICAL
USING EXTENSION CORDS
When using a power tool at a considerable distance from
the power source, use an extension cord heavy enough to
carry the current that the tool will draw. An undersized ex-
tension cord will cause a drop in line voltage, resulting in a
loss of power and causing the motor to overheat. Use only
3-wire extension cords that have 3 prong grounding plugs
and 3-pole receptacles that accept the tool’s plug. Use the
chart provided below to determine the minimum wire size
required in an extension cord. Only round jacketed cords
listed by (UL) should be used.
Amp Rating (AMP) 0-6 6-10 10-12 12-16
Cord Length Wire Size (A.W.G.) American Wire Gauge
25’ 16 14 14 14
50’ 16 14 14 12
100’ 14 12 10 Not Recommended
Before using an extension cord, inspect it for loose or ex-
posed wires and cut or worn insulation.
When working with the tool outdoors, use an extension
cord that is designed for outside use. This is indicated by
the letters WA or W on the cord’s jacket.
ELECTRICAL CONNECTION
The precision built electric motor should be connected
to a power supply that is 120 volts/60Hz AC only. Do not
operate this product on DC. If there is a substantial drop
in voltage, it may lose power, causing the motor to over-
heat. If the product does not operate when plugged into
an outlet, check on the power supply.
SPEED AND WIRING
The speed changes depending on voltage. It’s very im-
portant the wiring in the shop leading to your product be
properly installed. Also, its important to keep in mind that
a line that can support one power tool may not have the
ability to handle two or three.
GROUNDING INSTRUCTIONS
This tool is equipped with an electric cord having an
equipment-grounding conductor and a grounding plug. If
the product malfunctions or breaks down, grounding pro-
vides a path of least resistance for electric current to reduce
the risk of electric shock. The plug must be plugged into a
matching outlet that is properly installed and grounded in
accordance with all local codes and ordinances.
The plug provided should not be modied. If it will not
t the outlet, have the proper outlet installed by a quali-
ed electrician. Improper use of the equipment-ground-
ing conductor can result in a risk of electric shock. The
conductor with insulation having an outer surface that
is green with or without yellow stripes is the equip-
ment-grounding conductor. If repair or replacement of
the electric cord or plug is necessary, do not connect the
equipment-grounding conductor to a live terminal.
If in doubt as to whether the tool is properly grounded,
check with a qualied electrician or service personnel.
Repair or replace a damaged or worn cord immediately.
POWER SUPPLY
Make sure your power supply is appropriate for this heat
gun. Keep in mind that 120 volts AC only means that your
tool will work on standard 60 Hz household power. Do not
attempt to use AC tools on DC power. If the rating is 120
volts AC/DC, this also means the tool will work on standard
60 Hz household power. This information is available on
the nameplate. If lower voltage is used, there will be a loss
in power, which can result in over-heating.
WARNING:
Be sure to keep the cord in a position where it will not
get caught on tools or other obstructions while you are
working. Failure to do so can result in serious personal
injury.
WARNING:
If extension cords are damaged, replace them imme-
diately. Electrical shock and/or serious injury can result
from using any tool with a damaged cord.
VER. 052015-IW
7
VER.08262015
© TR Industrial 2015
OPERATING THE HEAT GUN
The switch can be adjusted to control both the heat out-
put and the fan speed. The temperature adjustment knob
is used in combination with the switch to nd the proper
setting.
• Slide the switch to the position marked with “I” for
low air speed/heat.
• Slide the switch to the position marked with “II” for
high air speed/heat.
• Slide the switch to the position marked with “0” to
turn it o.
• Turn the knob clockwise to raise the temperature.
• Turn the knob counter-clockwise to lower the air
temperature.
PAINT REMOVAL
Proper paint removal is in fact quite a developed skill. A
few simple projects should help you rene your technique.
Start by turning on the heat gun and holding it with the
nozzle around one inch from the surface you’re planning
to strip. The paint should start to blister once it’s ready
to be stripped. You can then scrape it with even, smooth
strokes. If the paint is hot enough and the scraper is ap-
propriate for the surface being stripped, the paint should
come o in a way that mirrors the size of the scraper. Keep
the heat gun slightly ahead of the scraper to make sure the
paint is softened. Moving the heat gun slowly, but steadily
is the ideal way to distribute heat. Remember that the bits
and pieces can be ammable, and may ignite. Take care,
keeping that in mind.
TIPS FOR PAINT STRIPPING
Some paints will become more dicult to strip if they are
heated for too long. Be sure to try a few variations to get
the technique down based on the paint being stripped.
Paint should be removed immediately after being heated
as it will cool and harden again.
If a window frame is being stripped, do not allow the heat
gun to stay focused on an area on the glass as it can cause
it to crack. Instead, use some type of non-ammable ma-
terial to shield the glass o.
MORE THAN A PAINT STRIPPER
Don’t forget that this heat gun is an extremely dynamic
tool that can be used for a lot more than paint stripping.
It can be used to soften linoleum, oor tile, loosening heat
sensitive adhesives, heat-shrinkable tubing, and even
some automotive uses such as reducing drying time on
paints and set up time on body llers. Place the heat gun
on a at surface to use it hands-free.
WARNING: The use of any accessory not recom-
mended for use with this tool could be hazardous.
Always unplug the tool before attaching or removing
accessories. Do not remove accessory tips until the tool
has cooled to room temperature.
INCLUDED ATTACHMENTS
Fan Nozzle: For wider distribution of hot air, mostly for
wider surfaces such as doors and oors.
Glass Protector: Safer to use near glass as it distributes
heat away from the area that needs to be protected.
Cone Nozzle: For more precision, this nozzle concentrates
the air into a smaller area.
Spool Reector: Dispenses the air equally around the
whole object, which is ideal for soldering pipework or
shrink sealing electrical cables.
Handheld Scraper: Convenient for scraping paint.
OPERATION
8
VER.08262015
© TR Industrial 2015
WARRANTY
Limited Warranty Statement
The TR Industrial limited warranty covers the original
purchaser’s product in the event that genuine defects
resulting from materials or workmanship is discovered.
Your product will be either repaired or replaced if such
conditions are veried.
This warranty is eective for 2 years from the original
purchase date. Mail the completed registration card in-
cluded in this manual to activate the warranty within
90 days of the purchase date.
If the TR Industrial product is found to be defective due
to faulty material or workmanship, TR Industrial will re-
pair or replace the product without charge for parts or
labor.
To successfully utilize your warranty, you must rst reg-
ister our product. You must also ensure that the prod-
uct reaches TR Industrial within the warranty period,
and not after. The expense of delivering the product to
TR Industrial as well as the expense of returning it back
after repair or replacement is the responsibility of the
owner. Proof of purchase will be required to process the
warranty to substantiate any warranty claim.
This warranty does not cover any TR Industrial product
that has been subjected to misuse, neglect, negligence
or accidents. It is not covered if it is rented out to third
parties. The product will not be covered if regular main-
tenance instructions are not followed and/or if the ap-
parent defect is a result of regular wear and tear.
TR Industrial may change or improve the design of any
of its products without notice, and it will not be re-
sponsible for changing previous models to make them
match newer models.
As stated previously, the warranty described in this
manual is limited, and it is completely void after the
term specied has ended. The warranty does not go
beyond repair and/or replacement for TR Industrial
products and has no other obligations to products
regardless of the issues at hand. No loss of revenue,
damage to property, loss of time or inconvenience is
covered under the TR Industrial warranty. There are
rules that vary from state to state, which may aect the
preceding statements.
To register your product with us and activate your war-
ranty, use the warranty card on the following page:
VER. 052015-IW
9
VER.08262015
© TR Industrial 2015
WARRANTY CARD
DATE OF PURCHASE: ____________________________________________________________________
PLACE OF PURCHASE: ___________________________________________________________________
NAME: ________________________________________________________________________________
STREET ADDRESS: ______________________________________________________________________
CITY: __________________________________________________________________________________
STATE: ________________________________________________________________________________
ZIP CODE: _____________________________________________________________________________
PHONE: _______________________________________________________________________________
EMAIL: ________________________________________________________________________________
TR INDUSTRIAL
1788 W 2nd Street, Pomona, CA 91766
(888) 446-6088 | support@trindustrial.com | www.TRIndustrial.com
HEAT GUN KIT
MODEL: TR89200
(RETAILERS NAME)
Instructions:
Fill in the information above and mail in with a copy of the sales receipt when registering warranty.
TM
PRODUCT SERIAL NUMBER: __________________________________
10
VER.08262015
© TR Industrial 2015
TM
  • Page 1 1
  • Page 2 2
  • Page 3 3
  • Page 4 4
  • Page 5 5
  • Page 6 6
  • Page 7 7
  • Page 8 8
  • Page 9 9
  • Page 10 10

TR Industrial TR89200 User guide

Type
User guide

TR Industrial TR89200 Below you will find brief product information for TR Industrial TR89200 heat gun. It is a powerful tool with a 1500W motor and two fan settings, which allow you to adjust the airflow (300L/min and 500L/min) and temperature (122-1112°F) to your needs. The heat gun comes with a variety of accessories, including a fan nozzle, glass protector, cone nozzle, spool reflector, and handheld scraper, making it a versatile tool for a variety of tasks, such as loosening rusty nuts, heat-shrinking, welding plastics, and drying out damp wood.

Ask a question and I''ll find the answer in the document

Finding information in a document is now easier with AI