
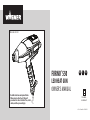
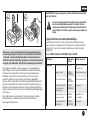
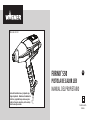
FURNO
™
550
LED HEAT GUN
OWNER‘S MANUAL
EN
ES
F
0519 • Form No. 0520251B
Read all instructions and product labels.
When using electrical tools, follow all
precautions to reduce the risk of re, electric
shock, and other personal injury.
Double-
insulated
Model No. 2363334

2
Important Safety Information
Read all safety information before operating the equipment. SAVE THESE INSTRUCTIONS.
SAVE THESE INSTRUCTIONS
EN
To reduce the risks of re or explosion, electrical shock and the
injury to persons, read and understand all instructions included in
this manual. Be familiar with the controls and proper usage of the
equipment.
Indicates a hazardous situation which, if not avoided,
could result in death or serious injury.
HAZARD: POISON
Extreme care should be taken when stripping paint. The
peelings, residue and vapors of paint may contain lead,
which is poisonous. Any paint applied to homes before 1950
is likely to contain lead. Any paint manufactured before 1977
may contain lead. Once the paint is deposited on surfaces,
hand-to-mouth contact can result in the ingestion of lead.
Exposure to even low levels of lead can cause irreversible
brain and nervous system damage. Young and unborn
children are particularly vulnerable to lead poisoning.
Before beginning any paint removal process you should
determine whether the paint you are removing contains
lead. This can be done by your local health department
or by a professional who uses a paint analyzer to check the
lead content of the paint to be removed. Lead-based paint
should only be removed by a professional and should not be
removed using a heat gun.
PREVENTION:
• Move the work piece outdoors. If this is not possible, keep the
work area well ventilated. Open the windows and put an exhaust
fan in one of them. Be sure the fan is moving the air from inside to
outside.
• Remove or cover any carpets, rugs, furniture, clothing, cooking
utensils and air ducts.
• Place drop cloths in the work area to catch any paint chips or
peelings. Wear protective clothing such as extra work shirts,
overalls and hats.
• Work in one room at a time. Furnishings should be removed or
placed in the center of the room and covered. Work areas should
be sealed o from the rest of the dwelling by sealing doorways
with drop cloths.
• Children, pregnant or potentially pregnant women and nursing
mothers should not be present in the work area until the work is
done and all cleanup is complete.
• Wear a dust respirator mask of a dual lter respirator mask for
dust and fumes which has been approved by the Occupational
Safety and Health Administration (OSHA) the National Institute of
Safety and Health (NIOSH), or the United States Bureau of Mines.
These masks and replaceable lters are readily available at major
hardware stores. Be sure that the mask ts properly. Beards and
facial hair may keep masks from sealing properly. Change the
lters often. Disposable paper masks are not adequate.
• Use caution when operating the heat gun. Keep the heat gun
moving as excessive heat will generate fumes which can be inhaled
by the operator.
• Keep food and drink out of the work area. Wash hands, arms and
face and rinse mouth before eating or drinking. Do not smoke or
chew gum or tobacco in the work area.
• Clean up all removed paint and dust by wet mopping the oors.
Use a wet cloth to clean all walls, sills and any other surface where
paint dust is clinging. Do not sweep, dry dust or vacuum. Use a
high phosphate detergent of trisodium phosphate (TSP) to wash
and mop areas.
• At the end of each work session, put the paint chips and debris in

3
Important Safety Information
Read all safety information before operating the equipment. SAVE THESE INSTRUCTIONS.
SAVE THESE INSTRUCTIONS
EN
a double plastic bag, close it with tape or twist ties and dispose of
properly.
• Remove protective clothing and work shoes in the work area to
avoid carrying dust into the rest of the building. Wash work clothes
separately. Wipe shoes o with a wet rag and then wash it with the
work clothes. Wash hair and body thoroughly with soap and water.
HAZARD: EXPLOSION OR FIRE
This heat gun produces extremely high temperatures (as
high as 1300º F). It must be used with caution to prevent
combustible material from igniting.
PREVENTION:
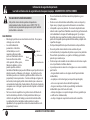
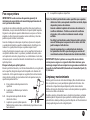
• Keep the gun in constant motion. Do not stop or dwell in one spot.
Fascia
Sot
Inside
Wall
Siding
• Use extreme caution if the
other side of the material being
scraped is inaccessible, such
as house siding. Hidden areas
such as behind walls, ceilings,
oors, sot boards and other
panels may contain ammable
materials that could be ignited
by the heat gun when working
in these locations. The ignition
of these materials may not be
readily apparent and could result in property damage and injury
to persons. When working in these locations, keep the heat gun
moving in a back-and-forth motion. Lingering or pausing in one
spot could ignite the panel or the material behind it.
• Do not use near surfaces with cracks or near metal pipes or
ashing. Heat may be conducted behind the work surface and
ignite hidden material. The ignition of hidden materials may not
be readily apparent and can result in property damage and injury.
• Do not use electric tools in the presence of ammable liquids or gases.
• Do not use near combustible materials such as dry grass, leaves,
and paper which can scorch and catch re.
• The nozzle becomes very hot. Do not lay the heat gun on
ammable surfaces when operating the gun or immediately after
shutting the gun o. Always set the gun on a at, level surface
so that the nozzle tip is directed upwards and away from the
supporting surface.
• Do not touch the nozzle until the tool has cooled.
• Do not use the heat gun as a hair dryer.
• Tools and paint scrapings become very hot. To avoid burns, use work
gloves when scraping.
• Always treat the hot air units with the same respect as an open ame.
• A re may result if the appliance is not used with care, therefore:
– be careful when using the appliance in places where there are
combustible materials;
– do not apply to the same place for a long time;
– do not use in presence of an explosive atmosphere;
– be aware that heat may be conducted to combustible materials
that are out of sight;
– place the appliance on its stand after use and allow it to cool
down before storage;
– do not leave the appliance unattended when it is switched on.

4
Important Safety Information
Read all safety information before operating the equipment. SAVE THESE INSTRUCTIONS.
SAVE THESE INSTRUCTIONS
EN
HAZARD: ELECTRIC
May cause property damage, severe injury or loss of life.
PREVENTION:
• Do not disassemble the heat gun.
• Do not work in wet areas or expose the heat gun to rain.
• Guard against electric shock by preventing body contact with
grounded surfaces such as pipes, radiators, ranges, aluminum
ladders or other grounded devices.
• Do not abuse the electric cord. Never carry the heat gun by the
cord or yank on the cord to disconnect if from the power supply.
Keep the electric cord away from heat, oil and sharp edges. Inspect
the cord for wear or damage regularly.
• Use only extension cords rated for outdoor use. If an extension
cord is damaged or otherwise unsuitable for use, replace it with a
new cord.
• WARNING - To reduce the risk of electric shock, do not expose
this product to rain or moisture. Store indoors. Read instruction
manual before using.
• If the supply cord is damaged, it must be replaced by the
manufacturer, its service agent or similarly qualied person in order
to avoid a hazard.
HAZARD: GENERAL
May cause property damage or severe injury.
PREVENTION:
• Do not point heat tool at yourself, others, or animals.
• ALWAYS disconnect the heat gun from the power supply when not
in use. Store indoors in a dry place and out of the reach of children.
• Keep your work area well lit and clean.
• Do not overreach, especially when working on ladders. Keep
proper footing and balance at all times. Be certain any ladders
being used are sturdy, stable, on a rm surface, or on rm ground
and erected at safe working angles.
• Avoid power lines.
• Keep moveable items secured and steady while scraping.
• Always use protective eyewear when working.
• Stay alert and use common sense when operating any tool.
• When using to thaw frozen pipes, always use the curved deector
(P/N 2366225). NEVER use to thaw pipes located inside walls or
near combustibles.
• This appliance is not intended for use by persons (including
children) with reduced physical, sensory or mental capabilities, or
lack of experience and knowledge, unless they have been given
supervision or instruction concerning use of the appliance by a
person responsible for their safety.
• Children should be supervised to ensure that they do not play with
the appliance.

5
Important Safety Information
Read all safety information before operating the equipment. SAVE THESE INSTRUCTIONS.
SAVE THESE INSTRUCTIONS
EN
WARNING!
Some dust, peelings, residue, and vapors caused by paint
removal activities contain chemicals known to the state
of California to cause birth defects or other reproductive
harm. An example of a chemical would be lead from lead-
based paints (do not use a heat tool to remove lead-based
paint). Your risk from exposure varies, depending on how
often you do this type of work. To reduce your exposure to
these chemicals: work in a ventilated area, and work with
approved safety equipment, such as those dust masks that
are specially designed to lter out microscopic particles.
For more information, go to www.P65warnings.ca.gov
Important Electrical Information
Use only an extension cord that will accept the plug on the product. Make
sure your extension cord is in good condition. When using an extension
cord, be sure to use one heavy enough to carry the current your product
will draw. An undersized cord will cause a drop in line voltage resulting in
loss of power and overheating. A SJT type cord is required. Cord shall be
14 AWG minimum for general indoor use.
This appliance has a polarized plug (one blade is wider than the other). To
reduce the risk of electric shock, this plug is intended to t in a polarized
outlet only one way. If the plug does not t fully in the outlet, reverse the
plug. If it still does not t, contact a qualied electrician. Do not modify
the plug in any way. When servicing, only use identical service parts.
Contact WAGNER for a replacement cordset.
General Description
This heat gun is a quality power tool. Like any power tool, it can be
dangerous when misused. Read the following instructions carefully and
follow all safety precautions. It is the responsibility of the owner to use the
heat gun properly. Only adults should use a heat gun.
Specications
Housing: .................Engineered high-impact corrosion and heat-resistant
polymers
Wattage: ................1500 Watts on highest, 150 Watts on lowest.
Heat Output: ........Approximately 1200°F on high, approximately 150°F on
low
Weight: ................... 1.95 pounds
For more details on multiple projects and ‘how to’ videos
please visit www.wagnerspraytech.com.

6
EN
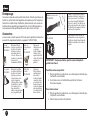
Using the Heat Gun
Always read the safety information
included in this manual before
using the heat gun.
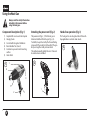
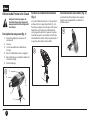
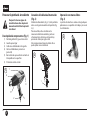
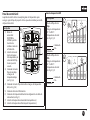
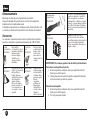
Component Description (Fig. 1)
1) Graphic LED screen and control panel
2) Hanging hook
3) Cordset with integrated stabilizers
4) Rear stabilizer ns (stand)
5) Side bars to prevent nozzle touching
surface
6) Heat shield
1
3
4
2
6
5
1
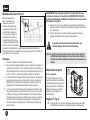
Attaching the power cord (Fig. 2)
The power cord (Fig. 2, 1) for the heat gun is
delivered detached from the gun (Fig. 2, 2).
To attach, line up the cord by the forward facing
groove with the socket on the handle of the gun
and press together until you hear a click.
This will permanently attach the cord. It cannot
be removed once installed.
1
2
2
Hands-free operation (Fig. 3)
The heat gun has an integrated stand for bench
top applications and cool down mode.
3

7
EN
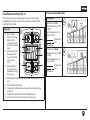
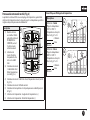
Touch Pad Control Panel (Fig. 4)
The heat gun gives you a wide temperature range to choose from,
depending upon the type of project. These can be controlled via the
Touch Pad Control Panel.
Description
4
2
4
6
7
1
5
3
8
1) Power button:
Turns the heat gun
ON and OFF or
switches the heat
tool into cool down
mode
2) Mode selector: Sets
the temperature
range and air ow
speed you are
using
3) Mode indicator:
Low air ow / low
temperature range
(See Fig. 5, a)
4) Mode indicator: High air ow / high temperature range (See Fig.
5, b)
5) Mode indicator: Cool down
6) Temperature indicator: Shows the current heat output setting
(see Fig. 5)
7) Temperature selector: Increases the temperature (+)
8) Temperature selector: Decreases the temperature (-)
Temperature Guide LED display
Description
C
F
95º
200º
C
F
205º
400º
C
F
260º
500º
C
F
425º
800º
C
F
540º
1000º
C
F
650º
1200º
C
F
565º
1050º
C
F
510º
950º
C
F
400º
750º
C
F
290º
550º
C
F
175º
350º
C
F
65º
150º
5a
Air ow mode: Low
Temperature range: 150
o
F
- 1050
o
F
Cycle temperatures: See
Fig. 4, #7 & #8
= Illuminated
= not
illuminated
Air ow mode: High
Temperature range: 200
o
F
- 1200
o
F
Cycle temperatures: See
Fig. 4, #7 & #8
= Illuminated
= not
illuminated
C
F
95º
200º
C
F
205º
400º
C
F
260º
500º
C
F
425º
800º
C
F
540º
1000º
C
F
650º
1200º
C
F
565º
1050º
C
F
510º
950º
C
F
400º
750º
C
F
290º
550º
C
F
175º
350º
C
F
65º
150º
5b

8
EN
Cool Down Mode (Fig. 6)
C
F
95º
200º
C
F
205º
400º
C
F
260º
500º
C
F
425º
800º
C
F
540º
1000º
C
F
650º
1200º
6
While the heat gun is
operating, press the power
button once to enter cool
down mode. When cool down
mode is entered, the gun
will run for 3 minutes with
maximum air ow. During this
period, the blue cool down
light will illuminate to indicate
cooling. To override cool down
mode, press and hold the
power button for 2-3s.
Startup
1. Plug the unit into a standard wall outlet.
2. Turn on the heat gun by pressing the power button on the Control
Panel (Fig. 4, 1). When the gun is turned on, it is automatically set
in the low temperature range (Fig. 5, a) at 150ºF and a low air ow
setting.
3. If you wish to continue working within the low temperature range,
simply press the plus or minus button on the touch pad until your
desired temperature setting is selected, this will be indicated by
the temperature bar being lit.
4. If you wish to operate within the high temperature range and high
air ow setting, press the Mode Selector button (Fig. 4, 2) once. The
high temperature range indicator light will turn on. You can now
simply press the plus or minus button on the touch pad until you
reach your desired temperature setting, this will be indicated by
the temperature bar being lit.
IMPORTANT: If the blower motor in the heat gun does not turn
on when the POWER button is activated, turn the switch OFF
immediately. The heating element will burn out if it is not cooled by
the blower.
5. During rest periods or when you are nished with your project,
press the power button to enter cool down mode.
6. Set the gun down in an upright position. The heat gun will shut
itself o after 30 seconds.
Following cool down mode the barrel of the heat gun
may still be hot.
Note: Smoke may appear during the initial start up due to
the burning of manufacturing oils. The smoke should
disappear in less than a minute.

9
EN
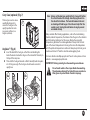
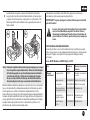
Carry Case (optional) (Fig. 7)
7
The heat gun case has been
specically designed to
secure the heat gun in the
upright position for work
on uneven surfaces (see
AngleLoc, below).
AngleLoc™ (Fig. 8)
A: Insert the back of the heat gun so that the rear stabilizing ns
locate themselves below the ridges on the side wall of the cavity in
the top of the carry case.
B: Then slide the heat gun forward so that it naturally locks into place
at a 135 degree angle. The heat gun should now be secure for
upright use.
8a
8b
Note: Always set the heat gun upright after it is turned o, either
for a short break or for storage. Avoid laying the unit on
the side after shutdown. The heat will remain in the unit
and cooling will take longer. Store the unit only after the
nozzle is cool. Unplug the unit before storing to prevent
accidental startup.
Many variables aect heating applications, such as the material being
heated, ambient temperature, the distance from the gun to the substrate
and the heating technique. For this reason, Wagner has provided
temperature guidelines for certain applications. Always start the heat
gun at the lowest temperature in the range then raise the temperature
until the optimum temperature is achieved. Always keep the heat gun in
motion and at least 2” from the substrate when applying heat.
For more details on multiple projects and ‘how to’ videos please visit our
website - www.wagnerspraytech.com.
IMPORTANT: Always protect glass when working near windows.
Do not touch nozzle or the scraper blade when working.
These become extremely hot and will cause severe burns.
Wear gloves to protect hands from hot scrapings.

10
EN
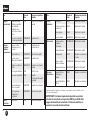
Heating Guidelines
The heat gun is one of the most versatile tools you can own. It can be used
for a great variety of projects, from big DIY to small Art & Crafts jobs.
Use Heat Setting Nozzle Tip Options*
DIY Stripping paint HIGH Concentrator or Flare
Wall repair LOW/MED Open (no tip)
Drying paint LOW/MED Open (no tip)
Soften adhesives to
remove oor tiles
LOW/MED Flare
Bend plastic,
plexiglass, formica
LOW/HIGH Open / Concentrator
Removing formica
and linoleum
LOW/MED Flare
Soften paint, caulking
and putty for easier
removing (use heat
shield)
HIGH Concentrator or Flare
Shrink plastic lm
for wrapping or
weatherproong
LOW/MED Flare
Small jobs
(including
repair)
Loosen rusted nuts,
bolts and ttings
HIGH Open / Concentrator
Removing adhesives LOW/MED Open (no tip)
Waxing skis/
snowboard
LOW/MED Flare
Glass ber work MED / HIGH Concentrator or Flare
Use Heat Setting Nozzle Tip Options*
Small jobs
(including
repair)
Unfreezing pipes LOW Curved Deector
Lighting a BBQ grill HIGH Concentrator / BBQ
Nozzle
Heat concrete prior to
patching
LOW/HIGH Concentrator
Defrosting
refrigerator / freezer
LOW/MED Open (no tip)
Arts & Crafts Making candles LOW Open (no tip)
Making soap LOW Open (no tip)
Shrink wrapping
presents
LOW Open (no tip)
Forming foam LOW Open (no tip)
Cookie decoration LOW/HIGH Open (no tip)
Automotive Removing stickers,
emblems and decals
LOW/MED Open (no tip)
Removing dents MED / HIGH Open (no tip)
Removing paint HIGH
Concentrator or Flare
Applying and
removing window
tint
LOW/MED Open (no tip)
Restoring bumpers MED / HIGH Open (no tip)
Electronics Smartphone & tablet
repair
LOW Concentrator
PlayStation and Xbox
repair
LOW Concentrator

11
EN
*Nozzle tips may not be included with your heat gun. See Accessories page 12.
IMPORTANT: If the blower motor in the heat gun does not turn on
when the switch is set to either LOW or HIGH, turn the switch OFF
immediately. The heating element will burn out if it is not cooled by
the blower.
Stripping Paint
IMPORTANT: Read the general operating and safety information
sections of this owner’s manual before using the heat gun.
The heat gun heats up the surface and causes the paint to soften, at which
time it can be scraped o easily without damaging the surface. Some
paints may soften even though they do not blister; some may become
rubbery, and some may require higher heat.
When working with several layers of paint, it speeds up the scraping process
to heat the surface thoroughly, all the way to the wood. Then all the layers
can be scraped at one time.
A soft wire brush may be the best tool to use for very intricate surfaces.
Mineral paints and nishes, such as cement paint and porcelain, do not
soften with heat, so using a heating tool will not work for paint removal.
The best method of paint removal
ABCD
Move the gun slowly and steadily
forward at an angle to the surface,
pointing the nozzle in the direction of
motion. This allows you to scrape safely
outside the hot air stream and keeps
the scraper and the scraped surface
cooler.
A. Warm air preheats the
surface.
B. Paint is softened by hot air.
A + B. Deep penetration of heat over total area.
C. Paint can be easily scraped o as soon as it is softened and the
gun is moved forward.
D. Stripped surface allowed to cool.
Note: Do not use the heat gun on surfaces that can be damaged
by heat, such as vinyl-coated paneling, siding or window
frames.
When removing paint from window frames, the heat gun
will soften the putty. Be careful not to gouge the putty with
the scraper. The putty will rm up after it cools.
Do not use the heat gun on insulating laminated window
glass such as Thermopane. The glass edge expansion may
break the edge seal.
When scraping fascia, do not overheat the edges of the
asphalt shingles protruding over the edge of the sheathing.
Too much heat will melt the asphalt.
IMPORTANT: The removal of paint by heat gun is safe if the above
guidelines are used, but always keep either a container of water or
an ABC re extinguisher (suitable against class A, B and C type res)
within reach.
Cleaning and Maintenance
Keep the intake openings on the housing clean and free of obstructions.
Us a soft, dry brush to clean the openings periodically. Use only mild soap
and a damp cloth to clean the heat gun. Many household cleaners contain
chemicals which could seriously damage the housing.
Do not use gasoline, turpentine, lacquer or paint thinner, dry cleaning
uids or similar products when cleaning the heat gun. Never allow any
liquid to get inside the tool or immerse any part of the tool into a liquid.

12
EN
Storage
Allow the heat gun nozzle to cool to room temperature before placing in
storage.
The nozzle will turn dark over time because of the high heat. This is
normal and will not aect the performance or life of the unit.
Accessories
The following accessories may come with the heat gun or may be
purchased separately by calling 1-800-727-4023.
Concentrator
P/N 2366222
Directs a concentrated
heat ow to the
work surface. Ideal
for removing paint
in awkward corners,
crevices, mouldings,
beading or architraves.
Glass Protector
P/N 2366224
Deects the heat
away from glass or
other fragile areas.
Ideal for window
sills, ledges, frames
and skirting
boards.
Flare
P/N 2366223
Directs a long, narrow
heat pattern to the
work surface. Ideal
for removing paint
or varnish from large,
at surfaces such as
skirting boards, doors,
stairs, etc. It should be
used in conjunction
with a at scraper.
Curved Deector
P/N 2366225
Disperses the heat
ow evenly around
the whole work
surface. Ideal for
thawing frozen
pipes, solder pipe
work, bending
plastics or heat
shrinking electrical
insulating tubing.
1
4
23
5-in-1 tool
P/N 2366227
The blade (1) is used to scrape paint
and spread compound. The gouge
point (2) is used to remove putty/caulk
and the curved area (3) is used to clean
roller covers. Flat side (4) can also be
used to open paint cans.
Case
P/N 2366226
The heat gun case has been specically
designed to locate the heat gun in the
upright position for work on uneven
surfaces.
IMPORTANT: Always use gloves when handling the heat gun.
To attach a nozzle to the gun:
1. Set the heat gun upright on a level surface until the tip is cool.
2. Set the item onto the tip of the heat gun and push rmly into place
by hand.
To remove a nozzle:
1. Set the heat gun upright on a level surface until the tip is cool.
2. Pull the item o of the tip.

FURNO
™
550
PISTOLET À AIR
CHAUD À ÉCRAN DEL
GUIDE D‘UTILISATION
F
Double
isolation
Lire toutes les directives et les étiquettes
de produits. Suivre toutes les mesures
de sécurité lors de l’utilisation d’outils
électriques an de réduire tout risque
d’incendie, de choc électrique ou de blessure.
Model No. 2363334

14
Importantes consignes de sécurité
Lire toutes ces consignes avant d’utiliser l’appareil. GARDER CES CONSIGNES.
GARDER CES CONSIGNES
F
Pour réduire les risques d’incendie ou d’explosion, de choc électrique
et de blessure, vous devez lire et comprendre les directives gurant
dans ce manuel. Familiarisez-vous avec les commandes et l’utilisation
adéquate de l’équipement.
Indique une situation à risque, laquelle, si elle n’est pas
évitée, peut entraîner des blessures graves, voire la mort.
RISQUE D’EMPOISONNEMENT
Il est essentiel de faire preuve d’une extrême prudence lors
du décapage d’une surface peinte. Les pellicules, les résidus
et les émanations de peinture peuvent contenir du plomb, un
produit toxique. Toute peinture ayant été appliquée sur des
maisons avant 1950 est susceptible de contenir du plomb;
et toute peinture ayant été fabriquée avant 1977 peut aussi
contenir du plomb. Une fois que la peinture est déposée
sur une surface, le fait de porter la main à la bouche peut
entraîner l’ingestion d’une quantité de plomb. Cette quantité,
si minime soit-elle, peut causer des dommages irréversibles
sérieux au cerveau ou au système nerveux. Les jeunes enfants
et les foetus sont particulièrement vulnérables à ce type
d’empoisonnement.
Avant de commencer tout décapage d’une surface peinte,
il est essentiel de vérier si la peinture contient du plomb.
Cette opération peut être eectuée par un service de la
santé local, ou par un professionnel, à l’aide d’un analyseur
de peinture servant à vérier le contenu en plomb de
la peinture. LES PEINTURES CONTENANT DU PLOMB NE
DOIVENT ÊTRE ENLEVÉES QUE PAR UN PROFESSIONNEL; LE
PISTOLET À AIR CHAUD NE PEUT ÊTRE, DANS UN TEL CAS,
UTILISÉ.
MESURES PRÉVENTIVES :
• Déplacer l’objet à décaper à l’extérieur. Si cela n’est pas possible,
s’assurer que la zone de travail reçoit un bon apport d’air. Ouvrir
les fenêtres et placer un ventilateur d’évacuation à l’intérieur de
l’une d’elles. S’assurer que le ventilateur déplace l’air de l’intérieur à
l’extérieur.
• Enlever ou recouvrir tout tapis, toute carpette, tout meuble, tout
vêtement, tout ustensile de cuisine et tout conduit d’air.

15
Importantes consignes de sécurité
Lire toutes ces consignes avant d’utiliser l’appareil. GARDER CES CONSIGNES.
GARDER CES CONSIGNES
F
• Placer des toiles de protection à l’intérieur de la zone de travail,
an de recueillir toute pellicule ou tout éclat de peinture. Porter
des vêtements de protection, tels qu’une chemise de travail
supplémentaire, une combinaison et un chapeau.
• Ne travailler que dans une seule pièce à la fois. Les meubles
doivent être retirés ou placés au centre de la pièce et recouverts. La
pièce dans laquelle s’eectue le travail doit être isolée du reste de
l’édice à l’aide de toiles de protection placées sur les portes.
• Les enfants, les femmes enceintes ou possiblement enceintes, ainsi
que les mères qui allaitent, ne doivent pas pénétrer dans la pièce
tant et aussi longtemps que le travail n’est pas terminé et que le
nettoyage n’a pas été eectué.
• Porter un masque anti-poussière ou un masque à deux ltres
contre la poussière et les émanations, ayant été approuvé par
l’Occupational Safety and Health Administration (OSHA), le
National Institute of Safety and Health (NIOSH), ou le United States
Bureau of Mines. Ces masques, ainsi que les ltres jetables, peuvent
être facilement obtenus chez les principaux quincailliers. S’assurer
que le masque s’adapte bien aux formes du visage. La barbe et
les poils faciaux peuvent empêcher le masque de bien adhérer au
visage. Changer les ltres régulièrement. LES MASQUES EN PAPIER
JETABLES NE SONT PAS ACCEPTÉS.
• Faire preuve de prudence lors de l’utilisation du pistolet. Garder
ce dernier constamment en mouvement, étant donné qu’une
chaleur excessive engendre des vapeurs pouvant être inhalées par
l’opérateur.
• Conserver toute nourriture et tout breuvage à l’extérieur de la
pièce où s’eectue le travail. Se laver les mains, les bras et le visage,
et se rincer la bouche avant de manger ou de boire. Ne pas fumer
ou mastiquer de la gomme à mâcher ou du tabac dans la pièce
dans laquelle on eectue le travail.
• Enlever tous les résidus de peinture et toute la poussière en
essuyant le plancher à l’aide d’un balai à franges humide. Utiliser
aussi un linge humide pour nettoyer tous les murs, tous les rebords
et toute autre surface pouvant comporter des résidus de peinture.
NE PAS BALAYER, ÉPOUSSETER OU UTILISER D’ASPIRATEUR. Au
cours de l’opération de nettoyage, utiliser un détergent à haute
teneur de phosphate trisodique.
• À la n de chaque session de travail, placer les éclats et les débris
de peinture dans un sac en plastique double, le fermer à l’aide
d’un ruban adhésif ou d’attaches, puis en disposer d’une manière
adéquate.
• Retirer les vêtements de protection et les chaussures de travail
avant de quitter la zone de travail, an d’éviter de transporter de la
poussière dans le reste de l’édice. Laver les vêtements de travail
séparément. Essuyer les chaussures avec un linge humide, puis les
laver avec les vêtements de travail. Se laver les cheveux et le corps
entièrement avec de l’eau et du savon.

16
Importantes consignes de sécurité
Lire toutes ces consignes avant d’utiliser l’appareil. GARDER CES CONSIGNES.
GARDER CES CONSIGNES
F
RISQUE D’EXPLOSION OU D’INCENDIE
Le pistolet à air chaud génère des températures
extrêmement élevées (pouvant atteindre 1300°F, ou 704°C).
Il doit donc être utilisé avec prudence, an d’éviter toute
inammation de matériau combustible.
MESURES PRÉVENTIVES :
• Garder le pistolet constamment en mouvement. Ne pas s’arrêter ou
s’attarder à un endroit précis.
Panneaux
Sotes
Mur
intérieur
Re
vêtements
extérieurs
• Agir avec une extrême
prudence lorsque la partie
se trouvant à l’arrière
du matériau devant être
enlevé est inaccessible, tel
le revêtement extérieur
d’une maison. Endroits
cachés tels que derrière les
murs, plafonds, planchers,
planches d’intrados
et d’autres panneaux
peuvent contenir des matériaux inammables qui pourraient être
allumées par le pistolet thermique lorsque l’on travaille dans ces
endroits. L’allumage de ces matériaux peut ne pas être évident et
pourrait entraîner des dommages matériels et des blessures à des
personnes. Lorsque vous travaillez dans ces endroits, garder le
pistolet à air chaud se déplaçant dans un mouvement de va-et-
vient. Persistante ou la pause dans un endroit pourrait enammer
le panneau ou de la matière derrière elle.
• Ne pas utiliser l’appareil à proximité de surfaces présentant
des ssures ou à proximité de conduits en métal ou de bandes
d’étanchéité. La chaleur peut traverser la surface de travail et
enammer le matériau caché. L’inammation d’un matériau
caché n’étant pas toujours facile à déceler, des blessures ou des
dommages matériels peuvent en résulter.
• Ne pas utiliser d’outils électriques à proximité de liquides ou de gaz
inammables.
• Ne pas utiliser l’appareil à proximité de matériaux combustibles,
tels que de l’herbe ou des feuilles sèches, ou encore, du papier,
étant donné que ces derniers peuvent s’enammer rapidement.
• La buse devient très chaude. Par conséquent, ne pas déposer le
pistolet sur des surfaces inammables lors de son utilisation ou
immédiatement après l’avoir arrêté. Toujours déposer le pistolet
sur une surface plate et de niveau de façon que le bec de la buse
soit dirigé vers le haut et, de par le fait même, éloigné de la surface.
• Ne pas toucher la buse avant que l’outil ne soit refroidi.
• Ne pas utiliser le pistolet en tant que séchoir à cheveux.
• Les outils et les raclures de peinture deviennent très chauds. Pour
éviter toute brûlure, porter des gants de travail et une protection
oculaire lors de l’opération de raclage.
• Toujours traiter les unités d’air chaud avec la même précaution que
s’il s’agissait d’une amme nue.
• Un incendie pourrait être déclenché si l’appareil n’est pas utilisé
avec prudence :
– Faire attention pendant l’utilisation de l’appareil à des endroits
où il y a des matières combustibles;
– Ne pas laisser au même endroit pendant longtemps;
– Ne pas utiliser en présence d’un atmosphère explosif;
– Il faut savoir que la chaleur peut atteindre des matières
combustibles hors de la vue;
– Placer l’appareil sur son support après l’utilisation pour le laisser
refroidir avant de le ranger;
– Ne pas laisser l’appareil sans surveillance lorsqu’il est allumé.

17
Importantes consignes de sécurité
Lire toutes ces consignes avant d’utiliser l’appareil. GARDER CES CONSIGNES.
GARDER CES CONSIGNES
F
RISQUES AU NIVEAU DES ÉLÉMENTS ÉLECTRIQUES
Peut causer des dommages matériels, des blessures graves
ou même mortelles.
MESURES PRÉVENTIVES :
• Ne démontez pas le pistolet à air chaud.
• Ne pas travailler dans un endroit humide ou exposer le pistolet à la
pluie.
• Se protéger contre les chocs électriques en évitant tout contact du
corps avec des éléments mise à la terre, telles que des conduits, des
radiateurs, des cuisinières, des échelles en aluminium, ou tout autre
dispositif mis à la terre.
• Ne pas faire un usage abusif du cordon électrique. Ne jamais
transporter le pistolet à l’aide du cordon électrique, ou tirer sur ce
dernier pour débrancher l’appareil. Garder le cordon électrique
éloigné des sources de chaleur, des contenants d’huile ou des
arêtes vives. Vérier régulièrement le cordon, an de s’assurer que
ce dernier n’est pas usé ou endommagé.
• N’utiliser que les rallonges appropriées à un usage extérieur. Si une
rallonge est endommagée ou autrement inadéquate, la remplacer.
• AVERTISSEMENT - An d’éviter tout risque d’électrocution, nepas
exposer à l’eau de pluie. A stocker à l’intérieur. Lire le manual de
l’utilisateur avant chaque utilisation.
• Si le cordon d’alimentation est endommagé, il doit être remplacé
par le fabricant, son agent de service ou une personne qualiée
an d’éviter tout danger.
RISQUES D’ORDRE GÉNÉRAL
Peut causer des dommages matériels ou des blessures
graves.
MESURES PRÉVENTIVES :
• Ne dirigez pas l’outil chauant sur vous-même, les autres ou les
animaux.
• Toujours débrancher le pistolet à air chaud lorsque ce dernier n’est
pas utilisé. L’entreposer à l’intérieur dans un endroit sec et hors de
la portée des enfants.
• Maintenir la zone de travail propre et assurer un bon éclairage.
• Ne pas trop étirer le corps, surtout lorsque l’on travaille sur une
échelle. Se maintenir dans une position stable en tout temps.
S’assurer que les échelles sont solides, ou la terre rme, bien en
équilibre et érigées sur une surface plate et à un angle sécuritaire.
• Éviter les ls électriques.
• Garder les articles amovibles stables et en lieu sûr lors de
l’opération de décapage.
• Toujours utiliser des lunettes de protection au cours de l’opération.
• Toujours être vigilant et faire preuve de jugement lors de
l’utilisation de n’importe quel outil.
• Toujours utiliser buse déecteur incurvé (P/N 2366225) pour
dégeler des tuyaux. NE JAMAIS utiliser pour dégeler des tuyaux
situés à l’intérieur des murs ou près de combustibles.
• Cet appareil n’est pas destiné à être utilisé par des personnes (y
compris des enfants) ayant des capacités physiques, sensorielles
ou mentales réduites, ou un manque d’expérience ou de
connaissances, à moins qu’elles soient supervisées ou qu’elles
aient reçu des consignes concernant l’utilisation de l’appareil d’une
personne responsable pour leur sécurité.

18
Importantes consignes de sécurité
Lire toutes ces consignes avant d’utiliser l’appareil. GARDER CES CONSIGNES.
GARDER CES CONSIGNES
F
• Les enfants devraient être supervisés an de faire en sorte qu’ils ne
jouent pas avec l’appareil.
MISE EN GARDE!
Certains fragments, résidus, poussières et vapeurs
engendrés par l’enlèvement de peinture contiennent des
produits chimiques que l’état de la Californe reconnaît
comme générateurs d’anomalies congénitales ou de
troubles reproductifs. On peut notamment penser à
l’élément principal des peintures à base de plomb, en
présence desquelles on ne doit pas utiliser de décamper
thermique. Les risques varient en fonction de la fréquence
et du degré d’exposition; pour réduire ce dernier, on doit
toujours travailler dans un endroit bien ventilé et être muni
d’équipment de sécurité approuvé, comme un masque
antipoussières spécialment conçu pour ltrer les particules
microscopiques.
Pour plus d’informations, rendez-vous à www.
P65warnings.ca.gov
Renseignements importants sur l’électricité
Utilisez uniquement une rallonge qui acceptera la che du produit.
S’assurer que la rallonge est en bon état. S’assurer également que cette
dernière convient au courant consommé par l’appareil. Une rallonge de
calibre inférieur produirait une perte de tension, entraînant une perte
de puissance et une surchaue de l’appareil. Un cordon de type SJT est
nécessaire. Cordon doit être 14 AWG minimum pour un usage général à
l’intérieur.
Le pistolet à air chaud est muni d’une che polarisée. Une pale est plus
large que l’autre. An de réduire le risque de choc électrique, la che a été
conçue pour se brancher dans une prise polarisée d’une seule manière.
Si vous ne pouvez insérer la che à fond dans la prise, inversez-la. Si elle
ne s’enfonce toujours pas correctement, consultez un électricien qualié.
Veillez n’apporter aucune modication à la che. Lors de l’entretien,
utiliser uniquement des pièces de rechange identiques. Contactez
WAGNER pour un cordon de remplacement.

19
Importantes consignes de sécurité
Lire toutes ces consignes avant d’utiliser l’appareil. GARDER CES CONSIGNES.
GARDER CES CONSIGNES
F
Description générale
Le pistolet à air chaud est un outil électrique de qualité. Comme tout
autre outil électrique, une utilisation non adéquate de l’appareil pourrait
s’avérer dangereuse. Il est donc important de lire attentivement les
directives présentées ci-dessous et de respecter toutes les mesures
de sécurité indiquées. Il incombe au propriétaire d’utiliser cet appareil
correctement. L’utilisation du pistolet à air chaud est réservée
uniquement aux personnes adultes.
Spécications
Boitier: ....................fabrication en polymère hautement résistant à la
corrosion et à la chaleur
Tension: ..................1 500 W en régime élevé et 150 W en régime lent
Chaleur émise: ..... environ 648°C (1 200°F) en régime élevé et 66°C (150°F)
en régime lent
Poids: .......................0,88 kg (1,95 lb)

20
F
Utilisation du Pistolet à Air Chaud
Toujours lire les consignes de
sécurité incluses dans le présent
manuel avant d’utiliser le pistolet
à air chaud.
Description du composant (g. 1)
1) Écran DEL graphique et panneau de
commande
2) Anneau
3) Cordon amovible avec stabilisateurs
intégrés
4) Bavures stabilisatrices arrière (support)
5) Barres latérales pour empêcher la buse de
toucher la surface
6) Écran thermique
1
3
4
2
6
5
1
Fixation du cordon d’alimentation
(g. 2)
Le cordon d’alimentation (g. 2, 1) du pistolet à
air chaud est livré séparé du pistolet (g. 2, 2).
Pour le xer, aligner le cordon près de la rainure
faisant face vers l’avant avec l’emboîtement
sur la poignée du pistolet et pousser les pièces
ensemble jusqu’à ce qu’un déclic soit entendu.
Cela attachera le cordon de façon permanente. Il
ne peut pas être retiré une fois installé.
1
2
2
Fonctionnement mains libres (Fig. 3)
Le pistolet à air chaud dispose d’un support
intégré pour les applications sur table et le
refroidissement.
3
Page is loading ...
Page is loading ...
Page is loading ...
Page is loading ...
Page is loading ...
Page is loading ...
Page is loading ...
Page is loading ...
Page is loading ...
Page is loading ...
Page is loading ...
Page is loading ...
Page is loading ...
Page is loading ...
Page is loading ...
Page is loading ...
Page is loading ...
Page is loading ...
Page is loading ...
Page is loading ...
Page is loading ...
Page is loading ...
Page is loading ...
Page is loading ...
-
 1
1
-
 2
2
-
 3
3
-
 4
4
-
 5
5
-
 6
6
-
 7
7
-
 8
8
-
 9
9
-
 10
10
-
 11
11
-
 12
12
-
 13
13
-
 14
14
-
 15
15
-
 16
16
-
 17
17
-
 18
18
-
 19
19
-
 20
20
-
 21
21
-
 22
22
-
 23
23
-
 24
24
-
 25
25
-
 26
26
-
 27
27
-
 28
28
-
 29
29
-
 30
30
-
 31
31
-
 32
32
-
 33
33
-
 34
34
-
 35
35
-
 36
36
-
 37
37
-
 38
38
-
 39
39
-
 40
40
-
 41
41
-
 42
42
-
 43
43
-
 44
44


Ask a question and I''ll find the answer in the document
Finding information in a document is now easier with AI
in other languages
Related papers
-
WAGNER Furno 500 Heat Gun User manual
-
-
-
-
-
-
-
-
-
Other documents
-
-
Leister 162.263 User manual
-
Genesis GHG350 Compact Heat Gun User guide
-
Stanley STEL670 User manual
-
-
MasterCraft 54-6505-6 Owner's manual
-
Ryobi HG500 User manual
-
Genesis GHG1500A User manual
-
Milwaukee MHT3300 Owner's manual
-
Makita HG6030 User manual