
TV Wireless Headphones
Item No. 201771
Introduction
Congratulations on your purchase of the Sharper Image TV Wireless Headphones. Thanks to the
latest FM Wireless technology, you will soon be enjoying great audio quality with complete
freedom of movement. Please read this guide to install and use the equipment properly, and keep
it for future reference.
Important
Before using the TV Wireless Headphones for the first time, please ensure that the batteries are
fully charged for about 16 hours. This will guarantee a longer operating lifetime of the batteries.
General Information
Function and Capability
1. RF/FM wireless transmission
The transmitter sends the stereo audio signal from your audio or video source to the headphones
without wires. The headphones receive the signals through walls, doors and windows. The
headphones use high radio frequency as the signal carrier, ensuring clear and crisp reception.
Multiple headphones can be used at the same time with a single transmitter.
2. Automatic rechargeable system
The transmitter automatically recharges the rechargeable batteries in the headphones. Simply
place the headphones on the transmitter with the recharging contact on the transmitter and
headphones connected. The green LED will light up during recharging. After the batteries are
fully charged, the green LED light will turn off.
3. Volume control
A volume controller is located on the left headphone. Simply adjust the knob for desired volume
level.
4. Applications
The RF/FM Wireless Stereo Headphone System is compatible with TVs, stereo systems, VCRs,
DVD players, CD players, MP3 players, iPods, computers and all other audio and video
equipment.

Contents
1 x Transmitter
1 x Headphone Receiver
1 x 3.5mm Stereo Plug to 2 x RCA Audio Cable
1 x 3.5mm Stereo Plug Audio Cable
1 x AC 220V, DC5V, 300 ma. Adapter
Controls
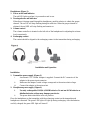
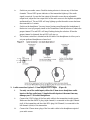
Transmitter (Figure 1)
1. Level indicator
The red LED lights up when audio signals are detected.
2. Recharging indicator
The green LED will light up during recharging. When the recharging is completed, the green
LED will turn off.
3. Recharging contact
When not in use, the headphones should be stored on the transmitter and aligned to this
contact for recharging.
4. Tuning selector
This is for selecting one of the three pre-set channels for best reception.
5. DC Socket
The DC5V. 300 ma. external adapter provided should be connected to this socket to obtain
power.
6. Connection Method 1: RCA audio output jacks
TV Wireless Headphones can be connected to an audio source from RCA audio outputs.
Simply use the included RCA to 3.5mm cable.
7. Connection Method 2: Headphone output jack
8. TV Wireless Headphones can be also be connected to an audio source from its headphone
output jack. Use the included RCA to 3.5mm cable OR the 3.5mm to 3.5 mm cable.
Figure 1

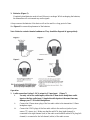
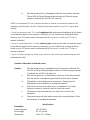
Headphones (Figure 2)
1. Power switch and indicator
The red LED lights up when it is powered on and in use.
2. Turning selector and indicator
When there is hissing sound through the headphones, push the selector to obtain the proper
channel. The red LD will keep flashing during the selection. When the proper channel is
obtained, the red LED will stop flashing and remain on.
3. Volume control
The volume controller is situated on the left side of the headphones for adjusting the volume
level conveniently.
4. Recharging contact
The contact should be aligned to the recharging contact in the transmitter during recharging.
Installation and Operation
Installation
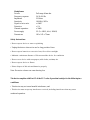
1. Transmitter power supply (Figure 3)
i. An external C 5V. 300ma. Adapter is supplied. Connect the DC connector of the
adaptor to the power input connector.
ii. Make sure the adaptor’s rated voltage corresponds to the main socket voltage.
iii. Connect the adapter to the main socket.
2. Headphones power supply (Figure 4)
i. Use only rechargeable LR03/AA/NiMH batteries. Do not use NiCd batteries or
alkaline batteries as these may damage your device.
ii. The power button should be in the off position.
Place the headphones on the transmitter with the recharging contact on the transmitter and
headphones connected. The green LED light will light up during recharging. After the batteries
are fully charged, the green LED light will turn off.

3. Batteries (Figure 5)
Completely dead batteries need at least 16 hours to recharge. While recharging the batteries,
the transmitter will not transmit any audio signals.
Always remove the batteries if the device will not be used for a long period of time.
See Figure 6 for removal/replacement of the batteries.
Note: Batteries contain chemical substances. They should be disposed of appropriately.
Operation
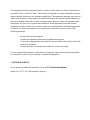
1. Audio connection Option 1: RCA output to 3.5 mm input (Figure 7)
i. Use only one of the audio inputs, either the 3.5mm stereo headphone audio
input or the line audio input. Using both audio inputs at the same time may
damage your TV Wireless Headphones.
ii. Connect the 3.5mm stereo plug of the line audio cable to the transmitter’s 3.5mm
headphone input.
iii. Connect the 2 RCA plugs of the line audio cable to the audio out jacks of your
source (TV, stereo, etc.). Make sure that the red RCA plug (right channel) is
connected to the right channel (red) of the audio source and the white RCA plug (left
channel) is connected to the left channel (white) of the audio source.

iv. Switch on your audio source. Push the tuning selector to choose any of the three
channels. The red LED power indicator of the transmitter lights up if the audio
signal is received. In case the line output of the audio source has an adjustable
output level, adjust the line output level of the audio source to the highest acceptable
undistorted level. The red LED will stop lighting up after the audio source has been
disconnected for 1 minute.
v. Switch on the headphone. You may hear a hissing sound through the headphones if
the device is not yet properly tuned to the Transmitter. Push the selector to obtain the
proper channel. The red LED will keep flashing during the selection. When the
proper channel is obtained, the red LED will stay on.
vi. The volume controller is situated on the left side of the headphones to allow you to
set your preferred headphone volume level.
2. Audio connection Option 2: 3.5mm output to RCA input (Figure 8)
i. Use only one of the audio inputs, either the 3.5mm stereo headphone audio
input or the line audio input. Using both audio inputs at the same time may
damage your TV Wireless Headphones.
ii. Connect the 2 RCA plugs of the line audio cable to the transmitter’s audio inputs.
Make sure that the red RCA plug (right channel) is connected to the right Channel
(red) of the transmitter and the white RCA plug (left Channel) is connected to the
left channel (white) of the transmitter.
iii. Connect the 3.5mm stereo plug of the line audio cable to the headphone output of
your audio source.

iv. Switch on your audio source. Push the tuning selector to choose any of the three
channels. The red LED power indicator of the transmitter lights up if the audio
signal is received. In case the line output of the audio source has an adjustable
output level, adjust the line output level of the audio source to the highest acceptable
undistorted level. The red LED will stop lighting up after the audio source has been
disconnected for 1 minute.
v. Switch on the headphone. You may hear a hissing sound through the headphones if
the device is not yet properly tuned to the Transmitter. Push the selector to obtain the
proper channel. The red LED will keep flashing during the selection. When the
proper channel is obtained, the red LED will stay on.
vi. The volume controller is situated on the left side of the headphones to allow you to
set your preferred headphone volume level.
3. Audio connection Option 3: 3.5mm output to 3.5mm input (Figure 9)
i. Use only one of the audio inputs, either the 3.5mm stereo headphone audio
input or the line audio input. Using both audio inputs at the same time may
damage your TV Wireless Headphones.
ii. Connect the 3.5mm stereo plug of the audio cable to the transmitter’s audio input.
iii. Connect the 3.5mm stereo plug of the audio cable to the headphone’s output of your
audio source.
iv. Switch on your audio source. Push the tuning selector to choose any of the three
channels. The red LED power indicator of the transmitter lights up if the audio
signal is received. In case the line output of the audio source has an adjustable

output level, adjust the line output level of the audio source to the highest acceptable
undistorted level. The red LED will stop lighting up after the audio source has been
disconnected for 1 minute.
v. Switch on the headphone. You may hear a hissing sound through the headphones if
the device is not yet properly tuned to the Transmitter. Push the selector to obtain the
proper channel. The red LED will keep flashing during the selection. When the
proper channel is obtained, the red LED will stay on.
vi. The volume controller is situated on the left side of the headphones to allow you to
set your preferred headphone volume level.
Troubleshooting
Question: When there is no sound
Remedy: i. The batteries in the headphones are running low. Simply place the
Headphones on the transmitter to recharge the batteries.
ii. You should check if the audio source is switched on.
iii. You should check if the volume is too low. Adjust the volume to obtain the
right level of sound.

iv. Push the tuning selector on headphones until the clear sound is obtained.
The red LED will keep flashing during the selection. When the proper
channel is obtained, the red LED will remain lit.
NOTE: On some newer TV sets, it may be necessary to turn on or increase the volume of the
headphone jack the audio out jack. Consult the instruction manual of your TV to adjust these
settings.
• If you are connected to the TV via the headphone jack, make sure the headphone jack is turned
on and that the output level is turned up. (Normally, you can check this by pressing the Menu
button on your TV remote control and entering the Set-Up menu. Consult your TV owner’s
manual for details.)
• If you are connected to the TV via the audio out jacks, make sure the audio out jacks are turned
on and that the output level is turned up. (Normally, you can check this by pressing the Menu
button on your TV remote control and entering the Set-Up menu. Consult your TV owner’s
manual for details.)
• If you are still not getting any sound, try the alternate cable connection method using the other
included audio cable.
Question: When there is distorted sound
Remedy: i. Push the tuning selector on headphone until clear sound is obtained. The
red LED will keep flashing during the selection. When the proper channel
is obtained, the red LED will remain lit.
ii. Push the tuning selector on transmitter to select any of the three channels.
Push the selector on headphone again until the clear sound is obtained.
iii. The batteries in the headphones are running low. Simply place the
Headphones on the transmitter to recharge the batteries.
iv. Check if the volume on the audio source or headphones is too high.
Adjust the volume to obtain the right level and clear sound.
v. The distance from the transmitter is too large. Move closer to the
transmitter.
vi. Fluorescent lamps and other audio sources may cause interference. Move
the transmitter or headphones elsewhere.
Specifications
Transmitter
Carrier frequency 914, 915 MHz
Power supply DC 5V 300 ma.
Dimensions 148 x 107 x 102mm

Headphones
Drivers Full range 40mm dia.
Frequency response 20-20,000 Hz
Impedance 32 Ohms
Sensitivity 105dB @ 1KHz
Signal-to-noise ratio > 60dB
Distortion < 1%
Channel separation > 30dB
Power supply 3V (2 x LR03, AAA, NiMH)
Dimensions 185 x 165 x 75mm
Safety Instructions
• Do not expose device to water or splashing
• Unplug the device when not in use for long periods of time
• Do not expose batteries to excessive heat, fire or direct sunlight
• Maintain a minimum distance of 50cm around the device for ventilation
• Do not cover device with newspapers, table cloths, curtains, etc.
• Do not expose device to flames
• Please dispose of this unit and batteries properly
Note: Excessive volume can cause hearing loss
The device complies with Part 15 of the FCC rules. Operation is subject to the following two
conditions:
• This device may not cause harmful interference, and
• This device must accept any interference received, including interference that may cause
undesired operation.

This equipment has been tested and found to comply with the limits for a Class B digital device,
pursuant to Part 15 of the FCC rules. These limits are designed to provide reasonable protection
against harmful interference in a residential installation. This equipment generates, uses and can
radiate radio frequency energy and if not installed and used in accordance with the instructions,
may cause harmful interference to radio communications. However, there is no guarantee that
interference will not occur in a particular installation. If this equipment does cause harmful
interference to radio or television reception, which can be determined by turning the equipment
off and on , the user is encouraged to try correcting the interference by one or more of the
following measures:
- Reorient the receiving antenna.
- Increase the separation between the equipment and receiver.
- Connect the equipment into and outlet on a circuit different from that to which the
receiver is connected.
- Consult the dealer or an experienced radio/TV technician for help.
You are cautioned that changes or medications not expressly approved by the party responsible
for compliance could void your authority to operate the equipment.
CUSTOMER SERVICE
If you require any additional assistance with your TV Wireless Headphones,
please call 1 (877) 714-7444, and select Option 3.
-
 1
1
-
 2
2
-
 3
3
-
 4
4
-
 5
5
-
 6
6
-
 7
7
-
 8
8
-
 9
9
-
 10
10


Sharper Image SUPER WAVE OVEN User manual
- Type
- User manual
- This manual is also suitable for
Ask a question and I''ll find the answer in the document
Finding information in a document is now easier with AI
Related papers
Other documents
-
 SHENZHEN YUXINXIN ELECTRONICS ZRH2012010603A User manual
-
Philips HC850 User manual
-
-
-
Acoustic Research wireless speakers AW877 User manual
-
-
-
Optimus TC-Z904B User manual
-
Koss JR/900 User manual
-
Geemarc CL7350 User guide
