Page is loading ...

1
Instruction Manual
82
114

2
Sun Warning
WARNING!
o Always use the EclipseView Solar Filter when viewing at or near
the Sun. When viewing a solar eclipse, always use this solar filter
during ALL phases of the eclipse.
o Before use always check both sides of the solar filter for damage.
Do not use if scratches, pin-holes, or the filter is separated from its
holder.
o This item is not a toy and requires adult supervision.
o Failure to use proper solar filtering can cause severe & permanent
eye injury including blindness.
o Do not attempt to clean or disinfect the filter material.
Solar Filter Safety Compliance Information:
o Meets the requirements for ISO 123112-2:2015
o CE certified which meets the transmission requirements of scale 12-16 of EN 169/1992.
o Meets the transmission requirements of EN 1836:2005 & AS/NZS 1338.1:1992 for Eclipse filters. (Queensland Directive).
1
Always use the EclipseView Solar Filter when viewing at or near the Sun or irreversible eye damage may occur.

3
Quick Start - Viewing the Sun
In order to get started observing the Sun, you will need to do the following:
1) Read the Instructions!
Viewing the Sun can be dangerous.
Read the instructions carefully.
3) Install the SunFinder
2) Confirm Solar Filter is not damaged
and properly installed.
4) Insert the eyepiece
2
Always use the EclipseView Solar Filter when viewing at or near the Sun or irreversible eye damage may occur.

4
Quick Start - Viewing at Night
In order to get started observing night sky objects, you will need to do the following:
1) Remove the Solar Filter 3) Insert the eyepiece
2) Attach the red-dot viewfinder
4) Align the red-dot viewfinder
3
Always use the EclipseView Solar Filter when viewing at or near the Sun or irreversible eye damage may occur.

5
Table of Contents
4
Sun Warning.............................................................1
Quick Start – Viewing the Sun.....................................2
Quick Start – Viewing at Night.....................................3
Introduction.......................................................................5
Telescope Features – 82mm........................................6
Telescope Features – 114mm......................................7
Specifications...................................................................8
About Your Telescope.....................................................9
DayTime Use of the Telescope.........................10
Quick Start – Viewing the Sun.............................11
Using the Solar Filter...............................................12
Installing the Solar Filter..........................................12
Installing the SunFinder...........................................14
Using the SunFinder................................................15
Observing the Sun...................................................16
How to Observe a Solar Eclipse..........................18
Solar Filter Maintenance.........................................19
Solar Filter Safety Compliance.............................20
NightTime Use of the Telescope......................21
Quick Start – Viewing at Night.............................22
Attaching The Accessories....................................23
Balancing The Scope..............................................25
Aligning The Red-dot Viewfinder..........................27
Adjusting The Azimuth Tension.............................29
How To Use Your Telescope..................................30
Observing at Night........................................................31
Resources.......................................................................35
Tip and Tricks.................................................................36
Calculating Magnification............................................37
Collimation......................................................................39
Viewfinder Battery Replacement...............................45
Care and Maintenance.................................................46
Accessories....................................................................47
Recycling.........................................................................48
Customer Service and Warranty...............................49

6
Introduction
Congrats on getting a Meade EclipseView Dobsonian Telescope! Now you can setup and share the
stargazing & solar viewing experience in seconds. Whether you are camping in the outdoors or relaxing in
your backyard, grab your EclipseView Dobsonian and take it wherever life takes you. Your telescope is
already pre-assembled for you at our factory, so you only have to attach the accessories to start viewing
the sun, galaxies, planets, stars and more!
Each telescope contains the following parts:
• Optical tube
• Dobsonian Mount
• Solar Filter
• Two Eyepieces
• Barlow lens
• SunFinder
• Red-dot finder
• Software dvd
• Optical tube
• Dobsonian Mount
• Solar Filter
• Two Eyepieces
• SunFinder
• Red-dot finder
• Software dvd
82mm
114mm
5

7
EclipseView 82
Always use the EclipseView Solar Filter when viewing at or near the Sun or irreversible eye damage may occur.
1. Mount Feet
2. Dobsonian Mount
3. Azimuth Tension Nut
4. Optical Tube Assembly (OTA)
5. Solar Filter Assembly (See Image D) -
*Required for viewing the Sun
6. Secondary Mirror Collimation Adjustments (not visible)
7. SunFinder with Mounting Bracket (See Image C)
8. Finder Bracket Mounting Thumbscrews
(See image A)
9. Focuser
10. Focuser Drawtube
11. Focuser Knob
12. Eyepiece
13. Eyepiece Holder Thumbscrews
14. Vertical Lock Knob (See Image A)
15. Red-dot Viewfinder Power Switch (See Image B)
16. Red-dot Viewfinder Adjustment Knobs (See Image B)
17. Red-dot Finder (See Image B)
11
2
3
4
5
6
17
7
9
10
12
16
15
13
13
11
8
14
Image A
Image B
Image C
FIGURE 1A
6
Image D
7
5
Telescope Features

8
1. Mount Feet
2. Dobsonian Mount
3. Azimuth Tension Nut
4. Optical Tube Assembly (OTA)
5. Solar Filter Assembly (See Image D) -
*Required for viewing the Sun
6. Secondary Mirror Collimation Adjustments (See Image A)
7. SunFinder with Mounting Bracket (See Image C)
8. Finder Bracket Mounting Thumbscrews (See Image A)
9. Focuser
10. Focuser Drawtube
11. Focuser Knob
12. Eyepiece
13. Eyepiece Holder Thumbscrews
14. Vertical Lock Knob
15. Red-dot Viewfinder Power Switch (See Image B)
16. Red-dot VIewfinder Adjustment Knobs (See Image B)
17. Primary Mirror Collimation Adjustment Knobs (not visible)
18. Dovetail Locking Knob (See Image A)
19. OTA Dovetail (See Image A)
20. Dovetail Receiver (See Image A)
21. Red-dot Viewfinder (See Image B)
21
16
15
Image B
Image A
1
1
2
7
10
13
11
12
3
9
4
14
18
19
20
8
5
6
17
FIGURE 1B
7
Image C
Image D
7
5
EclipseView 114
Telescope Features
Always use the EclipseView Solar Filter when viewing at or near the Sun or irreversible eye damage may occur.

9
Specifications
Optical tube design
Optical tube focal length
Primary mirror diameter
Focal ratio
Viewfinder
Eyepieces
Solar Filter
2X Barlow
82 mm
Reflector
300mm
82mm (3.2 in.)
f/3.7
SunFinder for Day Time
Red-dot for Night Time
Two 1.25” H26mm, H9mm
White-Light Filter
(Removable)
Included
114mm
Reflector
450mm
114mm (4.5 in.)
f/4
SunFinder for Day Time
Red-dot for Night Time
Two1.25” MA26mm, MA9mm
White-Light Filter
(Removable)
Optional Accessory
8

10
About The Telescope
The EclipseView Series are Dobsonian tabletop telescopes. The word “Dobsonian” comes from it’s inventor John
Dobson, who created this specialized mount. This mount style allows you to move the telescope both up/down
(vertical) and left/right (horizontal). Because its height is fixed, use the telescope on a tabletop or stable elevated
surface for comfortable viewing. Sturdy tabletop surfaces permit you to enjoy the 360° swivel mount while the
“point-and-look” design allow you to aim the scope at whatever celestial object you choose.
These optical tubes, called reflectors, use mirrors to focus incoming light. Inside the telescope, there are two
mirrors: a primary and a secondary mirror. The primary mirror is the largest of the two and is located at the bottom of
the tube. The secondary mirror is near the top of the tube.
The large primary mirror collects light from the object you’re looking at and bounces it forward to the secondary
mirror which redirects it out the side of the tube.
9
Always use the EclipseView Solar Filter when viewing at or near the Sun or irreversible eye damage may occur.

11
DAY TIME USE
OF THE
ECLIPSEVIEW
TELESCOPE
10

12
Quick Start - Viewing the Sun
In order to get started observing the Sun, you will need to do the following:
1) Read the Instructions!
Viewing the Sun can be dangerous.
Read the instructions carefully.
3) Install the SunFinder
2) Confirm Solar Filter is not damaged
and properly installed.
4) Insert the eyepiece
Always use the EclipseView Solar Filter when viewing at or near the Sun or irreversible eye damage may occur.
11

13
CAUTION: NEVER look through your telescope at or near the Sun until the
solar filter is securely installed at the front of the telescope. Please read the
following instructions fully and keep them in mind when observing the Sun.
Always use caution when viewing at or near the Sun. Adult Supervision is
required.
Inspecting the Solar Filter:
All filters are checked carefully before shipment. However, as the solar filter
material is delicate, be sure to check for any damage prior to each use.
STEP 1: Before installing the solar filter, hold the solar filter up to the sky
away from the Sun or use a standard 60 to 100 watt light bulb.
STEP 2: Examine the filter for any pin holes, scratches, tears, or signs the
filter material has separated from its holder. If any damage is seen, do not use
the solar filter. Replacement will be required.
Installing the Solar Filter: The solar filter is pre-installed at our factory to
allow use right out of the box. However, if the solar filter is removed from the
telescope make sure to reinstall the filter before looking at or near the Sun. To
Using The Solar Filter
Step 1.
12

14
install the filter, do the following.
STEP 1: Point the telescope upwards away from the Sun.
STEP 2: Carefully slide the filter fully over the front end of the telescope.
Never force the filter onto the optical tube or damage can occur.
STEP 3: Tighten the thumb screw located on side the filter until firm. Do not
overtighten the thumb screw.
STEP 4: The solar filter is now installed and ready to use on the Sun. Always
use caution when viewing at or near the Sun.
STEP 5: When removing the solar filter, point the telescope away from the
Sun first, then remove the filter. Removing the filter while the telescope is still
pointed at the Sun is very dangerous and can cause serious damage to the
telescope or anyone that may unknowingly attempt to look through the now
unfiltered telescope.
Step 2.
Step 3.
13

15
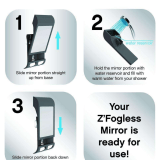
Installing the SunFinder:
The SunFinder is a pointing device that will allow you to easily locate the Sun.
Follow the below instructions to install and use the SunFinder.
STEP 1: Remove the two viewfinder mounting thumb screws from the optical
tube.
STEP 2: Place the SunFinder mounting bracket onto the threaded screws,
with the SunFinder pin hole pointed forward towards the front of the telescope.
STEP 3: Use the two mounting thumb screws to secure the SunFinder
bracket onto the optical tube. Tighten to a firm feel.
Step 1.
Step 2.
Step 3.
14

16
Using the SunFinder:
STEP 1: To use the SunFinder point the telescope toward the Sun. The small pinhole in the front of the
SunFinder will act as a projector. As the telescope moves closer to the Sun, a projection of the Sun will be
displayed on the back plate of the SunFinder.
STEP 2: Center the projection in the middle to the finder viewing circle.
STEP 3: We recommend using the lowest power eyepiece, such as the 26mm eyepiece to initially find
the Sun. You can then center the sun in the eyepiece, then switch to higher power eyepieces if desired to
zoom in on detail such as Sunspots.
Step 2.
Step 1.
15
Projection
of Sun
This side
toward Sun

17
Observing the Sun:
What makes our Sun so enjoyable to observe is that it’s an active star that’s
always changing. When viewing the Sun through the EclipseView solar filter,
the Sun will show up as a yellow-orange disk with possible Sunspots on its
surface.
Sunspots are temporary dark regions on the Sun where the surface temperature
is cooler than the surrounding material. They are places where the Suns ever-
changing magnetic field prevents the hotter material from below from reaching
the surface. Sunspots are continuously changing on a daily basis, sometimes
even on an hourly basis and always occur in pairs just like the North & South
Pole of a magnet. When viewing Sunspots you will notice they always have
different shapes and sizes where no two Sunspots are the same.
Our Sun goes through an eleven year cycle where its surface activity increases
dramatically. During increased surface activity, many Sunspots can be observed
near the solar equator. As the solar activity increases, Sunspots typically will be
seen closer to the Suns north and south poles. During periods of low surface
activity, the number of Sunspots will reduce drastically and often no Sunspots
will be visible at all.
As the number of Sunspots are constantly changing, don’t get discouraged
if you don’t see any Sunspots when observing the Sun. Check back again on
another day, and look carefully on the solar surface. How many Sunspots do
16
Sunspots
Planetary Transit
Planet Venus

18
you see each day?
Planetary transits are another exciting feature to see when observing the Sun.
Although this event happens infrequently, it occurs when the planet Mercury or
Venus passes in front of the Sun. From your EclipseView telescope this would
look like a small black dot travelling very slowly across the face of the Sun.
These rare planetary transits are well known in advance and often mentioned
on the local news days before they occur.
Solar Eclipses occur when the Moon, during its monthly trip around the Earth,
passes between the Earth and the Sun. This causes the Moons shadow to be
cast onto a small part of the Earth. This shadow will have two distinct regions,
the innermost and darkest region called the umbra and the outer brighter region
called the penumbra. The dark umbra region is a very narrow region sometimes
60 - 100 miles wide. The penumbra region covers a much larger area and can
be almost 4,000 miles wide.
There are three different types of solar Eclipses:
A Partial Solar Eclipse occurs when the Moon passes in front of the Sun and
blocks only a portion of the Sun. This is the most common type of solar eclipse.
The Sun will look like a bite has been taken out of it.
An Annular Solar Eclipse occurs when the Moon passes directly in front
of the Sun, but only blocks the central portion of the Sun. During this
Annular Solar Eclipse
17
Partial Solar Eclipse
Total Solar Eclipse

19
type of eclipse, the Moon is a smaller apparent size than the Sun and cannot
completely block the Sun. As a result, the Sun’s entire edge, or annular region,
is still visible around the Moon.
A Total Solar Eclipse occurs when the Moon passes directly in front of the
Sun, blocking the entire solar disk. During this type of eclipse, the Moon and
Sun overlap completely and observers located in the shadows darker umbra
region will experience “totality”. During “totality”, or maximum blockage, the
daytime sky can noticeably darken in a matter of minutes. This is the most
prized of all solar eclipses and few people see this in their lifetime.
The partial, annular, and total solar eclipses are events you don’t want to miss!
How to Observe a Solar Eclipse:
CAUTION: NEVER look through your telescope at or near the Sun until the
solar filter is securely installed at the front of the telescope. Please read the
following instructions fully and keep them in mind before observing the Sun.
Always use caution when viewing at or near the Sun. Adult Supervision is
required.
To view the solar eclipse, make sure you have the front EclipseView solar
filter installed. Never look at the Sun without the solar filter installed or severe
damage to your eye can occur, including blindness.
The view through the EclipseView Solar filter should be comfortable, and not
Total Solar Eclipse
Sun Warning
18

20
excessively bright. If the view through the filter is uncomfortable or excessively bright, stop using the filter
immediately!
Choose an observing site with a clear view of the sky and as close to the umbra shadow region as possible.
Often, people travel to locations where the solar eclipse will be most intense and weather will be clear.
Choose an observing location on grass and away from asphalt and concrete. Viewing over grass will reduce
the amount of heat currents seen and give a better image quality.
Use an eyepiece with low magnification, such as the 26mm eyepiece, so you can see the entire solar disk.
The solar eclipse can last several hours from start to finish so make sure you have sunblock, head covering
or shaded place where you can get out of the bright Sun when needed.
Check the weather! Nothing can spoil a solar eclipse like clouds or rain.
You can also observe the Sun with special Mylar solar glasses, which you can purchase from Meade or at
online retailers. The filters on these solar glasses are made of solar safe material, similar to that found on
the EclipseView solar filter. In addition to using your EclipseView Telescope there are also indirect ways to
view the Sun as well. A quick Google search will yield many different ideas. Just remember to never look
at or near the Sun without the proper solar filters!
Solar Filter Maintenance:
The solar filter can be cleaned by using a soft micro-fiber cloth, soft brush, or soft blower. First, gently blow
off any dust that may accumulate on the filter from outside use. If the filter is still dirty than you may
19
/