Page is loading ...

Caution: All installation types need to allow room for faucet installation.
Ensure adequate clearance behind the basin for your faucet and backsplash,
as well as the full range of motion for faucet handles and spouts. All basins,
especially under mount and apron front installations, should be installed by
professional installers.
The Sinkology Dual-Flex rim is designed with a Flat Standard
under-mount rim, also has a slight curve at the end to allow for
decorative and exible drop-in installation.
INSTALLATION

Step 1. Flip sink upside down and trace outside edge onto craft paper or card-
board. Add second line that is 1/2” inside that line. Cut out the center of
the traced template using the second line.
Step 2. Position the template at on the countertop to align with cabinet and
plumbing connections. Mark opening on countertop. Drill a 1/2” hole on
the inside of the scribed line to start cutout, then use a jigsaw to cut the
countertop.
Step 3. Position the sink in the hole and check for gaps around the rim. Eliminate
gaps by gently tapping the rim with a rubber mallet.
Step 4. Attach drain assembly
to sink.
Step 5. Apply silicone to the bottom rim of the sink. Position the sink in the
cutout, and use weight in the basin to hold the sink in place.
Step 6. Clean excess silicone.
Apply polyurethane to
seal the gap between
the sink and countertop.
Mount faucet.
Step 7. Treat copper sinks with
Sinkology Copper Armor
for maximum protection
(apply based on
directions on bottle).
Bag
(Weight)
Spray Foam
Silicone
BATH – DROP-IN INSTALLATION
Plumbers putty (or Silicone)

Step 1. Flip sink upside down and trace outside edge, noting where the rim is
located, on craft paper or cardboard. Add second line that is inside that
line at the desired offset. Cut out the center of the traced template
using the second line.
Step 2. Place the template on to the countertop, trace the edge with a pencil,
and cut the hole into the countertop.
Step 3. Assemble waste tting
to basin, and use silicone
to seal between waste
tting and the inside of
the basin.
Step 4. Mount sink
to countertop.
Step 5. Clean excess silicone and mount faucet.
Step 6. Treat copper sinks with Sinkology Copper Armor for maximum
protection (apply based on directions on bottle).
BATH – UNDER-MOUNT INSTALLATION
Bracket
(only bracket included)
Washer
Solid Surface Countertop
Wingnut
Brass Insert
Screw
Bowl
Plumbers putty (or Silicone)

Step 1. Flip sink upside down and trace outside edge onto craft paper or
cardboard. Outline faucet to ensure necessary clearance. Cut out
template and place on the countertop.
Step 2. Find and mark the
center of the sink
based on the
template. Remove
template from
countertop. Drill
a 2 3/4” diameter
hole in the center
of your countertop.
1/8” chamfered
edge is recommended,
but not necessary.
Step 3. Apply silicone to
chamfer and
mount sink to
countertop using
waste tting and
supplied Washer.
Step 4. Clean excess silicone and mount faucet.
Step 5. Treat copper sinks with Sinkology Copper Armor for maximum
protection (apply based on directions on bottle).
Counter TopCounter Top
2-3/4”
Diameter
Hole
1/8”
1/8”
BATH – VESSEL INSTALLATION
Counter Top
Plumbers putty (or Silicone)
Steel Washer
Brass Locknut

BATHTUB – FREESTANDING INSTALLATION
Before you begin, please read and follow installation and care instructions.
Observe local plumbing, building, and electrical codes. Ensure adequate and
level support oor.
If you are unfamiliar with installing bathroom xtures and plumbing, we
recommend consulting a professional. Keep plumbing connections around the
tub easily accessible for future maintenance that may be necessary. Sinkology
does not accept liability for any damage to the oor, walls, plumbing, or for
personal injury during installation.
Preparation:
1. Unpack and inspect copper tub for damages. If damages are found,
contact supplier to discuss replacement.
2. Acquire tools and accessories needed for installation. For Sinkology
copper bathtubs, we recommend the following accessories available at
Sinkology.com retail partners.
A. Sinkology Drain & Overow Kit – Model # SDT101-AC
B. Sinkology Copper Armor Kit – Model # SARMOR-101
C. OS&B Bathtub Rough-In Kit – Model # ITD35
A B C

Note: Sinkology copper bathtubs are handmade so variations in dimensions can
occur. We recommend performing Rough-In procedures with the bathtub on
site to ensure the correct installation.
1. Loosely assemble selected freestanding bathtub waste drain or overow
kit onto bathtub (leaving off the tailpipes at this time).
2. Determine water line locations for selected bathtub ller. Tub faucet may
need to be assembled prior to tub installation.
3. Place bathtub in nal location and mark exact location on the oor.
4. Rough-In nal plumbing waste drain and water lines into proper locations.
a. We recommend using OS&B Model # ITD35 rough-in kit. This
kit is designed to work with Sinkology copper bath tubs and
makes plumbing rough-in fast and easy, and ensures a water
tight connection.
Rough-In Waste Drain and Waterlines:
Step 1. Final waste drain and waterline Rough-In’s should be completed and
ooring should be nished. Ensure bathtub is properly supported and
level.
Step 2. Double check bathtub faucet installation requirements before nal bath
tub installation.
Step 3. Apply thread sealant or plumbers tape to any threaded connections that
do not have rubber gaskets.
Step 4. Apply plumbers putty to underside of drain ange and thread through
the bathtub and into drain pipe.
Step 5. Ensure waste drain and overow is securely connected to bathtub.
Step 6. Place tub back into desired location and verify that bathtub is level.
a. If using recommended rough-in kit (model # ITD35), the tub will
need to be raised approx. 8” before lowering into nal position.
Step 7. Finish installation by running a bead of silicone adhesive around the
base of copper freestanding bathtub where applicable.
Step 8. Allow sealants and adhesive to thoroughly dry before lling bathtub with
water. Consult sealant and adhesive manufacturers for dry times, as they
may vary.
Installation
BATHTUB – FREESTANDING INSTALLATION (CONT.)

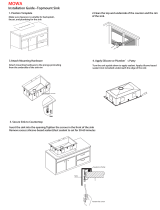
Step 1. Flip sink upside down and trace the inside edge onto craft paper or
cardboard by placing arm through the drain hole. Add second line that is
3/8” outside that line. Cut out the center of the traced template using the
second line.
Step 2. Position the template at on the countertop to align with cabinet and
plumbing connections. Mark opening on countertop. Drill a 1/2” hole
on the inside of the scribed line to start cutout, then use a jigsaw to cut
the countertop.
Step 3. Use the sink as a template for the faucet holes. Center the sink in the
cutout. Use a pencil to mark the faucet holes. Remove the sink and use
a 1 1/2” hole saw to cut out the necessary faucet holes.
Step 4. Install clamps. Place notched end of bolt into the keyhole slot. Lower the
sink carefully into the countertop so the bolts enter without interference.
(Illustration 4A) Turn the claws out 90° so they grasp the underside of the
countertop. (Illustration 5A). Tighten the clamps gradually (Illustration
5B), in a sequence similar to that shown. (Illustration 5C). Please note that
some kitchen sinks are designed to mount either as an undermount or
drop-in. These sinks will not have install clamps and need to be installed
using 100% silicone.
CAUTION: Tighten claws only until sink rim is ush with counter top.
Do not over tighten.
Step 5. Treat copper sinks with Sinkology Copper Armor for maximum protection
(apply based on directions on bottle).
KITCHEN – DROP-IN INSTALLATION

Step 1. Flip sink basin upside down on countertop and mark countertop by
tracing the edge of the basin. Measure the distance between the edge
of the basin and the inside edge of the lip. Add a second line inside the
rst according to this measurement.
Step 2. Cut countertop based on the inside, second line.
Step 3. Apply silicone around hole in the underside of the countertop and
position the basin.
Step 4. Use a level to make sure that the basin is sitting ush in all directions,
while pressing down to seal.
Step 5. Clean excess silicone and mount faucet.
Step 6. Treat copper sinks with Sinkology Copper Armor for maximum
protection (apply based on directions on bottle).
KITCHEN – UNDER-MOUNT INSTALLATION

Step 1. Flip sink upside down and mark the countertop by tracing the inside
edge of the basin by placing your arm through the drain hole.
Note: We recommend a ¼” reveal on 3 sides when using the
under-mount style. For ush or built-up mount, cut countertop along
the outside line of basin prole. Apron fronts are designed to be
installed ¾” extended out beyond the front of the countertop.
Step 2. Cut the countertop based on the installation type.
Step 3. Place the basin and apply silicone as a gasket between the sink and
the cabinet.
Step 4. Install countertop.
Step 5. Apply silicone around the top edge of the basin. Place the countertop
around the basin. Ensure it is centered and remove any excess silicone.
Step 6. Install the drain mount.
Step 7. Treat copper sinks with Sinkology Copper Armor for maximum
protection (apply based on directions on bottle).
KITCHEN – APRON FRONT INSTALLATION
/