Advent ADVUNI300 Operating Instructions Manual

Category
Car media receivers
Type
Operating Instructions Manual
6VRMS
RCA Output
ADVUNI300
Operating Instructions
6.2” Double DIN Multimedia Receiver
DVD / NAV / SiriusXM-Ready™ / Built-in Bluetooth / Compatible with iPhone /
Compatible with iPod / Pandora Link / USB / Aux In
2
ADVUNI300
“Made for iPod” and “Made for iPhone means that an electronic accessory has
for the operation of this device or its compliance with safety or regulatory standards.
is not responsible
or regulatory standards. Please note that the use of this accessory with iPod or
Android is a trademark of Google Inc.
microSD is a trademark or registered trademark of SD-3C, LLC in the United States,
other countries or both.
Pandora is a registered trademark of Pandora Media, Inc.
Sirius, XM and all related marks and logos are registered trademarks of Sirius XM
Radio Inc. All rights reserved.
ADVUNI300
3
CONTENTS
FEATURES ...............................................................................................................5
CONTROLS AND INDIC ATORS ...............................................................................8
REMOTE CONTROL ...............................................................................................10
EXTERNAL DEVICES .............................................................................................16
QUICK START GUIDE ............................................................................................18
EQUALIZER CONTROL MENU ..............................................................................21
SYSTEM SETTINGS ...............................................................................................23
DISC OPERATION .................................................................................................32
RADIO TUNER OPERATION ..................................................................................44
USB OPERATION ...................................................................................................49
iPod®/iPhone® OPERATION .................................................................................54
AV-In1/AV-In2 OPERATION ..................................................................................59
BLUETOOTH OPERATION .....................................................................................60
NAVIGATION QUICK START GUIDE .....................................................................68
REAR CAMERA OPERATION .................................................................................71
STEERING WHEEL CONTROLS (SWC) OPERATION .............................................72
PANDORA RADIO OPERATION ............................................................................74
SiriusXM® RADIO OPERATION ............................................................................78
CARE AND MAINTENANCE ..................................................................................95
SPECIFICATIONS ..................................................................................................96
NOTES ...................................................................................................................98
4
ADVUNI300
FCC Statement
1. This device complies with Part 15 of the FCC Rules.
Operation is subject to the following two conditions:
(1) This device may not cause harmful interference.
(2) This device must accept any interference received, including interference that
may cause undesired operation.
2. Changes or modications not expressly approved by the party responsible for
compliance could void the user’s authority to operate the equipment.
NOTE: This equipment has been tested and found to comply with the limits for
a Class B digital device, pursuant to Part 15 of the FCC Rules. These limits are
designed to provide reasonable protection against harmful interference in a
residential installation.
This equipment generates uses and can radiate radio frequency energy and, if
not installed and used in accordance with the instructions, may cause harmful
interference to radio communications. However, there is no guarantee that
interference will not occur in a particular installation. If this equipment does cause
harmful interference to radio or television reception, which can be determined
by turning the equipment o and on, the user is encouraged to try to correct the
interference by one or more of the following measures:
t Reorient or relocate the receiving antenna.
t Increase the separation between the equipment and receiver.
t Connect the equipment into an outlet on a circuit dierent from that to which
the r
eceiver is connected.
t Consult the dealer or an experienced radio/TV technician for help.
FCC R adiation Exposure Statement
This equipment complies with FCC radiation exposure limits set forth for an
uncontrolled environment. This equipment should be installed and operated with
minimum distance of 20 centimeters between the radiator and your body.
ADVUNI300
5
Thank you for choosing a ADVENT product. We hope you will nd the instructions
in this owner’s manual clear and easy to follow. If you take a few minutes to look
through it, you’ll learn how to use all the features of your new ADVUNI300
Multimedia Receiver for maximum enjoyment. Please save this manual for future
reference.
We recommend having your ADVUNI300 Multimedia Receiver installed by a
reputable installation shop.
FEATURES
DVD
t Audio Equalizer
t Next Chapter and Previous Chapter
t Play/Pause
t Track Direct Entry
t Disc Menu
t Selection Repeat / Track Repeat
t Disc Audio
t Disc Language
t Pic Control
CD / MP3 / WMA
t CD-Text Compatible
t ID3 Tag Compatible
t Directory Search (MP3 / WMA Only)
t Burn up to 1500 MP3 and WMA Files onto a DVD+R / RW
t Audible Forward / Reverse Track Search (CD-DA Only)
t Random, Repeat and Intro
t Play, Pause, Stop, Next Track and Previous Track
AM-FM
t USA, China, Japan, Europe, Europe (LW) and (OIRT)
t 30 Station Presets (18 FM / 12 AM)
t Auto Stereo / Mono
t Local / Distance
t Auto Store / Preview Scan
iPod®/iPhone®
t iPod®/ iPhone® via USB
t High Speed Direct Connect Interface to Access iPod® Playlists, Artists, Albums
and Songs. Play music and view video/photo* les from your iPod®. *Video/
photo playback requires jLink-USB iPod® interface cable (sold separately).
t Power Management Charges iPod® while Connected
6
ADVUNI300
SiriusXM-Ready®
t Satellite Channel Name, Artist, Song, and Categories Displayed on Monitor
(Vehicle Tuner and Subscription required and sold separately)
Chassis
t 2.0 DIN (Import / ISO-DIN Mountable)
t Fixed Front Panel
t 6.2” High Definition TFT LCD
t 800h x 480v x RGB WVGA
General
t Beep Tone Conrmation (ON-OFF Option)
t Built-In Bluetooth® providing Hands-Free operation for safety and convenience
and A2DP for streaming music from your smartphone or other Bluetooth®
device.
t One Composite Video Output for Additional Screens
t Front Panel Audio/Video Input
t Front Panel USB - Playback Music / Video Files via Portable Hard Drives / USB
t Ten-Band Equalizer
t Front / Rear / Subwoofer Line Output
t Rear Camera Input
t Touch Screen Calibration Mode
t Rotary Encoder Audio Control
Rear Camera
t The ADVUNI300 is camera ready. Before accessing any camera features, you must
purchase and install a rear video camera.
ADVUNI300
7
WARNING! Never install this unit where operation and viewing could interfere
with safe driving conditions.
WARNING! To reduce the risk of a trac accident (except when using for rear
view video camera) never use the video display function while driving the vehicle.
This is a violation of federal law.
WARNING! Never disassemble or adjust the unit.
WARNING! To prevent injury from shock or re, never expose this unit to moisture
or water.
WARNING! Never use irregular discs.
WARNING! To prevent damage to the mechanism inside this unit, avoid impact to
the unit’s monitor.
WARNING! Using an improper fuse may cause damage to the unit and result in
re.
8
ADVUNI300
CONTROLS AND INDICATORS
ADVUNI300 Controls and Indicators
1. Disc Slot:
Accepts DVD/CD/MP3 discs. If the unit is turned on, playback begins when a
disc is inserted.
2. LCD Screen and Touch Screen:
Touch icons on this screen to access menus or control functions.
3. Remote Sensor:
Used to receive command signals from the remote control.
4. 3.5mm AV IN Jack:
This connector accepts a 3.5 mm jack through which signals from various
audio/video devices can be applied to the unit.
5. MicroSD Card Slot:
MicroSD cards containing navigation software .

OPEN

ADVUNI300
9
6. USB Slot:
Used to connect an iPod®, MP3 player or ash drive connection adapter for
playback of music/video les.
7. Interface Cover:
Covers the AV IN jack, microSD card slot, and USB slot.
8. Reset Button:
Press this button to reset the system settings (except password and parental
lock settings) and to correct a system halt or other illegal operation. Use the
tip of a pen to press the Reset button.
9. Power On/O(
) Button / Rotary Volume ( ) Knob / Mute Button
Press to turn the unit ON. Press and hold to turn the unit o.
Rotate the knob to adjust the volume from 0 to 50.
Press the knob momentarily to mute the audio. Press the knob again to
restore the audio.
10. Menu Button:
Press this button to access the Main touch screen menu.
11. Eject ( ) Button:
Press this button to eject a DVD/CD/MP3 disc. Disc play is stopped, the disc is
ejected and the unit will change to radio operation. If the disc is not removed
from the unit and the button is pressed again, the disc will be re-loaded. If the
disc is not removed from the disc slot within 10 seconds of being ejected, it
will be automatically reloaded to prevent it from being accidentally damaged.
10
ADVUNI300
REMOTE CONTROL
Remote Control Notes
1. Aim the remote control at the remote sensor on the unit.
2. Remove the battery or insert a battery insulator if the remote control will not
be used for a month or longer.
3. Do not store the remote control in direct sunlight or in a high temperature
environment. It may not function properly.
4. Under normal operation conditions, battery life is approximately 6 months. If
the remote control does not work, replace the battery.
5. Use button-shaped CR2025 lithium batteries only.
6. Do not recharge or disassemble the battery.
7. Do not heat the battery or expose the battery to re.
8. To avoid risk of accident, store the battery in a place that children can not
reach.
Battery Installation/Removal
1. Slide out the battery compartment cover located on the bottom of the back
of the remote control.
2. Insert a CR2025 lithium battery into the battery tray. Make sure that the
proper polarity (+ or -) is observed.
3. Align the cover tabs with the remote control and slide the cover in until it
locks.
Slide Out
Slide In
Battery Compartment Cover Removal/Installation
ADVUNI300
11
This page intentionally left blank
12
ADVUNI300
30
29
32
31
26
25
28
27
23
20
24
22
21
19
18
16
15
14
13
9
10
7
8
11
12
1
2
3
4
17
5
6
20
ADVUNI300 Remote Control
ADVUNI300
13
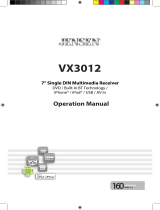
Remote Control Functional Description
1. SOURCESRC Button: Press this button to switch between
and select available sources. (Disc, Radio, USB/iPod®, AV-IN1,
Settings, Bluetooth®, Camera, AV-IN2, Pandora or SiriusXM)
2. POWER Button (
): Press this button to turn the unit ON and OFF.
3. BLUETOOTHBT Button: Press this button to enter the Bluetooth
feature.
4. MAP Button: Press this button to enter the Navigation feature. Press again to
return to previous source.
5. PLAY / PAUSE Button: Press this button to pause the playback of a disc.
Press this button again to resume normal playback.
6. NEXT FORWARDXXl) Button: Press this button to skip to the next chapter,
track or song during playback of a disc. Press this button while in Radio mode
to search available radio station by increasing tuning frequency. Press this
button while in iPod mode to pause playback/starts playback of a music le.
7. ANGLE Button (
): Press to display and select dierent camera angles
in DVD mode. Each time the button is pressed, the angle changes.
NOTE: The numbers of angles vary from disc to disc. Not all discs contain this
option.
8. SUBTITLE Button (
): Press to display and select the subtitle language in
DVD mode. Each time the button is pressed, the subtitle language changes.
NOTE: The type and number of languages for subtitles vary from disc to disc.
9. AUDIO Button: Press to display and select the audio language in
DVD mode. Each time the button is pressed, the language changes.
NOTE: The languages for audio vary from disc to disc.
10. VOLUME ButtonVOL + and: Press these buttons to increase or decrease
the playback volume.
11. SETUP Button: Press to this button to enter the system settings menu.
12. MUTE Button (
): Press this button to turn the audio output ON and OFF.
13. GOTO Button: Press this button to open direct entry search screen during the
playback of a disc.
14. ANSWER INCOMING PHONE CALL Button (
): Press this button to answer
an incoming Bluetooth phone call.
14
ADVUNI300
15. DISCONNEC T ACTIVE PHONE CALL Button ( ): Press this button to
disconnect an active Bluetooth phone call.
16. BACKSPACE Button (
): Press this button to correct invalid number entries
when entering passwords, track/chapter selections or phone numbers using
the remote control.
17. RANDOM Button ( ): Press this button to play tracks or chapters in random
order while playing a disc.
18. REPEAT Button
 : Press this button to repeat the playback of a current track.
Allows the user to repeat a selected Title, Chapter or Track of a DVD, CD or MP3.
19. NUMBER Buttons (0-9): Press these buttons to directly access chapters and
tracks, dialing phone numbers, or entering passwords.
20. UP (S) / DOWNT) Buttons – Press these buttons to scroll upward and
downward, respectively, in menu options.
21. MENU Button: Press this button to access the root menu of a DVD or CD
during playback. The disc will return to normal playback and the root menu
will disappear if no selection is made within 10 seconds. This button is also
used to select photo mode of an MP3 player.
22. ENTER Button (OK): Press this button to implement a selected setting or
accept an option.
23. LEFTW/ RIGHTXButtons: – Press these buttons to shift left and right,
respectively, in the menu options
24. EQUALIZER Button (EQ): Press this button to accesses the equalizer menu in
all audio playback modes.
25. SCREEN BACKLIGHT ADJUST BUTTON
: Press this button to adjust the
screen backlighting level between low, medium and bright.
ADVUNI300
15
26. ZOOM Button ( ): (FOR VIEWING IMAGE FILES)
DISC images -
Press ZOOM button CD Player Performs
Once Enlarge the picture 125% of the original size
2 times Enlarge the picture 150% of the original size
3 times Enlarge the picture 200% of the original size
4 times Picture is returned to original size
27. BAND Button: Press this button to scroll though preset stations.
28. PREVIOUSlWW) Button – Press this button to go back to the previous
chapter, track or song during playback of a disc. Press this button while in
Radio mode to search available radio station by increasing tuning frequency.
Press this button while in iPod mode to pause playback/starts playback of a
music le.
29. DISC Button: Press this button to enter Disc mode radio mode and scroll
though preset stations.
30. TUNER: Press this button to enter Radio mode
.
31. EJEC T Button (
): Press this button to eject a DVD/CD/MP3 disc. Disc play is
stopped, the disc is ejected and the unit will change to radio operation. If the
disc is not removed from the unit and the button is pressed again, the disc will
be re-loaded. If the disc is not removed from the disc slot within 10 seconds
of being ejected, it will be automatically reloaded to prevent it from being
accidentally damaged.
32. Menu Button: Press this button to return to the source menu.
16
ADVUNI300
EXTERNAL DEVICES
Connecting External Devices
External devices, including a game console, camcorder, navigation unit, iPod®,
Zune®, etc. can be connected to this unit using its front A/V input 3.5mm jack (AV-
In1), the rear RCA inputs (AV-In2) or the USB port.
You cannot directly control external devices connected to the A/V INPUTs using
the front panel controls or this unit’s remote control.
AV-In1
AV-In1 is used for playback of audio/video from an external device connected to
the unit through a 3.5mm jack. The unit can increase or decrease the volume of
the connected device all other controls are done on the connected device. Select
AV-In 1” mode to access auxiliary devices.
AV-In2
AV-In2 is used for playback of audio/video from an external device connected
through RCA connectors located on the back of the unit (see theADVUNI300
Installation Guide). The unit can increase or decrease the volume of the connected
device; all other controls are done on the connected device. Select AV-In2” mode
to access auxiliary devices.
ADVUNI300
AV INPUT
OPEN
PP $9 &DEOH QRW LQFOXGHG
9 LGHR
/HIW $XGLR
5LJKW $XGLR
*URXQG
86%&DEOH QRW LQFOXGHG
Connecting
External Devices
ADVUNI300
17
This page intentionally left blank
18
ADVUNI300
QUICK START GUIDE
Turning the Unit ON or OFF
) button / Rotary Volume ( ) knob / Mute
button to turn the unit ON. To turn the unit OFF, press and hold the front panel
) button / Rotary Volume ( ) knob / Mute button for
2 seconds.
Selecting an Audio/Video Source, Bluetooth, Steering
Wheel Controls, Backup Camera or Pandora
To select an audio/video source:
1. Press the front panel MENU button or touch the SRC icon to view the main
menu screen.
MENU
Button
SRC
Icon
ADVUNI300 Front Panel
2. Touch the desired source icon on one of the two main menu screens.
Screen 1 of 2: Disc, Radio, USB, AV-IN1, Settings, Bluetooth (BT) or Camera.
Touch Next at the bottom of the screen to access Screen 2 of 2: Steering Wheel
Controls (SWC), AV-IN2, Pandora or SiriusXM (SXM).
Screen 1 Screen 2
ADVUNI300 Main Menu Screen
ADVUNI300
19
System Settings Adjustment
To access and adjust system settings:
1. Touch the Settings (
) icon on the Main Menu screen to enter the SETTINGS
MENU. Sub-menus where adjustments can be made will be highlighted. (See
”SYSTEM SETTINGS” on page 23.)
Audible Beep Conrmation
An audible beep tone conrms each function selection. The beep tone can be
disabled through the Setup menu. (See “General Sub-menu Features” on page
23.)
Muting the Audio
Press the front panel Power On/O ( ) button / Rotary Volume ( ) knob / Mute
button to mute the audio from the unit. Mute icon is displayed on the LCD screen.
Press the Power On/O ( ) button / Rotary Volume ( ) knob / Mute button
again to restore the audio volume to its previous level. Adjusting the volume or
using any of the audio setup features cancels the mute function.
Equalizer Controls
Equalizer (EQ): Adjustment can be made after entering one of the audio/video
sources (Disc, Radio, USB, AV-IN or SXM).
Touch the Equalizer (EQ) icon to view the Equalizer Control Screen to select a
desired preset setting (Optimal, Classic, Rock, Jazz, Techno or Pop), Flat setting,
custom User setting, make adjustments to the audio Balance and Fade levels or to
turn the Loudness option ON or OFF. Touch the SRC icon to return to the current
source. (See ”Adjusting Equalizer Controls on page 21.)
Volume Adjustment / Turn On Volume
To increase or decrease the volume level, rotate the rotary encoder knob. The
unit’s front panel screen will display the volume level for 2 seconds. The
volume level ranges from 0 to 50. To set the Turn-On volume, press and hold
the rotary encoder knob 1 second while the green volume bar is displayed
after setting the desired volume level. You will hear 2 beeps to confirm the
new Turn-On volume level.
20
ADVUNI300
Playing a Disc
To begin playback of an Audio/Video Disc:
1. Press the front panel Power On/O (
) button / Rotary Volume ( ) knob /
Mute button to turn the unit ON.
2. Insert a disc with the label side facing up. Playback will begin automatically.
(See “DISC OPERATION” on page 32.)
To eject a disc:
1. Press the front panel Eject (
) button.
Resetting the System
Soft Reset - To correct a system halt or other illegal operation, use the tip of a pen
to press and release the reset button located just below the front panel interface
cover.
Reset
System Reset Button
After a system reset, the unit restores all factory default settings.
Note: If the unit is reset while a DVD is playing, the unit will return to Main Menu
once the reset is complete.
Parking Brake Inhibit
When the pink “Parking wire is connected to the vehicle Parking Brake circuit, the
front TFT monitor will display video when the Parking Brake is engaged.
  • Page 1 1
  • Page 2 2
  • Page 3 3
  • Page 4 4
  • Page 5 5
  • Page 6 6
  • Page 7 7
  • Page 8 8
  • Page 9 9
  • Page 10 10
  • Page 11 11
  • Page 12 12
  • Page 13 13
  • Page 14 14
  • Page 15 15
  • Page 16 16
  • Page 17 17
  • Page 18 18
  • Page 19 19
  • Page 20 20
  • Page 21 21
  • Page 22 22
  • Page 23 23
  • Page 24 24
  • Page 25 25
  • Page 26 26
  • Page 27 27
  • Page 28 28
  • Page 29 29
  • Page 30 30
  • Page 31 31
  • Page 32 32
  • Page 33 33
  • Page 34 34
  • Page 35 35
  • Page 36 36
  • Page 37 37
  • Page 38 38
  • Page 39 39
  • Page 40 40
  • Page 41 41
  • Page 42 42
  • Page 43 43
  • Page 44 44
  • Page 45 45
  • Page 46 46
  • Page 47 47
  • Page 48 48
  • Page 49 49
  • Page 50 50
  • Page 51 51
  • Page 52 52
  • Page 53 53
  • Page 54 54
  • Page 55 55
  • Page 56 56
  • Page 57 57
  • Page 58 58
  • Page 59 59
  • Page 60 60
  • Page 61 61
  • Page 62 62
  • Page 63 63
  • Page 64 64
  • Page 65 65
  • Page 66 66
  • Page 67 67
  • Page 68 68
  • Page 69 69
  • Page 70 70
  • Page 71 71
  • Page 72 72
  • Page 73 73
  • Page 74 74
  • Page 75 75
  • Page 76 76
  • Page 77 77
  • Page 78 78
  • Page 79 79
  • Page 80 80
  • Page 81 81
  • Page 82 82
  • Page 83 83
  • Page 84 84
  • Page 85 85
  • Page 86 86
  • Page 87 87
  • Page 88 88
  • Page 89 89
  • Page 90 90
  • Page 91 91
  • Page 92 92
  • Page 93 93
  • Page 94 94
  • Page 95 95
  • Page 96 96
  • Page 97 97
  • Page 98 98
  • Page 99 99
  • Page 100 100

Advent ADVUNI300 Operating Instructions Manual

Category
Car media receivers
Type
Operating Instructions Manual

Ask a question and I''ll find the answer in the document

Finding information in a document is now easier with AI