Polycom VVX 500 series Owner's manual

Category
Telephones
Type
Owner's manual
Polycom VVX 500
Touch Screen Phone
Owners Manual V.1
1
Table of Contents
1 Introduction ........................................................................... 5
Using this Document ............................................................... 5
Basic Requirements ................................................................ 6
2 Using Your Hosted PBX phone system ............................. 7
System Description ................................................................. 7
Getting Started ........................................................................ 7
Polycom VVX500 Touch Screen Phones ................................ 7
Introduction to your Polycom Desk Phone .............................. 7
Before You Use Your Phone .................................................... 7
Interacting with your Polycom VVX500 Touch
Screen Phone .......................................................................... 9
Information Screen ................................................................ 10
Main Menu Screen: ............................................................... 11
Adjusting the Volume ............................................................. 11
Cleaning your Touch Screen Display ..................................... 11
Placing Calls ...........................................................................12
To place a call using the handset: ......................................... 12
To place a call using Hands-Free
Speakerphone mode: ............................................................ 13
To place a call using the headset: ......................................... 13
Placing a second call .....................................................,,,,,... 14
Answering Calls .................................................................... 14
To answer a call using the handset: ................................,,,,.. 15
To answer a call using Hands-Free
Speakerphone mode: ............................................................ 15
To answer a call using the headset: ...................................... 15
Using Automatic Answer: ...................................................... 15
Inbound Caller ID .................................................................. 16
Ending Calls .......................................................................... 16
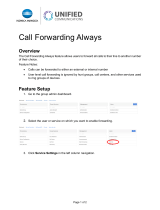
Forwarding Calls ................................................................... 16
Call Management Features ................................................... 19
Call Hold ................................................................................ 19
Conferencing Calls ................................................................ 20
3 Desk Phone– Basic Call Features .......................................12
2
Transferring Calls .................................................................. 22
Call Park ................................................................................ 24
Paging (Intercom) .................................................................. 24
Redial .................................................................................... 25
Mute ...................................................................................... 25
4 Managing Incoming Calls ....................................................26
Rejecting Calls ...................................................................... 26
Diverting Calls ....................................................................... 26
5 Using Voicemail ...................................................................27
Setting up the voicemail box for the rst time ........................ 27
Retrieving messages from your Desk Phone ........................ 27
Retrieving messages when you are away from
the ofce ................................................................................ 28
Returning a Call ..................................................................... 28
Change your Voicemail PIN .................................................. 28
Record a Personal Greeting via the Phone ........................... 28
Forward Voicemail Messages via the Phone ........................ 29
Logging into your Voicemail Box via the Web ....................... 29
Retrieving messages via the Web ......................................... 29
Forward Voicemail Messages via the Web ........................... 30
To Create a Voicemail Group ................................................ 33
Change the Number of Rings Before
Voicemail Picks Up ................................................................ 34
6 Call Lists and Directories ....................................................34
Managing Call Lists ............................................................... 34
Managing Contacts ............................................................... 35
Adding Contacts .................................................................... 35
Editing Contacts .................................................................... 37
Deleting Contacts .................................................................. 37
Placing Calls to Contacts ...................................................... 38
Searching for Contacts .......................................................... 38
7 Customizing your Phone .....................................................39
Conguring Basic Settings .................................................... 39
Changing the Appearance of Time and Date ........................ 39
Changing the Backlight Intensity ........................................... 40
Enabling the Headset Memory Mode .................................... 42
3
Selecting the Correct Headset for Electronic
Hookswitch ............................................................................ 42
Selecting the Ring Type ........................................................ 43
Changing the Language ........................................................ 43
8 Installation Overview ...........................................................44
Before you Begin Your Installation ........................................ 44
Assigning Extension Numbers and Phone
Numbers to Phones ............................................................... 46
Understanding Extensions and Lines .................................... 46
9 Installing your Hosted PBX Phone .................................... 46
Installing the Desk Phone Wirelessly .................................... 49
Activating the Service ............................................................ 50
Conformance ......................................................................... 51
Important Safety instructions ................................................. 51
FCC Information .................................................................... 53
4
1 Introduction
Congratulations on purchasing the Hosted PBX phone system
and service. You will now be able to share your phone connection
between xed & wireless handsets and across multiple locations
using the latest in ‘Voice over IP’ services.
This User Guide will show you how to setup and use your new
PBX phone system and service.
Note
Denition
WARNING
Using this Document
Notational conventions
Acronyms are dened the rst time they appear in the text. The
term LAN refers to a group of Ethernet-connected computers at
a site.
Typographical conventions
Italic text is used for items you select from menus, and drop-
down lists and the names of displayed web pages.
Bold text is used for text strings that you type when prompted by
the program, and to emphasize important points.
Special messages
This document uses the following icons to draw your attention to
specic instructions or explanations.
Provides clarifying or non-essential information on the current
topic.
Explains terms or acronyms that may be unfamiliar to many
readers.
Provides messages of high importance, including messages
relating to personal safety or system integrity.
5
Note
Installation Instructions are located on page 43 of this guide.
Basic Requirements
The Hosted PBX phone system is designed to use your existing
broadband data connection as well as the existing data wiring in
your ofce. Where you don’t have data wiring, you may use the
optional Wireless Transmitter and Wireless Adapters to connect
Desk Phones wirelessly.
In order to use all the features of the Hosted PBX phone system
and service, you must have the following:
Broadband Internet access
At least one free port on your router or modem/router
Your router must be set to DHCP
6
2 Using Your Hosted PBX phone system
System Description
The Hosted phone system supports up to 100 phones
You can have as few as one phone at an address
Cordless phones can be used in conjunction with Desk Phones or can
be installed stand alone
Through your Control Panel, you can view information and make
changes to the phone system
Getting Started
This section of your Owner’s Manual is your guide to using the PBX phone
system and its features. It also explains how to program system settings
for your Desk Phones.
Polycom VVX500 Touch Screen Phones
Introduction to your Polycom Desk Phone
The Polycom VVX500 Touch Screen Desk Phone provides a powerful,
yet exible IP communications solution, delivering excellent voice quality.
The high-resolution graphic display supplies content for call information,
directory access and system status. The phones support advanced func
-
tionality, including multiple call appearances, HTTPS security and a suite
of business phone features.
Some system settings are programmed through your Control Panel while
others are programmed through the phone.
Before You Use Your Phone
The image and table below describes the various feature buttons of your
phone.
7
Button Description
1
Voicemail
Indicator
Flashing red light indicates there is a
voicemail on the phone.
2
The home key returns you to the
Home
Screen of the phone. Pressing it
twice returns you to the idle screen.
3
Full Color
Touch Screen
Color Touch Screen. Touch sen
-
sitive, full color screen that allows
you to tap to highlight and select, or
scroll using up down left and right
movements.
4
Headset Key- Light is green with the
use of an analog headset and Blue
when using a USB headset.
5
Speakerphone Key – Glows green
when in use.
6
Mute Key- Glows red when in use.
7
Volume up and down key
8 Microphone
Transmits sound without using
the handset, this is an audio input
device.
9 Speaker
Transmits sound without using the
handset, this is for audio output.
10 Dial Pad
Allows entry of numbers, letters and
other characters, also allows for
selection of numbered menu items.
8
Interacting with your Polycom VVX500 Touch Screen Phone
This section contains information on the terms used when interacting with
your new Polycom VVX500 Touch Screen Desk Phone.
Tap- Touch that portion of the screen with your nger tip and let go.
Select- Tap that portion of the screen so that a submenu or additional
options appear.
Press- Tap and hold your nger in place, or you can Press a button on the
phone.
Highlight- Tap the screen which causes one portion to stand out from the
rest with its color, intensity or tone.
11 Security Slot
Allows physically locking the phone
down with the use of a laptop cable
lock.
9
Menu Navigation- Tap Menu > submenu > submenu
Swipe- Touch and hold the screen while moving it up, down or side to side.
Scrolling- Similar to Swipe, this just refers to swiping up and down through a list.
Dial Pad- Are the alpha/numeric buttons on the face of the telephone.
(See before you use your phone for details.)
Buttons- Physical buttons are located on the phone.
Information Screen
The display screen of your phone provides you with a host of important
information elements. This screen is also referred to as the idle screen.
The top line of the screen displays:
Popup text
Do Not Disturb text
Missed call text or second incoming caller display
Prompt text (for example, “Enter number”)
Time and date text
Voicemail and missed call indicators
New Call Option
Forward Option
The main content area of the screen displays the phone number as
-
signed to the phone as well as your company name. As a call comes in,
this area displays caller information.
10
You can press and again at any time to return to
the Idle Screen.
Note
Note
The Applications Option is not available at this time. It remains on
your screen to allow room for future upgrades and expansions.
Note
To conform to regulatory requirements, handset and headset
volume will return to a preset level after each call
.
Press
Main Menu Screen:
This screen is the rst point for more menu selections. You can reach this
menu at any time by pressing .
Adjusting the Volume
Press to adjust receiver volume during a call. Pressing these
keys in the idle state adjusts the ringer volume.
Cleaning your Touch Screen Display
To clean your touch screen phone you will want to rst disable the phone
so that you do not perform functions during the cleaning process. You can
reactivate your phone by pressing any button.
To Disable the phone for cleaning:
Tap Settings
Tap Basic
11
3 Desk Phone– Basic Call Features
Placing Calls
You can place a call in many ways using your Desk Phone:
using the handset
using the speakerphone
using the headset
You can also dial the number rst—called “hot dialing”— and then choose
the method you will use to speak to the other party.
You can search the call lists, the local contact directory or the corporate
directory and dial from the search results page.
During a call, you can alternate between Speakerphone Hands-Free,
Headset, or Handset modes by pressing the or keys or picking up
the handset.
The call duration of active calls is visible within the active call window on
the graphic display.
To place a call using the handset:
Use the following steps in any order:
Pick up the handset.
Tap Screen Clean
You can then wipe the screen with any clean dry microber cloth.
12
With the handset on-hook
1. Dial the number using the dial pad.
2. Press , or the
2. Press
Note
The phone starts suggesting a number you can select from
the recent call list as you dial.
Dial the number using the dial pad.
To place a call using Hands-Free Speakerphone mode:
Use one of the following options:
With the handset on-hook
1. Press and Tap or press to obtain dial tone.
2. Dial the number using the dial pad and tap
1. Press and to obtain dial tone.
3. Dial the desired number using the dial pad.
With the optional headset connected:
To place a call using the headset:
Use one of the following options:
With the optional headset connected
13
Note
Additional information on headsets can be found on page 41
of this guide.
Note
You do NOT need to dial 9 to make a phone call.
1. Dial the desired number using the dial pad.
2. Press
1. Press the Hold button or Hold option on the display. This will
place your caller on hold
2. Tap .
3. Dial the phone number or 3-digit extension number and tap
. You will be connected to that party
4. You may switch between calls by using the display and
resume options.
Placing a second call
While on a call, you may place that call on hold and make a
second call. There are two ways to place another call:
Method 1
1. Place the rst call on hold AND at the same time get dial tone to
make the second call by tapping
2. Dial the 10-digit phone number or 3-digit extension number
3. Press
Method 2
Answering Calls
There are a few methods to answer a call, similar to those of placing a
call.
using the handset
14
Using Automatic Answer:
Automatic Answer allows a call to be answered without touching the phone.
The incoming call still shows on the display and does provide the
and options on the display.
Enabling Automatic Answer:
1. Press > Settings> Basic> Preferences> Auto
Answer
2. Highlight and Select Auto Answer SIP Calls
3. Tap Yes
4. Tap Save
Note
Additional information on headsets can be found on
page 41 of this guide.
using the speakerphone
using the headset
To answer a call using the handset:
Pick up the handset.
To answer a call using Hands-Free Speakerphone mode:
Press and speak into the phone.
OR
Tap on the incoming call display.
To answer a call using the headset:
Press or follow the instructions for your optional headset.
15
Note
Changes to your Outbound Caller ID Name need to be
made through customer service.
Disabling Automatic Answer:
1. Press > Settings> Basic> Preferences> Auto
Answer
2. Highlight and Select Auto Answer SIP Calls
3. Tap No
4. Tap Save
Inbound Caller ID
Caller ID Name and Number are presented on the screen of your phone
with each inbound call. If you are using a Simultaneous hunt group, the
name of that hunt group will also be passed through to the display of your
-
phone.
Ending Calls
To end a call:
Do one of the following:
If you are using the handset, Tap or replace the handset.
If you are using a headset, press .
If you are using the speakerphone, press.
Tap in the display.
Forwarding Calls
You can congure your phone so that all incoming calls are forwarded to
another party (refer to Static Forwarding). You can also forward calls
while your phone rings (refer to Dynamic Forwarding).
All incoming calls can be forwarded to voicemail while Do Not Disturb is
enabled on your phone.
Static Forwarding
Static Forwarding allows you to send ALL incoming calls to another
phone number or extension. When Static Forwarding is enabled, your
phone will not ring.
16
To forward all incoming calls to another party:
1. From the idle display, Tap on the main display.
2. Tap the option that you would like to change. The options are:
o Always—To forward all incoming calls
o No Answer—To forward unanswered incoming calls
o Busy—To forward calls that arrive when you are already on a call
3. Depending on your selection:
a If you selected Always, enter a number, or extension number, to
forward all future incoming calls to.
b If you selected No Answer, you will see that your phone number is
entered in the Contact eld by default. By entering your own phone
number in this eld, the phone will send callers to your voicemail box if
you do not answer. You may enter a number to forward all unanswered
incoming calls to and how many rings to wait before forwarding (one
ring is approximately four seconds). A value of 5 is recommended.
17
1. From the idle display, tap on the display.
2. Tap and select the option to change.
3. Tap
.
The idle display returns and the regular icon appear below the date and
time.
Dynamic Forwarding
Dynamic Forwarding allows you to forward an INCOMING call to another
phone number or extension while your phone is ringing. You may only use
Dynamic Forwarding while your phone is ringing.
To forward an incoming call to another party:
1. When the phone rings, tap .
2. Enter a number to forward the incoming call to.
3. Tap .
c If you selected Busy, you will see that your phone number is
entered in the Contact eld by default. By entering your own phone
number in this eld, the phone will send callers to your voicemail box
if your phone is busy. You may enter a number to forward all future
incoming calls to when all of your incoming lines are busy.
4. Tap to conrm call forwarding.
Appears on the display under the date and time to
conrm call forwarding is enabled.
To Disable Call Forwarding:
18
The incoming call is forwarded to the other party. If call forwarding is
disabled, all future calls will not be forwarded and forwarding will remain
disabled.
Enabling Do Not Disturb
Do Not Disturb prevents the phone from ringing and sends callers
directly to your voicemail box.
To enable Do Not Disturb:
Press
1. Tap Settings
2. Tap Features
3. Tap Do Not Disturb
4. Tap Enable
To disable Do Not Disturb:
Press
1. Tap Settings
2. Tap Features
3. Tap Do Not Disturb
4. Tap Disable
Call Management Features
Call Hold
To place a call on hold
During a call, Tap . The hold icon will display. The caller will hear the
standard hold music or your custom hold music/message.
Tap to return to the caller.
Multiple Calls on Hold
If calls are on hold, you can view the details of the calls on your phone by
swiping the screen to see the active call list.
19
Note
The Hold feature typically generates music. Therefore, avoid putting a
conference call on hold.
Conferencing Calls
You can create a conference with other parties using the phone’s local
conference feature. There are two ways to do this.
Joining two calls
Adding calls
Joining Calls
You can create a conference at any time between an active call and a call
on hold by pressing on the display. The function is only
available if you have only two calls on your phone.
To join two calls with your call:
1. Have one call on hold while talking to another
2. Press on the display and then press . You will then be
connected to both callers.
Splitting Joined Calls
After you have joined two calls, you may split those calls back to their
individual calls.
To split a Joined call:
Press to split the joined calls.
20
  • Page 1 1
  • Page 2 2
  • Page 3 3
  • Page 4 4
  • Page 5 5
  • Page 6 6
  • Page 7 7
  • Page 8 8
  • Page 9 9
  • Page 10 10
  • Page 11 11
  • Page 12 12
  • Page 13 13
  • Page 14 14
  • Page 15 15
  • Page 16 16
  • Page 17 17
  • Page 18 18
  • Page 19 19
  • Page 20 20
  • Page 21 21
  • Page 22 22
  • Page 23 23
  • Page 24 24
  • Page 25 25
  • Page 26 26
  • Page 27 27
  • Page 28 28
  • Page 29 29
  • Page 30 30
  • Page 31 31
  • Page 32 32
  • Page 33 33
  • Page 34 34
  • Page 35 35
  • Page 36 36
  • Page 37 37
  • Page 38 38
  • Page 39 39
  • Page 40 40
  • Page 41 41
  • Page 42 42
  • Page 43 43
  • Page 44 44
  • Page 45 45
  • Page 46 46
  • Page 47 47
  • Page 48 48
  • Page 49 49
  • Page 50 50
  • Page 51 51
  • Page 52 52
  • Page 53 53
  • Page 54 54
  • Page 55 55

Polycom VVX 500 series Owner's manual

Category
Telephones
Type
Owner's manual

Ask a question and I''ll find the answer in the document

Finding information in a document is now easier with AI