Brigade Electronics BE-870EM (1993A) User manual
- Category
- TVs & monitors
- Type
- User manual
This manual is also suitable for

Brigade Electronics PLC
Brigade House, The Mills, Station Road, South Darenth, Kent DA4 9BD
Telephone +44 (0)870 774 1500
www.brigade-electronics.com [email protected]
FSW11649/May07/02
Page is loading ...

OWNERS RECORD
The model and serial numbers are located at the rear of the monitor.
Record the serial number in the space provided below.
Refer to these numbers whenever you call upon your supplier regarding this product.
Model No.:
Serial No.:
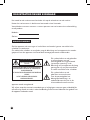
WARNING!
To prevent fire or shock hazard, do not expose the unit to rain or moisture.
To avoid electric shock, do not open the housing. Refer servicing to qualified to qualified
personnel only.
This symbol is intended to alert the
user to the presence of uninsulated
“dangerous voltage” within the
product enclosure that may be of
sufficient magnitude to constitute
risk of electric shock to persons.
This symbol is intended to alert the
user to the presence of important
operating and maintenance
(servicing) instructions in the
literature accompanying the
appliance.
You are cautioned that any changes or modifications not expressly approved in this
manual could void your authority to operate this equipment.
CAUTION
RISK OF ELECTRIC SHOCK
DO NOT OPEN
CAUTION: TO REDUCE THE RISK OF ELECTRIC SHOCK,
DO NOT REMOVE COVER (OR BACK).
NO USER-SERVICEABLE PARTS INSIDE.
REFER SERVICING TO QUALIFIED SERVICE PERSONNEL.

Please read carefully before using and keep for reference.
BACKEYE
®
BE-870EM
USER GUIDE
TFT LCD colour vehicle CCTV monitor
3
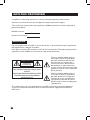
THIS SYMBOL MEANS DO NOT DISPOSE OF AS
MUNICIPAL WASTE.
RE-USE OR RECYCLE WHEREVER POSSIBLE.
ELECTRICAL / ELECTRONIC COMPONENTS MAY
CONTAIN SUBSTANCES WHICH ARE HARMFUL
TO THE ENVIRONMENT.
FOR ENVIRONMENTALLY SOUND METHODS
OF DISPOSAL, PLEASE CONTACT YOUR LOCAL
GOVERNMENT AUTHORITY.

4
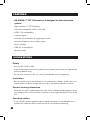
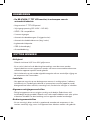
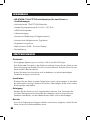
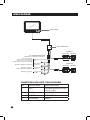
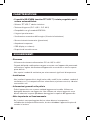
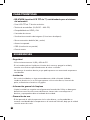
FEATURES
• BE-870EM (7" TFT LCD monitor) is designed for the automotive
system.
• High resolution 7" TFT LCD panel
• Free input voltage (DC 10.5V ~ DC 32V)
• NTSC / PAL compatibility
• 2 camera inputs
• Automatic picture display (2 triggering functions)
• Automatic brightness sensor (Day / night)
• Built in speaker
• OSD (on-screen display)
• Remote control
SUGGESTIONS
• Safety
- Use only DC 10.5V to 32V.
- If dust or liquid gets into the case, please turn off power and consult an experienced
technician before using.
- Do not cover air duct as this can cause a considerable rise in temperature.
• Installation
- Do not install the unit in an extremely hot or humid place, (radiator, air duct, etc.) or in
a place subject to direct sunlight, excessive dust, mechanical vibration or shock.
• General cleaning information
- Clean the unit with a slightly damp soft cloth. Use a mild household detergent. Never
use strong solvents such as thinner or benzine as they might damage the finish of the
unit.
• Operation caution
- If your vehicle has been parked in direct sunlight resulting in a considerable rise in
temperature inside the vehicle, allow the unit to cool off before operating.

5
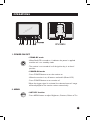
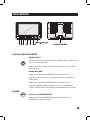
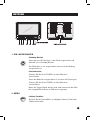
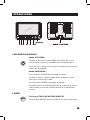
OPERATIONS
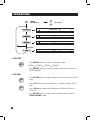
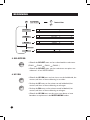
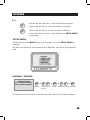
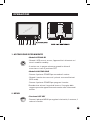
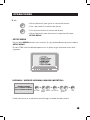
1. POWER ON/OFF
• STAND-BY mode
- When Red LED is turned on, it indicates the power is applied
and the unit is on stand-by mode.
- The monitor is not turned off until the ignition key is at the off
position.
• POWER-ON mode
- Press POWER button to turn the monitor on.
- When the monitor is on, all buttons are backlit (Green LED).
- Press POWER button to turn monitor off.
* When the trigger signal is activated, the selected source's image
will be displayed on the monitor screen automatically.
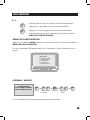
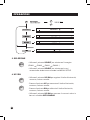
2. MENU
• HOT KEY function
- Press MENU button to adjust Brightness, Contrast, Colour or Tint.
MENU

6
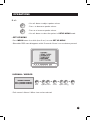
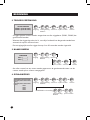
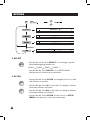
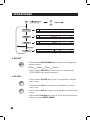
3. SELECT
• Use SELECT button to select the display image.
(CAM1
➞
CAM2
➞
CAM1
➞
CAM2...)
• Use SELECT
button to select the items that have sub-menus in
SETUP MENU.
4. UP/DN
• Use UP/DN button to adjust Brightness, Contrast, Colour or Tint
level.
- Press UP buttn to increase Brightness, Contrast, Colour or Tint
level.
- Press DN
button to decrease Brightness, Contrast, Colour or
Tint level.
• Use UP/DN
button to move cursor upward or downward in
SETUP MENU mode.
OPERATIONS
SELECT
DN
UP
MENU
DN
UP

7
OPERATIONS
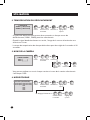
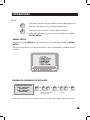
5. +/-
• Use +/- button to adjust speaker volume.
- Press
- to decrease speaker volume.
- Press
+ to increase speaker volume.
• Use
+/- button to select the options in SETUP MENU mode.
• SET UP MENU
- Press MENU button for a while (over 2 sec.) to enter SET UP MENU.
- Selectable OSD menu disappears within 5 seconds if there is no new button pressed.
1 NORMAL / MIRROR
- Each camera’s Normal / Mirror view can be selected.
1 NORMAL/MIRROR
CAM 1: [NORMAL/MIRROR]
CAM 2: [NORMAL/MIRROR]
–
+
MENU DN UP SELECT
–
+
MENU
➟ ➟ ➟ ➟
option setting exitselect
up/down move
enter

8
OPERATIONS
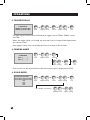
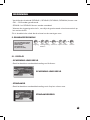
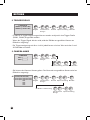
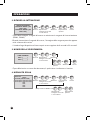
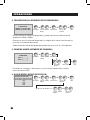
2. TRIGGER DELAY
- 2 trigger signals can be connected and each trigger source (CAM1, CAM2) can be
selected.
- When the trigger signal is activated, the selected source's image will be displayed on
the monitor screen.
- Each trigger's delay time can be adjusted from 0 seconds to 20 seconds.
3. CAMERA NAME
- Each camera can be named and the selected camera name is displayed via OSD.
4. SCALE MODE
MENU DN UP SELECT
–
+
MENU
➟ ➟ ➟ ➟
option setting exitselect
up/down move
enter
2 TRIGGER DELAY
TRIGGER 1: [0 SEC TO 20 SEC]
TRIGGER 2: [0 SEC TO 20 SEC]
3 CAMERA NAME
CAM 1: [_______]
CAM 2: [_______]
MENU DN UP SELECT
–
+
MENU
➟ ➟
➟
➟
option setting exit
select
up/down move
enter
SELECT
select
...
➟
4 SCALE MODE
DISPLAY MODE: [CAM1;CAM2;ALL;NONE]
CAM1 SCALE: [SCALE1; SCALE2; SCALE3; SCALE4]
CAM2 SCALE: [SCALE1; SCALE2; SCALE3; SCALE4]
SCALE1
SCALE2
SCALE3
SCALE4
MENU DN UP SELECT
–
+
MENU
➟ ➟ ➟ ➟
option setting exitselect
up/down move
enter
DN UP
–
+
➟ ➟
option setting
up/down move
SCALE 1.2 Setting

9
OPERATIONS
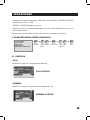
- Different scale modes (SCALE1, SCALE2, SCALE3, SCALE4) can be selected for
CA1 ~ CA2.
- SCALE1 and SCALE2 can be adjusted.
- When the trigger signal is activated, the selected scale is displayed on the monitor
screen.
*This is the electrical scale that is measuring the distance from the vehicles.
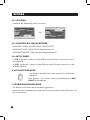
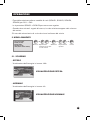
5. ADVANCED MENU
5.1. DISPLAY
- FULL
- Display the image in the ration of 16:9.
- NORMAL
- Display the image on the screen in the ratio of 4:3.
5 ADVANCED MENU
1 DISPLAY: [FULL; NORMAL]
2 UP/DOWN: [UP; DOWN]
3 DAY/NIGHT CONTROL
4 AUTO POWER: [ON; OFF]
5 LANGUAGE: [ENGLISH; GERMAN; FRENCH]
MENU DN UP SELECT
–
+
MENU
➟ ➟ ➟ ➟
option settingselect
up/down move
enter
FULL DISPLAY
NORMAL DISPLAY
exit

10
OPERATIONS
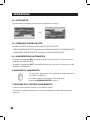
5.2. UP/DOWN
- Converted image display (top and bottom)
5.3. DAY/NIGHT CONTROL
- DAY/NIGHT: Select DAY/NIGHT ON/OFF/AUTO.
- DAY/NIGHT LEVEL: Adjust the sensitiveness of DAY/NIGHT LEVEL.
- DAY/NIGHT BRIGHT: Adjust the BRIGHTNESS level.
5.4. AUTO POWER
- When ‘ON’ is selected, turning the ignition key on turns the monitor to POWER-ON
mode.
- When ‘
OFF’ is selected, turning the ignition key on turns the monitor to STAND-BY
mode.
6. BRIGHTNESS SENSOR
- The brightness of the monitor will be adjusted automatically,
according to the circumstances.
This function above only works when the DAY/NIGHT switch is on.
7. REMOTE CONTROLLER SENSOR
- The monitor is operated by a remote controller.
- Point the remote controller towards the sensor on the front of the monitor, to operate it.

11
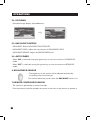
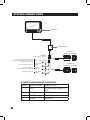
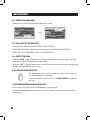
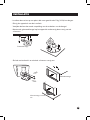
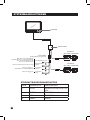
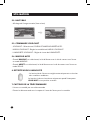
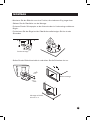
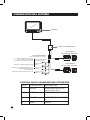
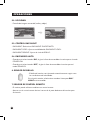
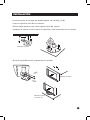
INSTALLATION
• Install the monitor in a location that can stand more weight than 5Kg (10 lb).
- Clean the surface before installation.
- Remove the protective paper covering the bottom of the bracket.
- Stick the provided bracket on the surface and fix it firmly with the screws.
- Adjust the angle of the monitor and fasten the screws tightly.
Mounting on the floor,
console, etc.
Mounting on the ceiling
Mounting on the ceiling
Page is loading ...

13
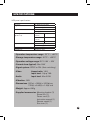
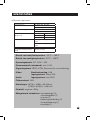
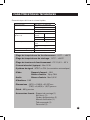
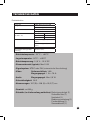
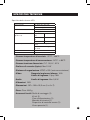
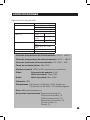
SPECIFICATIONS
LCD panel specifications
Size/Type 7" (Diagonal) TFT LCD
Brightness 400 cd/m
2
(min)
450 cd/m
2
(typ)
Contrast ratio 250 (min)
300 (typ)
View angles
(@ CR
≥ 10)
Top (12
o'clock)
30° (min)
Bottom (6
o’clock)
50° (min)
Horizontal ±50° (min)
Response time Rise: 15ms (typ) ; 30ms (max)
Fall: 20ms (typ) ; 40ms (max)
Backlight type LED
Backlight life 20,000 hrs (min)
• Operation temperature range: -20°C ~ +65°C
• Storage temperature range: -30°C ~ +85°C
• Operation voltage range: DC 10.5V ~ 32V
• Current draw (typical): Max 15W
• Signal system: NTSC or PAL (Auto switching)
• Video Aspect ratio: 16:9
Input level: 1Vp-p 75Ω
• Audio Input level: Max 0.5W
• Vibration: 15G
• Dimensions: 197(w) x 138(h) x 32.2(d)mm
7.75(w) x 5.43(h) x 1.3(d) inch
• Weight: Approx. 650g
• Supplied accessories: Mounting bracket (1)
Screw kits (1)
Power cord (1)
Instruction manual (1)
Remote contol (1)
Sun visor (1)
Page is loading ...

15
BACKEYE
®
BE-870EM
GEBRUIKERSHANDLEIDING
TFT LCD CCTV-kleurenmonitor voor voertuigen
Lees deze handleiding aandachtig door voor het gebruik
en bewaar de handleiding op een veilige plaats voor
naslagdoeleinden.
DIT SYMBOOL BETEKENT DAT HET APPARAAT NIET MET HET
HUISHOUDELIJK AFVAL WEGGEGOOID MAG WORDEN.
HET APPARAAT INDIEN MOGELIJK OPNIEUW GEBRUIKEN OF
RECYCLEN.
DE ELEKTRISCHE / ELEKTRONISCHE COMPONENTEN KUNNEN
STOFFEN BEVATTEN DIE SCHADELIJK ZIJN VOOR DE OMGEVING.
NEEM CONTACT OP MET UW PLAATSELIJKE
OVERHEIDSINSTANTIE VOOR INFORMATIE OVER
MILIEUVERANTWOORDE VERWIJDERINGSMETHODEN.
Page is loading ...
Page is loading ...
Page is loading ...
Page is loading ...

20
BEDIENING
2. TRIGGER VERTRAGING
- 2 triggersignalen kunnen worden aangesloten en elke triggerbron (CAM1, CAM2) kan
geselecteerd worden.
- Wanneer het triggersignaal actief is, verschijnt het beeld van de geselecteerde bron
automatisch op het monitorscherm.
- De vertragingstijd van elke trigger kan op 0 tot 20 seconden worden ingesteld.
3. NAAM CAMERA
- Aan elke camera kan een naam worden gegeven en de geselecteerde naam van de
camera wordt op het scherm weergegeven.
4. SCHAALMODUS
MENU DN UP
–
+
MENU
➟ ➟ ➟ ➟
2 TRIGGER VERTRAGING
TRIGGER 1: [0 SEC TOT 20 SEC]
TRIGGER 2: [0 SEC TOT 20 SEC]
3 CAMERANAAM
CAM 1: [_______]
CAM 2: [_______]
MENU DN UP
–
+
MENU
➟ ➟
➟
➟
...
➟
4 GRIJSSCHAAL MODUS
WEERGAVEMODUS: [CAM1;CAM2;ALLE;GEEN]
CAM1 SCHAAL: [SCHAAL1; SCHAAL2; SCHAAL3;
SCHAAL4]
CAM2 SCHAAL: [SCHAAL1; SCHAAL2; SCHAAL3;
SCHAAL4]
SCHAAL1
SCHAAL2
SCHAAL3
SCHAAL4
MENU DN UP
–
+
MENU
➟ ➟ ➟ ➟
DN UP
–
+
➟ ➟
SCHAAL 1.2 Instelling
SELECTEER
opties instellen verlatenselecteren
omhoog/omlaag
bladeren
toegang
SELECTEER
opties instellen verlatenselecteren
omhoog/omlaag
bladeren
toegang
selecteren
omhoog/omlaag
bladeren
toegang
SELECTEER
SELECTEER
opties instellen verlatenselecteren
omhoog/omlaag
bladeren
opties instellen
Page is loading ...
Page is loading ...
Page is loading ...
Page is loading ...
Page is loading ...
Page is loading ...
Page is loading ...
Page is loading ...
Page is loading ...
Page is loading ...
Page is loading ...
Page is loading ...

33
UTILISATION
- Différents modes d’échelles (SCALE1, SCALE2, SCALE3, SCALE4) peuvent être
sélectionnés pour CA1 ~ CA2.
- SCALE1 et SCALE2 peuvent être réglées.
- Quand le signal de déclenchement est activé, l’échelle sélectionnée est affichée sur
l’écran.
*C’est l’échelle électrique qui mesure la distance des véhicules.
5. MENU ADVANCED
5.1. AFFICHAGE
- PLEIN
- Affiche l’image au format 16:9.
- NORMAL
- Affiche l’image sur l’écran au format 4:3.
5 MENU ADVANCED
1 AFFICHAGE : [PLEIN; NORMAL]
2 HAUT/BAS : [HAUT ; BAS]
3 COMMANDE JOUR/NUIT
4 MARCHE AUTO : [ON; OFF]
5 LANGUE: [ANGLAIS; ALLEMAND; FRANCAIS]
MENU BS HT
–
+
➟ ➟ ➟ ➟
AFFICHAGE PLEIN
AFFICHAGE NORMAL
réglage des
options
sélectionner
mouvement vers
le haut/bas
entrée
SÉLECT-
IONNER
MENU
sortie
Page is loading ...
Page is loading ...
Page is loading ...
Page is loading ...
Page is loading ...
Page is loading ...
Page is loading ...
Page is loading ...
Page is loading ...
Page is loading ...
Page is loading ...
Page is loading ...
Page is loading ...
Page is loading ...
Page is loading ...
Page is loading ...
Page is loading ...
Page is loading ...
Page is loading ...
Page is loading ...
Page is loading ...
Page is loading ...
Page is loading ...
Page is loading ...
Page is loading ...
Page is loading ...
Page is loading ...
Page is loading ...
Page is loading ...
Page is loading ...
Page is loading ...
Page is loading ...
Page is loading ...
Page is loading ...

68
OPERACIONES
2. TRIGGER DELAY (RETARDO DE DISPARADOR)
- Puede conectar 2 señales de disparador y puede seleccionar cada fuente de
disparador (CAM1, CAM2).
- Cuando se activa la señal del disparador, la imagen de la fuente seleccionada se
mostrará en la pantalla del monitor.
- Cada tiempo de retardo del disparador puede ajustarse entre 0 y 20 segundos.
3. CAMERA NAME (NOMBRE DE CÁMARA)
- Puede dar un nombre a cada cámara y se mostrará el nombre de la cámara
seleccionada en OSD.
4. SCALE MODE (MODO DE ESCALA)
MENU DN UP SELECT
–
+
MENU
➟ ➟ ➟ ➟
2 TRIGGER DELAY
TRIGGER 1: [0 SEC TO 20 SEC]
TRIGGER 2: [0 SEC TO 20 SEC]
3 CAMERA NAME
CAM 1: [_______]
CAM 2: [_______]
MENU DN UP SELECT
–
+
MENU
➟ ➟
➟
➟
SELECT
...
➟
4 SCALE MODE
DISPLAY MODE: [CAM1;CAM2;ALL;NONE]
CAM1 SCALE: [SCALE1; SCALE2; SCALE3; SCALE4]
CAM2 SCALE: [SCALE1; SCALE2; SCALE3; SCALE4]
SCALE1
SCALE2
SCALE3
SCALE4
MENU DN UP SELECT
–
+
MENU
➟ ➟ ➟ ➟
DN UP
–
+
➟ ➟
Ajuste de SCALE 1.2
ajuste de
opción
salirseleccionarmover arriba/
abajo
acceder
ajuste de
opción
salirseleccionarmover arriba/
abajo
acceder
seleccionarmover arriba/
abajo
acceder
ajuste de
opción
salirseleccionar
mover arriba/
abajo
ajuste de
opción
Page is loading ...
Page is loading ...
Page is loading ...
Page is loading ...
Page is loading ...
Page is loading ...
Page is loading ...
-
 1
1
-
 2
2
-
 3
3
-
 4
4
-
 5
5
-
 6
6
-
 7
7
-
 8
8
-
 9
9
-
 10
10
-
 11
11
-
 12
12
-
 13
13
-
 14
14
-
 15
15
-
 16
16
-
 17
17
-
 18
18
-
 19
19
-
 20
20
-
 21
21
-
 22
22
-
 23
23
-
 24
24
-
 25
25
-
 26
26
-
 27
27
-
 28
28
-
 29
29
-
 30
30
-
 31
31
-
 32
32
-
 33
33
-
 34
34
-
 35
35
-
 36
36
-
 37
37
-
 38
38
-
 39
39
-
 40
40
-
 41
41
-
 42
42
-
 43
43
-
 44
44
-
 45
45
-
 46
46
-
 47
47
-
 48
48
-
 49
49
-
 50
50
-
 51
51
-
 52
52
-
 53
53
-
 54
54
-
 55
55
-
 56
56
-
 57
57
-
 58
58
-
 59
59
-
 60
60
-
 61
61
-
 62
62
-
 63
63
-
 64
64
-
 65
65
-
 66
66
-
 67
67
-
 68
68
-
 69
69
-
 70
70
-
 71
71
-
 72
72
-
 73
73
-
 74
74
-
 75
75
-
 76
76


Brigade Electronics BE-870EM (1993A) User manual
- Category
- TVs & monitors
- Type
- User manual
- This manual is also suitable for
Ask a question and I''ll find the answer in the document
Finding information in a document is now easier with AI
in other languages
- italiano: Brigade Electronics BE-870EM (1993A) Manuale utente
- français: Brigade Electronics BE-870EM (1993A) Manuel utilisateur
- español: Brigade Electronics BE-870EM (1993A) Manual de usuario
- Deutsch: Brigade Electronics BE-870EM (1993A) Benutzerhandbuch
- Nederlands: Brigade Electronics BE-870EM (1993A) Handleiding
Other documents
-
Voyager AOM713 User manual
-
-
Medion AKOYA P53002 MD 30159 Owner's manual
-
-
Camos CM-505 User manual
-
Clarion CJ5600E Installation guide
-
Brigade BE-145M (1348) Installation guide
-
-
-