Zenoah EB430 User manual
- Category
- Air blowers/dryers
- Type
- User manual
This manual is also suitable for
Page is loading ...
Page is loading ...

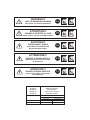
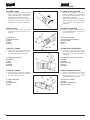
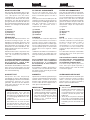
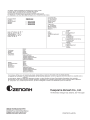
MODEL SOUND LEVEL
MODELE NIVEAU SONORE
MODELLE KLANGPEGEL
MODELLO LIVELLO DEL SUONO
MODELO NIVEL DE SONIDO
ISO 11094
LwA
mesured guaranteed
EB4300 (41.5cm
3
) 103.7dB(A) 106dB(A)
EB6200 (62.0cm
3
) 107.95dB(A) 110dB(A)
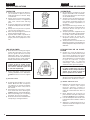
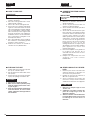
WARNING!!!
RISK OF DAMAGING HEARING
Wear head, eye and ear protection.
EB4300 EB6200
ATTENTION!!!
DANGER D'ATTEINTE A L'OUIE
Porter casque, visière et protège-oreilles.
EB4300 EB6200
ACHTUNG!!!
HÖRSCHADEN - RISIKO
Immer Helm, Schutzbrille und
Geräuschschutz tragen.
EB4300 EB6200
ATTENZIONE!!!
RISCHIO DI DANNO UDITIVO
Indossare casco, occhiali e cuffie
di protezione.
EB4300 EB6200
ATENCION!!!
RIESGO DE DAÑO AUDITIVO
Llevar casco, gafas y auriculares
de protección.
EB4300 EB6200

4
• Lire attentivement ce mode
d'emploi du souffleurs. S'assurer
de bien comprendre son
fonctionnement avant toute
utilisation. Ce sont des
précautions à prendre qui, faute
d'être observées, pourraient
entraîner des blessures graves.
• Conserver ce mode d'emploi dans
un endroit pratique, afin de
pouvoir le consulter
ultérieurement en cas de
problème. Noter également qu'il
est indispensable de prendre con-
tact avec votre revendeur pour de
l'assistance technique au cas où
vos questions sont restées sans
réponse.
• Toujours joindre ce mode d'emploi
en cas de vente, de location ou de
tout autre transfert de propriété
de cet appareil.
• Prière de consulter et respecter la
réglementation locale.
• Read this blowers Owner/Operator
Manual carefully. Be sure you un-
derstand how to operate this unit
properly before you use it. Failure
to do so could result in serious in-
jury.
• Be sure to keep this manual handy
so that you may refer to it later
whenever any questions arise.
Also note that you are requested
to contact the dealer from whom
you purchased the product for as-
sistance in the event that you
have any questions which cannot
be answered herein.
• Always be sure to include this
manual when selling, lending, or
otherwise transferring the owner-
ship of this product.
• Please check and follow the local
regulations.
PRECAUTIONS DE SECURITE .......... 6
EMPLACEMENT DES PIECES ET
SPECIFICATIONS .............................. 10
INSTALLATION .................................. 12
CARBURANT ...................................... 14
FONCTIONNEMENT .......................... 20
ENTRETIEN ........................................ 22
STOCKAGE ........................................ 28
LIMITATION DE LA GARANTIE ......... 30
TABLE DES MATIERESCONTENTS
SAFETY PRECAUTIONS ..................... 6
PARTS LOCATION &
SPECIFICATIONS .............................. 10
SET UP ............................................... 12
FUEL ................................................... 14
OPERATION ....................................... 20
MAINTENANCE .................................. 22
STORAGE .......................................... 28
LIMITED WARRANTY ........................ 30
Engilsh
Français
Page is loading ...

6
SAFETY PRECAUTIONS PRECAUTIONS DE SECURITE
OPERATOR
Refrain from operating the blower if
you are tired, ill, or upset, or if you are
under the influence of alcohol, drugs
or medication.
Always wear eye protection goggles,
substantial footwear, a longsleeved
shirt, a hat, a dust mask, and long
pants.
If you have long hair, tie it up and put it
inside the head protection not to be in-
haled.
Always wear ear protectors to protect
your ears from engine noise.
Wear anti-slip work gloves which can
help to grip the handle easier.
A person who is within a perimeter of
15m (50ft) should wear the same
proper protective equipment as the
user.
Empêcher les enfants de jouer avec la
soufflerie. Vérifier que chaque
personne autorisée à utiliser la
soufflerie a bien compris toutes les
régles de sécurité décrites dans ce
manuel.
Eviter d'utiliser tout accessoire ou
pièce rattachée autre que celle portant
la marque ZENOAH avec la soufflerie.
Lors de l'interruption d'un travail ou de
la vérification de la soufflerie, arrêter le
moteur.
Vidanger le carburant du réservoir à
carburant avant de transporter ou de
ranger la soufflerie.
Avoid allowing children to use the
blower. Make sure that each person
you authorize to operate the blower
understands all of the safety rules in
this manual.
Avoid using any accessory or attach-
ment other than those bearing the
ZENOAH mark for use with the blower.
When suspending a job or inspecting
the blower, be sure to stop engine.
Drain the fuel from the fuel tank before
transporting or storing the blower.
Engilsh
Français
USE OF BLOWER
Each time before starting the engine,
inspect the entire unit to see if every
part is in good order and is securely
tightened in place. If any damage is
found in the fuel line, the exhaust line,
the ignition wiring, avoid using the
blower and have the part repaired.
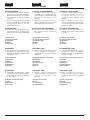
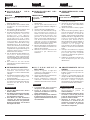
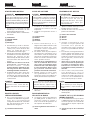
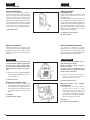
Never use the blower without the
screen at the air intake of the
blower. Before each use, check that
the screen is attached in place and
is free from any damage.
Before operation, confirm that the
catching SCREW on the AIR INLET
SCREEN is not loose. If loose, tighten
it.
(1) Air inlet screen
UTILISATION DE LA SOUF-
FLERIE
Chaque fois avant de démarrer le
moteur, vérifier l'unité entière afin de
voir si toutes les pièces sont en bon
état et correctement fixées en place.
Si une défaillance est constatée dans
la ligne de carburant, la ligne
d'échappement, le câblage
d'allumage, éviter d'utiliser la
soufflerie et faire réparer les pièces.
Ne jamais utiliser la soufflerie sans
la grille d'admission d'air de la
soufflerie. Avant chaque utilisation,
vérifier que la grille est fixée en
place et qu'elle est sans défaut.
Avant l'opération, s'assurer que la vis
de prise sur l'écran d' entrée d'air n'est
pas desserrée. Si elle l'est, la serrer
(1) Grille d' admission d' air
OPERATEUR
Ne pas utiliser la soufflerie en cas de
fatigue, de maladie ou de contrariété,
ou sous l'effet de l'alcool, de la drogue
ou des médicaments.
Toujours porter des lunettes de pro-
tection, des chaussures adéquates,
une chemise à manches longues, un
casque, un masque à poussières, et
un pantalon.
Si vous portez des longs cheveux, les
attacher et les placer à l' intérieur de la
protection de tête afin qu'n ils ne
soient pas aspirés.
Toujours porter des équipements de
protection des oreilles afin de protéger
vos oreilles contre le bruit du moteur.
Porter des gants de travail anti-
dérapants afin de pouvoir saisir le
manche plus facilement.
Toute personne se trouvant dans un
périmètre inférieur à 15 m doit porter le
même équipement de protection que l'
utilisateur.
Page is loading ...

8
When storing the blower, choose a
space indoors free from moisture and
out of the reach of children.
Examine the blower at intervals for
loose fasteners and rusted or dam-
aged parts. Use special care around
the fuel line, the muffler, and the ig-
nition wiring.
All engine service except for those de-
scribed in this manual should be per-
formed by competent service person-
nel. Improper service to the blower fan
and muffler could cause a hazardous
failure.
WORKING CONDITION
Avoid running the engine indoors.
The exhaust gases conain harmful
carbon monoxide.
Check the work area and remove or
cover all valuables that may be dam-
aged by the air blast or thrown debris.
Keep open flames and sparks away
from the area where fuel is handled or
stored. Mix and store fuel only in a
marked container. Never smoke
while refueling the blower. Make
sure to stop the engine before refu-
eling. The fuel is highly flamable.
Wipe off any spilled fuel and tighten
the fuel cap securely. Move at least
3m (10 ft) away from the fueling spot
before starting the engine.
Keep operation area clear of all per-
sons, particularly small children and
pets. Injury may result from thrown de-
bris.
Never direct the blower nozzle toward
persons or a fire.
Avoid using the blower where stable
footing and balance are not assured.
■ AVOID NOISE PROBLEM
Check and follow the local regulations
as to sound level and hours of opera-
tions for blower.
Lors du rangement de la soufflerie,
choisir un endroit à l'intérieur exempt
d'humidité et hors de portée des
enfants.
Examiner la soufflerie périodiquement
pour rechercher des fixations
desserrées et rouillées ou des pièces
endommagées. Faire très attention
autour de la ligne de carburant, de
l'échappement, et du câblage
d'allumage.
Toute réparation du moteur, excepté
celle décrite dans ce manuel, doit être
effectuée par un dépanneur qualifié.
Une réparation incorrecte du
ventilateur de la soufflerie et de
l'échappement pourrait provoquer une
défaillance dangereuse.
CONDITIONS DE TRAVAIL
Eviter de faire tourner le moteur à
l'intérieur. Les gaz d'échappement
contiennent du monoxyde de
carbone dangereux.
Vérifier la zone de travail et retirer tous
les objets de valeur qui risquent être
endommagés par le vent de soufflage
ou les débris projetés.
Eloigner les flammes nues et les
étincelles de la zone d'utilisation ou de
stockage du carburant. Ne mélanger
et stocker le carburant que dans un
bidon marqué. Ne jamais fumer pen-
dant le ravitaillement. Vérifier que le
moteur est arrêté avant de
ravitailler en carburant. Le
carburant est très inflammable.
Essuyer tout carburant renversé et
serrer fermement le bouchon à
carburant. S'éloigner au moins de 3 m
(10 pieds) de l'endroit de ravitaillement
avant de démarrer le moteur.
Eloigner de la zone de travail toute
personne, en particulier de jeunes
enfants et des animaux. Des
blessures risquent d'être provoquées
par des débris volants.
Ne jamais diriger le gicleur de la
soufflerie vers des personnes ou vers
un feu.
Eviter d'utiliser la soufflerie,
lorsqu'aucun point d'appui stable et
équilibre ne sont assurés.
■ EVITER LES PROBLEMES DE
BRUIT
Consulter et respecter la
réglementation locale concernant le
niveau sonore et les heures d'
utilisation d' un soufleur.
SAFETY PRECAUTIONS PRECAUTIONS DE SECURITE
Engilsh
Français
Page is loading ...

10
MODELE EB4300 EB6200
Dimensions (L L H) mm (in) 480 535 495 (18,9 21,1 19,5) 480 530 490 (18,9 20,9 19,3)
Poids à sec kg (lbs) 8,5 (18,6) 8,6 (18,9)
Capacité du réservoir à carburant
litres
(fl.oz) 2,0 (67,6)
Type de moteur Moteur à essence, 2 temps, refroidi à air
Déplacement du piston cc (cu.in) 41,5 (2,53) 62 (3,78)
Filtre à air Normal
Carburateur Membrane de type à valve rotative
Système d'allumage CDI
Bougie Champion RJ6C Champion RCJ6Y
Echappement Equipé d'une grille d'arrêt d'étincelles
Vitesse de fonctionnement du moteur
tr/min. 2000 à 6500 2000 à 7500
Consommation en carburant
litres/h (fl.oz/h) 1,7 (57,5) 2,2 (65)
Volume d'air maximum (w/std Pipes)
cu.m/min (cfm) 12 (423) 15 (529)
Volume d'air maximum (w/o Pipes)
cu.m/min (cfm) 16 (564) 20 (730)
Vitesse d'air maximum m/sec (mph) 72(160) 83 (184)
Niveau de bruit à 50 pieds dB (A) 72 à 6500 tr/min. 75 à 7500 tr/min.
PARTS LOCATION EMPLACEMENT DES PIECES
MODEL EB4300 EB6200
Dimensions (L W H) mm (in) 480 535 495 (18.9 21.1 19.5) 480 530 490 (18.9 20.9 19.3)
Dry Weight kg (ibs) 8.5 (18.6) 8.6 (18.9)
Fuel Tank Capacity liter (fl.oz) 2.0 (67.6)
Engine Type Air-cooled 2-cycle gasoline engine
Piston Displacement cc (cu.in) 41.5 (2.53) 62(3.78)
Air Filter Regular size
Carburetor Diaphragm, rotary valve type
Ignition System C.D.I.
Spark Plug Champion RJ6C (Noise-proof) Champion RCJ6Y
Muffler Spark arrester equipped
Operating Engine Speed rpm 2000 to 6500 2000 to 7500
Fuel Consumption liter/h (fl.oz/h) 1.7 (57.5) 2.2 (65)
Max. Air Volume (w/std Pipes) cu.m/min (cfm) 12 (423) 15 (529)
Max. Air Volume (w/o Pipes) cu.m/min (cfm) 16 (564) 20 (730)
Max. Air Velocity m/sec (mph) 72 (160) 83 (184)
Noise Level at 50 feet dB (A) 72 at 6500 pm 75 at 7500 rpm
SPECIFICATIONS
SPECIFICATIONS
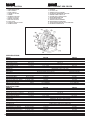
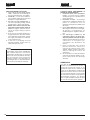
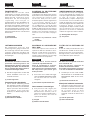
1. SHOULDER STRAP
2. AIR CLEANER
3. STOP SWITCH
4. THROTTLE LEVER
5. FRAME
6. BLOWER HOUSING
7. SPARK PLUG CAP
8. RECOIL STARTER
9. EXHAUST OUTLET
10. FUEL TANK
11.STARTER LOCK BUTTON
12. CHOKE LEVER
1. CHASSIS
2. FILTRE A AIR
3. COMMUTATEUR D'ARRET
4. LEVIER DE COMMANDE DES GAZ
5. BANDOULIERE D'EPAULE
6. CARTER DE LA SOUFFLERIE
7. BOUCHON DE BOUGIE
8. STARTER DE RECUL
9. SORTIE D'ECHAPPEMENT
10. RESERVOIR A CARBURANT
11. TOUCHE DE BLOCAGE DU DémARRAGE
12. LEVIER D'ETRANGLEUR
Engilsh
Français
Page is loading ...

12
TUYAUX DE SOUFFLERIE
1. Connecter la soufflerie et le joint à
rotule au flexible. Serrer fermement
les deux extrémités du flexible avec le
matériel fixé à l'appareil.
2. Aligner la partie en saillie et la rainure
sur les extrémités du tuyau et tordre le
tuyau jusqu'au verrouillage de la
connexion.
POIGNÉE DU GUIDON
Insérer la poignée du guidon dans le
tuyau de jonction du pivot et fixer avec
une vis et un écrou.
(1) Poignée du guidon
(2) Tuyau de jonction du pivot
(3) tuyau souple
(4) Écrou
(5) Vis
LEVIER D’ACCÉLÉRATION
Insérer la poignée du levier
d’accélération dans la poignée du gui-
don et serrer la vis sur l’attache fixée à
la poignée.
(1) Poignée de levier d’accélération
(2) Serrer
(3) Guidon
(4) Tuyau souple
(5) Pivot
(6) Attache
CÂBLE D’ACCÉLÉRATION
Utiliser la bande pour fixer le tube
colgate qui contient le câble
d’accélération et le câble
d’alimentation au tuyau souple.
(1) Fixer avec la bande
(2) Câble
(3) Levier d’accélération
(4) tuyau souple
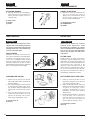
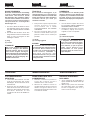
BLOWER TUBES
1. Connect the blower and swivel joint
with the flexible hose. Clamp both
ends of the flexible hose securely with
the hardware attached to the unit.
2. Align the protrusion and the groove
provided on the tube ends and twist
the tube until connection is locked up.
HANDLE STAY
Insert the handle stay in the swivel
joint pipe and fasten with the screw
and nut.
(1) Handle stay
(2) Swivel joint pipe
(3) Hose
(4) Nut
(5) Screw
THROTTLE LEVER
Insert the throttle lever handle in the
handle stay and tighten the screw on
the clamp attached to the handle.
(1) Throttle lever handle
(2) Tighten
(3) Stay
(4) Hose
(5) Swivel
(6) Clamp
THROTTLE CABLE
Use the band to fasten the colgate
tube containing the throttle cable and
the power cable to the hose.
(1) Fasten with band
(2) Cable
(3) Throttle lever
(4) Hose
INSTALLATIONSETUP
Engilsh
Français
Page is loading ...

14
Engilsh
Français
FUEL CARBURANT
■ FUEL
• Gasoline is very flammable. Avoid
smoking or bringing any flame or
sparks near fuel. Make sure to stop
the engine and allow it cool before
refueling the unit. Select outdoor
bare ground for fueling and move at
least 3m (10ft) away from the fuel-
ing point before starting the engine.
• The Zenoah engines are lubricated by
oil specially formulated for air-cooled
2-cycle gasoline engine use. If Zenoah
oil is not available, use an anti-oxidant
added quality oil expressly labeled for
air-cooled 2-cycle engine use. (JASO
FC GRADE OIL or ISO EGC GRADE)
• Do not use BIA or TCW (2-stroke wa-
ter-cooling type) mixed oil.
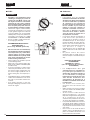
RECOMMENDED MIXING RATIO
GASOLINE 50:OIL 1
(when using ZENOAH genuine oil)
• Exhaust emission are controlled by
the fundamental engine parameters
and components (eq., carburation,
ignition timing and port timing)
without addition of any major hard-
ware or the introduction of an inert
material during combustion.
• These engines are certified to operate
on unleaded gasoline.
• Make sure to use gasoline with a mini-
mum octane number of 89 RON (USA/
Canada: 87AL)
• If you use a gasoline of a lower octane
value than prescribed, there is a dan-
ger that the engine temperature may
rise and an engine problem such as
piston seizing may consequently oc-
cur.
• Unleaded gasoline is recommended to
reduce the contamination of the air for
the sake of your health and the envi-
ronment.
• Poor quality gasolines or oils may
damage sealing rings, fuel lines or fuel
tank of the engine.
■ Carburant
• L’essence est un produit
hautement inflammable. S’abstenir
de fumer et ne tolérer aucun flamme
ou source d’étincelles à proximité
de l’endroit où est entreposée
l’essence. Arrêter le moteur puis le
laisser refroidir un peu avant de
remplir le réservoir. Remplir le
réservoir à l’extérieur sur une sur-
face nue et éloigner le bidon
d’essence d’au moins 3 mètres
avant de mettre le moteur de la
tronçonneuse en marche.
• Les moteurs Zenoah sont lubrifiés à
l’aide d’une huile spécialement
conçue pour les moteurs 2 temps à
refroidissement par air. S’il n’est pas
possible d’obtenir de l’huile Zenoah,
utilisez une huile antioxydante de
haute qualité spécialement destinée
aux moteurs 2 temps à
refroidissement par air (HUILE DE
TYPE JASO FC ou DE TYPE ISO
EGC).
• Ne jamais utiliser des huiles
mélangées BIA ou TCW (pour les
moteurs 2 temps à refroidissement par
eau).
RAPPORT DE MELANGE
RECOMMANDE
ESSENCE 50 : HUILE 1
(Lors de l’utilisation de la véritable
huile ZENOAH)
• La composition des gaz
d’échappement est contrôlée par
les principaux paramètres et
composants du moteur (comme par
ex., la carburation, le calage de
l’allumage et le calage du port) sans
avoir besoin d’effectuer des
changements de matériel ou à
introduire un matériel inerte durant
la combustion.
• Ces moteurs sont certifiés pour
fonctionner avec de l’essence sans
plomb.
• Utiliser toujours une essence à indice
d’octane minimal de 89RON (USA/
Canada : 87AL).
• Si une essence à indice d’octane
inférieur est utilisée, il y a un risque
important d’augmentation dangereuse
de la température du moteur,
entraînant des problèmes de moteur
au niveau des cylindres par exemple.
• Il est préférable d’utiliser de l’essence
sans plomb afin de réduire la pollution
de l’atmosphère et de participer ainsi à
la protection de l’environnement et de
votre santé.
• De l’essence ou de l’huile de basse
qualité risque d’endommager les
joints, les conduites d’essence ou le
réservoir d’essence du moteur.
WARNING!!!
ATTENTION!!!
Page is loading ...

16
Engilsh
Français
FUEL CARBURANT
WARNING!!!
ATTENTION!!!
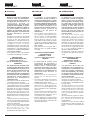
■ HOW TO MIX FUEL
IMPORTANT
Pay attention to agitation.
1. Measure out the quantities of gasoline
and oil to be mixed.
2. Put some of the gasoline into a clean,
approved fuel container.
3. Pour in all of the oil and agitate well.
4. Pour In the rest of gasoline and agitate
again for at least one minute. As some
oils may be difficult to agitate depend-
ing on oil ingredients, sufficient agita-
tion is necessary for the engine to last
long. Be careful that, if the agitation is
insufficient, there is an increased dan-
ger of early piston seizing due to ab-
normally lean mixture.
5. Put a clear indication on the outside of
the container to avoid mixing up with
gasoline or other containers.
6. Indicate the contents on outside of
container for easy identification.
■ FUELING THE UNIT
1. Untwist and remove the fuel cap. Rest
the cap on a dustless place.
2. Put fuel into the fuel tank to 80% of the
full capacity.
3. Fasten the fuel cap securely and wipe
up any fuel spillage around the unit.
1. Select bare ground for fueling.
2. Move at least 10feet (3meters) away
from the fueling point before start-
ing the engine.
3. Stop the engine before refueling the
unit. At that time, be sure to suffi-
ciently agitate the mixed gasoline in
the container.
■ COMMENT OBTENIR UN BON
MELANGE
IMPORTANT
Faire attention à ne pas trop remuer le
carburant.
1. Mesurez les volumes d’essence et
d’huile à mélanger.
2. Verser un peu d’essence dans un
récipient à carburant propre.
3. Verser ensuite toute l’huile, puis bien
remuer le tout.
4. Verser enfin le reste de l’essence, puis
bien mélanger l’ensemble pendant
une minute environ. Etant donné que
certains types d’huiles sont plus
fluides que d’autres en fonction de leur
composition, un brassage énergique
est nécessaire afin de garantir une
bonne marche du moteur pendant
longtemps. En effet, en cas de
mélange insuffisant, un risque majeur
de problèmes au niveau des cylindres
peut apparaître en raison d’un
mélange hétérogène.
5. Placer une étiquette assez grande sur
le récipient afin d’éviter de le
confondre avec de l’essence ou avec
d’autres récipients.
6. Indiquer les composants sur cette
étiquette afin d’en faciliter
l’identification.
■ REMPLISSAGE DU RESER-
VOIR
1. Dévisser puis retirer le bouchon de
carburant. Déposer ce bouchon sur
une surface non poussiéreuse.
2. Remplir le réservoir de carburant à
80% de sa capacité totale.
3. Visser fermement le bouchon du
réservoir et essuyer toute éventuelle
éclaboussure d’essence sur l’appareil.
1. Effectuer le remplissage sur une
surface nue.
2. S’éloigner d’au moins 3 mètres du
point de remplissage avant de
démarrer le moteur.
3. Arrêter le moteur avant de démarrer
l’appareil. Bien remuer à cet instant
le mélange d’essence dans le
réservoir.
Page is loading ...

18
Engilsh
Français
FUEL CARBURANT
FOR YOUR ENGINE LIFE, AVOID;
1. FUEL WITH NO OIL(RAW GASO-
LINE) – It will cause severe damage to
the internal engine parts very quickly.
2. GASOHOL – It can cause deteriora-
tion of rubber and/or plastic parts and
disruption of engine lubrication.
3. OIL FOR 4-CYCLE ENGINE USE – It
can cause spark plug fouling, exhaust
port blocking, or piston ring sticking.
4. Mixed fuels which have been left
unused for a period of one month or
more may clog the carburetor and re-
sult in the engine failing to operate
properly.
5. In the case of storing the product for a
long period of time, clean the fuel tank
after rendering it empty. Next, activate
the engine and empty the carburetor
of the composite fuel.
6. In the case of scrapping the used
mixed oil container, scrap it only at an
authorized repository site.
NOTE:
As lot details of quality assurance, read
the description in the section Limited War-
ranty carefully. Moreover, normal wear
and change in product with no functional
influence are not covered by the warranty.
Also, be careful that, if the usage in the
instruction manual is not observed as to
the mixed gasoline, etc. described therein,
it may not be covered by the warranty.
A EVITER POUR PROLONGER LA
DUREE DE VIE DU MOTEUR;
1. ESSENCE SANS HUILE (ESSENCE
PURE) – L’essence pure est capable
d’endommager très rapidement les
pièces du moteur.
2. ESSENCE-ALCOOL – Ce mélange
risque de très rapidement détruire les
pièces en caoutchouc et/ou en
plastique et d’empêcher la lubrification
du moteur.
3. HUILE POUR MOTEURS 4 TEMPS –
Elles risquent d’encrasser les bougies,
de bloquer l’échappement ou
d’endommager les segments des pis-
tons.
4. Les mélanges d’huile et de
carburants laissés au repos pen-
dant une période d’un mois ou plus
risquent sérieusement d’encrasser le
carburateur et d’entraîner par
conséquent une défaillance du
moteur.
5. Dans l’éventualité d’une longue
période d’inactivité, nettoyer le
réservoir de carburant après l’avoir
vidangé. Allumer ensuite le moteur et
vider le mélange d’essence du
carburateur.
6. En cas de mise au rebut du récipient
contenant le mélange d’huile, en dis-
poser toujours dans une décharge
autorisée.
REMARQUE:
Pour plus de détails sur la garantie de
qualité, lire attentivement la section à
propos de la Garantie Limitée. Il est
également important de rappeler que
l’usure et les dégradations normales de
l’appareil ne sont en aucun cas couvertes
par cette garantie. De plus, le non-respect
des instructions relatives aux proportions
des mélanges d’essence, etc. décrites
dans ce mode d’emploi risque d’entraîner
un refus de couverture par la garantie.
Page is loading ...

20
DEMARRAGE DU MOTEUR
ATTENTION!
Eviter d'utiliser la soufflerie avec le
flexible et le joint à rotule débranchés.
Cela couperait l'air de refroidissement
du moteur, et le moteur pourrait donc
être endommagé par une surchauffe.
1. Enfoncer la bulbe d'amorceur jusqu'à
ce que le carburant s'écoule dans le
tuyau clair.
2. Lorsque le moteur est froid, fermer
l'étrangleur.
(1) Levier d'etrangleur
(2) FERMER
(3) OUVRIR
(4) Bulle d'amorceur
3. Mettre l'interrupteur(a) en position "I" .
Placer le levier de commande des gaz
en position de démarrage(1-2-3), puis
faire démarrer le moteur en suivant la
procédure décrite dans la section 4.
4. Pour démarrer, tenir fermement le
haut de la soufflerie à la main gauche.
Tirer lentement le bouton d'étrangleur
jusqu'à ce qu'on sent qu'il est engagé
et tirer ensuite vigoureusement.
• Eviter de tirer à fond sur la ficelle de
démarrage. Nepas relacher la ficelle
de démarrage. Rentrer la ficelle
lentement. Ceci évitera une usure
prématurée du démarreur.
5. Dès que le moteur tourne, ouvrir
progressivement l'étrangleur, s'il a été
fermé et laisser le moteur tourner au
ralenti pendant une minute pour le
préchauffer.
REMARQUE:
Si le moteur ne veut pas démarrer
après plusieurs tentatives due à un
surétranglement, ouvrir l'étrangleur et
tirer la corde plusieurs fois.
6. Tirer le levier de commande des gaz
pour la débloquer.
REGLAGE DE LA VITESSE AU
RALENTI
La vitesse au ralenti est réglée à 2000
tr/min. au départ de l'usine. S'il s'avère
nécessaire de régler la vitesse au
ralenti, utiliser la vis de réglage sur le
côté supérieur du carburateur.
(1) Vis de reglage du ralenti
Engilsh
Français
OPERATION
FONCTIONNEMENT
(1)
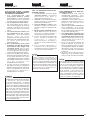
STARTING ENGINE
CAUTION!
Avoid operating the blower with the
flexible tube and swivel joint discon-
nected. That would cut down the en-
gine cooling air so that the engine
could be damaged by overheat.
1. Push the primer bulb until fuel flows
out in the clear tube.
2. When the engine is cool, close the
choke.
(1) Choke lever
(2) CLOSE
(3) OPEN
(4) Primer bulb
3. Set the stop switch(a) to the "I" posi-
tion. Set the throttle lever to the start
position(1-2-3), then start the engine
following the procedure described in 4.
4. To start, hold the top of the blower
firmly with your left hand. Pull the
starter knob slowly until you feel it en-
gage and then give it a vigorous strong
pull.
• Avoid pulling the starter rope out to
its full extension. Do not allow the
starter rope to snap back. Rewind
the rope slowly. This will prevent
premature damage to the starter.
5. Once the engine is running, gradually
open the choke if it was set closed,
and let the engine run at idle speed for
a minute to warm it up.
NOTE:
When the engine failed to start after
several attempts due to overchoking,
open the choke and repeat pulling the
rope.
6. Pull the throttle lever to unlock it.
ADJUSTING IDLE SPEED
The idling speed is set for 2000 rpm at
the factory. If it is necessary to adjust
the idle speed, use the adjustment
screw on the top side of carburetor.
(1) Idling adjustment screw
Page is loading ...

22
ARRET DU MOTEUR
Déplacer le levier de commande des
gaz sur la position de ralenti et
appuyer sur le commutateur d'arrêt
(touche rouge) jusqu'à ce que le
moteur s'arrête complètement.
(1) Commutateur d'arret
(2) D'ÉMARRAGE
(3) ARRÉT
Vérifier que le moteur est arrêté et
refroidi avant d'effectuer toute
réparation de la soufflerie. Un contact
avec le ventilateur de la soufflerie rota-
tive ou avec le tuyau d'échappement
risque de provoquer des blessures
corporelles.
FILTRE A AIR
Vérifier le filtre à air toutes les 25 heures
d'utilisation ou plus fréquemment s'il est
utilisé dans des endroits poussiéreux. Un
filtre à air encrassé risque d'augmenter la
consommation de carburant et de
diminuer la puissance du moteur. Ne
jamais utiliser la soufflerie sans le filtre à
air ou avec un élément de filtre déformé,
parce que l'air poussiéreux non filtré ris-
que d'abîmer rapidement le moteur.
NETTOYAGE DU FILTRE A AIR:
1. Retirer le couvercle du filtre à air en
poussant la languette sur le dessous
et en sortant l'élément à filtre.
2. Utiliser un détergent neutre et de l'eau
tiède pour nettoyer l'élément du filtre à
air. Après le nettoyage, sécher
l'élément complètement à l'air et
l'humidifier avec une petite quantité
d'huile moteur.
3. Installer l'élément du filtre à air dans le
carter du filtre à air et presser le
couvercle contre le carter jusqu'à ce
qu'il s'enclenche en position. Ne
jamais oublier d' attacher l' écran.
(1) Huile moteur 2 temps
(2) Ecran
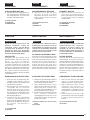
STOPPING ENGINE
Move the throttle lever to the idling po-
sition and press the stop switch (red
button) until the engine comes to a
complete stop.
(1) Stop switch
(2) START
(3) STOP
Make sure that the engine has been
stopped and is cool before performing
any service to the blower. Contact with
rotating blower fan or hot muffler may
result in a personal injury.
AIR CLEANER
Check the air cleaner every 25 hours of
use or more frequently if used under dusty
conditions. A clogged air filter may in-
crease fuel consumption while cutting
down the engine power. Never operate
the blower without the air filter or with a
deformed filter element because unfiltered
dusty air may quickly ruin the engine.
CLEANING AIR FILTER:
1. Remove the air cleaner cover by pull-
ing the tab on the bottom and take out
the filter element.
2. Use neutral detergent and warm water
to clean the filter element. After clean-
ing, air dry the element completely and
moisten with a small amount of motor
oil.
3. Place the filter element into the air
cleaner housing and press the cover
against the housing until it clicks.
Never forget attaching the screen.
(1) 2Cycle moter oil
(2) Screen
OPERATION FONCTIONNEMENT
Engilsh
Français
WARNING!!!
ATTENTION!!!
MAINTENANCE ENTRETIEN
Page is loading ...

24
FILTRE A CARBURANT
Un filtre à carburant encrassé risque de
provoquer une mauvaise accélération du
moteur. Vérifier régulièrement pour voir si
le filtre est encrassé par la saleté.
Le filtre peut être sorti de l'orifice de
ravitaillement à l'aide d'un petit crochet à
fil. Débrancher l'ensemble filtre du tuyau à
carburant et décrocher le récipient de
dépôt pour le démonter. Nettoyer les
composants avec de l'essence.
(1) Grille
(2) Element (2)
(3) Support
(4) Retenue
BOUGIE
La bougie peut accumuler des dépôts de
carbone sur l'extrémité d'allumage après
une utilisation raisonnable. Retirer la bou-
gie et la vérifier toutes les 25 heures et
nettoyer les électrodes si nécessaire avec
un gratte-brosse. L'écartement de la bou-
gie doit être ajusté à 0,025 pouces.
Les fabricants de bougies recommandent
de remplacer la bougie deux fois l'an afin
d'éviter une panne de bougie inattendue.
BOUGIE DE REMPLACEMENT CHAM-
PION RJ6C(EB4300) OU CHAMPION
RCJ6Y(EB6200) OU EQUIVALENT.
Pour installer la bougie, tourner d'abord la
bougie jusqu'à ce qu'elle soit serrée à la
main, ensuite la serrer d'un quart de tour
de plus avec une clé à pipe.
ECHAPPEMENT
Vérifier régulièrement l'échappement pour
rechercher des fixations desserrées, des
dommages ou de la corrosion. Si des
signes de fuite sont trouvés, éviter
d'utiliser la soufflerie et la faire réparer
immédiatement.
IMPORTANT
Avant de procéder à la mise en
marche, toujours s' assurer de vérifier
si le silencieux est bien fixé au cylindre
par trois boulons. (Tension de serrage
: 80 à 120kg, cm)
Même si un boulon sur les trois est
desserré, le silencieux peut se
détacher pendant l' utilisation, ce qui
pourrait occasionner un incendie du
moteur.
MAINTENANCE ENTRETIEN
Engilsh
Français
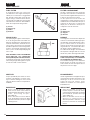
FUEL FILTER
A clogged fuel filter may cause poor
accceleration of the engine. Check peri-
odically to see if the filter is clogged with
dirt. The filter can be taken out of the fuel-
ing port using a small wire hook. Discon-
nect the filter assembly from the fuel pipe
and unhook the retainer to disassemble it.
Clean the components with gasoline.
(1) Screen
(2) Element (2)
(3) Holder
(4) Retainer
SPARK PLUG
The spark plug may gather carbon depos-
its on its firing end with reasonable use.
Remove and inspect the spark plug every
25 hours and clean the electrodes as nec-
essary with a wire brush. The spark gap
should be adjusted to .025 in.Plug manu-
facturers recommend replacing the plug
twice a year to avoid unexpected plug fail-
ure in a job.
REPLACEMENT PLUG IS A CHAMPION
RJ6C(EB4300) OR CHAMPION
RCJ6Y(EB6200) OR THE EQUIVALENT.
To install the spark plug, first turn the plug
until it is finger tight, then tighten it a quar-
ter turn more with a socket wrench.
MUFFLER
Inspect periodically the muffler for loose
fasteners, any damage or corrosion. If any
sign of exhaust leakage is found, avoid
using the blower and have it repaired im-
mediately.
IMPORTANT
Before starting operation, always
make sure to check if the muffler is
properly held by three bolts to the cyl-
inder. (Fastening Torque :
80~120kg·cm)
Even if one bolt out of three bolts is
loose, the muffler may get loose during
operation which may result in engine
catching on fire.
(1) Three bolts
Page is loading ...

26
MAINTENANCE ENTRETIEN
GRILLE D'ARRET
D'ETINCELLES
Les moteurs RedMax sont équipés d'une
grille d'arrêt d'étincelles à l'orifice
d'échappement.
La vérifier régulièrement et la maintenir en
bon état. Dans l'état de Californie, la loi
(section 4442 du Code des Ressources
Public de la Californie) oblige d'équiper un
outil électrique alimenté en gaz d'une
grille d'arrêt d'étincelles, lorsque l'outil est
utilisé dans une région boisée, couverte
de brousailles ou d'herbes.
(1) Grille d'arret d'etincelles
(2) Trois boulons
Engilsh
Français
SPARK ARRESTER
The muffler is equipped with a spark ar-
rester to prevent red hot carbon from fly-
ing out of the exhaust outlet. Periodically
inspect and clean as necessary with a
wire brush. In the State of California it is
required by law (Section 4442 of the Cali-
fornia Pulic Resources Code) to equip a
spark arrester when a gas powered tool is
used in any forest covered, brush cov-
ered, or grass covered unimproved land.
(1) Spark arrester
GRILLE D'ADMISSION D'AIR
L'air soufflé est admis par la grille
d'admission d'air. Lorsque le débit d'air
chute pendant le fonctionnement, arrêter
le moteur et vérifier si la grille d'admission
d'air est bloquée par des obstacles.
ATTENTION!!!
Ne jamais utiliser la soufflerie avec la
grille d'entrée d'air retirée.
Avant de vérifier la grille, arrêter le
moteur sans faille.
Le contact avec le ventilateur de la
soufflerie rotative risque de provoquer
des blessures corporelles.
S'assurer que la vis de prise sur
l'écran d' entrée d'air n'est pas
desserrée. Si elle l'est, la serrer
(1) Grille admission d'air
Manipulation du câble
d’accélération
Manipuler en passant le tube de
colgate (qui couvre le câble
d’accélération et le câble de
l’interrupteur d’arrêt) par dessous la
volute (entre le caoutchouc anti-vibra-
tion sur la droite et la gauche) jusqu’au
côté du couvercle de la volute.
(1) Colgate
(2) Caoutchouc anti-vibration
AIR INLET SCREEN
Blowing air is taken in from the air inlet
screen. When air flow has dropped down
during operation, stop the engine and in-
spect the air inlet screen for blocking by
obstacles.
WARNING!!!
Never use the blower with the air inlet
screen removed. Before inspecting the
air inlet screen, stop the engine with-
out fail. Contact with rotating blower
fan may result in a serious personal in-
jury.
Confirm that the catching SCREW on
the AIR INLET SCREEN is not loose.
If loose, tighten it.
(1) Air inlet screen
Handling the throttle cable
Handle by passing the colgate tube
(covering the throttle cable and stop
switch wiring) from underneath the vo-
lute (between the anti-vibration rubber
on the right and left) to the volute cover
side.
(1) Colgate
(2) Anti-vibration rubber
Page is loading ...

28
SHOULDER STRAP
If the shoulder strap is damaged it may
break during use, thus causing the
product to fall and resulting in per-
sonal injury. Follow the instructions
below to replace the shoulder strap.
1. Pass the upper end of the strap
through the hanger, making the
FLAPPED SIDE OUTSIDE.
2. Put the end of the strap through the
ring on the strap, and then push the
ring toward the hanger as close as
possible.
(1) Ring
(2) Flapped side
CAUTION!
The flap on the end of the strap
works as a stopper. Never install
the strap with the flapped side in-
side, or the unit may fall from the
operation, which could result in in-
jury to the operator and/or damage
to the unit.
BEFORE STORING THE
BLOWER:
1. Drain a fuel tank and push the primer
bulb until it becomes empty of fuel.
2. Remove the spark plug and drop a
spoonful of 2-cycle oil into the cylinder.
Crank the engine several times and
replace the plug.
SANGLE D' EPAULE
Si la sangle d' épaule est endommagée,
elle peut rompre pendant l' utilisation,
occasionnant la chute de la machine et
entrainant des blessures corporelles.
Suivre les instructions en-dessous
pour remplacer la sengle d' épaule.
1. Passer l'extrémité supérieure de la
bandoulière à travers la suspension,
en mettant le COTE PENDANT VERS
L'EXTERIEUR.
2. Passer l'extrémité de la bandoulière à
travers la bague sur la bandoulière, et
pousser ensuite la bague aussi près
que possible vers la suspension.
(1) Bague
(2) Cote pendant
ATTENTION!
La patte à l'extrémité de la
bandoulière fonctionne comme une
butée. Ne jamais installer la
bandoulière avec le côté pendant à
l'intérieur, sinon l'ensemble risque
de tomber et de blesser l'opérateur
et/ou d'endommager l'appareil.
AVANT DE STOCKER LA
SOUFFLERIE:
1. Vidanger le réservoir à carburant et
enfoncer la bulle de l'amorceur jusqu'à
ce qu'elle ne contienne plus de
carburant.
2. Retirer la bougie et faire tomber une
cuillère d'huile 2 temps dans le
cylindre.
Lancer le moteur plusieurs fois et
remettre la bougie en place.
STORAGE STOCKAGE
MAINTENANCE ENTRETIEN
Engilsh
Français
Page is loading ...

30
GARANTIE LIMITÉELIMITED WARRANTY
Engilsh
Français
Should any failure occur on the product
under normal operating conditions within
the applicable warranty period, the failed
part will be replaced or repaired free of
charge by a ZENOAH authorized dealer.
WARRANTY PERIOD: 1 year (6 months if
used professionally, and 30 days if used
for rental purpose) from the date of initial
purchase.
THE PURCHASER SHALL BEAR
COSTS OF TRANSPORTING THE UNIT
TO AND FROM THE ZENOAH DEALER.
THE PURCHASER SHALL NOT BE
CHARGED FOR DIAGNOSTIC LABOR
WHICH LEADS TO THE DETERMINA-
TION THAT A WARRANTED PART IS
DEFECTIVE, IF THE DIAGNOSTIC
WORK IS PERFORMED AT THE
ZENOAH DEALER.
THE PURCHASER OR OWNER IS RE-
SPONSIBLE FOR THE PERFORMANCE
OF THE REQUIRED MAINTENANCE AS
DEFINED BY THE MANUFACTURER IN
THE OWNER/OPERATOR MANUAL.
ANY WARRANTED PART WHICH IS
NOT SCHEDULED FOR REPLACE-
MENT AS REQUIRED MAINTENANCE,
OR WHICH IS SCHEDULED ONLY FOR
REGULAR INSPECTION TO THE EF-
FECT OF REPAIR OR “REPLACE AS
NECESSARY” SHALL BE WARRANTED
FOR THE WARRANTY PERIOD. ANY
WARRANTED PART WHICH IS SCHED-
ULED FOR REPLACEMENT AS RE-
QUIRED MAINTENANCE SHALL BE
WARRANTED FOR THE PERIOD OF
TIME UP TO THE FIRST SCHEDULED
REPLACEMENT POINT FOR THE
PART.
ANY REPLACEMENT PART THAT IS
EQUIVALENT IN PERFORMANCE AND
DURABILITY MAY BE USED IN NON-
WARRANTY MAINTENANCE OR RE-
PAIRS, AND SHALL NOT REDUCE THE
WARRANTY OBLIGATION OF THE
COMPANY.
THE COMPANY IS LIABLE FOR DAM-
AGES TO OTHER ENGINE COMPO-
NENTS CAUSED BY THE FAILURE OF
A WARRANTED PART STILL UNDER
WARRANTY.
THE WARRANTY DOES NOT APPLY
TO THOSE UNITS WHICH HAVE BEEN
DAMAGED BY NEGLIGENCE OF IN-
STRUCTION LISTED IN THE OWNER/
OPERATOR MANUAL FOR PROPER
USE AND MAINTENANCE OF THE
UNITS ACCIDENT MISHANDLING, AL-
TERATION, ABUSE, IMPROPER LUBRI-
CATION, USE OF ANY PARTS OR AC-
En case de panne ou de défaut constaté
sur le produit au cours de la période de
garantie, les pièces défectueuses seront
réparées ou remplacées gratuitement par
le concessionnaire ZENOAH.
PERIODE DE GARANTIE : 1 an (6 mois
pour un usage professionnel ou 30 jours
pour les machines de location) à compter
de la date d’achat.
LE CLIENT PREND EN CHARGE TOUS
LES COUTS DE TRANSPORT DE
L’APPAREIL DEPUIS ET JUSQU’AUX
LOCAUX DU CONCESSIONNAIRE
ZENOAH.
LE CLIENT NE SERA PAS TENU POUR
RESPONSABLE DES CHARGES RELA-
TIVES A LA DETECTION D’UNE
DEFAILLANCE D’UNE PIECE SOUS
GARANTIE UNIQUEMENT LORSQUE
CES TRAVAUX DE DIAGNOSTIC
AURONT ETE EFFECTUES DANS LES
LOCAUX DU CONCESSIONNAIRE
ZENOAH.
LE CLIENT OU LE CAS ECHEANT, LE
PROPRIETAIRE DEVRA
IMPERATIVEMENT S’ACQUITTER DES
TACHES D’ENTRETIEN DECRITES
PAR LE FABRICANT DANS LE MODE
D’EMPLOI DU CLIENT/UTILISATEUR.
TOUTE PIECE SOUS GARANTIE DONT
LE REMPLACEMENT N’EST PAS
PREVU DANS LE CADRE DE
L’ENTRETIEN REQUIS, OU DESTINEE
A ETRE CONTROLEE
REGULIEREMENT ET REPAREE OU
“REMPLACEE SI NECESSAIRE” SERA
SOUS GARANTIE POUR TOUTE LA
PERIODE APPLICABLE. TOUTE PIECE
SOUS GARANTIE DESTINEE A ETRE
REMPLACEE A LA SUITE D’UN
CONTROLE SERA SOUS GARANTIE
POUR TOUTE LA PERIODE ALLANT
JUSQU’A SON PREMIER
REMPLACEMENT PREVU.
TOUTE PIECE DE RECHANGE DE
QUALITE ET DE VALEUR
EQUIVALENTES POURRA ETRE
UTILISEE POUR DES REPARATIONS
OU DES OPERATIONS DE MAINTE-
NANCE NON COUVERTES PAR LA
GARANTIE, SANS REDUCTION DES
OBLIGATIONS DE GARANTIE DE LA
SOCIETE.
LA SOCIETE SERA TENUE POUR
RESPONSABLE DE TOUS LES
DOMMAGES CAUSES AUX PIECES DU
MOTEUR PAR UNE DEFAILLANCE DE
PIECES QUELCONQUES SE
TROUVANT ENCORE SOUS
GARANTIE.
Page is loading ...

32
Engilsh
Français
CESSORIES OTHER THAN THOSE
SPECIFIED BY THE COMPANY, OR
OTHER CAUSES BEYOND THE
COMPANY'S CONTROL.
THIS WARRANTY DOES NOT COVER
THOSE PARTS REPLACED BY NOR-
MAL WEAR OR HARMLESS CHANGES
IN THEIR APPEARANCE.
THERE ARE NO OTHER EXPRESS
WARRANTIES.
IMPLIED WARRANTIES INCLUDING
THOSE OF MERCHANTABILITY AND
FITNESS FOR A PARTICULAR PUR-
POSE ARE LIMITED TO TWO (2)
YEARS OF HOME USE [ONE (1) YEAR
FOR ANY OTHER USE] FROM THE
ORIGINAL DELIVERY DATE.
LIABILITIES FOR INCIDENTAL OR
CONSEQUENTIAL DAMAGE UNDER
ANY AND ALL WARRANTIES ARE EX-
CLUDED.
IF YOU NEED TO OBTAIN MORE IN-
FORMATION, PLEASE CALL YOUR
NEAREST SERVICE CENTER, OR
CHECK PLEASE ZENOAH WEB SITE:
http://www.zenoah.net
LA GARANTIE NE S’APPLIQUE EN
AUCUN CAS AUX APPAREILS AYANT
ETE ENDOMMAGES SUITE AU NON-
RESPECT DES INSTRUCTIONS
D’UTILISATION ET D’ENTRETIEN
DECRITES DANS LE MODE D’EMPLOI
DU CLIENT/UTILISATEUR, PAR UNE
MAUVAISE MANIPULATION, PAR DES
MODIFICATIONS, DES MISES A
L’EPREUVE SEVERES, UNE
MAUVAISE LUBRIFICATION,
L’UTILISATION DE PIECES OU
D’ACCESSOIRES AUTRES QUE CEUX
RECOMMANDES PAR NOTRE SOCI-
ETE, OU ENFIN EN RAISON D’AUTRES
CAUSES NE DEPENDANT PAS DE LA
SOCIETE.
CETTE GARANTIE NE COUVRE EN
AUCUN CAS LE REMPLACEMENT DE
PIECES EN RAISON DE LEUR USURE
NORMALE OU DE LEGERES MODIFI-
CATIONS D’APPARENCE.
AUCUNE AUTRE GARANTIE
FORMELLE N’EST FOURNIE.
LES GARANTIES TACITES, IET
NOTAMMENT CELLES RELATIVES A
LA QUALITE MARCHANDE OU A LA
POSSIBILITE D’ACCOMPLIR UNE TA-
CHE PARTICULIERE SONT LIMITEES A
DEUX (2) ANS POUR UNE UTILISATION
A DOMICILE [ET A UN (1) AN POUR
TOUT AUTRE TYPE D’UTILISATION]
DEPUIS LA DATE D’ACHAT D’ORIGINE.
NOUS NE SAURIONS EN AUCUN CAS
ETRE TENUS RESPONSABLES DE
TOUT DOMMAGE ACCIDENTEL OU
CONSEQUENT A L’UTILISATION DE
CET APPAREIL.
POUR PLUS D’INFORMATIONS A CE
SUJET, VEUILLEZ APPELER VOTRE
CENTRE DE SERVICE LE PLUS
PROCHE OU CONSULTEZ LE SITE
INTERNET DE ZENOAH:
http://www.zenoah.net
GARANTIE LIMITÉELIMITED WARRANTY

33
Deutsch Italiano
Español
AN ANDEREN MOTORTEILEN
HAFTBAR GEMACHT WERDEN, DIE
DURCH EINE FEHLFUNKTION VON
DURCH DIE GARANTIE ABGEDECKTE
BAUTEILE INNERHALB DES
GARANTIEZEITRAUMES ENTSTEHEN.
DIE GARANTIE BEZIEHT SICH NICHT
AUF BAUTEILE, DIE DURCH DIE
NICHTBEACHTUNG DER IM
BESITZER-/BEDIENER-HANDBUCH
BESCHRIEBENEN ANLEITUNGEN ZUR
ORDNUNGSGEMÄSSEN
VERWENDUNG UND WARTUNG
ENTSTANDEN SIND.
AUSGESCHLOSSEN VON DEN
GARANTIELEISTUNGEN SIND ZUDEM
SCHÄDEN DURCH UNFÄLLE,
FALSCHE HANDHABUNG,
VERÄNDERUNG, MISSBRAUCH,
FALSCHE SCHMIERUNG ODER
VERWENDUNG VON BAUTEILEN
ODER ZUBEHÖR, DIE BZW. DAS NICHT
DURCH DAS UNTERNEHMEN
VORGESEHEN WURDE, SOWIE
DURCH ANDERE, AUSSERHALB DES
EINFLUSSES DES UNTERNEHMENS
LIEGENDE URSACHEN.
DIESE GARANTIE BEZIEHT SICH
NICHT AUF BAUTEILE, DIE NACH
EINEM NORMALEN VERSCHLEISS
AUSGETAUSCHT WERDEN MÜSSEN,
ODER AUF NICHT BEDEUTENDE
VERÄNDERUNGEN DER ÄUSSEREN
ERSCHEINUNG DIESER BAUTEILE.
DARÜBER HINAUS BESTEHEN
KEINERLEI WEITEREN
GARANTIEANSPRÜCHE.
DIE IMPLIZIERTEN
GARANTIELEISTUNGEN ÜBER DIE
ERHÄLTLICHKEIT UND DIE EIGNUNG
VON BAUTEILEN FÜR EINEN
BESTIMMTEN ZWECK SIND AB
URSPRÜNGLICHEM KAUFDATUM
BZW. AUSLIEFERUNGSDATUM AUF
ZWEI (2) JAHRE FÜR EINE
VERWENDUNG IM RAHMEN DES
HAUSGEBRAUCHS [EIN (1) JAHR FÜR
JEDE ANDERE VERWENDUNG]
BESCHRÄNKT.
HAFTUNGEN FÜR VERSEHENTLICHE
ODER FOLGESCHÄDEN UNTER
ALLEN GARANTIEN SIND
AUSGESCHLOSSEN.
WENN WEITERE INFORMATIONEN
BENÖTIGT WERDEN, BITTE DAS
NÄCHSTGELEGENE SERVICECENTER
ANRUFEN ODER DIE ZENOAH-
WEBSITE BESUCHEN UNTER:
http://www.zenoah.net
ABUSI, LUBRIFICAZIONE ERRATA,
USO DI PARTICOLARI O ACCESSORI
DIVERSO DA QUELLO SPECIFICATO
DAL PRODUTTORE, OPPURE ALTRE
CAUSE NON SOTTO IL CONTROLLO
DEL PRODUTTORE.
LA PRESENTE GARANZIA NON
COPRE I PARTICOLARI SOSTITUITI
PER NORMALE USURA O MODIFICHE
NON AUTORIZZATE AL PRODOTTO.
NON ESISTONO ALTRE GARANZIE
ESPRESSE.
LE GARANZIA IMPLICITE, INCLUSE
QUELLE DI COMMERCIABILITA’ E
IDONEITA’ PER UN PARTICOLARE
SCOPO, SONO LIMITATE A DUE (2)
ANNI PER USO DOMESTICO [UN (1)
ANNO PER QUALSIASI ALTRO USO]
DALLA DATA DI ACQUISTO
ORIGINALE.
IL PRODUTTORE NON RISPONDE DI
EVENTUALI DANNI ACCIDENTALI O
CONSEQUENZIALI.
PER MAGGIORI INFORMAZIONI,
RIVOLGETEVI AL VOSTRO CENTRO DI
ASSISTENZA PIU’ VICINO OPPURE
VISITATE IL SITO WEB ZENOAH:
http://www.zenoah.net
LA GARANTÍA NO SE APLICA A
AQUELLAS UNIDADES QUE HAN
SIDO DAÑADAS POR
NEGLIGENCIA EN LAS
INSTRUCCIONES DESCRITAS EN
EL MANUAL DEL PROPIETARIO/
OPERADOR PARA UN USO Y
MANTENIMIENTO ADECUADO DE
LAS UNIDADES, EL MAL MANEJO
ACCIDENTAL, ALTERACIÓN,
ABUSO, LUBRICACIÓN
INCORRECTA, USO DE
ACCESORIOS DIFERENTES A LOS
ESPECIFICADOS POR LA
EMPRESA, U OTRAS CAUSAS
QUE ESTÁN FUERA DEL CON-
TROL DE LA EMPRESA.
ESTA GARANTÍA NO CUBRE
AQUELLAS PIEZAS
REMPLAZADAS POR DESGASTE
NORMAL O CAMBIOS
INOFENSIVOS EN SU
APARIENCIA.
NO EXISTEN OTRAS GARANTÍAS
EXPLÍCITAS.
GARANTÍAS IMPLÍCITAS
INCLUYENDO AQUELLAS
GARANTÍAS DE
COMERCIALIZACIÓN Y
ADAPTABILIDAD PARA UN
PROPÓSITO EN PARTICULAR,
ESTÁN LIMITADAS A DOS (2)
AÑOS DE USO DOMÉSTICO [UN
(1) AÑO PARA CUALQUIER OTRO
USO] DESDE LA FECHA DE ENVÍO
ORIGINAL.
RESPONSABILIDADES POR
DAÑOS ACCIDENTALES O
CRÍTICOS ESTÁN EXCLUIDAS DE
CUALQUIER GARANTÍA.
SI NECESITA INFORMACIÓN
ADICIONAL, LLAME POR FAVOR A
SU CENTRO DE SERVICIO MÁS
CERCANO, O CONSULTE LA
PÁGINA WEB DE ZENOAH:
http://www.zenoah.net
GARANTIEBESTIMMUNGEN GARANZIA LIMITATA GARANTÍA LIMITADA
Page is loading ...
-
 1
1
-
 2
2
-
 3
3
-
 4
4
-
 5
5
-
 6
6
-
 7
7
-
 8
8
-
 9
9
-
 10
10
-
 11
11
-
 12
12
-
 13
13
-
 14
14
-
 15
15
-
 16
16
-
 17
17
-
 18
18
-
 19
19
-
 20
20
-
 21
21
-
 22
22
-
 23
23
-
 24
24
-
 25
25
-
 26
26
-
 27
27
-
 28
28
-
 29
29
-
 30
30
-
 31
31
-
 32
32
-
 33
33
-
 34
34


Zenoah EB430 User manual
- Category
- Air blowers/dryers
- Type
- User manual
- This manual is also suitable for
Ask a question and I''ll find the answer in the document
Finding information in a document is now easier with AI
in other languages
- italiano: Zenoah EB430 Manuale utente
- français: Zenoah EB430 Manuel utilisateur
- español: Zenoah EB430 Manual de usuario
- Deutsch: Zenoah EB430 Benutzerhandbuch
Related papers
Other documents
-
RedMax HB280 User manual
-
Briggs & Stratton 610000 User manual
-
-
Hitachi RB24E User manual
-
Briggs & Stratton Vanguard 380000 User manual
-
-
-
Briggs & Stratton 613477-0164-E1 User manual
-
RedMax EBZ5000Q User manual
-