
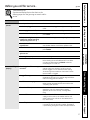
Safety Instructions . . . . . . . . . . 2, 3
Operating Instructions
Control Panel . . . . . . . . . . . . . . . . . . . .4–5
Features . . . . . . . . . . . . . . . . . . . . . . . .6–8
Loading and Using
the Washer . . . . . . . . . . . . . . . . . . . .9, 10
Installation Instructions
Before You Begin . . . . . . . . . . . . . .11–13
Step-by-Step Instructions . . . . . .13–16
Troubleshooting Tips . . . . . .17–19
Consumer Support
Consumer Support . . . . . . . . . . . . . . . .22
Warranty (Canada) . . . . . . . . . . . . . . . 21
Warranty (U.S.) . . . . . . . . . . . . . . . . . . . 20
ge.com
Washers
175D1807P604 49-90336 09-07 JR
Profile
Write the model and serial
numbers here:
Model # ______________
Serial # ______________
You can find them on the
rear cover of the washer
backsplash.
WPGT9150
Owner’s Manual
and Installation
Instructions

■ Install or store where it will not be exposed to
temperatures below freezing or exposed to the
weather.
■ Properly ground washer to conform with all governing
codes and ordinances. Follow details in Installation
Instructions.
IMPORTANT SAFETY INFORMATION.
READ ALL INSTRUCTIONS BEFORE USING.
WARNING!
For your safety, the information in this manual must be followed to minimize the risk
of fire or explosion, electric shock, or to prevent property damage, personal injury or
loss of life.
WATER HEATER SAFETY
Under certain conditions, hydrogen gas may be produced in a water heater that has not been used for two weeks
or more. Hydrogen gas can be explosive under these circumstances.
If the hot water has not been used for two weeks or more, prevent the possibility of damage or injury by turning on
all hot water faucets and allowing them to run for several minutes. Do this before using any electrical appliance
which is connected to the hot water system. This simple procedure will allow any built-up hydrogen gas to escape.
Since the gas is flammable, do not smoke or use an open flame or appliance during this process.
PROPER INSTALLATION
This washer must be properly installed and located in accordance with the Installation Instructions before it is used.
Installation Instructions are included in the back of this manual.
■ Keep the area underneath and around your
appliances free of combustible materials such as
lint, paper, rags and chemicals.
■ Close supervision is necessary if this appliance is
used by or near children. Do not allow children to
play on, with or inside this or any other appliance.
YOUR LAUNDRY AREA
2
Consumer Support Troubleshooting Tips
Operating Instructions
Safety Instructions
Installation
Instructions

3
Consumer SupportTroubleshooting TipsOperating InstructionsSafety Instructions
Installation
Instructions
■ Never reach into washer while it is moving.
Wait until the machine has completely stopped
before opening the lid.
■ Do not mix chlorine bleach with ammonia or
acids such as vinegar and/or rust remover. Mixing
different chemicals can produce a toxic gas which
may cause death.
■ Do not wash or dry articles that have been
cleaned in, washed in, soaked in or spotted
with combustible or explosive substances (such as
wax, oil, paint, gasoline, degreasers, dry-cleaning
solvents, kerosene) which may ignite or explode.
Do not add these substances to the wash water.
Do not use or place these substances around
your washer or dryer during operation.
■ The laundry process can reduce the flame
retardancy of fabrics. To avoid such a result,
carefully follow the garment manufacturer’s
wash and care instructions.
■ To minimize the possibility of electric shock,
unplug this appliance from the power supply
or disconnect the washer at the building’s
distribution panel by removing the fuse or
switching off the circuit breaker before
attempting any maintenance or cleaning.
NOTE: Pressing the START/PAUSE or POWER
button does NOT disconnect the appliance
from the power supply.
■ Never attempt to operate this appliance if it is
damaged, malfunctioning, partially disassembled,
or has missing or broken parts, including a
damaged cord or plug.
WHEN USING THE WASHER
■ Turn off water faucets to relieve pressure on
hoses and valves and to minimize leakage if
a break or rupture should occur. Check the
condition of the fill hoses; they should be
replaced every 5 years.
■ Before discarding a washer, or removing it
from service, remove the washer lid to prevent
children from hiding inside.
■ Do not attempt to repair or replace any part of
this appliance unless specifically recommended
in this Owner’s Manual, or in published user-repair
instructions that you understand and have the
skills to carry out.
■ Do not tamper with controls.
WHEN NOT IN USE
READ AND FOLLOW THIS SAFETY INFORMATION CAREFULLY.
SAVE THESE INSTRUCTIONS
Use this
appliance
only for its
intended
purpose as
described in
this Owner’s
Manual.
ge.com

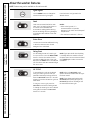
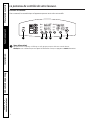
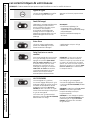
About the washer control panel.
4
Consumer Support Troubleshooting Tips
Operating Instructions
Safety Instructions
Installation
Instructions
Power
Press to “wake up” the display. If the display is active, press to put the washer into idle mode.
NOTE: Pressing POWER does not disconnect the appliance from the power supply.
1
2
6
3 5
1
4
Control Panel
Throughout this manual, features and appearance may vary from your model.

2
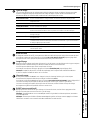
Wash Cycles
The wash cycles are optimized for specific types of wash loads. The chart below will help you match
the wash setting with the loads. The GentleClean
™
lifters lightly tumble the clothes into the water and
detergent solution to clean the load.
WHITES/HEAVY DUTY
For heavily to lightly soiled white cottons, household linens, work and play clothes.
COLORS/NORMAL For heavily to lightly soiled colorfast cottons, household linens, work and play clothes.
COMFORTER For comforters and bedspreads.
COTTONS/TOWELS For cottons and towels.
ACTIVE WEAR For active sports, exercise and some casual wear clothes. Fabrics include modern
technology finishes and fibers such as spandex, stretch and micro-fibers.
DELICATES For lingerie and special-care fabrics with light to normal soil. Provides gentle tumbling and
soak during wash and rinse.
HANDWASH For items labeled hand-washable with light soils. Provides gentle rocking to mimic the
handwashing action.
WASHABLE For the washing of machine washable wool products, provided that they are washed
WOOL according to the instructions on the garment label. When selecting this cycle, you must use
a detergent suitable for washing wool.
MY CYCLE Press to use, create or modify custom wash cycles.
SPEED WASH For lightly soiled items that are needed in a hurry. Cycle time is approximately 30 minutes,
depending on selected options.
RINSE & SPIN To quickly rinse out any items at any time.
Soil Level
Changing the SOIL LEVEL increases or decreases the wash time to remove different amounts of soil.
To change the SOIL LEVEL, press the SOIL LEVEL button until you have reached the desired setting.
You can choose between Light, Normal or Heavy soil.
Wash/Rinse
Adjust to select the proper water temperature for the wash cycle. The prewash and rinse water is
always cold to help reduce energy usage and reduce setting of stains and wrinkles.
Follow the fabric manufacturer’s care label when selecting the wash temperature.
To change the wash temperature, press the WASH/RINSE button until you have reached the desired
setting.
NOTE: The first 10 seconds of the wash fill is always cold. This feature assists in conditioning the fabric
and preventing stains from setting on garments.
Spin Speed
Changing the SPIN SPEED changes the final spin speed of the cycles. Always follow the fabric
manufacturer’s care label when changing the SPIN SPEED.
To change the SPIN SPEED, press the SPIN SPEED button until you have reached the desired setting.
Higher spin speeds are not available on certain cycles, such as Delicates.
Higher spin speeds remove more water from the clothes and will help reduce dry time, but may also
increase the possibility of setting wrinkles on some fabrics.
START/PAUSE
Press to start a wash cycle. If the washer is running, pressing it once will pause the washer. Press again
to restart the wash cycle.
NOTE: If the washer is paused and the cycle is not restarted within 15 minutes, the current wash cycle
will be cancelled.
NOTE: The washer performs automatic system checks after pressing the START button. Water will flow
in 45 seconds or less.
3
4
5
6
5
ge.com
Consumer SupportTroubleshooting TipsOperating InstructionsSafety Instructions
Installation
Instructions

Consumer Support Troubleshooting Tips
Operating Instructions
Safety Instructions
Installation
Instructions
About the washer features.
NOTE: Features may not be available on all washer models.
Cycle Signal
Use the SIGNAL button to change the
volume of the end of cycle signal.
Press the button until you reach the
desired volume.
Soak
Soak is an extra wash before the main
wash. Use it for heavily soiled clothes or
for clothes with a care label that
recommends soaking before washing.
Be sure to add high-efficiency detergent,
or the proper wash additive to the soak
dispenser.
NOTES:
• When selecting soak, it is
recommended to use powder
detergent in the main wash (detergent)
compartment.
• The maximum soak time is 3 hours.
Extra Rinse
Use an extra rinse when additional rinsing
is desired to remove excess dirt and
detergent from soiled loads.
Delay Start
You can delay the start of a wash cycle
for up to 24 hours. Press the DELAY START
button to choose the number of hours
you want to delay the start of the cycle,
then press the START button. The machine
will count down and start automatically at
the correct time.
NOTE: If you open the lid when the delay
is counting down, the machine will enter
the pause state. You must close the lid and
press START again in order to restart the
countdown.
MY CYCLE
To save a favorite cycle, set the desired
settings for wash cycle, soil level, spin
speed and wash temp settings and hold
down the MY CYCLE button for 3 seconds.
A beep will sound to indicate the cycle has
been saved.
To use your custom cycle, press the
MY CYCLE button before washing a load.
To change the saved cycle, set the desired
settings and hold down the MY CYCLE
button for 3 seconds.
NOTE: When using MY CYCLE, wash
options cannot be modified after the cycle
has been started.
NOTE: If you change wash options with
MY CYCLE before starting the cycle, the
MY CYCLE light will turn off and you will
be returned to the base cycle.
6

ge.com
Consumer SupportTroubleshooting TipsOperating InstructionsSafety Instructions
Installation
Instructions
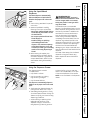
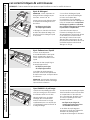
Using the Liquid Bleach
Dispenser
The bleach dispenser automatically
dilutes and dispenses liquid chlorine
bleach at the proper time in the wash
cycle.
1 Check clothing care labels for special
instructions.
2 Measure liquid bleach carefully,
following instructions on the bottle.
• Never pour undiluted liquid chlorine
bleach directly onto clothes or into
the wash basket.
• Do not pour powdered bleach into
bleach dispenser.
• Avoid overfilling or splashing
when adding bleach to the
dispenser. The maximum capacity
of the bleach dispenser is one cup
of bleach per wash cycle. Overfilling
could result in early dispensing of
bleach.
3 Before starting the washer, pour
measured amount of bleach directly
into bleach dispenser. If you prefer to
use powdered bleach, add it into the
wash basket directly before adding
clothes.
WARNING!
Do not mix
chlorine bleach with ammonia or acids
such as vinegar and/or rust remover.
Mixing can produce a toxic gas which
may cause death.
The manufacturer’s recommended
amount of undiluted bleach goes into the
bleach dispenser. During the final “Infusor”
wash action, the bleach is added to the
wash load. This ensures performance
won’t be diminished. Two sequential
flushes through the bleach dispenser
completely remove the bleach from the
dispenser. Any residual liquid left in the
dispenser at the end of the cycle is water,
not bleach. To prevent self-siphoning of
the bleach into the wash basket and
damage to your clothes, never add more
than the maximum fill level marked on the
dispenser.
Also keep clothes away from the bleach
dispenser so they don’t absorb any
bleach droplets left around the bleach
dispenser.
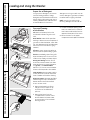
Using the Dispenser Drawer
The dispenser drawer contains
3 compartments:
• Liquid Fabric Softener
• Liquid or Powder Low-Sudsing,
High-Efficiency Detergent
• Liquid Pretreat Additives
The dispenser automatically dispenses
additives at the proper time in the wash
cycle.
1 Slowly open the dispenser drawer by
pulling out the drawer until it stops.
2 After adding laundry products, slowly
close the dispenser drawer. Closing the
drawer too quickly could result in early
dispensing of additives.
• Avoid overfilling or splashing when
adding laundry products to the
dispenser. Doing so could result in
early dispensing of laundry products.
At the end of the cycle, you may see
water in the compartments. This is part
of the normal operation of the washer.
NOTE: Do not use bleach in the dispenser
drawer.
7

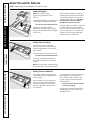
Insert
Detergent
box
Consumer Support Troubleshooting Tips
Operating Instructions
Safety Instructions
Installation
Instructions
About the washer features.
NOTE: Features may not be available on all washer models.
8
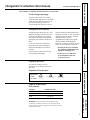
Adding Detergent
NOTE: Use only low-sudsing,
high-efficiency detergent such as
Tide
®
HE.
Add measured detergent to the detergent
compartment of the dispenser drawer.
• Do not exceed the maximum fill line.
Detergent is flushed through the
dispenser at the beginning of the wash
phase. Either powdered or liquid detergent
can be used.
When using liquid detergent, make sure
the detergent box and insert are in place.
For powdered detergent, remove both
the detergent box and insert. Powdered
detergent will not dispense with the
detergent box and insert in place.
Detergent usage may need to be adjusted
for water temperature, water hardness,
size and soil level of the load. Avoid using
too much detergent in your washer, as it
can lead to oversudsing and detergent
residue being left on the clothes.
Adding Fabric Softener
If desired, pour the recommended
amount of liquid fabric softener into the
left-hand compartment. Use only liquid
fabric softener.
Dilute with water to the maximum fill line.
• Do not exceed the maximum fill line.
Overfilling can cause early dispensing
of the fabric softener, which could stain
clothes.
NOTE: Do not pour fabric softener directly
on the wash load. It may stain the clothes.
Adding Pretreat Additives
The Pretreat dispenser may be used to
clean heavily soiled or stained garments
more efficiently.
Place the additives for the Wash Boost
setting in the right-hand compartment.
Select an Extra Rinse to make sure all
remaining detergent is removed from
the wash load.
You may add low-sudsing, high-efficiency
liquid detergent to this compartment
when selecting a Stain Inspector cycle
or when choosing a Presoak requiring
special additives.
• Do not exceed the maximum fill line
to avoid oversudsing.
Overfilling can cause early dispensing of
presoak additives, which could result in
damaged clothes.

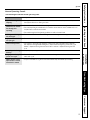
Always follow fabric manufacturer’s care label when laundering.
Bleach
symbols
Any bleach
(when needed)
Only non-chlorine bleach
(when needed)
Do not bleach
Bleach Labels
Category Target Temperature
Tap Cold 60°F
Cold 66°F
Warm 90°F
Hot 120°F
NOTE: Use HE (high-efficiency) labeled
detergent. HE detergents are available that
provide good cleaning performance in hot,
warm or cold water temperatures.
Loading and Using the Washer.
ge.com
Consumer SupportTroubleshooting TipsOperating InstructionsSafety Instructions
Installation
Instructions
9
Sorting Wash Loads
Sort by color (whites, lights, colors), soil
level, fabric type (sturdy cottons, easy
care, delicates) and whether the fabric
produces lint (terry cloth, chenille) or
collects lint (velveteen, corduroy).
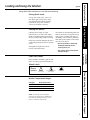
Loading the Washer
Load dry items loosely, no higher
than the top row of holes in the washer
basket. Overloading may reduce washer
efficiency and possibly increase wrinkling.
Bulky items should be placed as far down
in the wash basket as possible for optimal
results.
Always place buoyant items at the
bottom of the wash basket.
The washer will automatically detect the
load size. Because of the high-efficiency
wash system, the water level may not
completely cover the load. To add items
after washer has started, lift the lid, add
items and close the lid.
• Do not wash fabrics containing
flammable materials (waxes,
cleaning fluids, etc.)
• The washer will not fill or operate
with the lid open.
Fabric Care Labels
Below are fabric care label “symbols” that
affect the clothing you will be laundering.
Washer Temperature Ranges

Consumer Support Troubleshooting Tips
Operating Instructions
Safety Instructions
Installation
Instructions
10
Proper Use of Detergent
Using too much detergent is a common
cause of laundry problems. Today’s
detergents are formulated to be effective
without highly visible sudsing. Be sure to
carefully read and follow manufacturer’s
recommendations for how much
detergent to use in your wash. You can
use less detergent if you have soft water,
a smaller load or a lightly soiled load.
NOTE: Use only low-sudsing, high-
efficiency detergent such as Tide
®
HE.
Care and Cleaning
of the Washer
Lid: Wash with a damp cloth on the
outside and inside and dry with a soft
cloth.
Wash Basket: Leave the lid open after
washing to allow moisture to evaporate. If
you want to clean the basket, use a clean
soft cloth dampened with liquid detergent;
then rinse. (Do not use harsh or gritty
cleaners.)
Fill Hoses: Hoses connecting washer to
faucet should be replaced every 5 years.
Exterior: Immediately wipe off any spills.
Wipe with damp cloth. Do not touch the
surface or the display with sharp objects.
Moving and Storage: Ask the service
technician to remove water from drain
pump and hoses. For more information,
visit ge.com or call 800.GE.CARES
(800.432.2737). Do not store the washer
where it will be exposed to the weather.
Long Vacations: Be sure water supply is
shut off at faucets. Drain all water from
hoses if weather will be below freezing.
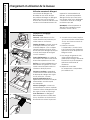
Dispenser Drawer: Detergent and fabric
softener may build up in the dispenser
drawer. Residue should be removed
once or twice a month.
1 Remove the drawer by pulling it
straight out until it stops. Lift up
on the front of the drawer and
pull it out.
2 Remove the inserts from the
3 compartments; rinse the inserts
and the drawer with warm water
to remove traces of accumulated
laundry products.
3 To clean the drawer opening, use a
small, non-metal brush to clean the
recess. Remove all residue from the
upper and lower parts of the recess.
4 Return the inserts to the proper
compartments and replace the drawer.
Loading and Using the Washer.

BEFORE YOU BEGIN
Read these instructions completely and carefully.
•
IMPORTANT – Save these instructions for
local electrical inspector’s use.
•
IMPORTANT – Observe all governing
codes and ordinances.
• Note to Installer – Be sure to leave these
instructions with the Consumer.
• Note to Consumer – Keep these instructions for
future reference.
• Skill level
– Installation of this appliance requires
basic mechanical skills.
• Proper installation is the responsibility of the
installer.
• Product failure due to improper installation is not
covered under the Warranty
.
Installation Washer
Instructions
WPGT9150
11
Questions? Call 800.GE.CARES (800.432.2737) or visit our Web site at: ge.com
In Canada, call 1.800.561.3344 or visit geappliances.ca
PLUMBING REQUIREMENTS
FOR YOUR SAFETY:
ELECTRICAL REQUIREMENTS
CAUTION – For personal safety, do
not use an extension cord or adapter plug with
this appliance. Do not, under any circumstances,
cut or remove the third grounding prong from the
power cord. Follow national electrical codes and
ordinances. This appliance must be supplied with
the voltage and frequency indicated on the rating
plate (located on the rear cover of the backsplash),
and connected to an individual, properly grounded
branch circuit, protected by a 15- or 20-amp circuit
breaker or time-delay fuse. If the electric supply
provided does not meet the above requirements,
call a licensed electrician.
WATER PRESSURE – Must be 10 psi minimum to
120 psi maximum.
WATER TEMPERATURE – Household water heater
should be set to deliver water at 120° to 150°F
(50° to 66°C) TO THE WASHER.
SHUTOFF VALVES – Both hot and cold shutoff
valves (faucets) should be supplied.
DRAIN – Water may be drained into standpipe
or set tub. Discharge height MUST NOT BE LESS
THAN 30 INCHES and no more than 8 feet above
the base of the washer. Standpipe must be 1
1
⁄2
inches minimum inside diameter and must be
open to atmosphere.
GROUNDING INSTRUCTIONS
This appliance must be grounded. In the event of
malfunction or breakdown, grounding will reduce
the risk of electric shock by providing a path of
least resistance for electric current. This appliance
is equipped with a cord having an equipment-
grounding conductor and a grounding plug.
The plug must be plugged into an appropriate
outlet that is properly installed and grounded in
accordance with all local codes and ordinances.
WARNING – Improper connection
of the equipment-grounding conductor can result
in a risk of electric shock. Check with a qualified
electrician or serviceman if you are in doubt as to
whether the appliance is properly grounded. Do not
modify the plug provided with the appliance—if it
will not fit the outlet, have a proper outlet installed
by a qualified electrician.

Installation Instructions
12
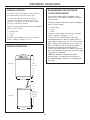
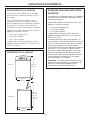
WASHER LOCATION
The washer must be installed on firm flooring to
minimize vibration during the spin cycle.
Concrete flooring is best, but a wood floor is
sufficient, provided floor support meets FHA
standards. The washer should not be installed
on rugs or exposed to weather.
Minimum clearance between washer and adjacent
walls or other surfaces:
• 0″ either side
• 2″ front
• 3″ rear
Minimum vertical space from floor to overhead
shelves, cabinets, ceilings, etc., is 52″.
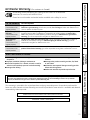
WASHER DIMENSIONS
27″
(68.6 cm)
43
7
⁄8″
(111.4 cm)
52
3
⁄4″
(133.7 cm)
(with lid
open
)
28
1
⁄4″
(71.6 cm)
Side View
Front View
REQUIREMENTS FOR ALCOVE OR
CLOSET INSTALLATION
Your washer is approved for installation in an
alcove or closet, as stated on a label on the back
of the machine.
Minimum clearance between washer and adjacent
walls or other surfaces:
• 0″ either side
• 2″ front
• 3″ rear
Minimum vertical space from floor to overhead
shelves, cabinets, ceilings, etc., is 52″.
Closet doors must be louvered or otherwise
ventilated and have at least 60 square inches of
open area for washer only, or if the closet contains
both a washer and a dryer, door must contain at
least 120 square inches of open area equally
distributed. Air openings are required to be
unobstructed when a door is installed. A louvered
door with equivalent air openings for the full length
of the door is acceptable.
NOTE: The clearances stated on this label
are minimums. Consideration must be given to
providing adequate clearances for installing and
servicing.

❑ Adjustable Pliers
❑ Carpenter’s Level
13
Installation Instructions
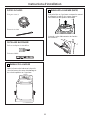
PARTS INCLUDED
❑ Water Hoses (2)
❑ Cable Tie
TOOLS YOU WILL NEED
UNPACK THE WASHER
1
UNPACK THE WASHER (CONT.)
Remove the Styrofoam block containing the
Owner’s Manual, parts, water hoses and laundry
product samples.
Remove the power cord from the back of the
washer.
1
After the washer is in the home, remove the carton
and Styrofoam shipping base from the washer.

14
Installation Instructions
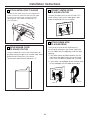
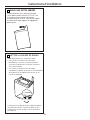
ATTACH WATER HOSES TO WASHER
Thread the hot water hose onto the washer hot
water connection (ORANGE) and the cold water
hose onto the cold water connection (BLUE).
Hand tighten; then make an additional 1/8
turn with pliers.
2
Hot
Cold
MOVE WASHER CLOSE
TO HOUSE UTILITIES
Move the washer as close to the final location as
possible, leaving enough room to make water, drain
and electrical connections to the home.
The minimum required rear clearance is 3″.
3
CONNECT WATER HOSES
TO HOUSE UTILITIES
Connect the water hoses to the HOT and COLD
water valves of your home. Hand tighten, plus
make an additional 1/4 turn with pliers.
4
ATTACH DRAIN HOSE
TO HOUSE DRAIN
Firmly insert the free end of the drain hose
into the drain opening of your home. Make sure
the soft rubber end is completely inside the drain
opening.
• If the water valves and drain are built into the
wall, fasten the drain hose to one of the water
hoses with the cable tie (ribbed side on inside).
• If your drain is a standpipe, fasten the drain hose
to the standpipe with the cable tie provided.
5
Cable Tie
Cable Tie
3″

15
Installation Instructions
LEVEL THE WASHER
Move the washer into final position.
• To check if the washer is level side to side,
open the lid and place a level at the back of
the opening above the dispenser drawer.
• To check if the washer is level front to back,
place a level at the side of the washer on the
edge where the cabinet side meets the top cover.
If the washer is not level, adjust the front leveling
legs. Turn clockwise to raise, counterclockwise to
lower.
7
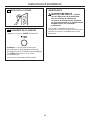
SET REAR LEGS
Tilt the washer forward (pivot on front legs)
about 4 to 6 inches and gently lower the rear legs
back onto the floor. This action will set rear leg
adjustments to correspond to front settings.
6
Lower
Raise

PLUG IN WASHER
16
Installation Instructions
8
WASHER STARTUP
Press the POWER button.
NOTE: If the washer has been exposed to
temperatures below freezing for an extended
period of time, allow it to warm up before pressing
POWER. Otherwise, the display will not come on.
The washer is now ready for use.
9
SERVICING
WARNING – Label all wires prior
to disconnection when servicing controls.
Wiring errors can cause improper and
dangerous operation after
servicing/installation.
For replacement parts and other information,
refer to the Owner’s Manual for servicing phone
numbers.

Before you call for service… ge.com
Troubleshooting Tips
Save time and money! Review the charts on the
following pages first and you may not need to call for
service.
17
Consumer SupportTroubleshooting TipsOperating InstructionsSafety Instructions
Installation
Instructions
Problem Possible Cause What To Do
Washer won’t Control panel is asleep • This is normal. Press POWER.
operate
Washer is unplugged • Make sure cord is plugged securely into a working
outlet.
Water supply is turned off • Turn both hot and cold faucets fully on.
Controls are not set properly • Make sure the cycle was set correctly, close the lid and
press START.
Lid is open—safety feature. • Close lid and reset cycle, to the beginning if necessary.
Prevents the washer from filling
and operating when lid is up
Circuit breaker/fuse is • Check house circuit breakers/fuses. Replace fuses or
tripped/blown reset breaker. Washer should have separate outlet.
Electronics need to be reset • Unplug washer, wait 2 minutes, plug back in and
press POWER.
START was not pressed after a • Press START.
cycle was set
Extremely low water pressure • Press START again.
Washer is too cold • If the washer has been exposed to temperatures
below freezing for an extended period of time, allow
it to warm up before pressing POWER. Otherwise,
the display will not come on.
Water not filling Filter clogged or fill hoses may • Make sure that the water valve filters (blue and
properly be kinked orange screen must be free of solids) on the unit
are not clogged. Turn off water and check filter by
disconnecting hose at machine. Check that fill hoses
are not kinked or clogged.
Energy efficiency • This is an energy-efficient washer. As a result, the
temperature settings for this washer may be different
than non-energy-efficient washers.
Insufficient water supply • Make sure that the water supply is turned on.
Make sure that the water faucets are turned to their
completely open positions.
The washer lid is open • The washer lid must be closed for all washer cycle
operations. If the lid is opened during washer
operation, all functions will stop, including water
filling.
Incorrect fill hose connection • Make sure that the fill hoses connect the hot water
supply to the hot inlet on the washer, and the cold
water supply to the cold inlet on the washer (hot to
hot, cold to cold).
Water fill optimization • Water may not cover the top level of the clothes. This
is normal for this high-efficiency washer. The water fill
is optimized by the system for best wash performance.

Problem Possible Cause What To Do
Washer will not drain— Kinked drain hose or drain • Ensure that the drain hose is not kinked. Per the
water standing in located higher than 8′ above floor recommended installation instructions, the drain outlet
the tub cannot be over 8′ above the floor.
Water leaks every load Hoses not installed correctly • Check all fill and drain hose connections to ensure that
they are tight and secure.
Water leaks Oversudsing of detergent • Oversudsing may create leaks, and may be caused by
the type and amount of detergent used. High-efficiency
detergent is recommended. Make sure that detergent
and any additives are put into the correct dispenser bins.
Follow the detergent manufacturer’s recommendations
for the amount of detergent, but try using less detergent,
especially if home water conditioning or water softening
units are used.
Incomplete or no Detergent bins clogged from • Make sure that detergent and additives are put into
dispensing of detergent incorrect filling the correct dispenser bins. If liquid detergent is used,
make sure that the liquid detergent insert box is in the
dispenser bin. If powdered detergent is used, make sure
that the liquid detergent insert box is not used. Liquids
must be put in the fabric softener and pretreat bins.
For all detergent types, always make sure that the
dispenser box is fully closed before the start of the cycle.
Too much detergent used • Make sure that the suggested amount of detergent is
used per the manufacturer’s recommendations. You may
also dilute the detergent with water to the maximum
fill line on the bin to avoid clogging. High-efficiency
detergent is recommended for this washer.
Insufficient water supply • Make sure that the water supply is turned on. Make sure
that the water faucets are turned to their completely
open positions.
Normal residue • Normal operation. Residue may remain in the bins of
the dispenser box. The dispenser box may be removed
for occasional cleaning with warm water and a scrub
brush. The liquid detergent insert box and siphon
caps may also be removed from the detergent bin for
occasional cleaning. Remember that only liquid may be
used in the fabric softener and pretreat bins. Powder
will not dispense from the fabric softener or pretreat bins.
Premature Bleach bin filled for future load • You cannot store bleach in the dispenser for future use.
dispensing The bleach bin will be dispensed every load for optimal
of bleach safety of the washer.
Overfilling the bleach bin • Overfilling the bin with bleach may lead to premature
dispensing. There is a maximum fill line indicated on
the bleach bin to help avoid overfilling.
Clogging of bleach Bleach bin is not seated • Make sure that the bleach cover is properly seated and
snapped into place before the start of the cycle.
Insufficient cleaning • You may remove and clean the bleach cover with warm
water and a scrub brush to clear clogging.
Poor stain removal Presoak not selected • When stain inspector is used, presoak temperature and
time are automatically selected. If you choose not to use
the stain inspector, we recommend that you select
presoak when defining your wash cycle. Always make sure
that any additives, such as your high-efficiency liquid
detergent, are added to the pretreat dispenser bin
before starting the cycle. Always reference your clothes
care label before treating stains.
18
Before you call for service…
Consumer Support Troubleshooting Tips
Operating Instructions
Safety Instructions
Installation
Instructions

19
Consumer SupportTroubleshooting TipsOperating InstructionsSafety Instructions
Installation
Instructions
The following are normal sounds you may hear:
ge.com
Sound Description
Repeated starting and • The HydroWash
™
action spins the wash basket in one direction, then pauses and spins in
stopping the opposite direction to clean your items.
Sound of water being • The washer adapts to the load size and type to add more water to the cycle as needed.
added after the washer
• The wash load may be unbalanced. If the washer senses that the load is unbalanced, it will
has already been
stop and refill to redistribute the load.
operating
• The washer may be diluting laundry additives to add to the wash load.
Clicking sound during • The washer will make a series of clicking noises as it changes the cleaning mode.
the wash cycle
High-pitched noise during • The wash basket spins faster to remove moisture from the load.
the spin cycle
Water flushing sound • The washer is diluting laundry additives to add to the wash load. Wash Boost additives
are dispensed during presoak. Detergent is dispensed at the beginning of the wash cycle.
Bleach is dispensed during the main wash. Fabric softener is dispensed during the final
rinse.
Humming noise during • The pump is operating to remove water from the basket.
draining
Pinging noise during the • The washer has special rinse features to remove detergent residue from the load after the
spin or rinse cycle main wash cycle.
Water sloshing sound • A liquid in the balance ring around the wash basket helps the basket spin smoothly.
when washer is turned
off and tub is rotated
Normal Operating Sounds

20
Consumer Support Troubleshooting Tips
Operating Instructions
Safety Instructions
Installation
Instructions
For The Period Of: We Will Replace:
GE Washer Warranty. (For customers in the United States)
All warranty service provided by our Factory Service Centers,
or an authorized Customer Care
®
technician. To schedule service,
on-line, visit us at ge.com, or call 800.GE.CARES (800.432.2737).
Please have serial number and model number available when
calling for service.
This warranty is extended to the original purchaser and any succeeding owner for products purchased for home use
within the USA. If the product is located in an area where service by a GE Authorized Servicer is not available, you may
be responsible for a trip charge or you may be required to bring the product to an Authorized GE Service location for
service. In Alaska, the warranty excludes the cost of shipping or service calls to your home.
Some states do not allow the exclusion or limitation of incidental or consequential damages. This warranty gives you
specific legal rights, and you may also have other rights which vary from state to state. To know what your legal rights
are, consult your local or state consumer affairs office or your state’s Attorney General.
■ Service trips to your home to teach you how to use
the product.
■ Improper installation, delivery or maintenance.
■ Failure of the product if it is abused, misused, or used for
other than the intended purpose or used commercially.
■ Damage after delivery.
■ Replacement of house fuses or resetting of circuit
breakers.
■ Damage to the product caused by accident, fire, floods
or acts of God.
■ Incidental or consequential damage caused by possible
defects with this appliance.
■ Product not accessible to provide required service.
What Is Not Covered (in the United States):
Warrantor: General Electric Company. Louisville, KY 40225
Staple your receipt here.
Proof of the original purchase
date is needed to obtain service
under the warranty.
One Year Any part of the washer which fails due to a defect in materials or workmanship. During this
From the date of the limited one-year warranty, GE will also provide, free of charge, all labor and related service
original purchase costs to replace the defective part.
Second through The suspension rod and spring assembly, and main electronic control board if any of these parts
Fifth Year should fail due to a defect in materials or workmanship. GE will also replace the washer lid or
From the date of the cover if they should rust under operating conditions. During this additional three-year limited
original purchase warranty, you will be responsible for any labor or related service costs.
Second through The direct drive motor and outer washer tub if any of these parts should fail due to a defect in
Tenth Year materials or workmanship. During this additional eight-year limited warranty, you will be
From the date of the responsible for any labor or related service costs.
original purchase
Lifetime of Product The washer basket if it should fail due to a defect in materials or workmanship. During this
From the date of the product lifetime limited warranty, you will be responsible for any labor or related service costs.
original purchase
EXCLUSION OF IMPLIED WARRANTIES—Your sole and exclusive remedy is product repair as provided in this Limited
Warranty. Any implied warranties, including the implied warranties of merchantability or fitness for a particular
purpose, are limited to one year or the shortest period allowed by law.
Page is loading ...
Page is loading ...
Page is loading ...
Page is loading ...
Page is loading ...
Page is loading ...
Page is loading ...
Page is loading ...
Page is loading ...
Page is loading ...
Page is loading ...
Page is loading ...
Page is loading ...
Page is loading ...
Page is loading ...
Page is loading ...
Page is loading ...
Page is loading ...
Page is loading ...
Page is loading ...
Page is loading ...
Page is loading ...
Page is loading ...
Page is loading ...
-
 1
1
-
 2
2
-
 3
3
-
 4
4
-
 5
5
-
 6
6
-
 7
7
-
 8
8
-
 9
9
-
 10
10
-
 11
11
-
 12
12
-
 13
13
-
 14
14
-
 15
15
-
 16
16
-
 17
17
-
 18
18
-
 19
19
-
 20
20
-
 21
21
-
 22
22
-
 23
23
-
 24
24
-
 25
25
-
 26
26
-
 27
27
-
 28
28
-
 29
29
-
 30
30
-
 31
31
-
 32
32
-
 33
33
-
 34
34
-
 35
35
-
 36
36
-
 37
37
-
 38
38
-
 39
39
-
 40
40
-
 41
41
-
 42
42
-
 43
43
-
 44
44


Ask a question and I''ll find the answer in the document
Finding information in a document is now easier with AI
in other languages
- français: GE WPGT9150HMG Manuel utilisateur