HPI Racing The Savage Flux HP User manual
- Category
- Remote controlled toys
- Type
- User manual
Page is loading ...

2
Danke
De
Thank you
En
Thank you for selecting this HPI RACING product ! This kit is designed to be fun to drive and uses top quality parts for durability and perfor-
mance. The instruction manual you are reading was designed to be easy to follow yet thorough in its explanations. HPI Racing wants you to
enjoy driving your new R/C kit. If you come across any problems or need some help getting through a step, give us a call and we will do our very
best to help you. You can also contact us on the internet at www.HPIracing.com.
This is a high performance R/C kit, and it requires regular maintenance for best performance. If you don’t do regular maintenance the perfor-
mance will suffer. HPI has all the necessary parts and accessories available to keep your car performing at its best.
The caution or attention symbols will warn you about steps that can be very dangerous.
Please read and understand the instructions carefully before proceeding.
Attention
Achtung
Attention
Failure to follow these instructions can
cause injury to yourself or others.
You might also cause property damage
or damage your kit.
Cautions
Warnhinweise
Précautions
Failure to follow these instructions
can damage your kit, and cause
serious bodily injury or death.
Cautions
Warnhinweise
Précautions
Before Running
While Operating
Before Operating
After Running
Battery safety
Please read manual (with parent, guardian or a responsible adult if necessary).
Please do not run on a public street, this could cause serious accidents, personal injuries and/or property damage.
Please do not run near pedestrians or small children.
Please do not run in small or conned areas.
Make sure that all screws and nuts are properly tightened.
Always use fresh batteries for your transmitter and receiver to avoid losing control of the model.
Please conrm the neutral throttle trigger position.
Turn OFF receiver rst, then turn OFF transmitter. This will prevent the car from losing control.
After running HPI RACING product, it is necessary to perform routine maintenance.
Failure to do this can result in increased wear and damage to the engine and chassis.
Please be careful when handling the battery. It will be hot after running. If the wire is frayed, a short circuit can cause a re.
Vielen Dank, dass Sie sich für HPI RACING entschieden haben! Dieses Auto soll Spaß machen und verwendet nur hochwertige Materialien für beste
Leistungen und Haltbarkeit. Die Anleitung, die Sie gerade lesen, ist einfach zu verstehen und dabei sehr ausführlich. HPI Racing will, dass Sie Erfolg und
Spaß mit Ihrem neuen Modell haben! Falls es dennoch einmal zu Problemen kommen sollte, melden Sie sich bei uns. Wir werden alles in unserer Macht
stehende tun, um zu helfen. Sie können uns auch gerne unter www.HPIracing.com kontaktieren.
Dies ist ein hochleistungs RC-Auto und benötigt regelmäßige Wartung. Wenn Sie diese Wartungsarbeiten nicht durchführen wird die Leistung
des Autos darunter leiden. Alle zur Wartung benötigten Teile sind bei HPI erhältlich.
Die Warnsymbole weisen Sie auf gefährliche Bauabschnitte hin.
Bitte lesen und verstehen Sie die Anweisungen bevor Sie sie durchführen.
Attention
Achtung
Attention
Wenn Sie diesen Anweisungen nicht folgen,
können Sie oder andere verletzt werden.
Es kann auch sein, dass dabei Sachschaden
an anderen Dingen oder ihrem Auto entsteht.
Cautions
Warnhinweise
Précautions
Wenn Sie diesen Anweisungen
nicht folgen, können Sie oder Ihr
Auto Schäden davontragen.
Cautions
Warnhinweise
Précautions
Vor dem Fahren
Während dem Fahren
Vor dem Fahren
Nach dem Fahren
Hinweise zum
Fahrakku
Bitte lesen Sie die Anleitung (mit einem Erwachsenen)
Fahren Sie bitte nicht auf öffentlichen Straßen. Dies kann zu schweren Unfällen mit Personen- und/oder
Sachschaden führen.
Fahren Sie bitte nicht in der Nähe von Fußgängern und Kindern.
Fahren Sie bitte nicht auf zu kleinen oder begrenzten Plätzen.
Vergewissern Sie sich, dass alle Schrauben und Muttern korrekt sitzen.
Verwenden Sie immer frische Batterien im Sender und Empfänger um nicht die Kontrolle über das Auto zu verlieren.
Überprüfen Sie, ob der Gashebel in der Neutralposition steht.
Schalten Sie den Empfänger aus, dann erst den Sender. Dies verhindert, dass das Auto außer Kontrolle gerät.
Nach dem Fahren mit dem
HPI RACING entschieden haben
ist regelmäßige Wartung nötig. Dies nicht zu tun,
kann den Verschleiß erhöhen oder den Motor beschädigen.
Geben Sie im Umgang mit dem Fahrakku bitte Acht. Er ist nach dem Fahren sehr heiß. Falls die Kabel
beschädigt sind, kann ein Kurzschluss ein Feuer auslösen.
Page is loading ...

4
Inhaltsverzeichnis
De
Contents
En
Section Contents Page
1 Overview 6
2 Start Up Guide 8
2-1 Charging battery 8
2-2 Setup Before Starting 8
2-3 Radio Control Car Operating Procedures 15
3 Trouble Shooting 19
4 Maintenance 20
4-1 Chassis Maintenance 21
4-2 Wheel Maintenance 21
4-3 Spur Gear Maintenance 22
4-4 Motor and Pinion Gear Replacement 24
4-5
Shock Maintenance 26
4-6 Diffrential Maintenance 28
4-7 Radio Maintenance 30
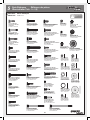
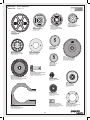
5 Parts Reference 35
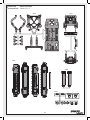
6 Exploded View 43
7 Parts List 47
8 Option Parts List 51
Abschnitt Inhalt Seite
1 Übersicht 6
2 Die ersten Schritte 8
2-1 Laden des Fahrakkus 8
2-2 Einstellungen vor dem Start 8
2-3 Umgang mit Ferngesteuerten Modellautos 15
3 Fehlerbehebung 19
4 Wartung 20
4-1 Wartung des Chassis 21
4-2 Wartung der Reifen 21
4-3
Hauptzahnrad
22
4-4
Tauschen des Motors und des Ritzels
24
4-5
Stoßdämpfer
26
4-6 Wartung des Differentials 28
4-7 RC-Anlage 30
5 Übersicht aller Teile 35
6 Explosionszeichnung 43
7 Ersatzteilliste 48
8 Tuningteileliste 51
Page is loading ...
Page is loading ...

7
Battery Batterie Batterie
2-3 cell LiPo (7.4 to 11.1v) battery pack
2-3 LiPo Zellen (7.4V - 11.1V) Akkupack
2-3 cellules (7.4-11.1V) Lithium-polymère
6-7 cell NiMH (7.2 to 8.4v) Battery
6-7 NiMh Zellen (7.2V - 8.4V)
Batterie 6-7 cellules NiMH (7.2 - 8.4v)
Do not use NiCd/NiMH battery chargers for LiPO batteries. If you do not use a special charger for LiPO batteries, they will be damaged. When using 3S LiPo
packs, cell quality is very important. We recommend battery packs with a 25C rating or better. Using batteries with a lower C rating may result in damage to
your batteries.
Verwenden Sie auf keinen Fall ein NiCd/NiMh Ladegerät für LiPo Akkus. Wenn Sie kein spezielles Ladegerät verwenden, wird der LiPo Akku beschädigt.
Wenn Sie 3s-Lipo-Akkus verwenden, ist die Qualität der Zellen sehr wichtig. Wir empfehlen, dass Sie Akkus mit einer Entladerate von mindestens 25C
verwenden. Wenn Sie Akkus mit einer geringeren Entladerate verwenden, kann dies zu Beschädigungen des Akkus führen.
N’utilisez pas de chargeurs NiCd ou NiMH pour les batteries LiPO. Si vous n’utilisez pas un chargeur spécial LiPo pour ces batteries, elles seront endom-
magées.Lorsque vous utilisez des packs LiPo 3S, la qualité des éléments est très importante. Nous vous conseillons d’utiliser des packs de batterie avec un
courant de décharge de 25C au moins. Utiliser des batteries ayant un moins bon courant de décharge pourrait endommager celles-ci.
For 2S or 3S LiPo packs we recommend a 25C rating or better. For 25C rated packs we recommend a minimum of
4000mAh. For 30C+ rated packs we recommend a minimum of 3500mAh
Bei 2S oder 3S LiPo Akku-Packs empfehlen wir eine 25C-Rate oder besser. Für Akkus mit einer 25C-Rate empfehlen wir
mindestens eine Kapazität von 4000mAh. Für Akkus mit einer Rate von 30C und mehr empfehlen wir mindestens eine
Kapazität von 3500mAh.
Pour les packs LiPo 2S ou 3S, nous conseillons de choisir un courant de décharge de 25C ou plus. Pour les packs 25C,
nous conseillons un minimum de 4000mAh. Pour les packs 30C ou plus, nous conseillons un minimum de 3500 mAh.
For 6-7 cell NiMH packs we recommend a minimum of 4000mah cells and soldered packs only, no welded tabs.
Bei 6-7 Zellen NiMh Akku-Packs empfehlen wir mindestens eine Kapazität von 4000mAh und nur verlötete Packs, keine
verschweißten Packs.
Pour les packs NiMH à 6 ou 7 éléments, nous conseillons les modèles délivrant un minimum de 4000 mAh par élément
qui sont brasés, et non soudés.
Always disconnect the battery from the ESC when you are nished using your vehicle. The switch on the ESC controls the power
that is delivered to the receiver and servos. The controller will always draw current when it is connected to the battery and will
completely discharge batteries if they are connected for long durations. This may cause failure of your batteries.
Ziehen Sie immer den Akku vom Regler ab, wenn Sie nicht mehr fahren. Der Schalter am Regler kontrolliert die Leistung die zum
Empfänger und den Servos geliefert wird. Der Regler zieht immer Strom, wenn er mit dem Akku verbunden ist und entlädt diesen
dann vollständig, wenn Regler und Akku lange verbunden sind. Dies kann Ihre Akkus beschädigen.
Débranchez toujours la pile du contrôleur électronique de vitesse lorsque vous avez ni d’utiliser votre véhicule. L’interrupteur du contrôleur électronique de
vitesse contrôle la puissance qui est transmise au récepteur et aux servos. Le contrôleur utilise en permanence du courant lorsqu’il est raccordé à la batterie,
et il la déchargera complètement s’il reste branché pour de longues durées. Cela peut provoquer une défaillance de vos batteries.
Do not use Nickel - Cadmium battery chargers for Nickel Metal Hydride batteries. If you do not use a special charger for Nickel Metal Hydride batteries, they
will be damaged.
We do not recommend the use of low quality batteries referred to as “stick packs” use of “stick packs” may result in personal injury or re.
Verwenden Sie keine Ladegeräte für Nickel Cadmium Akkus zum Laden von Nickel Metal Hydrid Akkus. Wenn Sie kein dafür vorgesehenes Ladegerät
verwenden können die Akkus beschädigt werden.
Wir empfehlen nicht den Einsatz von niederqualitativen Akkus wie “Stick-Packs”. Der Gebrauch dieser
Akkus kann zu Personenschaden oder Feuer führen.
N’utilisez pas de chargeur pour batteries Cadmium-Nickel pour charger des batteries Nickel-Métal Hydride. Si vous n’utilisez pas un chargeur spécial pour
des batteries Nickel-Métal Hydride, celles-ci seront endommagées.
Nous ne conseillons pas l’utilisation de batteries de basse qualité, connues sous le nom
de « stick packs », qui peuvent provoquer des blessures corporelles ou prendre feu.
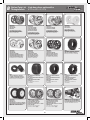
More speed you use, less control you have. Refer to the Battery
Chart and select the type of batteries suit your driving skill.
Je schneller das Auto ist, umso schwieriger ist es die Kontrolle zu
behalten. Wählen Sie den zu Ihrem Fahrkönnen passenden Akku.
Plus vous allez vite, et moins vous avez de contrôle. Reportez-
vous au tableau des piles et choisissez le type qui convient à votre
niveau de conduite.
OR
Cautions
Warnhinweise
Précautions
More Control
Einfachere Kontrolle
Plus de contrôle
More Speed
Höhere Geschwindigkeit
Plus de vitesse
LiPo
6 cell
7.2V
3s
11.1V
7 cell
8.4V
2s
7.4V
x2 x2
x2 x2
NiMH
Optimum Driving Experience
Optimales Fahrerlebnis
Expérience de conduite optimale
x2 x2
x2 x2
Battery Chart Akku-Übersicht Choix des batteries
Poor quality battery connectors can be a roadblock to performance. Avoid the common “white plastic” connectors
commonly seen on many battery packs. A fast brushless setup will draw many times the power that these connectors
can safely handle. For this reason your HPI Motiv ESC is equipped with a Deans Ultra plug.
Akkustecker schlechter Qualität sind eine Sperre für die Leistungsentfaltung. Vermeiden Sie es die weit verbreiteten
Stecker aus “weißem Plastik” zu verwenden, die man oft an Akkupacks sieht. Ein schnelles Brushless System benötigt
deutlich mehr Strom als diese einfachen Stecker vertragen. Aus diesem Grund ist Ihr HPI Motiv Regler mit Deans Ultra
Steckern ausgestattet.
Des batteries de très haute qualité ne sont pas indispensables pour faire fonctionner votre système normalement, mais
les meilleures permettront à votre système sans balais HPI Flux de transmettre plus de puissance au sol.
Battery Connector
Cautions
Warnhinweise
Précautions
Deans “Ultra Plug”
When using 3S LiPo batteries it is important to monitor the battery temperature. Battery temp
should not exceed 140F.
Wenn Sie 3S-LiPo-Akkus verwenden, ist es wichtig die Akkutemperatur zu überwachen. Der
Akku sollte nicht wärmer als 60°C werden.
Lorsque vous utilisez des batteries LiPo 3S, il est important de surveiller leur température.
Celle-ci ne devrait pas dépasser 60 °C (140 °F).
Page is loading ...
Page is loading ...

10
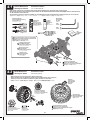
Choose wheelie angle
Wählen Sie den Winkel des Wheelie.
Choisissez l'angle de cabrage
Low wheelie angle
Kleiner Winkel
Faible angle de cabrage
High wheelie angle
Großer Winkel
Fort angle de cabrage
85245
6
85245
5
Choose wheelie angle
Wählen Sie den Winkel des Wheelie.
Choisissez l'angle de cabrage
Large wheel
Großes Rad
Grande roue de cabrage
Small wheel
Kleines Rad
Petite roue de cabrage
85245
6
85245
5
Z573
TP. Binder Head Screw M3x25mm
Flachkopfschneidschraube M3x25mm
Vis tole tête plate M3x25mm
Z519
Binder Head Screw M3x15mm
Flachkopfschraube M3x15mm
Vis tête ronde M3x15mm
x2
Z569
Z663
Lock Nut M3
Stoppmutter M3
Ecrou nylon M3
Z664
M4
Z619
M4x40mm
B030
B030
85245
85245
1
2
Z619
Binder Head Screw M4x40mm
Flachkopfschraube M4x40mm
Vis tête ronde M4x40mm
B030
Ball Bearing 10x15x4mm
Kugellager 10x15x4mm
Roulement 10x15x4mm
Z664
Flanged Lock Nut M4
Stoppmutter M4
Ecrou de blocage de bride M4
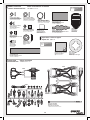
Wheely Bar Installation Montage der Wheely Bar
Mise en place de jeu de barre anti-cabrage
3
Z573
M3x25mm
Z519
M3x15mm
Z519
M3x15mm
Z663
M3
85245
85245

11
1
2
Front
Vorne
Avant
4
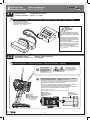
Battery installation Einbau des Fahrakkus Mise en place de la batterie
102089
102089
2
2
1
1
102089
Foam Sheet / Block Set
Schaumstoffblock Set
Ensemble feuille/blocs mousse
This step same for left and right.
This step of that same is for left side and right.
Cette étape même pour la gauche et la droite.
This step same for left and right.
This step of that same is for left side and right.
Cette étape même pour la gauche et la droite.

12
102089
Foam Sheet / Block Set
Schaumstoffblock Set
Ensemble feuille/blocs mousse
102089
102089
Cautions
Warnhinweise
Précautions
Make sure receiver is turned OFF before connecting
the battery, the vehicle may run out of control.
Achten Sie darauf, dass der Empfänger ausgeschaltet
ist, wenn Sie den Akku anstecken, sonst kann das
Auto außer Kontrolle geraten
Vériez que le récepteur est en position ARRÊT (OFF)
avant de connecter la batterie, faute de quoi vous
pourriez perdre le contrôle du véhicule.
2
1
OFF
AUS
ARRÊT
Use foam sheet /blocks to keep your batteries secure.
Benutzen Sie Schaumstoff-Blöcke um die Akkus fest zu sichern.
Utilisez des blocs de mousse pour maintenir vos piles en toute sécurité.
Assemble carefully, and do not
pinch the wires in the case.
Geben Sie Acht bei der Montage
und klemmen Sie nicht das Kabel
im Gehäuse ein.
Montez soigneusement, et ne
pincez pas les câbles dans le
boîtier.
4
3

13
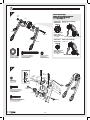
8
mm
ON
You will hear a long series
of tones followed by a two
second pause, followed by
a short series of tones.
YELLOW
Release trigger allowing it
to return to neutral position.
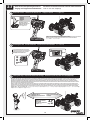
You must setup the ESC before running the rst time. After the initial setup, it is not required before every run.
We strongly recommend removing your tires before calibration as a safety precaution!
Start with the transmitter ON and the ESC switched OFF. Adjust the throttle trim to the center position.
Throttle Trim
Before Setup
Center
Please read through the instructions and get familiar with the procedure before starting setup. The setup process moves quickly,
and it will help you to be ready for each step.
If the LED on the speed control does not work as shown below, the speed control may not be setup properly. Repeat the setup process.
LED (Green)
Lighting
Full Throttle
Full Brake
Neutral
LED (Yellow)
Lighting
LED (Red)
Lighting
Setup
Setup Conrmation
Move trigger to full brake
position and hold until you
hear a long series of tones.
You will hear a short series
of tones followed by a two
second pause, followed by
a long series of tones.
GREEN RED YELLOW ALL
LED
RED YELLOW
En
Make sure the transmitter on.
Hold Full throttle while
switching on esc
LED
ESC Setup
5
OFF
x4
Deutsch
Français
P.14
1
2
3
87546
Glow Plug Wrench
ON
ON
LED
Z260
86804
Z680
M5x6mm
Installation is reverse of removal.
Page is loading ...
Page is loading ...

16
Turn steering trim to set tires in
completely centered position.
Stellen Sie die Trimmung so ein,
dass die Räder geradeaus zeigen.
Tournez le trim de direction de fa-
çon à ce que les pneus soient dans
une position complètement centrée.
4
Steering Trim Setup Einstellen der Lenkungstrimmung Réglage du trim de direction
5
Transmitter Operation Sender Funktionen Fonctionnement de l’émetteur
Left turn
Nach links
Vers la gauche
Right turn
Nach rechts
Vers la droite
Straight (Neutral)
Geradeaus (Neutral)
Tout droit (neutre)
Volant de direction
Steering Wheel
Lenkrad
Gâchette d’accélération
Throttle Trigger
Gashebel
Forward
Vorwärts
En avant
Brake
Bremse
Frein
Stop (Neutral)
Stopp (Neutral)
Arrêt (neutre)
Reverse
Rückwärts
Marche arrière
Reverse
Rückwärts
Marche arrière
After 2 Seconds
Nach 2 Sekunden
Après 2 secondes
A
Stop → Reverse
Stopp → Rückwärts
Arrêt → Marche arrière
B
Forward → Brake (2 Seconds) → Reverse
Vorwärts → Bremse (2 Sekunden) → Rückwärts
En avant → Frein (2 secondes) → Marche arrière
Reverse
Rückwärts
Marche arrière
Front
Vorne
Avant
Front
Vorne
Avant
Steering Trim
Lenkungstrimmung
Trim de direction
Steering Dual Rate
Lenkeinschlagsbegrenzung
Double débit de direction
To be used to adjust steering servo throw.
Zum Einstellen des maximalen Lenkeinschlags.
À utiliser pour le réglage du taux et de l’angle du servo.
Stop (Neutral)
Stopp (Neutral)
Arrêt (neutre)
Forward
Vorwärts
En avant
Brake / Reverse
Bremse / Rückwärts
Frein/Marche arrière
Throttle Trim
Gas-Trimmung
Trim d’accélération
If your vehicle is moving, adjust the throttle
trim until it stops.
Falls sich das Auto bewegt, bitte stellen Sie
die Gas-Trimmung so ein, um das Auto zum
Stillstand zu bringen.
Si la voiture bouge, ajustez le trim de direction pour
que la voiture arrête de bouger.
Reverse operation
●A and B show the two ways to go in reverse.
Rückwärts fahren
●A und B zeigen die beiden Möglichkeiten rückwärts zu fahren.
Marche arrière
●A et B indiquent les trois manières de passer en marche arrière.
A
A

17
If the red LED is lit, but the throttle servo is not closing the throttle or applying the brake, refer to the page32 and
perform the fail-safe setup procedure .
Wenn die rote LED leuchtet, das Gas-Servo den Vergaser aber nicht schließt und bremst, schauen Sie bitte auf
Seite 32 und führen Sie den Fail-Safe Einstellvorgang durch.
Si la LED rouge s’allume, mais que le servo d’accélérateur n’arrête pas d’accélérer ou n’actionne pas le frein,
reportez-vous à la page32 et effectuez la procédure de réglage de sécurité.
Cautions
Warnhinweise
Précautions
Cautions
Warnhinweise
Précautions
1
Fail Safe Operation
Fail-Safe Kontrolle
Fonctionnement de la sécurité redondante
OFF
AUS
ARRÊT
ON
AN
MARCHE
ON
AN
MARCHE
HPI RF-20
Receiver
Empfänger
Récepteur
This car has a built-in fail safe system. If the radio glitches, because of interference or the car goes out of range, the servo will apply the brakes to protect your car. The fail
safe system has been setup at the factory, but you should become familiar with the function of the fail safe and check the operation before running.
Dieses Auto ist von Werk aus mit einer Fail-Safe Einheit ausgestattet. Falls es zu Empfangsproblemen kommt, weil Funkstörungen auftreten oder das Auto
die Reichweite des Senders verläßt, wird das Auto automatisch bremsen. Die Fail-Safe Einheit ist von Werk aus eingestellt. Sie sollten allerdings lernen,
wie man diese einstellt und sie vor jeder Fahrt überprüfen.
Ce véhicule possède un système de sécurité redondant. Si la radio tombe en panne, du fait des interférences ou qu’elle se trouve hors de portée, le servo
actionnera les freins pour protéger votre véhicule.Le système de sécurité redondant a été réglé en usine, mais vous devez vous familiariser avec son fonc-
tionnement et vérier qu’il marche correctement avant utilisation.
Situations when the fail safe will operate.
Situationen in denen die Fail-Safe Einheit eingreift
Situations dans lesquelles la sécurité redondante fonctionnera.
When transmitter radio signal is cut off.
Wenn das Signal vom Sender nicht richtig ankommt.
Lorsque le signal radio de l'émetteur est coupé.
When fail safe is operating, the Red
LED is lit.
Wenn die Fail-Safe Einheit aktiv ist,
leuchtet die rote LED.
Lorsque la sécurité redondante est
en fonctionnement, la LED rouge est
allumée.
The fail safe can not completely protect your car. Before running, make sure no one is using the same frequency
and check radio range. If someone is using the same fequency, the fail safe will not work.
Die Fail-Safe Einheit kann ihr Auto nicht zu 100% schützen. Überprüfen Sie vor jeder Fahrt die Reichweite, sowie ob jemand auf
der selben Frequenz wie Sie fährt. Falls jemand die selbe Frequenz verwenden, kann die Fail-Safe Einheit nicht richtig arbeiten.
La sécurité redondante ne peut pas complètement protéger votre véhicule. Avant de le faire fonctionner, vériez
que personne d'autre n'utilise la même fréquence et vériez la portée du système radio. Si quelqu’un d’autre
utilise la même fréquence, la sécurité redondante ne pourra pas fonctionner.
Attention
Achtung
Attention
Fail Safe Operation Fail-Safe Einheit Procédé à sécurité intégrée
6
Fail Safe Operation Check Überprüfen der Fail-Safe Einheit
Vérication du fonctionnement de la sécurité redondante
7
LED light will ash and vehicle will not move.
This means that the fail safe is working properly.
Die LED blinkt und das Auto bewegt sich nicht. Dies bedeutet, dass das
Fail-Safe korrekt arbeitet.
La LED clignote et le véhicule ne bouge pas. Cela signie que la sécurité
fonctionne correctement.
OPEN
ÖFFNEN
OUVRIR
2
5
3
4
We strongly recommend removing your tires as a safety precaution!
Wir empfehlen, dass Sie aus Sicherheitsgründen der Reifen.
Nous conseillons fortement de retirer des roues, par mesure de sécurité !
Page is loading ...

19
3
Trouble Shooting
Fehlerbehebung
Dépannage
If R/C car does not move or you have no control, see below.
Falls sich das Auto nicht bewegt, oder Sie nicht mehr die Kontrolle haben, schauen Sie bitte unten.
Si le véhicule télécommandé ne bouge pas ou si vous n’en avez pas le contrôle, voyez ci-dessous.
Problem
Problem
Problème
Cause
Grund
Cause
Remedy
Lösung
Remède
Section
Abschnitt
Section
Does Not Move.
Das Auto fährt nicht.
Le véhicule ne bouge pas
Battery is not placed properly in the transmitter.
Die Batterien sitzen nicht korrekt im Sender.
Les piles ne sont pas placées correctement dans
l’émetteur.
Place batteries in the transmitter properly.
Legen Sie die Batterien korrekt ein.
Positionnez correctement les piles dans l’émetteur.
Page8
2-2
Weak or no battery in model.
Leerer oder kein Akku im Auto.
Batterie faible ou non installée
Install charged battery.
Einbauen eines geladenen Akkus.
Mettez en place une batterie chargée
Page8
2-1
Damaged motor.
Kaputter Motor.
Moteur endommagé
Replace with new motor.
Austausch durch einen neuen Motor.
Remplacez par un nouveau moteur
Page22
4-4
Frayed or broken wiring.
Beschädigte Verkabelung.
Câble dénudé ou coupé
Is the binding setup properly?
Stimmt die Sender/Empfänger Verbindung?
Est-ce que l’association est correctement effectuée ?
Splice and insulate wiring completely.
Erneuern und isolieren Sie die kaputte Stelle.
Faites une épissure et isolez complètement le câble.
Make sure binding is setup properly.
Stellen Sie sicher, dass Sender und Empfänger korrekt verbunden sind.
Vériez que l’association est correctement effectuée.
Page31
Page32
4-7
4-7
ESC is shut down by heat protection circuit.
Notabschaltung des Reglers wegen Überhitzung.
Le système ESC est fermé par le circuit de protection thermique.
Stop driving immediately, do not drive the car until the
Speed Controller cools down.
Fahren Sie nicht weiter. Warten Sie bis der Fahrten-
regler abgekühlt ist.
Arrêtez immédiatement de conduire, ne pilotez pas la voiture
tant que le contrôleur de vitesse n’a pas refroidi.
Page31
4-7
No Control.
Keine Kontrolle über das
Auto Pas de contrôle
Weak or no batteries in transmitter or model.
Leere oder keine Batterien im Sender oder Auto.
Batterie faible ou absente dans l’émetteur ou le véhicule.
Fully extend antenna.
Ziehen Sie die Antenne vollständig aus.
Dépliez complètement l’antenne.
Page8
2-1
Improper antenna on transmitter or model.
Zu kurze Antenne am Sender oder Auto.
Antenne inadéquate sur l’émetteur ou le véhicule
Install charged or fresh batteries.
Einbauen voller Batterien.
Mettez des batteries rechargées ou neuves.
Page8
2-2
Neutral position or trim is incorrect.
Neutralposistion oder Trimmung sind verstellt.
La position neutre est incorrecte ou le trim n’est pas réglé.
Adjust the steering trim referring to Page 16.
Stellen Sie die Lenkungstrimmung neu ein (Seite 16).
Réglez le trim de direction en vous reportant à la page 16.
Page16
2-3
Steering and Throttle Func-
tion Reversed.
Lenkung und Gas funktionie-
ren genau verkehrt herum.
Direction et accélération in-
versées
Servo reverse switch is in wrong position.
Servorichtungs-Schalter ist in der falschen Position.
L’interrupteur de marche arrière du servo est dans
la mauvaise position
Set to correct position see page 8.
Schauen Sie auf Seite 8 für die korrekte Position.
Vériez la position correcte en page 8
Page8
2-2
Refer to page 31. It will show how to connect the motor.
Schauen Sie bitte auf Seite 31. Dort wird erklärt, wie
der Motor angeschlossen wird.
Reportez-vous à la page 31. Vous y verrez comment
raccorder le moteur.
Please check that the wires from ESC to motor are
connected properly.
Bitte überprüfen Sie, ob die Kabel vom Regler zum
Motor richtig sitzen.
Veuillez vérier que les ls allant de l’ESC au mo-
teur sont correctement raccordés.
Page31
4-7
Page8
2-2
Page is loading ...
Page is loading ...
Page is loading ...

23
Z792
Cap Head Screw M4x8mm
Inbusschraube M4x8mm
Vis tête cylindrique M4x8m
m
87042
Spring 4.9x8x7mm
Slipper Feder 4.9x8x7mm
Ressort 4.9x8x7mm
87402
Washer 4.3x10x1.0mm
Unterlagscheibe 4.3x10x1.0mm
Rondelle 4.3x10x1.0mm
Z260
Pin 2.5x12mm
Stift 2.5x12mm
Goupille 2.5x12mm
Loosen (1/2) turn.
Lösen Sie sie 1/2 Umdrehung.
Dévissez d’1/2 tour.
Tighten locknut all the way.
Ziehen Sie die Mutter vollständig an.
Serrez l’écrou à fond.
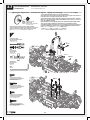
Standard Slipper Setup
Einstellung des Slippers
Réglages standard de l’embrayage
Tighten setscrew fully and then loosen one half turn.
The Slipper Clutch protects the drivetrain from shock.
Ziehen Sie die Schraube vollständig an und lösen Sie
sie dann wieder eine halbe Umdrehung.
Der Slipper schützt den Antrieb vor Schlägen.
Vissez la vis de réglage à fond puis dévissez d’un demi-tour.
L’embrayage protège la transmission des chocs.
Z792
M4x8mm
Proper Spur Gear Mesh
Korrektes Ritzelspiel
Engrènement correct de la couronne
Set gear mesh by adjusting motor mount position.
To get a perfect gear mesh, place a piece of paper
(See bottom of page) between the gears and tighten the
engine mount screws.
Stellen Sie das Spiel ein, indem Sie die Motorposition
verändern.
Um das Spiel optimal einzustellen, schieben Sie einen
Streifen Papier (siehe unten) zwischen die Zahnräder und
ziehen Sie dann die Motorschrauben an.
Congurez l’engrènement de la couronne en ajustant la
position du moteur.
Pour obtenir l’engrènement désiré, insérez un morceau de
papier entre les pignons et réglez les vis de montage du
support du moteur.
Paper for Gear Mesh Paper for Gear Mesh Paper for Gear Mesh
Paper for Gear Mesh
Paper for Gear Mesh
Papier zum Einstellen des Ritzelspiels.
Papier pour engrènement des pignons
3
mm
Z684
Flanged Lock Nut M4
Stoppmutter M4
Ecrou de blocage de bride M4
86089
Drive Shaft 6x70mm
Getriebewelle 6x70mm
Axe de transmission 6x70mm
Z245
E Clip E5mm
E-clip E5mm
Circlips 5mm
B023
Ball Bearing 6x13x5mm
Kugellager 6x13x5mm
Roulement 6x13x5mm
Z567
TP. Binder Head Screw M3x10m
m
Flachkopfschneidschraube M3x10mm
Vis tole tête plate M3x10mm
B023
86089
86097
Remove adhesive backing.
Entfernen Sie die Schutzschicht
auf der Rückseite.
Retirez le dos adhésif.
102093
72131
2
Installation is reverse of removal.
Die Montage erfolgt in umgekehrter Reihenfolge zur Demontage.
L’ordre d’installation est inverse de l’ordre de démontage.
Z260
M2.5x12mm
Z567
M3x10mm
B023
B245
Z260
Z684
M4
87042
87042
102093
72130
86130
Z950
Cross Wrench
Kreuzschlüssel
Clé en croix
7
mm

24
2
Z567
TP. Binder Head Screw M3x10m
m
Flachkopfschneidschraube M3x10mm
Vis tole tête plate M3x10mm
Z567
M3x10mm
2
2
1
1
Screwdriver (NO.2)
Kreuzschraubenzieher (Nr.2)
Tournevis (N° 2)
1
Entretien du moteur et du pignon
Motor and Pinion Gear Maintenance
Motors und Ritzels
4
-
4
Allen Wrench
Inbusschlüssel
Clé Allen
3
mm
2.5
mm
Z905
3.0mm
Z903
2.5mm
Z567
M3x10mm
Page is loading ...

26
2.5
mm
Z903
2.5mm
mm
5.5
Z569
TP. Binder Head Screw M3x15mm
Flachkopfschneidschraube M3x15mm
Vis tole tête plate M3x15mm
Z303
Cap Head Screw M3x42mm
Inbusschraube M3x42mm
Vis tête cylindrique M3x42mm
Z663
Lock Nut M3
Stoppmutter M3
Ecrou nylon M3
mm
5
mm
5.5
Z224
Washer 3x8x0.5mm
Scheibe 3x8x0.5mm
Rondelle 3x8x0.5mm
1
This step same for front and rear.
Diese Schritte sind für vorne und hinten identisch durchzuführen.
Même étape pour l’avant et l’arrière.
2
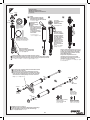
Entretien des amortisseurs
Shock Maintenance
Stoßdämpfer
4
-
5
Allen Wrench
Inbusschlüssel
Clé Allen
Screwdriver (NO.2)
Kreuzschraubenzieher (Nr.2)
Tournevis (N° 2)
Z950
Cross Wrench
Kreuzschlüssel
Clé en croix
Z569
M3x15mm
86551
6561
100949
Z303
M3x42mm
Z663
M3
Z224
Tighten completely.
Vollständig anziehen.
Serrez complètement.
Needle Nosed Pliers
Spitzzange
Pinces à becs longs
85231
85231
85231
85231
100949

27
1
2
1
2
3
mm
5
Z685
Washer 2.7x6.7x0.5mm
Scheibe 2.7x6.7x0.5mm
Rondelle 2.7x6.7x0.5m
m
Z661
Lock Nut M2.6
Stoppmutter M2.6
Ecrou nylon M2.6
87500
Bladder 16x5mm
Daempfermembran
Reservoir Souple
75075
75075
Silicone O-ring S4 (3.5x2mm)
Silikon O-ring S4
Joint torique silicone S4
100948
100948
O-ring 14x16x1.0mm (Black)
O-ring 14x16x1.0mm (Schwarz)
Joint torique 14x16x1.0mm (noir)
Z685
M2.7x0.5mm
100961
100961
Use masking tape to protect shock shaft. Screw ball end all of
the way onto the shock shaft.
Verwenden Sie einen Lappen um die Kolbenstange nicht zu ver-
kratzen. Schrauben Sie die Kugelpfanne vollständig auf die Stange.
Utilisez du ruban de masquage pour protéger l’axe de l’amortisseur.
Vissez entièrement l’embout sphérique sur l’axe de l’amortisseur.
86955
Shock Oil
(
Available separately
)
Dämpferöl
(
Separat erhältlich
)
Huile d’amortisseur
(
Disponible séparément
)
Use a Rag.
Verwenden Sie einen
Putzlappen.
Utilisez un chiffon.
Move the shaft up
and down slowly to
remove all air bubbles.
Bewegen Sie die Kol-
benstange langsam
nach oben und unten,
damit Luftblasen
entweichen können.
Déplacez l’axe vers
le haut et vers le bas
doucement pour
faire partir toutes les
bulles.
Compress shock shaft completely to remove excess
oil.This ensures smooth shock travel after assembly.
Schieben Sie die Kolbenstange vollständig
in den Dämpfer. Damit erzielt man eine sehr
gleichmäßige Dämpfung.
Compressez complètement l’axe de
l’amortisseur pour retirer l’excès d’huile.
Cela garantit un mouvement en douceur de
l’amortisseur après son montage.
Filling Oil Shocks
Befüllen der Dämpfer mit Öl
Remplissage d’huile des amortisseurs
If shock shaft is bent, replace shock shaft and silicone O-rings.
Wenn die Kolbenstange verbogen sein sollte, tauschen Sie sie und ersetzen Sie die O-Ringe.
Si l’axe de l’amortisseur présente un gauchissement, remplacez l’axe ainsi que les joints toriques silicone.
Check for leaking oil.
Achten Sie darauf, ob Öl ausläuft.
Vériez qu’il n’y a pas de fuite d’huile.
Standard Setting
Standard
Réglage standard
Stock shock oil is equiv-
alent to 30wt silicone oil.
Das Dämpferöl entspricht
30wt Silikonöl.
L’huile d’amortisseurs
est équivalente à l’huile
silicone 30wt.
3
Installation is reverse of removal.
Die Montage erfolgt in umgekehrter Reihenfolge zur Demontage.
L’ordre d’installation est inverse de l’ordre de démontage.
87500
87500
4
87058
87524
100961
100949
100949
100961
Z661
M2.6
100950
Page is loading ...

29
75080
O-ring 7x11x2.0mm (Black)
O-ring 7x11x2.0mm (Schwarz)
Joint torique 7x11x2.0mm (noir)
Z892
Washer 10x12x0.2mm
Unterlagscheibe 10x12x0.2mm
Rondelle 10x12x0.2 Mm
6811
O-ring 6x9.5x2mm (Black)
O-ring 6x9.5x2mm (Schwarz)
Joint torique 6x9.5x2mm (noir)
86827
Washer 6x19x0.2mm
Scheibe 6x19x0.2mm
Rondelle 6x19x0.2mm
86827
Washer 4x10x0.15mm
Scheibe 4x10x0.15mm
Rondelle 4x10x0.15mm
Z260
Pin 2.5x12mm
Stift 2.5x12mm
Goupille 2.5x12m
m
Z529
Flat Head Screw M3x15mm
Senkkopfschraube M3x15mm
Vis tête fraisee M3x15mm
B032
Ball Bearing 10x16x5mm
Kugellager 10x16x5mm
Roulement 10x16x5mm
B085
Ball Bearing 8x16x5mm
Kugellager 8x16x5mm
Roulement 8x16x5mm
Z877
Washer 8x10x0.2mm
Scheibe 8x10x0.2mm
Rondelle 8x10x0.2mm
3
Z159
Thread Lock (Green)
Schraubensicherung (grün)
Frein à let (vert)
Installation is reverse of removal.
Die Montage erfolgt in umgekehrter Reihenfolge zur Demontage.
L’ordre d’installation est inverse de l’ordre de démontage.
If parts are damaged, repair or replace them according to the instruction below.
Wenn Teile beschädigt sind, reparieren oder ersetzen Sie sie wie auf den Zeichnungen erklärt..
Si des pièces sont endommagées, réparez-les ou remplacez-les suivant les instructions ci-dessous.
Z164
Grease
Fett
Graisse
Z529
M3x15mm
86099
Z260
M2.5x12mm
86827
Z877
102692
B085
86248
75080
7x11x2.0mm
6811
6x9.5x2.0mm
86827
87194
87194
86827
86827
86827
86827
86827
86827
86827
Z260
M2.5x12mm
86827
6811
6x9.5x2.0mm
Z892
B032
86248
75080
7x11x2.0mm
86827
86732
86732
86732
86732
86032
86032
Page is loading ...

31
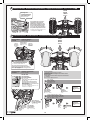
HPI RF-20
Receiver
Empfänger
Récepteur
This car has a built-in fail safe system. If the radio glitches, because of interference or the car goes out of range, the servo will apply the brakes to protect your car. The fail
safe system has been setup at the factory, but you should become familiar with the function of the fail safe and check the operation before running.
Dieses Auto ist von Werk aus mit einer Fail-Safe Einheit ausgestattet. Falls es zu Empfangsproblemen kommt, weil Funkstörungen auftreten oder das Auto die Reichweite des Senders
verläßt, wird das Auto automatisch bremsen. Die Fail-Safe Einheit ist von Werk aus eingestellt. Sie sollten allerdings lernen, wie man diese einstellt und sie vor jeder Fahrt überprüfen.
Ce véhicule possède un système de sécurité redondant. Si la radio tombe en panne, du fait des interférences ou qu’elle se trouve hors de portée, le servo actionnera les freins pour protéger
votre véhicule.Le système de sécurité redondant a été réglé en usine, mais vous devez vous familiariser avec son fonctionnement et vérier qu’il marche correctement avant utilisation.
Situations when the fail safe will operate.
Situationen in denen die Fail-Safe Einheit eingreift
Situations dans lesquelles la sécurité redondante fonctionnera.
When transmitter radio signal is cut off.
Wenn das Signal vom Sender nicht richtig ankommt.
Lorsque le signal radio de l'émetteur est coupé.
When fail safe is operating, the Red LED is lit.
Wenn die Fail-Safe Einheit aktiv ist, leuchtet
die rote LED.
Lorsque la sécurité redondante est en fonc-
tionnement, la LED rouge est allumée.
The fail safe can not completely protect your car. Before running, make sure no one is using the same frequency and
check radio range. If someone is using the same fequency, the fail safe will not work.
Die Fail-Safe Einheit kann ihr Auto nicht zu 100% schützen. Überprüfen Sie vor jeder Fahrt die Reichweite, sowie ob jemand auf der selben
Frequenz wie Sie fährt. Falls jemand die selbe Frequenz verwenden, kann die Fail-Safe Einheit nicht richtig arbeiten.
La sécurité redondante ne peut pas complètement protéger votre véhicule. Avant de le faire fonctionner, vériez que
personne d'autre n'utilise la même fréquence et vériez la portée du système radio. Si quelqu’un d’autre utilise la même
fréquence, la sécurité redondante ne pourra pas fonctionner.
Attention
Achtung
Attention
Receiver and Servo Empfänger und Servo Récepteur et servo
RF-20 Fail Safe Operation RF-20 Fail-Safe Einheit RF-20 Procédé à sécurité intégrée
Receiver Connections
Anschluss des Empfängers
Connexions du récepteur
HPI SF-50
Steering Servo
Lenkservo
Servo de direction
Antenna
Antenne
Antenne
100684 HPI Flux Blur
Electronic Speed Controller
Elektrischer Fahrtenregler
Contrôleur de vitesse électronique
Battery (Not included)
Fahrakku (Nicht enthalten)
Batterie (non incluse)
If the temperature of the ESC is too high, the Thermal Protection Function will activate. Once the ESC has cooled
down to normal temperature, it will work as normal.
Wenn die Temperatur des Reglers zu hoch steigt, wird die Temperatur-Schutzfunktion aktiviert. Sobald der Regler
wieder abgekühlt ist, arbeitet er wieder ganz normal.
Si la température du contrôleur électronique de vitesse est trop haute, la protection thermique va s’activer. Une fois
que l’appareil est redescendu à une température normale, il fonctionnera normalement.
100684 HPI Blur
Electronic Speed Controller
Elektrischer Fahrtenregler
Contrôleur de vitesse électronique
Receiver Switch
Ein/Aus Schalter
Interrupteur du récepteur
Fail-safe Function of The Flux Blur Speed Controller
Fail-Safe Funktion des Flux Blur Fahrtenreglers
Fonction de sécurité redondante du contrôleur de vitesse Flux Blur
100685
HPI Flux Tork
Motor
Motor
Moteur
Attention
Achtung
Attention
Do not make sharp bends or cut the
antenna.
Knicken oder kürzen Sie die Antenne
auf keinen Fall.
Ne faites pas d’angles vifs et ne coupez
pas l’antenne
.
Steering Servo
Lenkservo
Servo de direction
Throttle Servo
Gasservo
Servo d’accélération
For transponder or other accessories.
Für Transponder oder weiteres Zubehör.
Pour le transpondeur ou autres accessoires.
CH1:
CH2:
HPI RF-20
Receiver
Empfänger
Récepteur
Page is loading ...

33
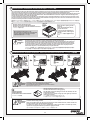
Castle link Software
Your HPI Blur ESC is also fully compatible with the Castle link Software from Castle Creations. You can download the
software directly from the Castle Creations website
http://www.castlecreations.com
The Castle link USB programming kit, HPI part # 100573, is required to use the Castle link software. The software
works with Windows 98 SE through XP only. At this time it is not compatible with Windows Vista and will not run on
Windows 95 or earlier, and you must have an available USB port.disponible.
100573
Castle Link USBProgramming Kit
Release trigger allowing
it to return to neutral
position. All LEDs will
ash with a series of
tones. Once solid Yel-
low LED is present your
ESC is ready for use.
In order to turn Auto-LiPo ON,
move trigger to the full throttle po-
sition. ESC will beep continuously
with GREEN LED ashing.
Release trigger allowing
it to return to neutral
position. ESC will beep
continuously while
ashing Yellow LED.
In order to turn Auto-LiPo OFF,
move trigger to the full brake posi-
tion. ESC will beep continuously
with RED LED ashing.
Continue holding full
throttle until you hear
and additional long
series of tones with all
LEDs ashing, then
continuous beeping
with Yellow LED
ashing.
You will hear a short
series of tones followed
by a two second pause,
followed by a long
series of tones. ESC will
beep continuously with
ashing red LED.
Auto-Lipo is pre-set to ON from factory.
If you are using a LiPo battery pack it is mandatory to use the Auto-LiPo setting (Low voltage cut-off). This will shut down the ESC when the
battery goes below a pre-set voltage to protect your battery from over-discharge and possible damage. The Auto LiPo setting will auto detect if
you are using 2 cell or 3 cell LiPo batteries and set the cut-off voltage accordingly.
How to turn on / off Auto-Lipo
ESC Auto-Lipo setting
ESC
En
Make sure the trans-
mitter on.
Hold Full throttle while
switching on esc
ON
Transmitter
1
Start with the transmitter ON and the ESC switched OFF.
2
Before Setup
ESC
RED YELLOWALL YELLOW OFF / REDON / GREEN YELLOWALLLED
LED
GREEN
OFF
Deutsch
Français
P.35
ON
ON
Page is loading ...

35
Z282
Step Screw M3x14mm
Stufenschraube M3x14mm
Vis M3x14mm
Z286
Step Screw M3x20mm
Stufenschraube M3x20m
m
Vis M3x20mm
Z288
Step Screw M4x20mm
Stufenschraube M4x20mm
Vis M4x20mm
Z303
Cap Head Screw M3x42mm
Inbusschraube M3x42mm
Vis tête cylindrique M3x42mm
Z517
Binder Head Screw M3x8mm
Flachkopfschraube M3x8mm
Vis tête ronde M3x8mm
Z520
Binder Head Screw M3x18mm
Flachkopfschraube M3x18mm
Vis tête ronde M3x18mm
Z526
Flat Head Screw M3x8mm
Senkkopfschraube M3x8mm
Vis tête fraisee M3x8mm
Z529
Flat Head Screw M3x15mm
Senkkopfschraube M3x15mm
Vis tête fraisee M3x15mm
Z530
Flat Head Screw M3x18mm
Senkkopfschraube M3x18mm
Vis tête fraisee M3x18mm
Z561
TP. Flanged Screw M3x10mm
Schneidschraube Mit Flansch M3x10mm
TP. vis M3x10mm
Z567
TP. Binder Head Screw M3x10m
m
Flachkopfschneidschraube M3x10mm
Vis tole tête plate M3x10mm
Z569
TP. Binder Head Screw M3x15mm
Flachkopfschneidschraube M3x15m
m
Vis tole tête plate M3x15mm
Z578
TP. Flat Head Screw M3x12mm
Senkkopfschneidschraube M3x12mm
Vis tole tête Fraisee M3x12mm
Z581
TP. Flat Head Screw M3x18mm
Senkkopfschneidschraube M3x18mm
Vis tole tête Fraisee M3x18mm
Z613
Binder Head Screw M4x10mm
Flachkopfschraube M4x10mm
Vis tête ronde M4x10mm
Z632
TP. Binder Head Screw M4x10mm
Flachkopfschneidschraube M4x10mm
Vis tole tête plate M4x10mm
Z634
TP. Binder Head Screw M4x15mm
Flachkopfschneidschraube M4x15mm
Vis tole tête plate M4x15mm
Z644
TP. Flat Head Screw M4x15mm
Senkkopfschneidschraube M4x15mm
Vis tole tête Fraisee M4x15mm
Z649
TP. Flat Head Screw M4x30mm
Senkkopfschneidschraube M4x30mm
Vis tole tête Fraisee M4x30mm
Z661
Lock Nut M2.6
Stoppmutter M2.6
Ecrou nylon M2.6
Z663
Lock Nut M3
Stoppmutter M3
Ecrou nylon M3
Z680
Flanged Lock Nut M5x8mm
Mutter mit flansch M5x8mm
Contre-écrou à collerette M5x8mm
Z682
Flanged Lock Nut M5
Stoppmutter M5
Ecrou de blocage de bride M5
Z684
Flanged Lock Nut M4
Stoppmutter M4
Ecrou de blocage de bride M4
Z721
Set Screw M4x4mm
Madenschraube M4x4mm
Vis sans tête M4x4mm
Z792
Cap Head Screw M4x8mm
Inbusschraube M4x8mm
Vis tête cylindrique M4x8mm
94398
Cap Head Screw M3x55mm
Inbusschraube M3x55mm
Vis tête cylindrique M3x55mm
86094
Screw Shaft M4x2.5x12mm
Gewindestift M4x2.5x12mm
Axe filete M4x2.5x12mm
86095
Screw Shaft M5x3x18mm
Gewindestift M5x3x18mm
Axe filete M5x3x18mm
Pièces métalliques
Metal Parts
Metall Teile
Shown actual size
In Originalgröße abgebildet
Taille réelle
1
:
1
Z892
Washer 10x12x0.2mm
Unterlagscheibe 10x12x0.2m
m
Rondelle 10x12x0.2 Mm
86972
Washer 6x15x0.2mm
Scheibe 6x15x0.2mm
Rondelle 6x15x0.2m
m
Z224
Washer 3x8x0.5mm
Scheibe 3x8x0.5mm
Rondelle 3x8x0.5mm
Z685
Washer 2.7x6.7x0.5mm
Scheibe 2.7x6.7x0.5mm
Rondelle 2.7x6.7x0.5m
m
Z695
Washer 4x6x0.3mm
Scheibe 4x6x0.3mm
Rondelle 4x6x0.3mm
Z538
Cap Head Screw M3x25mm
Inbusschraube M3x25mm
Vis tête cylindrique M3x25mm
Z547
Cap Head Screw M3x20mm
Inbusschraube M3x20mm
Vis tête cylindrique M3x20mm
Z877
Washer 8x10x0.2mm
Scheibe 8x10x0.2mm
Rondelle 8x10x0.2mm
94512
Cap Head Screw M4x30mm
Inbusschraube M4x30mm
Vis tête cylindrique M4x30mm
Z519
Binder Head Screw M3x15mm
Flachkopfschraube M3x15mm
Vis tête ronde M3x15mm
Z664
Flanged Lock Nut M4
Stoppmutter M4
Ecrou de blocage de bride M4
Z573
TP. Binder Head Screw M3x25mm
Flachkopfschneidschraube M3x25mm
Vis tole tête plate M3x25mm
Z619
Binder Head Screw M4x40mm
Flachkopfschraube M4x40mm
Vis tête ronde M4x40mm
100909
TP. Binder Head Screw M2x10mm
Flachkopfschneidschraube M2x10mm
Vis tole tête plate M2x10mm
100909
Washer 2x6x0.5mm
Scheibe 2x6x0.5mm
Rondelle 2x6x0.5mm
86827
Washer 6x19x0.2mm
Scheibe 6x19x0.2mm
Rondelle 6x19x0.2mm
86827
Washer 4x10x0.15mm
Scheibe 4x10x0.15mm
Rondelle 4x10x0.15mm
5
Parts Reference
Übersicht aller Teile
Référence des pièces

36
Z240
C-clip 8mm
C-clip 8mm
Clip C 8mm
Z243
E Clip E3mm
E-clip E3mm
Circlips 3mm
Z245
E Clip E5mm
E-clip E5mm
Circlips 5mm
Z260
Pin 2.5x12mm
Stift 2.5x12mm
Goupille 2.5x12mm
B023
Ball Bearing 6x13x5mm
Kugellager 6x13x5mm
Roulement 6x13x5mm
B032
Ball Bearing 10x16x5mm
Kugellager 10x16x5mm
Roulement 10x16x5mm
B085
Ball Bearing 8x16x5mm
Kugellager 8x16x5mm
Roulement 8x16x5mm
87194
Shaft For 4 Bevel Gear Diff 4x27mm
Welle Fuer 4 Spider Diff 4x27mm
Axe pour diff. 4 pignons coniques 4x27m
m
Pièces métalliques
Metal Parts
Metall Teile
Shown actual size
In Originalgröße abgebildet
Taille réelle
1
:
1
87042
Washer 4.3x10x1.0mm
Unterlagscheibe 4.3x10x1.0mm
Rondelle 4.3x10x1.0mm
87042
Spring 4.9x8x7mm
Slipper Feder 4.9x8x7mm
Ressort 4.9x8x7mm
86059
Ball 6.8x7.3x3mm
Kugelkopf 6.8x7.3x3mm
Rotule 6.8x7.3x3mm
86066
Hex Wheel Hub 14mm
Sechskant-radmitnehmer 14m
m
Fusee de roue hex 14mm
14mm
86319
Steering Post 12x47mm
Lenkungspfosten 12x47mm
Montant direction 12x47mm
86319
Servo Saver Spring 14x5x0.7mm
Feder 14x5x0.7mm
Ressort de sauve-servo 14x5x0.7mm
86319
Servo Saver Nut
Servo Saver Mutter
Écrou de sauve-servo
86804
Hex Wheel Hub 17mm
Sechskant-radmitnehmer 17mm
Fusee de roue hex 17mm
17mm
6203
Body Clip (8mm)
Karosserieklammern (8mm)
Clip carrosserie (8mm)
100950
Shock Shaft 3.5x90mm
Kolbenstange
Axe amortisseur
B030
Ball Bearing 10x15x4mm
Kugellager 10x15x4mm
Roulement 10x15x4mm
86048
Upper Arm Brace 4x54x3mm
Obere Querlenkerstrebe 4x54x3mm
Renfort bras supérieur 4x54x3mm
86070
Lower Arm Brace 4x54x3mm
Untere querlenkerstrebe 4x54x3mm
Support bras inferieur 4x54x3mm
86803
Joint Post 4x6x74mm
Bolzen 4x6x74mm
Montant de jonction 4x6x74mm
86071
Flange Shaft 4x62mm
Achsstift 4x62mm
Axe triangle 4x62mm
86073
Shaft 4x78mm
Achsstift 4x78mm
Axe 4x78mm
86074
Shaft 4x46mm
Achsstift 4x46mm
Axe 4x46mm
93535
Turnbuckle M4x70mm
Spurstange M4x70mm
Biellette M4x70mm
86090
Steering Crank Post 6x49mm
Lenkungspfosten 6x49mm
Axe pour direction 6x49mm
100907
Motor Mount Brace 7x7x80mm
Motorhalte Strebe 7x7x80mm
Renfort Montage Du Moteur 7x7x80mm
Z599
Screw Shaft 3x40mm
Achsstift mit Gewinde 3x40mm
Vis axe 3x40mm
100903
Spacer 4x8x20.5mm
Spacer 4x8x20.5mm
Rondelle 4x8x20.5mm

37
Pièces métalliques
Metal Parts
Metall Teile
Shown actual size
In Originalgröße abgebildet
Taille réelle
1
:
1
72130
Stainless Steel Slipper Plate
Stainless Steel Slipperplatte
Plaque acier inox slipper
86099
Diff Case Washer 0.7mm
Differentialgehaeuse Scheibe 0.7m
m
Rondelle boitier diff 0.7mm
86130
Slipper Clutch Hub
Slipperkupplungsmitnehmer
Moyeu d'embrayage anti-dribble
86827
Differential Case
Differentialgehaeuse
Boitier de differentiel
86827
Differential Plate 8x13x2.5mm
Differentiale Platte 8x13x2.5mm
Différentiellement Plate 8x13x2.5mm
86084
Drive Gear 32 Tooth
Getriebezahnrad 32 Zaehne
Couronne 32 Dents
86032
Bevel Gear 10 Tooth
Kegelrad 10 Zaehne
Pignon conique 10 Dents
b
86097
Drive Gear 18-23 Tooth
Getriebezahnrad 18-23 Zaehne
Couronne 18-23 Dents
86098
Idler Gear 29 Tooth
Getriebezahnrad 29 Zaehne
Pignon intermediaire 29 Dents
86032
Bevel Gear 20 Tooth
Kegelrad 20 Zaehne
Pignon conique 20 Dents
a
100903
Motor Mount Plate 8mm
Motorhalte Platte 8mm
Plaque Montage Du Moteur 8mm
100905
Idler Gear 44T
Getriebezahnrad 44Z
Ens. Pignon Fou 44T
102088
Pinion Gear 25 Tooth
Ritzel 25 Zaehne
Pignon 25 Dents
102093
Heavy Duty Spur Gear 44 Tooth
Heavy Duty Hauptzahnrad 44z
Couronne Renforcee 44 Dents
100919
Pinion Gear 20 Tooth
Ritzel 20 Zaehne
Pignon 20 dents
102692
Machined Bulletproof Diff Bevel Gear 29T
Bulletproof Kegelraeder 29Z
Pignons coniques diff 29d usines blindes
102692
Machined Bulletproof Diff Bevel Gear 9T
Bulletproof Kegelraeder 9Z
Pignons coniques diff 9d usines blindes
Page is loading ...
Page is loading ...
Page is loading ...
Page is loading ...
Page is loading ...
Page is loading ...
Page is loading ...
Page is loading ...
Page is loading ...
Page is loading ...
Page is loading ...
Page is loading ...
Page is loading ...
Page is loading ...
Page is loading ...
Page is loading ...
Page is loading ...
Page is loading ...
Page is loading ...
-
 1
1
-
 2
2
-
 3
3
-
 4
4
-
 5
5
-
 6
6
-
 7
7
-
 8
8
-
 9
9
-
 10
10
-
 11
11
-
 12
12
-
 13
13
-
 14
14
-
 15
15
-
 16
16
-
 17
17
-
 18
18
-
 19
19
-
 20
20
-
 21
21
-
 22
22
-
 23
23
-
 24
24
-
 25
25
-
 26
26
-
 27
27
-
 28
28
-
 29
29
-
 30
30
-
 31
31
-
 32
32
-
 33
33
-
 34
34
-
 35
35
-
 36
36
-
 37
37
-
 38
38
-
 39
39
-
 40
40
-
 41
41
-
 42
42
-
 43
43
-
 44
44
-
 45
45
-
 46
46
-
 47
47
-
 48
48
-
 49
49
-
 50
50
-
 51
51
-
 52
52
-
 53
53
-
 54
54
-
 55
55
-
 56
56


HPI Racing The Savage Flux HP User manual
- Category
- Remote controlled toys
- Type
- User manual
Ask a question and I''ll find the answer in the document
Finding information in a document is now easier with AI
in other languages
Related papers
-
HPI Racing Trophy Buggy Flux User manual
-
-
-
 HDI Sprint 2 Sport User manual
-
-
-
-
-
-

Other documents
-
hpi-racing hpi-racing Jumpshot FLLIX RC Monster Car User manual
-
MUGEN A2003 User manual
-
 MUGEN MTC2R 1/10 EP Touring Car Kit User manual
-
Kyosho IGW054 User manual
-
Castle Creations CSE010010400 User guide
-
 Phoenix Model PH213 Owner's manual
-
Associated Electrics RIVAL MT RTR User manual
-
Maverick TimberWolf 1/10th RTR Brushless SCT User manual
-
Atomik Atomik Whiplash 24in Electric RC Boat Owner's manual
-
REDCAT GEN8 SCOUT II Owner's manual

