Page is loading ...

TOOLS REQUIRED TABLE OF CONTENTS
Pour le français, voir la page 2. Para el español, ver la página 3.
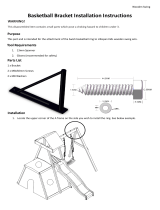
ASSEMBLY INSTRUCTIONS
MODEL 71526
Save this instruction in the event that the manufacturer has
to be contacted for replacement parts.
CONTACT LIFETIME CUSTOMER SERVICE:
Call: 1-800-225-3865
7:00 am–5:00 pm (Monday–Friday) MST
and 9:00 am–1:00 pm Saturday MST
QUESTIONS?
Model Number: 71526
Product ID:
For Customer Service in Mainland
Europe and the United Kingdom,
E-mail: [email protected]
Live Chat: www.lifetime.com
(click on “Ask An Expert” tab)
Video Instructions:
www.youtube.com/lifetimeproducts
BACKBOARD & RIM
BASKETBALL SYSTEM
• Before you start
Decide where you would like to mount your system.
A mounting kit is required for Roof and Wall
mounts and is available through our Customer
Service Department (see page 9).
• Recruit friends and family
Assembly should take 2 people about 2–3
hours to complete.
Icon Legend................................2
Notices....................................2
Backboard to Rim Assembly.........3
Mounting the System................9
Registration........................10
Warranty................................11
(2)
(1)
1/2” (13 mm)
(1)
3/8” (10 mm)
(1)
(1)
7/16” (11 mm)
Mounting Kit not included*
*Backboard Brackets (included with the Lifetime® Universal Mounting Kit,
sold separately) are required to complete the assembly as instructed in
this manual.
COPY

2
• Indicates the parts to be used for a section.
• Indicates special heed should be taken when reading.
• Indicates the hardware to be used for a section.
• Indicates the tools to be used for a section.
• Indicates no hardware required for a specifi c page.
• Indicates no parts required for a specifi c section.
• Indicates to use/not to use an electric drill for a specifi c step.
ICON LEGEND
• Indicates the use of a centerlock nut. A nut with this marking will require some effort to tighten.
This hardware was designed with this feature in order to prevent loosening later.
1187885
10/9/2018
WARNINGS & NOTICES
Most injuries are caused by misuse and/or not following instructions. Use caution when using this product.
To ensure safety, do not attempt to assemble this product without following the instructions carefully. Check entire box and inside all packing
material for parts and/or additional instruction material. Before beginning assembly, read the instructions and identify parts using the hardware
identifi er and parts list in this document. Proper and complete assembly, use and supervision are essential for proper operation and to reduce the
risk of accident or injury. A high probability of serious injury exists if this product is not installed, maintained, and operated properly.
FAILURE TO FOLLOW THESE WARNINGS MAY RESULT IN SERIOUS INJURY OR PROPERTY DAMAGE AND WILL VOID WARRANTY.
Owner must ensure that all players know and follow these rules for safe operation of the system.
• If using a ladder during assembly, use extreme caution.
•
Two capable adults are recommended for this operation.
• Minimum operational height is 6 ft 6 in (1.98m) to the bottom of the backboard.
SAFETY INSTRUCTIONS
COPY

3
BCS
Metal Parts
Hardware Bag
PARTS REQUIRED
HARDWARE REQUIRED
Plastic Parts
TOOLS REQUIRED
(2) (1)
(1)
1/2" (13 mm)
BACKBOARD TO RIM ASSEMBLY
1
ABC (x2)
ABK (x6)
AOW (x1)
ADP (x10)
AJI (x1)
ALX (x1)
ALD (x1)
AKZ (x1)
BAA (x1)
AJQ (x1)
BAB (x1)
BCU
AMA (x1)
AAQ (x2)
AAR (x2)
CYY (x2)
ABQ (x1)
25% of actual size
ADR (x4)
AAV (x2)
AJW (x2)
25% of actual size
AOU (x1)
25% of actual size
ABD (x2)
Hardware Bag
APY (x1)
(1)

4
TOOLS AND HARDWARE REQUIRED
X SECTION 1 (CONTINUED)
1.1
• Lay the backboard on a table or bench. Insert the U-Bolt (AOU) through the upper part of the opening on the backside
of the Backboard (AJI) as shown.
• Before beginning this assembly, follow the instructions included with your Mounting Kit
(or original basketball system if this is to replace an existing system) to assemble the
Backboard Brackets. To ensure a good fi t, use the U-Bolt (AOU) included with this system when
assembling the brackets.
For further details, see page 9.
AAR
AAR
APY
• The Backboard Brackets shown here are
provided with the Mounting Kit (sold
separately) or with your original unit. The
actual Brackets may vary, but the assembly
steps still apply. See page 9 for more details.
!
1/2" (13 mm) (x2)
• Backboard Brackets are included in the
Mounting Kit (sold separately) and may
vary from those shown here.
!
AAR (x2)
AOU
ABK
ALD
AJI
• The Backboard Brackets shown represent Lifetime Products
®
components and are for illustration purposes only. If using
Brackets other than the Lifetime Products
®
models shown here,
refer to the instructions provided with the Brackets.
!
ABK
ABK (x2)
AOU (x1)
25% of actual size

5
TOOLS AND HARDWARE REQUIRED
X SECTION 1 (CONTINUED)
1.2
• Slide a Carriage Bolt (ABC) into the crimped slot in each backboard channel.
1.3
• Bend the Backboard Brackets (not included) so the lower holes go over the Carriage Bolts. Lifetime
®
Backboard
Brackets are designed to be bent by hand. Secure the Brackets to the Carriage Bolts through the lower of the two holes
in the Bracket.
ABC (x2)
ABC
ABC
• The Backboard Brackets
shown here are not included
with this system.
!
ABK (x2)
ABK
ABK
1/2" (13 mm)
• The Backboard Brackets
shown here are not included
with this system.
!

6
TOOLS AND HARDWARE REQUIRED
X SECTION 1 (CONTINUED)
1.5
• Turn the backboard on its back and position the Rim (ALX) inside the Plastic Guard as shown. Slide the end of the
Axle (ABQ) through the Rim and the Rim Pivot Bracket (APY). Press the Push Nut (AAQ) onto the end of the Axle. Use the
1/2” (13 mm) socket head to secure the Push Nut if needed.
AAQ (x2)
1/2" (13 mm) (x2)
1.4
• Use the 1/2” socket head from the socket-head wrench to press one Push Nut (AAQ) onto one end of the Axle (ABQ).
• The Push Nut should rest about 1/4" from
the end of the Axle. If the Push Nut slips
on too far, continue sliding it to the other
end of the Axle to remove it and try again.
AAQ
ABQ
1/2" (13 mm) Socket Head
!
AAQ
ABQ
ALX
ABQ (x1)
25% of actual size

7
TOOLS AND HARDWARE REQUIRED
X SECTION 1 (CONTINUED)
1.6
• Thread the Jam Nuts (AAV) as far as they will go on the ends of the U-Bolt. Then slide the Springs (AJW) into place
and secure them with the hardware shown.
• DO NOT COMPLETELY TIGHTEN THE FLANGE NUTS
IN THIS STEP! Only tighten the Nuts until the Rim
does not wobble. Tightening the Nuts will adjust
the Rim tension.
!
ABK (x2)
AOW (x1)
25% of actual size
• Attach the Rim Cover Plate (AMA) to the Rim.
1.7
AJW (x2)
25% of actual size
AOW
ABK
AAV
AJW
AJW
1/2" (13 mm) (x2)
ADR (x4)
ADR
ADR
ADR
ADR
AMA
AAV (x2)

8
TOOLS AND HARDWARE REQUIRED
X SECTION 1 (CONTINUED)
ADP (x10)
AJI
ADP
ADP
ADP
ADP
AJQ
1.8
• Remove the plastic fi lm from the Backboard (AJI), and attach the Center Frame Pad (AJQ) to the Backboard in the location
shown with the hardware indicated. Make sure that the Center Frame Pad is oriented and centered on the metal piece of
the Backboard.
1.9
BAA
BAB
ADP
ADP
ADP
ADP
ADP
ADP
• Attach the Corner Frame Pads (BAA and BAB) to the Backboard in the locations indicated with the hardware indicated.
1.10
• Attach the Net (AKZ) to the Rim.
AKZ
• If a replacement Net is needed, please call
our Customer Service Department. Our Nets
are shorter than average to reduce the risk of
entanglement.
!

9
FIG. A, ROOF MOUNT FIG. B, WALL MOUNT
MOUNTING KIT SOLD SEPARATELY
See details below.
FIG. C, EXISTING POLE MOUNT
MOUNTING THE SYSTEM
LIFETIME
©
• For mounting the Backboard & Rim Combo to a roof, wall, or existing pole mount that does not provide an extension,
you must use a Mounting Kit designed for this purpose. Lifetime Products offers a Universal Mounting Kit, Model #9594,
through our Customer Service Department. Figures A, B, and C show the Universal Extension Bracket mounted to a
roof, a wall, and an existing pole. An Adjustable Height Mounting Kit, Model #1044, is also available (fi gure D).
Please refer to the information at the bottom of this page for ordering information.
PRODUCT DESCRIPTION MODEL #
Universal Mounting Kit 9594
Adjustable Height Mounting Kit 1044
Call our Customer Service Department at 1.800.424.3865 for prices and shipping costs.
To place orders, use a Master Card or Visa and call our Customer Service Department, or send check or money
order to:
LIFETIME PRODUCTS, INC.
P.O. BOX 160010
BLDG. D-11, FREEPORT CENTER
CLEARFIELD, UT 84016-0010
• The Universal Mounting Kit and the
Adjustable Height Mounting Kit are not
included with this basketball system. See
details below to order the kit from our
Customer Service Department.
!
FIG. D, ADJUSTABLE HEIGHT MOUNTING KIT

10
The life of your basketball system depends on many variables. The climate, exposure to corrosives such as salt, pesticides, or herbicides,
and excessive use or misuse can all contribute to Pole failure, which may cause property damage or personal injury.
Check your basketball system frequently for loose hardware, excessive wear, and signs of corrosion. For safety reasons, and to
prolong the life of your basketball system, you must take the following preventive measures.
a. Check all Nuts and Bolts. If any are loose, tighten them.
b. Check all parts for excessive wear and tear. If necessary, replace any parts that have been worn or damaged through usage.
Contact our Customer Service Department for replacement parts.
c. Inspect the Warning Sticker on the Pole. If it is ripped, faded, or illegible, call our Customer Service Department to request
a replacement Sticker.
d. Check all Pole sections for visible rust or chipped or cracked paint. If either are present, do the following:
1. Use an emery cloth to completely remove any rust or chipped paint.
2. Clean the area with a damp cloth and allow it to dry.
3. Apply two coats of a rust preventative, high gloss enamel paint to the area. Allow the paint to dry between coats.
IF RUST HAS PENETRATED THROUGH THE POLE ANYWHERE, REPLACE IT IMMEDIATELY!
MAINTENANCE / ENTRETIEN / MANTENIMIENTO
LIFETIME’S PROMISE TO YOU:
We invite you to read our privacy policy at www.lifetime.com
REGISTER today!
At Lifetime
®
, we are committed to providing innovative and quality products. While registering, you will have the opportunity to give us your feedback. Your input is
valuable to us.
• You can also opt in to receive new product notifications or promotions.
• In the unlikely event of a product recall or safety modification, your registration provides the information we need to notify you directly.
• Registration is fast, easy, and completely voluntary.
Maintaining your privacy is our long-standing policy at Lifetime
®
. And you can rest assured that Lifetime
®
will not sell or provide your
personal data to other third parties, or allow them to use your personal data for their own purposes.
REGISTER YOUR PRODUCT / ENREGISTREZ VOTRE PRODUIT / REGISTRE SU PRODUCTO

11
THE MANUFACTURER RESERVES THE RIGHT TO MAKE SUBSTITUTIONS TO WARRANTY CLAIMS IF PARTS ARE UNAVAILABLE OR OBSOLETE.
1. Lifetime basketball systems are warranted to the original purchaser to be free from defects in material or workmanship
for a period of fi ve years from the date of original retail purchase. The word “defects” is defi ned as imperfections that
impair the use of the product. Defects resulting from misuse, abuse or negligence will void this warranty. This warranty
does not cover defects due to improper installation, alteration or accident. This warranty does not cover damage caused
by vandalism, rusting, “acts of nature” or any other event beyond the control of the manufacturer.
2. This warranty is nontransferable and is expressly limited to the repair or replacement of defective product. If the product
is defective within the terms of this warranty, Lifetime Products, Inc. will repair or replace defective parts at no cost to
the purchaser. Shipping charges to and from the factory or distribution center are not covered and are the responsibility
of the purchaser. Labor charges and related expenses for removal, installation or replacement of the basketball system
or its components are not covered under this warranty.
3. This warranty does not cover scratching or scuffi ng of the product that may result from normal usage. In addition,
defects resulting from intentional damage, negligence, unreasonable use or hanging from the rim will void this warranty.
4. Liability for incidental or consequential damages is excluded to the extent permitted by law. While every attempt is made
to embody the highest degree of safety in all equipment, freedom from injury cannot be guaranteed. The user assumes
all risk of injury resulting from the use of this product. All merchandise is sold on this condition, and no representative
of the company may waive or change this policy.
5. This product is not intended for institutional or commercial use; Lifetime Products, Inc. does not assume any liability for
such use. Institutional or commercial use will void the warranty.
6. Our goods come with guarantees that cannot be excluded under the Australian Consumer Law. You are entitled to a
replacement or refund for a major failure and for compensation for any other reasonably foreseeable loss or damage.
You are also entitled to have the goods repaired or replaced if the goods fail to be of acceptable quality and the failure
does not amount to a major failure.
7. This warranty is expressly in lieu of all other warranties, expressed or implied, including warranties of merchantability
or fi tness for use to extent permitted by Federal and state law. Neither Lifetime Products, Inc., nor any representative
assumes any other liability in connection with this product. This warranty gives you specifi c legal rights, and you may
also have other rights which vary from state to state.
www.lifetime.com
PLEASE INCLUDE YOUR DATED SALES RECEIPT AND PHOTOGRAPHS OF DAMAGED PARTS.
REPORT PRODUCT DEFECTS IN WRITING TO:
Lifetime Products, Inc., PO Box 160010 Clearfi eld, UT 84016-0010
or call 1-800-225-3865 M-F 7 a.m. to 5 p.m. MST.
REGISTER YOUR PRODUCT FOR QUICKER CUSTOMER SERVICE.
Visit www.lifetime.com or call 1-800-225-3865 to register your product today.
FOR INTERNATIONAL WARRANTY CLAIMS:
All warranty claims must be accompanied by a sales receipt. Report all warranty claims in writing to your regional sales
support representative. Please include your dated sales receipt and photographs of damaged parts.
To Identify the representative for your region, please visit: www.lifetime.com/international
5-YEAR LIMITED FACTORY WARRANTY
W
A
R
R
A
N
T
Y
W
A
R
R
A
N
T
Y
WARRANTY

12
www.lifetime.com
Or call: 1-800-424-3865
7:00 am–5:00 pm (M–F) MST and 9:00 am–1:00 pm Saturday MST
To purchase accessories or other Lifetime
®
products, visit us at:
www.lifetime.com
ENHANCE YOUR LIFETIME
®
PURCHASE BY ADDING ACCESSORIES OR OTHER GREAT PRODUCTS
/