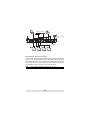
ATEN VM0404HA is a powerful 4x4 4K HDMI Matrix Switch that offers an easy and affordable way to manage and distribute 4K digital video signals. It supports high resolutions up to 4K (3840 x 2160) at 30 Hz (4:4:4) and 60 Hz (4:2:0), ensuring stunning image quality for your applications.
ATEN VM0404HA is a powerful 4x4 4K HDMI Matrix Switch that offers an easy and affordable way to manage and distribute 4K digital video signals. It supports high resolutions up to 4K (3840 x 2160) at 30 Hz (4:4:4) and 60 Hz (4:2:0), ensuring stunning image quality for your applications.


-
 1
1
-
 2
2
-
 3
3
-
 4
4
-
 5
5
-
 6
6
-
 7
7
-
 8
8
-
 9
9
-
 10
10
-
 11
11
-
 12
12
-
 13
13
-
 14
14
-
 15
15
-
 16
16
-
 17
17
-
 18
18
-
 19
19
-
 20
20
-
 21
21
-
 22
22
-
 23
23
-
 24
24
-
 25
25
-
 26
26
-
 27
27
-
 28
28
-
 29
29
-
 30
30
-
 31
31
-
 32
32
-
 33
33


ATEN VM0404HA is a powerful 4x4 4K HDMI Matrix Switch that offers an easy and affordable way to manage and distribute 4K digital video signals. It supports high resolutions up to 4K (3840 x 2160) at 30 Hz (4:4:4) and 60 Hz (4:2:0), ensuring stunning image quality for your applications.
Ask a question and I''ll find the answer in the document
Finding information in a document is now easier with AI