Toro Flex-Force Power System 60V MAX 36cm Lawn Mower User manual
- Category
- Lawnmowers
- Type
- User manual
This manual is also suitable for

FormNo.3442-672RevA
Flex-ForcePowerSystem™60V
MAX36cmand43cmLawn
Mower
ModelNo.21836—SerialNo.321000001andUp
ModelNo.21836T—SerialNo.321000001andUp
ModelNo.21843—SerialNo.321000001andUp
ModelNo.21843T—SerialNo.321000001andUp
ModelNo.21844—SerialNo.321000001andUp
ModelNo.21844T—SerialNo.321000001andUp
Registeratwww.Toro.com.
OriginalInstructions(EN)*3442-672*

Forassistance,pleasesee
www.Toro.com/supportor
contactyourAuthorized
ServiceDealerbefore
returningthisproduct.
ThisproductcomplieswithallrelevantEuropean
directives;fordetails,pleaseseetheseparateproduct
specicDeclarationofConformity(DOC)sheet.
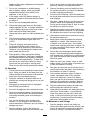
Introduction
Thisrotary-blade,walk-behindlawnmowerisintended
tobeusedbyresidentialhomeowners.Itisdesigned
primarilyforcuttinggrassonwell-maintainedlawns
onresidentialproperties.Itisnotdesignedforcutting
brushorforagriculturaluses.Itisdesignedto
useT oroFlex-Forcelithium-ionbatterypackModel
81825(providedwithModel21836),Model81850
(providedwithModel21843andModel21844)and
81860or81875.Thesebatterypacksaredesigned
tobechargedonlybybatterychargerModel81802
(providedwithModels21836,21843,and21844),or
81805.Usingtheseproductsforpurposesotherthan
theirintendedusecouldprovedangeroustoyouand
bystanders.
Models21836T,21843T ,and21844Tdonotinclude
abatteryoracharger.
Readthisinformationcarefullytolearnhowtooperate
andmaintainyourproductproperlyandtoavoid
injuryandproductdamage.Youareresponsiblefor
operatingtheproductproperlyandsafely.
Visitwww.T oro.comformoreinformation,including
safetytips,trainingmaterials,accessoryinformation,
helpndingadealer,ortoregisteryourproduct.
Wheneveryouneedservice,genuinethe
manufacturerparts,oradditionalinformation,contact
anAuthorizedServiceDealerorthemanufacturer
CustomerServiceandhavethemodelandserial
numbersofyourproductready.Figure1identies
thelocationofthemodelandserialnumbersonthe
product.Writethenumbersinthespaceprovided.
Important:Withyourmobiledevice,youcan
scantheQRcodeontheserialnumberdecal(if
equipped)toaccesswarranty,parts,andother
productinformation.
g275230
Figure1
1.Modelandserialnumberlocation
ModelNo.
SerialNo.
Thismanualidentiespotentialhazardsandhas
safetymessagesidentiedbythesafety-alertsymbol
(Figure2),whichsignalsahazardthatmaycause
seriousinjuryordeathifyoudonotfollowthe
recommendedprecautions.
g000502
Figure2
Safety-alertsymbol
Thismanualuses2wordstohighlightinformation.
Importantcallsattentiontospecialmechanical
informationandNoteemphasizesgeneralinformation
worthyofspecialattention.
©2021—TheToro®Company
8111LyndaleAvenueSouth
Bloomington,MN554202
Contactusatwww.Toro.com.
PrintedinChina
AllRightsReserved

Contents
Safety.......................................................................3
SafetyandInstructionalDecals..........................5
Setup........................................................................8
1MountingtheBatteryCharger
(Optional)........................................................8
2AssemblingtheHandle....................................9
ProductOverview...................................................10
Specications..................................................10
BeforeOperation..................................................11
InstallingtheBatteryPack.................................11
AdjustingtheCuttingHeight.............................12
DuringOperation.................................................13
StartingtheMachine.........................................13
UsingtheSelf-PropelDrive...............................13
AdjustingtheBladeSpeed................................13
RecyclingtheClippings....................................14
BaggingtheClippings.......................................15
ShuttingOfftheMachine..................................17
RemovingtheBatteryPackfromthe
Machine........................................................17
OperatingTips.................................................18
AfterOperation....................................................18
ChargingtheBatteryPack................................18
CleaningtheMachine.......................................19
FoldingtheHandle...........................................19
StoringtheMachineintheVertical-Stow
Position.........................................................20
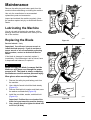
Maintenance...........................................................21
LubricatingtheMachine....................................21
ReplacingtheBlade..........................................21
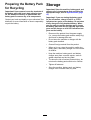
PreparingtheBatteryPackfor
Recycling......................................................22
Storage...................................................................22
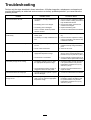
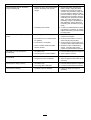
Troubleshooting......................................................23
Safety
IMPORTANTSAFETY
INSTRUCTIONS
WARNING—Whenusinganelectricmachine,always
readandfollowbasicsafetywarningsandinstructions
toreducetheriskofre,electricshock,orinjury,
includingthefollowing:
I.Training
1.Theoperatorofthemachineisresponsiblefor
anyaccidentsorhazardsoccurringtoothersor
theirproperty.
2.Donotallowchildrentouseorplaywiththe
machine,batterypack,orthebatterycharger;
localregulationsmayrestricttheageofthe
operator.
3.Donotallowchildrenoruntrainedpeopleto
operateorservicethemachine.Allowonly
peoplewhoareresponsible,trained,familiar
withtheinstructions,andphysicallycapableto
operateorservicethemachine.
4.Beforeusingthemachine,batterypack,and
batterycharger,readalltheinstructionsand
cautionarymarkingsontheseproducts.
5.Becomefamiliarwiththecontrolsandproper
useofthemachine,batterypack,andbattery
charger.
II.Preparation
1.Keepbystanders,especiallychildrenandpets,
outoftheoperatingarea.
2.Donotoperatethemachinewithoutallguards
andsafetydevices,suchasdeectorsandgrass
catchers,inplaceandfunctioningproperlyon
themachine.
3.Inspecttheareawhereyouwillusethemachine
andremoveallobjectsthatcouldinterferewith
theoperationofthemachineorthatthemachine
couldthrow.
4.Beforeusingthemachine,ensurethattheblade,
bladebolt,andbladeassemblyarenotwornor
damaged.Replaceanydamagedorunreadable
labels.
5.UseonlythebatterypackspeciedbyToro.
Usingotheraccessoriesandattachmentsmay
increasetheriskofinjuryandre.
6.Pluggingthebatterychargerintoanoutletthat
isnot100to240Vcancauseareorelectric
shock.Donotplugthebatterychargerintoan
outletotherthan100to240V.Foradifferent
styleofconnection,useanattachmentplug
3

adapterofthepropercongurationforthepower
outletifneeded.
7.Donotuseadamagedormodiedbattery
packorbatterycharger,whichmayexhibit
unpredictablebehaviorthatresultsinre,
explosion,orriskofinjury.
8.Ifthesupplycordtothebatterychargeris
damaged,contactanAuthorizedServiceDealer
toreplaceit.
9.Donotusenon-rechargeablebatteries.
10.Chargethebatterypackwithonlythebattery
chargerspeciedbyT oro.Achargersuitablefor
1typeofbatterypackmaycreateariskofre
whenusedwithanotherbatterypack.
11.Chargethebatterypackinawell-ventilatedarea
only.
12.Donotexposeabatterypackorbatterycharger
toreortotemperatureshigherthan68°C
(154°F).
13.Followallcharginginstructionsanddo
notchargethebatterypackoutsideofthe
temperaturerangespeciedintheinstructions.
Otherwise,youmaydamagethebatterypack
andincreasetheriskofre.
14.Dressproperly—Wearappropriateclothing,
includingeyeprotection;longpants;substantial,
slip-resistantfootwear(notbarefootorwearing
sandals);andhearingprotection.Tiebacklong
hairanddonotwearlooseclothingorloose
jewelrythatcangetcaughtinmovingparts.
Wearadustmaskindustyoperatingconditions.
III.Operation
1.Contactwiththemovingbladewillcauseserious
injury.Keepyourhandsorfeetawayfromthe
cuttingareaandallmovingpartsofthemachine.
Keepclearofanydischargeopening.
2.Usingthismachineforpurposesotheranits
intendedusecouldprovedangeroustoyouand
bystanders.
3.Disengagetheself-propeldrive(ifequipped)
beforestartingthemachine.
4.Donottilttheappliancewhenstartingthemotor.
5.Preventunintentionalstarting—Ensurethatthe
safetykeyisremovedfromthemachinebefore
connectingthebatterypackandhandlingthe
machine.
6.Useyourfullattentionwhileoperatingthe
machine.Donotengageinanyactivitythat
causesdistractions;otherwise,injuryorproperty
damagemayoccur.
7.Stopthemachine,removethesafetykey,
removethebatterypackfromthemachine,and
waitforallmovementtostopbeforeadjusting,
servicing,cleaning,orstoringthemachine.
8.Removethebatterypackandsafetykeyfrom
themachinewheneveryouleaveitunattended
orbeforechangingaccessories.
9.Donotforcethemachine—Allowthemachineto
dothejobbetterandsaferattherateforwhichit
wasdesigned.
10.Stayalert—Watchwhatyouaredoinganduse
commonsensewhenoperatingthemachine.
Donotusethemachinewhileill,tired,orunder
theinuenceofalcoholordrugs.
11.Operatethemachineonlyingoodvisibilityand
appropriateweatherconditions.Donotoperate
themachinewhenthereistheriskoflightning.
12.Useextremecautionwhenreversingorpulling
themachinetowardyou.
13.Keepproperfootingandbalanceatalltimes,
especiallyonslopes.Mowacrosstheface
ofslopes,neverupanddown.Useextreme
cautionwhenchangingdirectionsonslopes.Do
notmowexceedinglysteepslopes.Walk,never
runwiththemachine.
14.Donotdirectthedischargematerialtoward
anyone.Avoiddischargingmaterialagainsta
wallorobstruction;materialmayricochettoward
you.Stoptheblade(s)whencrossingsurfaces
otherthangrass.
15.Watchforholes,ruts,bumps,rocks,orother
hiddenobjects.Uneventerraincouldcauseyou
toloseyourbalanceorfooting.
16.Wetgrassorleavescancauseseriousinjuryif
youslipandcontacttheblade.Avoidmowingin
wetconditionsorwhenitisraining.
17.Ifthemachinestrikesanobjectorstartsto
vibrate,immediatelyshutoffthemachine,
removethesafetykey,removethebattery
pack,andwaitforallmovementtostopbefore
examiningthemachinefordamage.Makeall
necessaryrepairsbeforeresumingoperation.
18.Stopthemachineandremovethesafetykey
beforeloadingthemachineforhauling.
19.Underabusiveconditions,thebatterypackmay
ejectliquid;avoidcontact.Ifyouaccidently
comeintocontactwiththeliquid,ushwith
water.Iftheliquidcontactsyoureyes,seek
medicalhelp.Liquidejectedfromthebattery
packmaycauseirritationorburns.
IV.MaintenanceandStorage
1.Stopthemachine,removethesafetykey,
removethebatterypackfromthemachine,and
waitforallmovementtostopbeforeadjusting,
servicing,cleaning,orstoringthemachine.
4

2.Donotattempttorepairthemachineexceptas
indicatedintheinstructions.HaveanAuthorized
ServiceDealerperformserviceonthemachine
usingidenticalreplacementparts.
3.Wearglovesandeyeprotectionwhenservicing
themachine.
4.Replacethebladeifitisbent,worn,orcracked.
Anunbalancedbladecausesvibration,which
coulddamagethemotororcausepersonal
injury.
5.Whenservicingtheblade,beawarethatthe
bladecanstillmoveeventhoughthepower
sourceisoff.
6.Checkthegrasscollectionbagfrequentlyfor
deteriorationorwear,andreplaceawornbag
withaT oro[replacement]bag.
7.Forbestperformance,useonlygenuineToro
replacementpartsandaccessories.Other
replacementpartsandaccessoriescouldbe
dangerous,andsuchusecouldvoidtheproduct
warranty.
8.Maintainthemachine—Keepcuttingedges
sharpandcleanforthebestandsafest
performance.Keephandlesdry,clean,andfree
fromoilandgrease.Keepguardsinplaceandin
workingorder.Keepbladessharp.Useidentical
replacementbladesonly.
9.Checkthemachinefordamagedparts—Ifthere
aredamagedguardsorotherparts,determine
whetherthemachinewilloperateproperly.
Checkformisalignedandbindingmovingparts,
brokenparts,mounting,andanyothercondition
thatmayaffectitsoperation.Unlessindicated
intheinstructions,haveanAuthorizedService
Dealerrepairorreplaceadamagedguardor
part.
10.Whenthebatterypackisnotinuse,keepit
awayfrommetalobjectssuchaspaperclips,
coins,keys,nails,andscrewsthatcanmakea
connectionfrom1terminaltoanother.Shorting
thebatteryterminalsmaycauseburnsorare.
11.Checkthebladeandmotormountingbolts
frequentlyfortightness.
12.Whenyouarenotusingthemachine,storeit
indoorsinadry,secureplaceoutofthereach
ofchildren.
13.CAUTION—Amistreatedbatterypackmay
presentariskofreorchemicalburn.Donot
disassemblethebatterypack.Donotheatthe
batterypackabove68°C(154°F)orincinerate
it.ReplacethebatterypackwithagenuineToro
batterypackonly;usinganothertypeofbattery
packmaycauseareorexplosion.Keep
batterypacksoutofthereachofchildrenand
intheoriginalpackaginguntilyouarereadyto
usethem.
14.Donotdisposeofthebatteryinare.The
cellmayexplode.Checkwithlocalcodesfor
possiblespecialdisposalinstructions.
SAVETHESE
INSTRUCTIONS
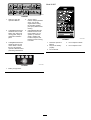
SafetyandInstructionalDecals
Safetydecalsandinstructionsareeasilyvisibletotheoperatorandarelocatednearanyarea
ofpotentialdanger.Replaceanydecalthatisdamagedormissing.
decal134-6016
134-6016
1.Enginespeed—slow2.Enginespeed—fast
decal134-5099
134-5099
1.Warning—keephandsandfeetawayfromthemowerblade.
decal134-5297
134-5297
1.MaxPowerMode
5

decal134-4550
134-4550
1.Warning—readthe
Operator'sManual.
4.Thrownobject
hazard—keepbystanders
away;shutoffthe
enginebeforeleaving
theoperatingposition;
pickupanydebrisbefore
mowing.
2.Cutting/dismemberment
hazardofhand,mower
blade—stayawayfrom
movingparts;keepall
guardsandshieldsin
place.
5.Cutting/dismemberment
hazardofhandorfoot,
mowerblade—donot
operateupanddown
slopes;operateside
tosideonslopes;look
behindyouwhenmoving
inreverse.
3.Cutting/dismemberment
hazardofhandorfoot,
mowerblade—remove
thekeyandreadthe
Operator’sManualbefore
performingmaintenance.
decal137-9461
137-9461
1.Batterychargestatus
Model81825
decal137-9487
137-9487
1.ReadtheOperator’s
Manual.
4.Donotexposetoame.
2.Recyclethebattery
properly.
5.Donotexposetorain.
3.Donotdiscard.
6

Model81850
decal140-2158
140-2158
1.ReadtheOperator’s
Manual.
4.Donotexposetoame.
2.Recyclethebattery
properly.
5.Donotexposetorain.
3.Donotdiscard.
decal137-9495
137-9495
1.ReadtheOperator’sManual.3.Forindooruse.
2.Donotdiscard.4.Doubleinsulated
decal137-9463
137-9463
1.Thebatterypackischarging.
2.Thebatterypackisfullycharged.
3.Thebatterypackisoverorundertheappropriatetemperaturerange.
4.Batterypackchargingfault
7

Setup
Important:Thebatterypackisnotfullychargedwhenitispurchased.Beforeusingthemachinefor
thersttime,refertoChargingtheBatteryPack(page18).
Note:Thesafetykeyandallotherloosepartshavebeenplacedinthebatterycompartmentforsafedelivery;
ensurethatyouremovethemfromthecompartmentandstoretheminasafeplacepriortoassembly.
1
MountingtheBattery
Charger(Optional)
Partsneededforthisprocedure:
2Mountinghardware(notincluded)
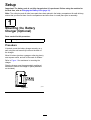
Procedure
Ifdesired,mountthebatterychargersecurelyona
wallusingthewall-mountkeyholesonthebackof
thecharger.
Mountitindoors(suchasagarageorotherdryplace),
nearapoweroutlet,andoutofthereachofchildren.
RefertoFigure3forassistanceinmountingthe
charger.
Slidethechargerovertheappropriatelypositioned
hardwaretosecurethechargerinplace(hardware
notincluded).
g290534
Figure3
8

2
AssemblingtheHandle
Partsneededforthisprocedure:
1Upperhandleassembly
2Bolt
2Locknut
Procedure
Important:Removeanddiscardtheprotective
plasticsheetthatcoversthemowerandanyother
plasticorwrappingonthemachine.
Note:Removetherubberend-capfromthehandle
assemblypriortoinsertingtheupperhandlebar
intothelowerhandlebar.Theseareaddedduring
manufacturingtopreventdamagetothecables.
WARNING
Foldingorunfoldingthehandleimproperly
candamagethecables,causinganunsafe
operatingcondition.
•Donotdamagethecableswhenfoldingor
unfoldingthehandle.
•Ifacableisdamaged,contactan
AuthorizedServiceDealer.
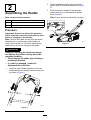
1.Installtheupperhandleassemblytothelower
handleandsecureitusing2boltsand2locknuts
asshowninFigure4.
g342173
Figure4
2.Pullthehandlebarreleasebracetowardthe
upperhandletoreleasethehandlelock(Figure
5).
3.Movethehandlerearwardtotheoperating
positionandletgoofthehandlebarrelease
brace(Figure5).
Note:Ensurethatthehandleclicksintoplace.
g341335
Figure5
9

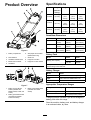
ProductOverview
g342172
Figure6
1.Batterycompartment6.Self-propeldrivehandles
(Model21844only)
2.Reardeector7.Grassbox
3.Handlebarreleasebrace8.Height-of-cutbutton
4.Blade-controlhandles9.Height-of-cutviewwindow
5.Handlebar
g342171
Figure7
1.BatterychargerModel
81802(includedwith
Models21836,21843,and
21844)
3.BatterypackModel81825
(includedwithModel
21836)
2.BatterypackModel81850
(includedwithModels
21843and21844)
Specications
ModelWeight
(withouta
battery)
LengthWidthHeight
20.2kg130.6cm41.7cm107.3cm
21836/T(44.5lb)(51.4
inches)
(16.4
inches)
(42.2
inches)
22.1kg136.2cm48.5cm108.5cm
21843/T(48.7lb)(53.6
inches)
(19.1
inches)
(42.7
inches)
24.0kg136.2cm48.5cm108.5cm
21844/T(52.9lb)(53.6
inches)
(19.1
inches)
(42.7
inches)
SmartStowDimensions
ModelLengthWidthHeight
21836/T41.2cm(16.2
inches)
41.7cm(16.4
inches)
113.5cm
(44.7inches)
21843/T41.0cm(16.1
inches)
48.5cm(19.1
inches)
114.0cm
(44.9inches)
21844/T41.0cm
(16.1inches)
48.5cm(19.1
inches)
114.0cm
(44.9inches)
BatteryPack
Model8182581850
2.5Ah4.0Ah
Batterypackcapacity135Wh216Wh
Batterymanufacturerrating=60Vmaximumand54Vnominal.
Actualvoltagevarieswithload.
BatteryCharger
Model81802
Type60VMAXLithium-IonBatteryCharger
Input100to240VAC50/60HzMax2.0A
Output60VMAXDC2.0A
AppropriateTemperatureRanges
Charge/storethebatterypack
at
5°C(41°F)to40°C(104°F)*
Usethebatterypackat-30°C(-22°F)to49°C(120°F)*
Usethemachineat0°C(32°F)to49°C(120°F)*
*Chargingtimewillincreaseifyoudonotchargethe
batterypackwithinthisrange.
Storethemachine,batterypack,andbatterycharger
inanenclosedclean,dryarea.
10

Operation
Note:Determinetheleftandrightsidesofthemachinefromthenormaloperatingposition.
BeforeOperation
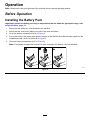
InstallingtheBatteryPack
Important:Operatethebatterypackonlyintemperaturesthatarewithintheappropriaterange;refer
toSpecications(page10).
1.Ensurethatthesafetykeyisnotinstalledtothemachine.
2.Ensurethattheventsonthebatteryareclearofanydustanddebris.
3.Liftupthebattery-compartmentlid(AofFigure8).
4.Lineupthecavityinthebatterypackwiththetongueonthemachineandslidethebatterypackintothe
compartmentuntilitlocksintoplace(BofFigure8).
5.Closethebattery-compartmentlid(CofFigure8).
Note:Ifthebattery-compartmentliddoesnotclosecompletely,thebatteryisnotfullyinstalled.
g341293
Figure8
11

AdjustingtheCuttingHeight
WARNING
Adjustingtheheight-of-cutcouldbringyourhandsintocontactwithamovingbladeand
resultinseriousinjury.
•Shutoffthemotor,removethebattery,andwaitforallmovingpartstostopbeforeadjusting
thecuttingheight.
•Donotputyourngersunderthehousingwhenadjustingthecuttingheight.
Toadjustthecuttingheight,pressdownontheheight-of-cutbuttonandraiseorlowerthedeckuntilthedesired
height-of-cutsettingisshownintheheight-of-cutwindow(Figure9).
g341347
Figure9
1.Height-of-cutbutton2.Height-of-cutviewwindow
Theheightofcutisadjustablein6incrementsbetween19mm(3/4inch)and70mm(2-3/4inches).
12

DuringOperation
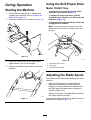
StartingtheMachine
1.Ensurethatthebatterypackischargedand
installedinthemachine;refertoInstallingthe
BatteryPack(page11).
2.Installthesafetykeytothemachine(Figure10).
g344530
Figure10
3.PressthePowerbuttonatthecenterofthe
upperhandletoturnonthemachine.
4.Squeezetheblade-controlhandlestostartthe
machine.
g341398
Figure11
UsingtheSelf-PropelDrive
Model21844/TOnly
•Toadjusttheself-propelmovementspeed,
adjustthespeedcontrol(Figure7).
•Toengagetheself-propeldrive,pullthe
self-propeldrivehandlesuptothehandleand
holdthem(Figure12).
•Todisengagetheself-propel-drive,releasethe
self-propeldrivehandles.
Note:Toreducethegroundspeed,movethe
speedcontroltotheleft;toincrease,moveitto
theright.
g342174
Figure12
1.Self-propelspeedcontrol
2.MAXbutton
3.Self-propel-drivehandles
AdjustingtheBladeSpeed
Thismachinehas2blade-speedsettings:RUNSMART
andMAX.
•WhensettoRUNSMART,thebladespeedis
adjustedautomaticallyforgreaterefciency;
changesincuttingconditionsaredetectedand
thebladespeedincreaseswhennecessaryto
maintainqualityofcut.
•WhensettotheMAX,thebladespeedremainsat
thehighestspeedatalltimes.
PresstheMAXbuttonbelowtheOnbuttontosetthe
machinetoMAXspeed(Figure12).
13

RecyclingtheClippings
Yourmachinecomesfromthefactoryreadytorecycle
thegrassandleafclippingsbackintothelawn.
Ifthegrassboxisonthemachine,removeitbefore
recyclingtheclippings.RefertoRemovingtheGrass
Box(page16).
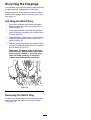
InstallingtheMulchPlug
1.Shutoffthemachineandremovethebattery
packandsafetykey;refertoShuttingOffthe
Machine(page17).
2.Placethemachineintheverticalstowposition;
refertoStoringtheMachineintheVertical-Stow
Position(page20).
3.Cleanthebottomofthedecktoensuretheplug
installsproperly;refertoCleaningunderthe
Machine(page19).
4.Alignthemulchplugandpushthebottomofthe
pluguntilitsnapsintoplaceontothe2retaining
pinsasshowninFigure13.
Important:Thebottomofthemulchplug
shouldbeushwiththebottomofthedeck
whenproperlyinstalled;ifthemulchplug
doesnotinstallcorrectly,donotuseit;
contactyourAuthorizedServiceDealer.
g342177
Figure13
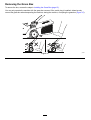
RemovingtheMulchPlug
Toremovethemulchplug,removethebatterypack
andthenreversethestepsinInstallingtheMulch
Plug(page14).
14

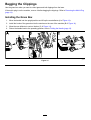
BaggingtheClippings
Usethegrassboxwhenyouwanttocollectgrassandleafclippingsfromthelawn.
Ifthemulchplugisonthemachine,removeitbeforebaggingtheclippings.RefertoRemovingtheMulchPlug
(page14).
InstallingtheGrassBox
1.Movethehandleintotheuprightpositionandliftupthereardeector(AofFigure14).
2.Installthehooksofthegrassboxintothenotchesontherearofthemachine(BofFigure14).
3.Allowthereardeectortorestonthebox(CofFigure14).
4.Returnthehandlebacktotheoperatingposition;refertoFoldingtheHandle(page19).
g341400
Figure14
15


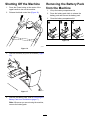
ShuttingOfftheMachine
1.PressthePowerbuttonatthecenterofthe
upperhandletoturnoffthemachine.
2.Releasetheblade-controlbar(Figure10).
g341392
Figure16
3.Removethesafetykeyfromthemachine(Figure
10).
g344533
Figure17
4.Removethebatterypack;refertoRemovingthe
BatteryPackfromtheMachine(page17).
Note:Wheneveryouarenotusingthemachine,
removethebatterypack.
RemovingtheBatteryPack
fromtheMachine
1.Liftupthebattery-compartmentlid.
2.Pressthebattery-packlatchtoreleasethe
batterypackandremovethebatterypack.
3.Closethebattery-compartmentlid.
g341360
Figure18
17

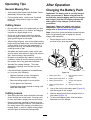
OperatingTips
GeneralMowingTips
•Avoidstrikingsolidobjectswiththeblade.Never
deliberatelymowoveranyobject.
•Forbestperformance,installanewToroblade
beforethecuttingseasonbeginsorwhen
necessary.
CuttingGrass
•Cutonlyaboutathirdofthegrassbladeatatime.
Forimprovedqualityofcut,runtime,andbagging,
cutgrassatahigherheightofcut.
•Donotcutatthelowestheight-of-cutsetting
unlessthegrassissparseoritislatefallwhen
grassgrowthbeginstoslowdown.
•Whencuttingtallgrass,mowatthehighestcutting
heightsettingandwalkslower;thenmowagainat
alowersettingforthebestlawnappearance.If
thegrassistoolong,themachinemayplugand
causethemotortostall.
•Wetgrassandleavestendtoclumpontheyard
andcancausethemachinetoplugorthemotorto
stall.Avoidmowinginwetconditions.
•Beawareofapotentialrehazardinverydry
conditions,followalllocalrewarnings,andkeep
themachinefreeofdrygrassandleafdebris.
•Alternatethemowingdirection.Thishelps
dispersetheclippingsoverthelawnforeven
fertilization.
•Ifthenishedlawnappearanceisunsatisfactory,
try1ormoreofthefollowing:
–Replacethebladeorhaveitsharpened.
–Walkataslowerpacewhilemowing.
–Raisethecuttingheightonyourmachine.
–Cutthegrassmorefrequently.
–Overlapcuttingswathsinsteadofcuttingafull
swathwitheachpass.
CuttingLeaves
•Aftercuttingthelawn,ensurethathalfofthelawn
showsthroughthecutleafcover.Youmayneed
tomakemorethanasinglepassovertheleaves.
•Removeexcessivequantitiesofleavesfromthe
groundbeforecuttingtheleaves.Ifthemachineis
notcuttingleavesnelyenough,slowdownyour
mowingspeed,ormowatahighercuttingheight
andthenagainatthedesiredcuttingheight.
AfterOperation
ChargingtheBatteryPack
Important:Thebatterypackisnotfullycharged
whenyoupurchaseit.Beforeusingthetoolfor
thersttime,placethebatterypackinthecharger
andchargeituntiltheLEDdisplayindicatesthe
batterypackisfullycharged.Readallsafety
precautions.
Important:Chargethebatterypackonlyin
temperaturesthatarewithintheappropriate
range;refertoSpecications(page10).
Note:Atanytime,pressthebattery-charge-indicator
buttononthebatterypacktodisplaythecurrent
charge(LEDindicators).
1.Ensurethattheventsonthebatteryandcharger
areclearofanydustanddebris.
g290533
Figure19
1.Batterypackcavity5.LEDindicators(current
charge)
2.Batterypackventingareas6.Handle
3.Batterypackterminals7.ChargerLEDindicator
light
4.Battery-charge-indicator
button
8.Chargerventingareas
2.Lineupthecavityinthebatterypack(Figure19)
withthetongueonthecharger.
3.Slidethebatterypackintothechargeruntilitis
fullyseated(Figure19).
4.Toremovethebatterypack,slidethebattery
backwardoutofthecharger.
18

5.RefertothefollowingtabletointerprettheLED
indicatorlightonthebatterycharger.
Indicator
light
Indicates
OffNobatterypackinserted
Green
blinking
Batterypackischarging
GreenBatterypackischarged
RedBatterypackand/orbatterychargerisoverorunder
theappropriatetemperaturerange
Red
blinking
Batterypackchargingfault*
*RefertoTroubleshooting(page23)formore
information.
Important:Thebatterycanbeleftonthecharger
forshortperiodsbetweenuses.
Ifthebatterywillnotbeusedforlongerperiods,
removethebatteryfromthecharger;referto
Storage(page22).
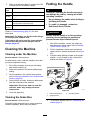
CleaningtheMachine
CleaningundertheMachine
ServiceInterval:Aftereachuse
Forbestresults,cleanunderthemachinesoonafter
youhavecompletedmowing.
1.Shutoffthemachineandremovethebattery
packandthesafetykey.
2.Lowerthemachinetoitslowestcutting-height
setting.
3.Setthemachineinthevertical-stowposition;
refertoStoringtheMachineintheVertical-Stow
Position(page20).
4.Usingabrushorbroom,cleananydebrisaway
fromtheundersideofthemachine.
Important:Donotusewatertocleanthe
machine;watermaydamageelectrical
components.
5.Cleanthegrassbox.
CleaningtheGrassBox
ServiceInterval:Aftereachuse
Frequentlycleanthegrassboxtoensuremaximum
collectioncapability.Brushawayanydebris.
FoldingtheHandle
WARNING
Foldingorunfoldingthehandleimproperly
candamagethecables,causinganunsafe
operatingcondition.
•Donotdamagethecableswhenfoldingor
unfoldingthehandle.
•Ifacableisdamaged,contactan
AuthorizedServiceDealer.
WARNING
Ensurethatthehandleisintheoperating
positionpriortostartingthemachineto
preventthrownobjectrelatedinjuries.
1.Shutoffthemachine,removethesafetykey,
andremovethebatterypack;refertoShutting
OfftheMachine(page17).
2.Pullthehandlebarreleasebracetowardthe
upperhandletoreleasethehandlelock(Figure
20).
3.Foldthehandlehalfwayforwardtotheupright
position,orfullyforwardtothevertical-stow
positionasshowninFigure20.
g342175
Figure20
1.Vertical-stowposition3.Operatingposition
2.Uprightposition
4.Tounfoldthehandle,referto2Assemblingthe
Handle(page9).
19

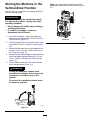
StoringtheMachineinthe
Vertical-StowPosition
Youcanstoreyourmachineintheverticalpositionto
minimizestoragespace.
WARNING
Foldingorunfoldingthehandleimproperly
candamagethecables,causinganunsafe
operatingcondition.
•Donotdamagethecableswhenfoldingor
unfoldingthehandle.
•Ifacableisdamaged,contactan
AuthorizedServiceDealer.
1.Shutoffthemachine,removethesafetykey,
andremovethebatterypack;refertoShutting
OfftheMachine(page17).
2.Foldthehandleallthewayforwarduntilitclicks
intoposition;refertoFoldingtheHandle(page
19).
3.Ensurethatthegrassboxisnotinstalledtothe
machine;ifitis,removeit.RefertoRemoving
theGrassBox(page16).
4.Ensurethatthecutting-heightonthemachineis
settothehighestsetting(setting6);ifitisnot,
raiseit.RefertoAdjustingtheCuttingHeight
(page12).
5.Tiltthemachinebackandrollitbythehandle
intoastoragespace(Figure21).
WARNING
Pullingthehandlebarreleasebrace
unlocksthehandlebar,whichmaycause
themowertosuddenlydroptothe
ground.
Donotpullthehandlebarreleasebrace
tomovethemachine.
g342176
Figure21
Note:Youcanhookthegrassboxontothe
handlebarreleasebraceinthisposition(Figure
22).
g356985
Figure22
20
Page is loading ...
Page is loading ...
Page is loading ...
Page is loading ...
Page is loading ...
Page is loading ...
Page is loading ...
Page is loading ...
-
 1
1
-
 2
2
-
 3
3
-
 4
4
-
 5
5
-
 6
6
-
 7
7
-
 8
8
-
 9
9
-
 10
10
-
 11
11
-
 12
12
-
 13
13
-
 14
14
-
 15
15
-
 16
16
-
 17
17
-
 18
18
-
 19
19
-
 20
20
-
 21
21
-
 22
22
-
 23
23
-
 24
24
-
 25
25
-
 26
26
-
 27
27
-
 28
28


Toro Flex-Force Power System 60V MAX 36cm Lawn Mower User manual
- Category
- Lawnmowers
- Type
- User manual
- This manual is also suitable for
Ask a question and I''ll find the answer in the document
Finding information in a document is now easier with AI
Related papers
-
Toro Heavy-Duty 60V 21in Recycler/Rear Bagger Lawn Mower User manual
-
Toro Flex-Force Power System 60V MAX 21in Recycler Lawn Mower User manual
-
-
Toro Flex-Force Power System 60V MAX 22in Recycler Lawn Mower User manual
-
-
-
-
Toro Flex-Force Power System 1 AMP 60V MAX Battery Charger User manual
-
-
