Ninja Smart Screen FreshVac CT660UKV Instructions Manual
- Category
- Blenders
- Type
- Instructions Manual
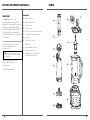
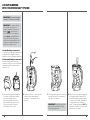
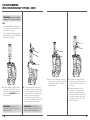
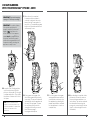
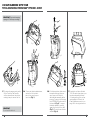
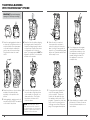
Ninja Smart Screen FreshVac CT660UKV is a powerful high-performance blender with a large 2L jug capacity. The device features a combination of blade assemblies and preset programs, suitable for smoothies, soups, purees, and sauces. It also comes with a vacuum pump and a special cup which allows to remove oxygen from the container before blending to preserve the freshness, flavor and nutrients of blended products for longer. The cups have spouts which makes them convenient for drinking on the go.
Ninja Smart Screen FreshVac CT660UKV is a powerful high-performance blender with a large 2L jug capacity. The device features a combination of blade assemblies and preset programs, suitable for smoothies, soups, purees, and sauces. It also comes with a vacuum pump and a special cup which allows to remove oxygen from the container before blending to preserve the freshness, flavor and nutrients of blended products for longer. The cups have spouts which makes them convenient for drinking on the go.


-
 1
1
-
 2
2
-
 3
3
-
 4
4
-
 5
5
-
 6
6
-
 7
7
-
 8
8
-
 9
9
-
 10
10
-
 11
11
-
 12
12
-
 13
13
-
 14
14
-
 15
15
-
 16
16
-
 17
17


Ninja Smart Screen FreshVac CT660UKV Instructions Manual
- Category
- Blenders
- Type
- Instructions Manual
Ninja Smart Screen FreshVac CT660UKV is a powerful high-performance blender with a large 2L jug capacity. The device features a combination of blade assemblies and preset programs, suitable for smoothies, soups, purees, and sauces. It also comes with a vacuum pump and a special cup which allows to remove oxygen from the container before blending to preserve the freshness, flavor and nutrients of blended products for longer. The cups have spouts which makes them convenient for drinking on the go.
Ask a question and I''ll find the answer in the document
Finding information in a document is now easier with AI
Related papers
-
Ninja CT661V User manual
-
-
Ninja BN800 Series Owner's manual
-
-
Ninja Smoothie maker Operating instructions
-
-
-
-
Ninja BL580 User manual
-

