Trendnet RB-TEW-692GR Quick Installation Guide
- Category
- Routers
- Type
- Quick Installation Guide
This manual is also suitable for
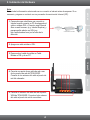
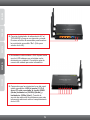
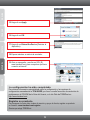
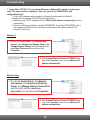
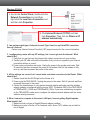
Trendnet RB-TEW-692GR is a high-performance wireless router that combines the speed and range of 802.11ac with the reliability of a wired connection. With its four Gigabit LAN ports, one Gigabit WAN port, and dual-band Wi-Fi, the RB-TEW-692GR can handle even the most demanding home or small office network needs.
Trendnet RB-TEW-692GR is a high-performance wireless router that combines the speed and range of 802.11ac with the reliability of a wired connection. With its four Gigabit LAN ports, one Gigabit WAN port, and dual-band Wi-Fi, the RB-TEW-692GR can handle even the most demanding home or small office network needs.


-
 1
1
-
 2
2
-
 3
3
-
 4
4
-
 5
5
-
 6
6
-
 7
7
-
 8
8
-
 9
9
-
 10
10
-
 11
11
-
 12
12
-
 13
13
-
 14
14
-
 15
15
-
 16
16
-
 17
17
-
 18
18
-
 19
19
-
 20
20


Trendnet RB-TEW-692GR Quick Installation Guide
- Category
- Routers
- Type
- Quick Installation Guide
- This manual is also suitable for
Trendnet RB-TEW-692GR is a high-performance wireless router that combines the speed and range of 802.11ac with the reliability of a wired connection. With its four Gigabit LAN ports, one Gigabit WAN port, and dual-band Wi-Fi, the RB-TEW-692GR can handle even the most demanding home or small office network needs.
Ask a question and I''ll find the answer in the document
Finding information in a document is now easier with AI
in other languages
- español: Trendnet RB-TEW-692GR
Related papers
-
Trendnet RB-TEW-692GR Quick Installation Guide
-
Trendnet TEW-423PI Quick Installation Guide
-
-
-
-
-
-
-
-
Trendnet AC1750 User manual
Other documents
-
Vivo iQOO Z3 5G User manual
-
-
-
3com WL-602 Installation guide
-
Dynex DX-NRUTER User manual
-
-
Dynex DX-EBNBC - Wireless G Notebook Card User manual
-
Longshine IEEE802.11n AP/Router/Client User manual
-
 nexxt Nyx1200-AC Plus User guide
-
Belkin 8820NP00425 User manual
