Siemens TE803M09GB User manual
- Category
- Coffee makers
- Type
- User manual

siemens-home.bsh-group.com/welcome
Register
your
product
online
TE 803.. / TE 806..
en Instruction manual
fr Mode d’emploi
nl Gebruiksaanwijzing
pl Instrukcjaobsługi
cs Návodkpoužití
ru Инструкцияпоэксплуатации
Page is loading ...
Page is loading ...
Page is loading ...
Page is loading ...
Page is loading ...

3
en
Intendeduse
Intended use
This appliance is intended for
domestic use only.
Only use the appliance indoors
at room temperature and up to
2000 m above sea level.
Important safety information
Please read and follow the
operating instructions carefully
and keep them for later refer-
ence! Enclose these instructions
when you give this appliance to
someone else.
This appliance can be used
by children aged from 8 years
and above and by persons with
reduced physical, sensory or
mental capabilities or lack of
experience and knowledge if
they have been given supervi-
sion or instruction concerning
use of the appliance in a safe
way and if they understand the
hazards involved. Keep children
under 8 years of age away from
the appliance and connecting
cable and do not allow them
to use the appliance. Children
shall not play with the appliance.
Cleaning and user maintenance
shall not be made by children
unless they are older than
8 years and supervised.
Intended use Important safety information

4
en Importantsafetyinformation
W Warning
Risk of electric shock!
■ The appliance may only be
connected to a power supply
with alternating current via
a correctly installed socket
with earthing. Ensure that the
protective conductor system
of the domestic supply has
been correctly installed.
■ Connect and operate the
appliance only in accordance
with the specications on the
rating plate.
■ Do not use the appliance if
the power cord and/or appli-
ance are damaged.
■ Only our customer service
may repair the appliance,
e.g. by replacing a damaged
power cord, in order to avoid
hazards.
■ Never immerse the appliance
or mains cord in water.
■ If there is a fault, pull out the
mains plug immediately or
switch o the power supply.
W Warning
Hazard due to magnetism!
The appliance contains perma-
nent magnets which can aect
electronic implants such as
pacemakers or insulin pumps.
Persons wearing electronic
implants must maintain a
minimum distance of 10 cm
from the appliance and from the
following parts upon removal:
milk container, milk system,
water tank and brewing unit.
W Warning
Risk of suocation!
■ Do not allow children to play
with packaging material.
■ Store small parts safely as
they can be easily swallowed.
W Warning
Risk of injury!
■ Do not reach into the grinding
unit!
■ Improper use of this appliance
may result in injury.
W Warning
Risk of burns!
■ The milk system becomes
extremely hot. After use,
always let it cool down before
you touch it.
■ After use the surfaces of the
heating element or hotplate
can remain hot for some time.

5
en
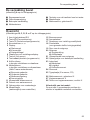
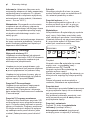
Included in delivery
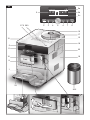
1 Poweron/offswitchO / I
2 Customisingbutton
á
3 Serviceprogrammesbutton
à
4 Selectionbuttons< >
5 Display
a)Statusline
b)Selectionline
c)Navigationline
6 Rotaryknobfordisplaysettings
7Infomenubuttonj
8 start button(drinks/programmes)
9 Coffeeoutlet,
height-adjustableandswivelling
10 Milksystem,
height-adjustableandremovable
(milk/hotwater)
a)Upperpart
b)Lowerpart
c)Suctionhose
d)Suctionpipe
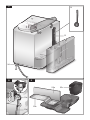
11 Removablewatertank
12 Lidforwatertank
13 Storagecompartmentfor
measuringspoon
14 Measuring spoon
(insertionaidforwaterfilter)
15 Beancontainer
16 Aromacover
17 Selectorforgrindsetting
18 Powdercompartment
(groundcoffee/cleaningtablet)
19 Doortobrewingunit
20 Brewingunit
a) Lock
b) Cover
21 Ejectleverforbrewingunit
22 Storagecompartmentfor
quickreferenceguide
23 Driptray
a) Panel
b)Grate
c) Coffeegroundscontainer
24 Cablestoragecompartment
25 Ratinglabel(E-No.;FD)
26 Milkcontainer,insulated
*
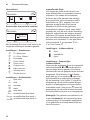
27 Cupwarmingfunction
*
28 Buttonforcupwarmingfunction,
illuminated
*
Depending on the model:
Itemsmarked
*
arenotpresentinall
models.
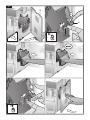
At a glance
(Figures B, C, D, E and Fonthefold-outpages)
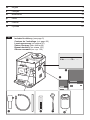
Included in delivery
(Figure Aonthefold-outpages)
1 Fullyautomaticespressomachine
2 Instructionmanual
3 Quick reference guide
4 Milkfrother
5 Waterhardnesstestingstrip
6 Measuring spoon
7 Milkcontainer,insulated
*
W Warning
Risk of electric shock!
■ The appliance may only be
connected to a power supply
with alternating current via
a correctly installed socket
with earthing. Ensure that the
protective conductor system
of the domestic supply has
been correctly installed.
■ Connect and operate the
appliance only in accordance
with the specications on the
rating plate.
■ Do not use the appliance if
the power cord and/or appli-
ance are damaged.
■ Only our customer service
may repair the appliance,
e.g. by replacing a damaged
power cord, in order to avoid
hazards.
■ Never immerse the appliance
or mains cord in water.
■ If there is a fault, pull out the
mains plug immediately or
switch o the power supply.
W Warning
Hazard due to magnetism!
The appliance contains perma-
nent magnets which can aect
electronic implants such as
pacemakers or insulin pumps.
Persons wearing electronic
implants must maintain a
minimum distance of 10 cm
from the appliance and from the
following parts upon removal:
milk container, milk system,
water tank and brewing unit.
W Warning
Risk of suocation!
■ Do not allow children to play
with packaging material.
■ Store small parts safely as
they can be easily swallowed.
W Warning
Risk of injury!
■ Do not reach into the grinding
unit!
■ Improper use of this appliance
may result in injury.
W Warning
Risk of burns!
■ The milk system becomes
extremely hot. After use,
always let it cool down before
you touch it.
■ After use the surfaces of the
heating element or hotplate
can remain hot for some time.

6
en Beforeusingforthersttime
Before using for the
first time
General
Filltheappropriatecontainerusingonly
pure,cold,uncarbonatedwaterandonly
roastedbeans(preferablyespressoor
coffeebeanblendsforfullyautomaticcoffee
machines).Donotusecoffeebeansthat
havebeenglazed,caramelisedortreated
withotheradditivescontainingsugar,since
theywillblockthebrewingunit.
Thewaterhardnesssettingcanbeadjusted
onthisappliance.Thefactorysettingforthe
waterhardnessis4.Checkthehardness
ofthewateryouusewiththeenclosedtest
strip.Ifavalueotherthanwaterhardness4
isdisplayed,changethesettingonthe
applianceaccordinglyafterswitchingon
(see“Menusettings–Water hardness”).
Setting up the appliance
■ Placethefullyautomaticespresso
machineonaflat,water-resistantsurface
thatcantakeitsweight.
Important: Onlyusetheappliancein
frost-freerooms.Iftheappliancehasbeen
transportedorstoredattemperaturesbelow
0°C,waitatleast3hoursbeforeoperation.
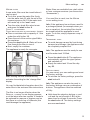
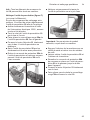
■ Pulloutthemainsplugfromthecable
compartment24andplugitin.Adjustthe
lengthofthecablebypushingitbackin
andpullingitout.Todothis,placethe
appliancewithitsbackflushwiththeedge
oftheworksurfaceandeitherpullthe
cabledownwardsorpushitupwards.
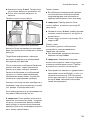
■ Liftthelidofthewatertank12.
■ Removeandrinsethewatertank11 and
fillitwithfresh,coldwater.Donotfill
abovethe“max”mark.
■ Replacethewatertank11andpushit
firmlydownwardsintoplace.
■ Closethewatertanklid12again.
■ Fillthebeancontainer15withcoffee
beans.
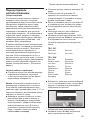
■ Pressthepowerswitch1 O / I. The
startbutton8lightsupandthedifferent
languagesappearinthedisplay5.
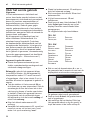
Thefollowinglanguagescanbeselected:
TE8.. DE
Deutsch English
Français Italiano
TE8.. RW
English Русский
Nederlands Français
Italiano Svenska
Español Polski
Українська Magyar
Türkçe Dansk
Norsk Suomi
Português Čeština
Ελληνικa
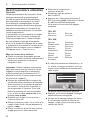
■ Usethebuttons< and > 4toselectthe
languageinwhichyouwantthedisplay
textstoappear.
Sprache
Deutsch
start
English
Français
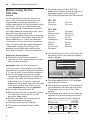
Theselectedlanguageishighlighted.
■ Pressthestartbutton8.Thelanguage
youselectedissaved.
■ Thebrandlogolightsupinthedisplay5.
Theappliancenowheatsupandrinses.
Somewaterwillrunoutofthecoffee
outlet9.
■ Theapplianceisreadyforusewhenthe
symbolsforthedrinkselectionandthe
startbutton8lightupinthedisplay5.
Espresso
ËË
Í
 à À Á Å Æ

7
en
Controls
Info: Thefactorysettingsofthefullyauto-
maticespressomachineareprogrammedfor
optimalperformance.Theapplianceswitches
offautomaticallyafteraspecifictime(see
“Menusettings–AutoOffafter”).
Note: Iftheapplianceisbeingusedforthe
firsttime,theserviceprogrammehasbeen
run,ortheappliancehasnotbeenoperated
foralongperiod,thefirstbeveragewill
nothavethefullaromaandshouldnotbe
consumed.
Whenthefullyautomaticespressomachine
isfirstused,youwillachieveasuitablythick
andstable“crema”onlyafterthefirstfew
cupshavebeendispensed.
Controls
Power on/off switch O / I
Thepoweron/offswitch1 O / I is used
toswitchtheapplianceonoroff.The
appliancerinsesautomaticallywhenitis
switchedonandoff.
Theappliancewillnotrinseif:
■ itisstillwarmwhenswitchedon.
■ therewasnocoffeedrawnbefore
switchingoff.
Theapplianceisreadyforusewhenthe
symbolsforthedrinkselectionandthestart
button8lightupinthedisplay5.
Customising button
á
Theapplianceprovidestheoptionofsaving
andcallingupcustomisedsettingsfor
coffeedrinks.Pleaserefertothesection
“Customising”forinformationonhowto
saveandcallupthesesettings.
Service programmes button à
Presstheàbutton3brieflytocallupthe
selectionofserviceprogrammes.Please
runtheprogrammeasdescribedin“Service
Programmes”.
Pressandholdtoactivateordeactivatethe
child-prooflock,see“Child-prooflock”.
Rotary knob
Turntherotaryknob6totheleftorrightto
navigatethroughthedisplay5,ortoadjust
parametersinthemenu.
Selection buttons
< and >
Presstheselectionbuttons4 < and >to
navigateupanddownthroughthemenu
levels(navigationline5c).
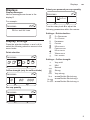
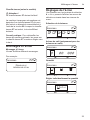
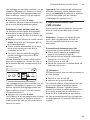
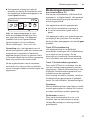
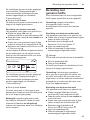
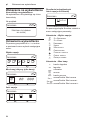
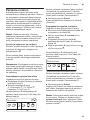
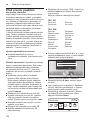
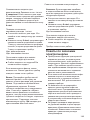
Display
The display 5usessymbolstoindicate
theselectionoptions,coffeestrengthand
per-cupquantity,andusestexttoindicate
settings,ongoingprocessesandmessages.
Therotaryknob6andselectionbuttons4
canbeusedtochangesettings.
Theselectedsettingishighlightedbya
frame.
Espresso
ËË
Í
 à À Á Å Æ
5a
5b
5c
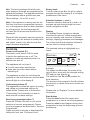
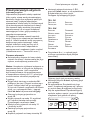
Example:
Thestatusline5ashowsthenameofthe
typeofdrink,alongwiththestrengthsetting
55andper-cupquantity
Î
.
Theselectionline5bshowssymbolsfor
drinkselection.
Thearrowsinthenavigationline5cindicate
thedirectioninwhichmoremenulevelscan
befound.
Pleasereferto“Displays”formoredetailed
information.
Start button
Pressthestartbutton8tobegindrink
preparationortostartaserviceprogramme.
Pressthestartbutton8 again during drink
preparationtostopthedispensingprocess
prematurely.

8
en Controls
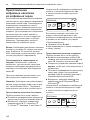
j button and settings
Usethejbutton7todisplay information
(pressbriefly)andadjust settings (hold
downforatleast3seconds).
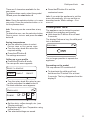
Displaying information
Thefollowinginformationcanbedisplayed
intheInfomenu:
■ whenshouldthenextservicebe
completed.
■ howmanydrinkshavebeendispensed
sincetheespressomachinewas
switchedon.
■ Pressthejbutton7brieflyandnavigate
withthe< and >buttons4.
Info
Descale after. 200
À
Clean after 200
À
Change filter in 200
À
*
Info
No. of coffees 11
No. of milk mixes 15
Amount hot water 2l
*appearsonlyifthefilterisactivated.
Pressthejbutton7brieflytoreturntothe
drinkselection.Ifnobuttonispressedfor
about10seconds,theapplianceautomati-
callyswitchesbacktodrinkselectionmode.
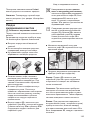
Adjusting settings
See“Menusettings”.
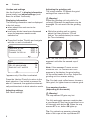
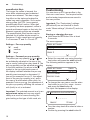
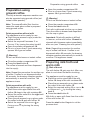
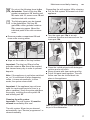
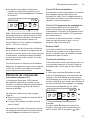
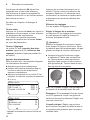
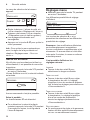
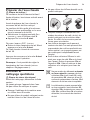
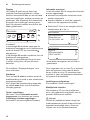
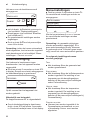
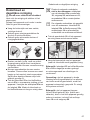
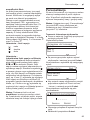
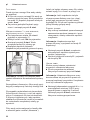
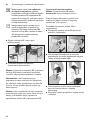
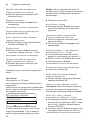
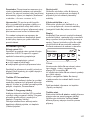
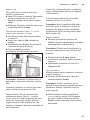
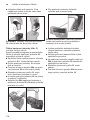
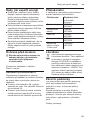
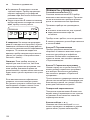
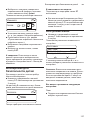
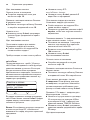
Adjusting the grinding unit
Therotaryselector17adjuststhegrind
settingsfromcoarsetofine.
W Warning!
Adjustthegrindingunitonlywhileitis
running!Otherwisetheappliancemaybe
damaged.Donotreachintothegrinding
unit.
■ Whilethegrindingunitisrunning,
adjusttherotaryselector17from
fine (a:Turnanticlockwise)tocoarse
(b:Turnclockwise).
a b
Info: Thenewsettingwillnotbecome
apparentuntilafterthesecondcupof
coffee.
Note:Ifthemessage
Please adjust
grinding unit to coarser setting!
appearsinthedisplay,thegrindsetting
forthecoffeebeansistoofine.Adjustthe
grindingunittoacoarsersetting.
Tip: Fordarkroastcoffeebeans,choosea
finergrind;forlighterbeansacoarsergrind.
Cup warming function
(depending on the model)
W Warning!
Thecupwarmer27getsveryhot.
Thefullyautomaticespressomachinehas
acupwarmer27thatcanbeswitchedonor
offmanuallywithbutton28.Whenthecup
warmer27ison,button28lightsup.
Tip:Foroptimalcupwarming,placethe
baseofthecupsonthecupwarmer27.

9
en
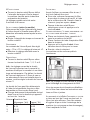
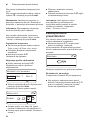
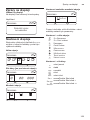
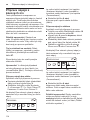
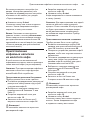
Displays
Displays
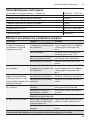
Display messages
Variousmessagesareshowninthe
display 5.
Forexample:
Espresso
ËË
Í
Refill water tank
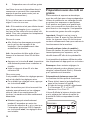
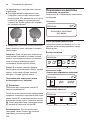
Display settings
Presstheselectionbuttons< and > 4to
selectthefollowingselectionmenusinthe
menulevels:
Drink selection
Espresso
Ë
Í
 à À Á Å Æ
Coffee strength (only for coffee drinks)
Espresso
Ë
Í
5 55 555
Per-cup quantity
Espresso
Ë
Í
Î Ð Ò
Select your personal per-cup quantity
Espresso
Ë
Í
Î
± 0 ml
Turntherotaryknob6toadjustthe
followingparameterswithinthemenus:
Settings – Drink selection:
Â
2xEspresso
Ã
2xCoffee
À
Espresso
Á
Coffee
Å
Macchiato
Æ
Cappuccino
È
Milk froth
É
Warm milk
Ê
Hot water
Settings – Coffee strength:
å
Verymild
åå
Mild
ååå
Normal
ä
Strong
ã
Verystrong
2x
å
aromaDoubleShotstrong
2x
ååå
aromaDoubleShotstrong+
2x
ã
aromaDoubleShotstrong++

10
en Customising
aromaDouble Shot:
Thelongerthecoffeeisbrewed,the
morebittersubstancesandundesired
aromasarereleased.Thishasanega-
tiveeffectonthetasteandmakesthe
coffeelesseasilydigestible.Soforextra
strongcoffee,theTE8..hasaspecial
aromaDoubleShotfunction.Whenhalf
thequantityhasbeenprepared,coffeeis
groundandbrewedagainsothatonlythe
pleasant,aromaticscentsarereleased.
ThearomaDoubleShotfunctioncanbe
selectedforallcoffeedrinksexceptfor
EspressoÀ withasmallper-cupquantity,
2xEspresso  and 2xCoffee Ã.
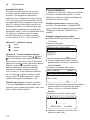
Settings – Per-cup quantity
Î
small
Ð
medium
Ò
large
Settings – Personal per-cup quantity
Thepresetper-cupquantity
Î
,
Ð
or
Ò
can
beindividuallyadjustedtothesizeofthe
cupinusebyturningtherotaryknob6.The
per-cupquantitycanbeadjustedaccording
tothedrinkselected.Anarrowinthe
Ò
symbolinthetopright-handcornerof
thedisplayindicateswhethertheper-cup
quantitywasincreasedordecreased.If
yousetforexampleCoffee Á,theadjust-
mentoftheper-cupquantityinml,andin
thecaseofamilk-basedcoffeedrink,for
example
Cappuccino
Æ
,theadjustmentof
theper-cupquantityincludingthevolumeof
milk(froth)inml,isindicated.
Important:Theselectedamountinmlisan
approximate value and can vary signifi-
cantlyasaresultofcremaforming,the
grindsettingorthetypeofmilkused,etc.
Customising
Youcanstoreupto6userprofilesinthe
User settingsmenu.Therequiredcoffee
andhotwatertemperaturesaresavedin
theuserprofiles.
Important:The“Customising”settings
(ábutton2)arenotidenticaltothose
under“Menusettings”(jbutton7) and vice
versa.
Storing or changing the user
■ Holddowntheábutton2foratleast
3seconds.
Themenuappears:
User settings
User 1
start
User 2
User 3
■ Selecttherequireduserusingtheselec-
tionbuttonandpressthestart button 8.
Thefollowingselectionappearsinthe
display:
User settings: User 1
Edit name
start
Delete name
Coffee temp.
■ Tochangetheusername,usetheselec-
tionbuttontogotoEdit name
start
andpressthestart button 8.
Theinputfieldappearsinthedisplay:
â ABCDEFGHIJKLMNOPQ
_ _____
Abort Store
■ Turntherotaryknob6toselectaletteror
number.
■ Confirmbypressingthestart button 8.

11
en
Child-proof lock
Thereare6charactersavailableforthe
username.
Todeleteentriesmade,selectthesymbol
âandpressthestart button 8.
Note: Presstheselectionbutton>tosave
yourentry.Presstheselectionbutton<to
cuttheprocessshort.
Info:Theentrycanbeoverwrittenatany
time.
Todeletetheuser,usetheselectionbutton
Delete name
startandpressthestart
button8.
Saving temperatures
■ Usetheselectionbuttontoselect
Coffeetemp. or Hot water temp.
■ Turntherotaryknob6toselectthe
requiredsetting.
■ Presstheábutton2.
Thesettingsaresaved.
Calling up a user profile
■ Presstheábutton2briefly.
Theuserprofilemenuappears:
Select a profile
Robert User 1 User 2
■ Turntherotaryknob6toselectauser
profileandpressthestart button 8.
Thedrinkselectionmenuappears:
Macchiato
Ë
Í
Robert
À Á Å Æ
■ Setthedrink,coffeestrength,etc.(see
“Displaysettings”).
■ Dispenseadrink(see“Preparationusing
coffeebeans”).
■ Theselectedsettingsaresaved.
■ Presstheá button2toexitthe
customisedmenu.
Info:Ifyouwishtheappliancetoexitthe
menuautomatically,youcansetthisas
describedunder“Menusettings–Exit
profile”.
Child-proof lock
Theappliancecanbelockedtoprotect
childrenfromscaldingandburning.
■ Holddowntheàbutton3foratleast
3seconds.
The display 5showsakey;thechild-proof
lockisactivated.
Espresso
Ë
Í
Itisnolongerpossibletooperatethe
appliance.
Depending on the model:
Thecupwarmer27isswitchedoff.
■ Todeactivatethechild-prooflock,
holddowntheà button3foratleast
3seconds.Thekeydisappearsfromthe
display 5.

12
en Menusettings
Menu settings
■ Holddownthejbutton7foratleast
3seconds.
Thedifferentsettingoptionsarenow
displayed.
Settings
Coffee temp.
Hot water temp. <85°C
Exit profile
Thedifferentsettingoptionscanbeselected
withtheselectionbuttons< and > 4.
Note:Thechangesyouhavemadeare
savedautomatically.Itisnotnecessary
toconfirmthemadditionally.Ifnoentryis
madeafterapprox.2minutes,themenuwill
closeautomatically.
The following settings can be selected:
Language
■ Turntherotaryknob6toselectthe
requiredlanguage.
Coffee temp.
■ Turntherotaryknob6tosetthecoffee
temperature.Thesettingappliesto
alltypesofpreparation,exceptthe
customisedsettingsunder“Customising”.
Hot water temp.
■ Turntherotaryknob6tosetthe
temperature.Thesettingappliesto
alltypesofpreparationexceptthe
customisedsettingsunder“Customising”.
Exit profile
■ Hereyoucansetwhethertheappliance
shouldexitthecustomisingfunction
automaticallyautomaticormanually
manually.
Auto off after
■ Turntherotaryknob6toenterthetime
spanafterwhichtheapplianceshould
automaticallyswitchofffollowingthelast
drinkpreparation.
Atimebetween5minutesand8hourscan
beset.
Cup warm. off in
(depending on the model)
Hereyoucansetthetimespanafterwhich
thecupwarmer27switchesoffagain
automatically.
■ Settherequiredtimebyturningtherotary
knob6.
Contrast
The display 5contrastcanbesetfrom–10
to+10.Thefactorysettingis+0.
■ Turntherotaryknob6toselectthe
requiredsetting.
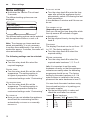
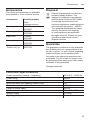
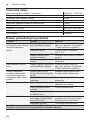
Water hardness
■ Turntherotaryknob6toselectthe
requiredwaterhardness1, 2, 3 or 4.
Info: Itisimportanttosetthewater
hardnesscorrectly,sothattheappliance
indicatesaccuratelywhenthedescaling
programmeshouldberun.Thefactory
settingforthewaterhardnessis4.If a
watersoftenerisinstalledinthehouse,
pleasesetthewaterhardnesstolevel3.
Youcancheckthewaterhardnessusing
theenclosedteststriporbyaskingyour
localwatersupplier.
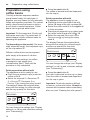
■ Diptheteststripbrieflyinwaterand
checktheresultafteroneminute.
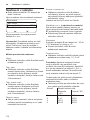
Level Waterhardness
German(°dH) French(°fH)
1
2
3
4
1-7
8-14
15-21
22-30
1-13
14-25
26-38
39-54

13
en
Menusettings
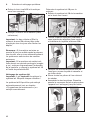
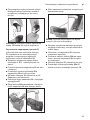
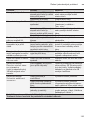
Water filter
Anewwaterfiltermustberinsedbeforeit
canbeused.
■ Todothis,pressthewaterfilterfirmly
intothewatertank11withtheaidofthe
measuringspoon14.Fillthewatertank
withwateruptothe“max”mark.
■ Turntherotaryknob6toselectstart
andpressthestartbutton8.
Place 1 l container
Place suction pipe in container
start
■ Placeacontainerwithacapacityof1litre
underthemilkfrother10.
■ Placetheendofthesuctionpipe10d in
thecontainer.
■ Pressthestartbutton8.Waterwillnow
flowthroughthefiltertorinseit.
■ Next,emptythecontainer.
Theapplianceisreadyforuseagain.
Info: Rinsingthefiltersimultaneously
activatesthesettingforthe“changefilter”
display.
Youcanfinddetailedinformationaboutthe
waterfilterintheenclosedfilterinstructions.
Thefilterisnolongereffectivewhenthe
Service - change filter display appears,
oratthelatestaftertwomonths.Itneedsto
bereplacedforreasonsofhygieneandso
thatthereisnobuild-upoflimescale(this
coulddamagetheappliance).
Waterfiltersareavailablefromretailoutlets
orfromcustomerservices(seethesection
“Accessories”).
Ifnonewfilterisused,turnthe
Water
filtersettingtono.
Info: Iftheappliancehasnotbeenusedfor
aprolongedperiod(forexample,whenyou
areonvacation),theexistingfiltershould
berinsedbeforetheapplianceisused
again.Todothis,simplydispenseacupof
hotwater.
Transport. lock
■ Toavoiddamagecausedbyfrostduring
transportandstorage,theappliancemust
becompletelyemptiedfirst.
Info: Theappliancemustbereadyforuse
andthewatertank11filled.
■ Pressthestartbutton8.Theappliance
automaticallyemptiesthepipesystem
andswitchesoff.
■ Emptythewatertank11andthedrip
tray23.
Factory reset
Youcancancelyourownsettingsandreset
thefactorysettings.
■ Toactivatethefactorysettings,pressthe
startbutton8.
Info:Theappliancecanalsoberesetto
thefactorysettingsusingacombinationof
buttons.Theappliancemustbeswitched
offfully.
■ Holddowntheselectionbuttons< and
> 4andtheon/offswitch1 O / Iatthe
sametimeforatleast5seconds.Press
thestartbutton8.Thefactorysettings
arenowreactivated.

14
en Preparationusingcoeebeans
Preparation using
coffee beans
Thisfullyautomaticespressomachine
grindsbeansfreshlyforeachbrew.If
possible,useonlybeansforfullyautomatic
coffeeandespressomachines.Foroptimal
quality,deep-freezethebeansorstorein
acoolplaceinsealedcontainers.Coffee
beanscanbegroundwhilefrozen.
Important:Fillthewatertank11withcold,
freshwatereveryday.Thewatertank11
shouldalwayscontainsufficientwaterfor
operatingtheappliance.
Tip (depending on the model):Pre-warm
cups,especiallysmall,thickespressocups,
onthecupwarmer27.
Differentcoffeedrinkscanbeprepared
quitesimplyatthepressofabutton.
Note:Withsomesettings,thecoffee
ispreparedintwostages(see
“aromaDoubleShot”).Waituntilthe
procedureisfullycompleted.
Drink preparation without milk
Theappliancemustbereadyforuse.
■ Placethepre-warmedcup(s)underthe
coffeeoutlet9.
■ Selecttherequired2 xEspresso Â,
2xCoffee
Ã
, Espresso À or
CoffeeÁbyturningtherotaryknob6.
The display 5showstheselecteddrink
alongwiththesettingforcoffeestrength
andper-cupquantityforthisdrink.
Espresso
Ë
Í
 à À Á Å Æ
Youcanchangethesettings(see“Display
settings”)orcallupandcustomisesettings
(see“Customising”).
■ Pressthestartbutton8.
Thecoffeeisbrewedandthendispensed
intothecup(s).
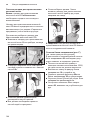
Drink preparation with milk
Theappliancemustbereadyforuse.
■ Placethesuctionpipe10dofthemilk
frother10deepinthemilkcontainer26.
■ Swivelthecoffeeoutlet9totherightuntil
itclicksintoplace.
■ Placethepre-warmedcuporglassunder
thecoffeeoutlet9andmilkfrother10.
■ Selecttherequired
Macchiato
Å
or
Cappuccino
Æ
byturningtherotary
knob6.
The display 5showstheselecteddrink
alongwiththesettingforcoffeestrength
andper-cupquantityforthisdrink.
Cappuccino
Ë
Í
À Á Å Æ È É
Youcanchangethesettings(see“Display
settings”)orcallupandcustomisesettings
(see“Customising”).
■ Pressthestartbutton8.
Firstmilkisdeliveredintothecuporglass.
Thenthecoffeeisbrewedanddispensed
intothecuporglass.
Important:Driedmilkresidueisdifficult
toremove,sothemilkfrother10 mustbe
cleanedwithlukewarmwaterimmediately
afteruse(see“Cleaningthemilksystem”).

15
en
Preparationusinggroundcoee
Preparation using
ground coffee
Thisfullyautomaticespressomachinecan
alsobeoperatedusinggroundcoffee(not
instantcoffeepowder).
Note: ThearomaDoubleShotfunction
cannotbeusedwhencoffeeisprepared
usinggroundcoffee.
Drink preparation without milk
Theappliancemustbereadyforuse.
■ Placethepre-warmedcup(s)underthe
coffeeoutlet9.
■ SelecttherequiredEspresso À or
CoffeeÁbyturningtherotaryknob6.
■ Openthepowdercompartment18.
■ Pourinnomorethan2levelmeasuring
spoons 14ofgroundcoffee.
W Warning!
Donotusewholebeansorinstantcoffee.
■ Closethepowdercompartment18.
■ Pressthestartbutton8.
Thecoffeeisbrewedandthendispensed
intothecup(s).
Note:Repeattheprocedureforanothercup
ofcoffee.Ifcoffeeisnotdispensedwithin
90seconds,thebrewingchamberempties
automaticallytoavoidanoverflow.The
appliancerinses.
Drink preparation with milk
Theappliancemustbereadyforuse.
■ Placethesuctionpipe10dofthemilk
frother10deepinthemilkcontainer26.
■ Swivelthecoffeeoutlet9totherightuntil
itclicksintoplace.
■ Placethepre-warmedcuporglassunder
thecoffeeoutlet9andmilkfrother10.
■ Selecttherequired
Macchiato
Å
or
Cappuccino
Æ
byturningtherotary
knob6.
■ Openthepowdercompartment18.
■ Pourinnomorethan2levelmeasuring
spoons 14ofgroundcoffee.
W Warning!
Donotusewholebeansorinstantcoffee.
■ Closethepowdercompartment18.
■ Pressthestartbutton8.
Firstmilkisdeliveredintothecuporglass.
Thenthecoffeeisbrewedanddispensed
intothecuporglass.
Important:Driedmilkresidueisdifficult
toremove,sothemilkfrother10 mustbe
cleanedwithlukewarmwaterimmediately
afteruse(see“Cleaningthemilksystem”).
Note:Repeattheprocedureforanother
cupofcoffee/milkdrink.Ifcoffeeisnot
dispensedwithin90seconds,thebrewing
chamberemptiesautomaticallytoavoidan
overflow.Theappliancerinses.
Preparing milk froth and
warm milk
W Risk of burns!
Themilkfrother10getsveryhot.Afteruse,
allowtocooldownfirstbeforetouching.
Theappliancemustbereadyforuse.
■ Placethesuctionpipe10dofthemilk
frother10deepinthemilkcontainer26.
■ Placethepre-warmedcuporglassunder
theoutletofthemilkfrother10.
■ Selecttherequiredsetting
Milk froth
È
or
Warmmilk
É
byturningtherotary
knob6.
■ Pressthestartbutton8.
Milkfrothorwarmmilkflowsfromtheoutlet
ofthemilkfrother10.
Pressthestartbutton8againtocutthe
processshort.

16
en Dispensinghotwater
Info:Whenpreparingwarmmilk,youmay
hearawhistlingsound.Thisiscausedby
themilkfrotherfortechnicalreasons.
Tip: Foroptimalmilkfrothquality,usecold
milkwithafatcontentofatleast1.5%if
possible.
Important:Driedmilkresidueisdifficult
toremove,sothemilkfrother10 mustbe
cleanedwithlukewarmwaterimmediately
afteruse(see“Cleaningthemilksystem”).
Dispensing hot water
W Risk of burns!
Themilkfrother10getsveryhot.Afteruse,
allowtocooldownfirstbeforetouching.
Themilkfrothermustbecleanedbefore
drawinghotwater.
Theappliancemustbereadyforuse.
■ Placethepre-warmedcuporglassunder
theoutletofthemilkfrother10.
■ Selecttherequiredsettingfor
Hot
water
Ê
byturningtherotaryknob6.
■ Pressthestartbutton8.
Please remove suction hose
start
■ Removethemilksuctionhose10c and
pressthestartbutton8.
Hotwaterrunsoutofthemilkfrother
outlet10.
Pressthestartbutton8againtocutthe
processshort.
Note:Itispossibletosetthetemperatureof
thehotwater(see“Menusettings”).
Maintenance and
daily cleaning
W Danger of electric shock!
Unplugtheappliancebeforecleaningit.
Neversubmersetheapplianceinwater.
Donotuseasteamcleaner.
■ Wipetheoutsideoftheappliancewitha
soft,dampcloth.
■ Donotuseanycleaningagentsthat
containalcoholorspirits.
■ Donotuseabrasiveclothsorcleaning
agents.
■ Alwaysremoveanylimescale,coffee,
milk,cleaningordescalingfluidresidue
immediately.Suchresiduecancause
corrosion.
■ Newspongeclothsmaycontainsalts.
Saltscancauserustfilmonstainless
steelandmustthereforebewashedout
thoroughlybeforeuse.
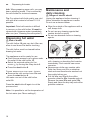
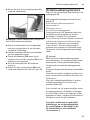
■ Pullthedriptray23withthecoffee
groundscontainer23cforwardsandout.
Removethepanel23aandgrate23b.
Emptyandcleanthedriptrayandcoffee
groundscontainer.

17
en
Maintenanceanddailycleaning
L
Donotputthefollowingitemsin the
dishwasher:Panelofdriptray23a,
powdercompartment18,brewingunit
20,watertank11,aromacover16 and
stainlesssteelmilkcontainer.
M
Thefollowingpartsmaybecleaned
inthedishwasher:Driptray23,
grate23b,coffeegroundscontainer
23c,measuringspoon14 andthe
individualpartsofthemilkcontainer
cover.
■ Removepowdercompartment18 and
rinseunderrunningwater.
■ Wipeouttheinsideofthetrayholders.
Important: Thedriptray 23 and coffee
groundscontainer23cshouldbeemptied
andcleanedeverydayinordertoprevent
deposits.
Note:Iftheapplianceiscoldwhenswitched
on,orifitisswitchedoffafterdispensing
coffee,itrinsesautomatically.Inother
words,thesystemcleansitself.
Important:Iftheappliancehasnotbeen
usedforaprolongedperiodoftime(e.g.
afteravacation),cleantheentireappliance
thoroughly,includingthemilksystem10
andbrewingunit20.
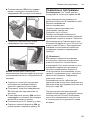
Cleaning the milk system
Important:Themilksystem10 must be
cleanedimmediatelyafteruse!
Themilksystem10canbepre-cleaned
automatically(see“Serviceprogrammes”or
cleanedmanually.
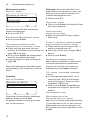
Dismantlingthemilksystem10 forcleaning:
■ Pullthemilksystem10forwardoutofthe
appliance.
■ Turntheupperpart10ainananti-
clockwisedirectionandremovefromthe
lowerpart10b.
■ Cleantheindividualpartswithdetergent
solutionandasoftcloth.
■ Rinseallpartswithcleanwateranddry.
■ Putallthepartsbacktogether.Themilk
frothercanthenbeclickedbackinto
placeintheappliance.
Info: Allpartsofthemilkfrother10 can also
beputinthedishwasher.

18
en ServiceProgrammes
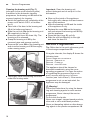
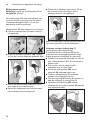
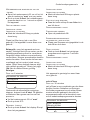
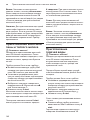
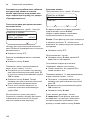
Cleaning the brewing unit (Fig. F)
(referalsotothequickreferenceguide)
Inadditiontotheautomaticcleaning
programme,thebrewingunit20shouldbe
removedregularlyforcleaning.
■ Switchtheapplianceoffcompletelyatthe
poweron/offswitch1 O / I ;nobuttons
arelit.
■ Takeholdofthedoortothebrewingunit
19atthebottomandopenit.
■ Slidetheredlock20aonthebrewingunit
20completelytotheleft.
■ Presstheejectlever21downfully.The
brewingunitisreleased.
■ Graspthebrewingunit20bythe
recessedgripsandremovecarefully.
■ Removethecover20bofthebrewingunit
andrinsethebrewingunit20thoroughly
underrunningwater.
■ Thoroughlycleanthebrewingunitsieve
undertherunningwater.
Important:Cleanthebrewingunit
withoutdetergentanddonotputitinthe
dishwasher.
■ Wipeouttheinsideoftheappliance
thoroughlywithadampclothandremove
anycoffeeresidues.
■ Allowthebrewingunit20andtheinside
oftheappliancetodry.
■ Replacethecover20bonthebrewing
unitandreinsertthebrewingunit20 fully
intotheappliance.
■ Presstheejectlever21upfully.
■ Slidetheredlock20afullytotheright
andclosethedoor19.
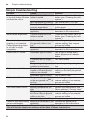
Service Programmes
Tip:Referalsotothequickreferenceguide
inthestoragecompartment22.
Atregularintervals,thedisplay5showsthe
followingtexts:
Short rinse milk system or
Service - Descale or
Service - Clean
or
Service - calc‘nClean.
Theapplianceshouldbecleanedor
descaledimmediatelyusingthecorre-
spondingprogramme.Youhavetheoption
ofcombiningtheprocesses
Descaling
and
Cleaningwiththe calc‘nClean
function(see“calc‘nClean”).Iftheservice
programmeisnotrunasinstructed,the
appliancemaybedamaged.
W Warning!
Followtheinstructionsforusingthedesca-
lingandcleaningagentsforeachservice
programme.Neverinterrupttheservice
programme!
Donotdrinktheliquids.
Neverusevinegar,vinegar-basedproducts,
citricacidorcitricacid-basedproducts.
Neverputdescalingtabletsorotherdesca-
lingagentsinthepowdercompartment18.

19
en
ServiceProgrammes
Beforestartingtherespectiveservice
programme(descaling,cleaningor
calc‘nClean),removethebrewingunit,
cleanasinstructedandreplace.
Specially developed and suitable
descaling and cleaning tablets are
available from retailers or customer
service (see “Accessories”).
Cleaning the milk system
Duration:approx.1minute
Cleaning and service
Short rinse
milk system
start
calc‘nClean
Themilksystem10canbepre-cleaned
automatically.
■ Presstheàbutton3.
Short rinse milk system
start
■ Pressthestartbutton8.
Place glass under frother, place
suction pipe in glass
start
■ Placeanemptyglassunderthemilk
system10andputtheendofthepipe
10dintheglass.
■ Pressthestartbutton8.Themilksystem
iscleanedautomatically.
■ Nowemptytheglassandcleanthe
suctionpipe10d.
Inadditiontothis,cleanthemilksystem
thoroughlyatregularintervals(byhandor
inthedishwasher).
Descaling
Duration:approx.30minutes.
Cleaning and service
Descale
start
Clean
Thestartbutton8flasheswhilethedifferent
descalingprocessesarerunning.
Thefiguresonthetoprightindicatethe
progressoftheprogramme.
Important:Ifthereisawaterfilterinthe
watertank11,itneedstoberemoved
beforetheserviceprogrammeisrun.
■ Presstheàbutton3.
Descale
start
■ Pressthestartbutton8;thedisplay5 will
guideyouthroughtheprogramme.
Empty drip tray
Replace drip tray
■ Emptythedriptray23andreinsertit.
Place 1 l container
Place suction pipe in container
start
■ Placeacontainerwith1litrecapacity
underthemilkfrother10.
■ Placetheendofthesuctionpipe10d in
thecontainer.
■ Pressthestartbutton8.
Remove filter
start
Info: Ifthewaterfilterisactivated,the
displaywillpromptyoutoremovethefilter,
thenpressthestartbutton8again.

20
en ServiceProgrammes
Add 0.5 l water and descaler
start
■ Pourlukewarmwaterintotheempty
watertank11uptothe“0.5 l”markand
thendissolve1Siemensdescalingtablet
TZ80002init.
■ Pressthestartbutton8.Thedescaling
programmewillnowrunforabout
20minutes.
Descaling
Not enough descaling fluid.
Refill fluid
start
Info: Ifthereisnotenoughdescalingsolu-
tioninthewatertank11,thecorresponding
promptisdisplayed.Pourindescalingsolu-
tionandpressthestartbutton8again.
Clean and refill water tank
start
■ Rinsethewatertank11andrefillitwith
freshwateruptothe“max”mark.
■ Pressthestartbutton8.Thedescaling
programmenowrunsforabout1minute
andrinsestheappliance.
Descaling
Empty drip tray
Replace drip tray
■ Emptythedriptray23andreinsertit.
Replacethefilterifoneisbeingused.The
applianceisreadyforuseagain.
Important:Wipedowntheapplianceusing
asoft,dampclothtoimmediatelyremove
anydescalerresidue.Suchresiduecan
causecorrosion.Newspongeclothsmay
containsalts.Saltscancauserustfilm
onstainlesssteelandmustthereforebe
washedoutthoroughlybeforeuse.
Thoroughlycleanthesuctionpipe10d of
themilkfrother.
Cleaning
Duration:approx.8minutes.
Cleaning and service
Descale
Clean
start
The startbutton8flasheswhilethe
differentcleaningprocessesarerunning.
Thefiguresonthetoprightindicatethe
progressoftheprogramme.
■ Fillthewatertank11uptothe“max”
mark.
■ Presstheàbutton3.
Clean
start
■ Pressthestartbutton8;thedisplay5 will
guideyouthroughtheprogramme.
Empty drip tray
Replace drip tray
■ Emptythedriptray23 andreinsertit.
Position swivel arm
■ Swivelthecoffeeoutlet9totheleftuntilit
clicksintoplace.
Cleaning
Open powder compartment
■ Openthepowdercompartment18.
Insert Siemens cleaning tablet
and close drawer
■ DropaSiemenscleaningtabletintothe
drawer 18andcloseit.
Press start
■ Pressthestartbutton8.Thecleaning
programmewillnowrunforabout
7minutes.
Cleaning

21
en
ServiceProgrammes
Empty drip tray
Replace drip tray
■ Emptythedriptray23 andreinsertit.
Theapplianceisreadyforuseagain.
calc‘nClean
Duration:approx.36minutes.
calc‘nCleancombinestheseparate
functionsofdescalingandcleaning.
Ifbothprogrammesareduetoberun
soon,theespressomachineautomatically
suggeststhisserviceprogramme.
Cleaning and service
Short rinse
milk system
calc‘nClean
start
The startbutton8flasheswhilethe
differentcalc‘nCleanprocessesarerunning.
Thefiguresonthetoprightindicatethe
progressoftheprogramme.
Important:Ifthereisawaterfilterinthe
watertank11,itneedstoberemoved
beforetheserviceprogrammeisrun.
■ Presstheàbutton3.
calc‘nClean
start
■ Pressthestartbutton8;thedisplay5 will
guideyouthroughtheprogramme.
Empty drip tray
Replace drip tray
■ Emptythedriptray23 andreinsertit.
■ Swivelthecoffeeoutlet9totherightuntil
itclicksintoplace.
Place 1 l container
Place suction pipe in container
start
■ Placeacontainerwithacapacityofat
least1lunderthemilkfrother10.
■ Placetheendofthesuctionpipe10d in
thecontainer.
■ Pressthestartbutton8.
Cleaning
Open powder compartment
■ Openthepowdercompartment18.
Insert Siemens cleaning tablet
and close drawer
■ DropaSiemenscleaningtabletinthe
drawer 18andclose.
Remove filter
start
Info: Ifthewaterfilterisactivated,the
displaywillpromptyoutoremovethefilter,
thenpressthestartbutton8again.
Add 0.5 l water and descaler
start
■ Pourlukewarmwaterintotheempty
watertank11uptothe“0.5 l”markand
thendissolve1Siemensdescalingtablet
TZ80002init.
■ Pressthestartbutton8.Thedescaling
programmenowrunsforabout
20minutes.
Descaling
Not enough descaling fluid.
Refill fluid
start
Info: Ifthereisnotenoughdescalingsolu-
tioninthewatertank11,thecorresponding
promptisdisplayed.Pourindescalingsolu-
tionandpressthestartbutton8again.
Page is loading ...
Page is loading ...
Page is loading ...
Page is loading ...
Page is loading ...
Page is loading ...
Page is loading ...
Page is loading ...
Page is loading ...
Page is loading ...
Page is loading ...
Page is loading ...
Page is loading ...
Page is loading ...
Page is loading ...
Page is loading ...
Page is loading ...
Page is loading ...
Page is loading ...
Page is loading ...
Page is loading ...
Page is loading ...
Page is loading ...
Page is loading ...
Page is loading ...
Page is loading ...
Page is loading ...
Page is loading ...
Page is loading ...
Page is loading ...
Page is loading ...
Page is loading ...
Page is loading ...
Page is loading ...
Page is loading ...
Page is loading ...
Page is loading ...
Page is loading ...
Page is loading ...
Page is loading ...
Page is loading ...
Page is loading ...
Page is loading ...
Page is loading ...
Page is loading ...
Page is loading ...
Page is loading ...
Page is loading ...
Page is loading ...
Page is loading ...
Page is loading ...
Page is loading ...
Page is loading ...
Page is loading ...
Page is loading ...
Page is loading ...
Page is loading ...
Page is loading ...
Page is loading ...
Page is loading ...
Page is loading ...
Page is loading ...
Page is loading ...
Page is loading ...
Page is loading ...
Page is loading ...
Page is loading ...
Page is loading ...
Page is loading ...
Page is loading ...
Page is loading ...
Page is loading ...
Page is loading ...
Page is loading ...
Page is loading ...
Page is loading ...
Page is loading ...
Page is loading ...
Page is loading ...
Page is loading ...
Page is loading ...
Page is loading ...
Page is loading ...
Page is loading ...
Page is loading ...
Page is loading ...
Page is loading ...
Page is loading ...
Page is loading ...
Page is loading ...
Page is loading ...
Page is loading ...
Page is loading ...
Page is loading ...
Page is loading ...
Page is loading ...
Page is loading ...
Page is loading ...
Page is loading ...
Page is loading ...
Page is loading ...
Page is loading ...
Page is loading ...
Page is loading ...
Page is loading ...
Page is loading ...
Page is loading ...
Page is loading ...
Page is loading ...
Page is loading ...
Page is loading ...
Page is loading ...
Page is loading ...
Page is loading ...
Page is loading ...
Page is loading ...
Page is loading ...
Page is loading ...
Page is loading ...
Page is loading ...
Page is loading ...
Page is loading ...
Page is loading ...
Page is loading ...
Page is loading ...
Page is loading ...
Page is loading ...
Page is loading ...
Page is loading ...
Page is loading ...
Page is loading ...
Page is loading ...
Page is loading ...
Page is loading ...
Page is loading ...
Page is loading ...
Page is loading ...
Page is loading ...
Page is loading ...
-
 1
1
-
 2
2
-
 3
3
-
 4
4
-
 5
5
-
 6
6
-
 7
7
-
 8
8
-
 9
9
-
 10
10
-
 11
11
-
 12
12
-
 13
13
-
 14
14
-
 15
15
-
 16
16
-
 17
17
-
 18
18
-
 19
19
-
 20
20
-
 21
21
-
 22
22
-
 23
23
-
 24
24
-
 25
25
-
 26
26
-
 27
27
-
 28
28
-
 29
29
-
 30
30
-
 31
31
-
 32
32
-
 33
33
-
 34
34
-
 35
35
-
 36
36
-
 37
37
-
 38
38
-
 39
39
-
 40
40
-
 41
41
-
 42
42
-
 43
43
-
 44
44
-
 45
45
-
 46
46
-
 47
47
-
 48
48
-
 49
49
-
 50
50
-
 51
51
-
 52
52
-
 53
53
-
 54
54
-
 55
55
-
 56
56
-
 57
57
-
 58
58
-
 59
59
-
 60
60
-
 61
61
-
 62
62
-
 63
63
-
 64
64
-
 65
65
-
 66
66
-
 67
67
-
 68
68
-
 69
69
-
 70
70
-
 71
71
-
 72
72
-
 73
73
-
 74
74
-
 75
75
-
 76
76
-
 77
77
-
 78
78
-
 79
79
-
 80
80
-
 81
81
-
 82
82
-
 83
83
-
 84
84
-
 85
85
-
 86
86
-
 87
87
-
 88
88
-
 89
89
-
 90
90
-
 91
91
-
 92
92
-
 93
93
-
 94
94
-
 95
95
-
 96
96
-
 97
97
-
 98
98
-
 99
99
-
 100
100
-
 101
101
-
 102
102
-
 103
103
-
 104
104
-
 105
105
-
 106
106
-
 107
107
-
 108
108
-
 109
109
-
 110
110
-
 111
111
-
 112
112
-
 113
113
-
 114
114
-
 115
115
-
 116
116
-
 117
117
-
 118
118
-
 119
119
-
 120
120
-
 121
121
-
 122
122
-
 123
123
-
 124
124
-
 125
125
-
 126
126
-
 127
127
-
 128
128
-
 129
129
-
 130
130
-
 131
131
-
 132
132
-
 133
133
-
 134
134
-
 135
135
-
 136
136
-
 137
137
-
 138
138
-
 139
139
-
 140
140
-
 141
141
-
 142
142
-
 143
143
-
 144
144
-
 145
145
-
 146
146
-
 147
147
-
 148
148
-
 149
149
-
 150
150
-
 151
151
-
 152
152
-
 153
153
-
 154
154
-
 155
155
-
 156
156
-
 157
157
-
 158
158
-
 159
159
-
 160
160
-
 161
161
-
 162
162
-
 163
163
-
 164
164


Siemens TE803M09GB User manual
- Category
- Coffee makers
- Type
- User manual
Ask a question and I''ll find the answer in the document
Finding information in a document is now easier with AI
in other languages
- français: Siemens TE803M09GB Manuel utilisateur
- русский: Siemens TE803M09GB Руководство пользователя
- Nederlands: Siemens TE803M09GB Handleiding
- polski: Siemens TE803M09GB Instrukcja obsługi
- čeština: Siemens TE803M09GB Uživatelský manuál
Related papers
-
Siemens TE803M09GB User manual
-
-
-
-
-
-
Siemens TE809F01DE User manual
-
Siemens TE713201 Owner's manual
-
Siemens TE716501DE/21 User manual
-
Other documents
-
Bosch TES80551DE/01 Owner's manual
-
Bosch TES803F9DE/08 User manual
-
-
Bosch TES80721RW/04 User manual
-
-
Bosch TES71221RW/01 Owner's manual
-
-
Bosch TES51521RW/05 User manual
-
-