Aerator
Aireador
Service
If Faucet Drips, Proceed As Follows:
• Turn HANDLES to OFF position.
• If spout drips, operate HANDLES several times from OFF to ON position.
Do not force HANDLES they turn only 90˚.
• AERATOR may accumulate dirt causing distorted and reduced water flow.
Remove AERATOR and clean before reinstalling.
Change Handle Direction:
• Remove plug button, losen set screw, and lift up handle.
• Remove plastic adapter and cartridge nut.
• Lift and turn STOP WASHER 90˚.
• Re-install HANDLE components.
Servicio
Si el grifo gotea, realice lo siguiente:
•
Gire la manijas a la posición de cierre.
•
Si el pico del grifo gotea, abra y cierre las MANIJAS
varias veces. No fuerce las manijas, sólo giran 90°.
•
Se puede acumular suciedad y causar un flujo de agua
distorsionado o reducido. Retire el AIREADOR y limpiar
antes de reinstalar.
Cambiar el sentido de la manija:
•
Remueva el tapón botón, afloje el tornillo de ajuste, y levante hacia arriba la manija.
•
Remueva el adaptador de plástico y la tuerca del cartucho.
•
Levante y gire la ARANDELA 90°.
•
Vuelva a instalar los componentes de la manija.
90°
90°
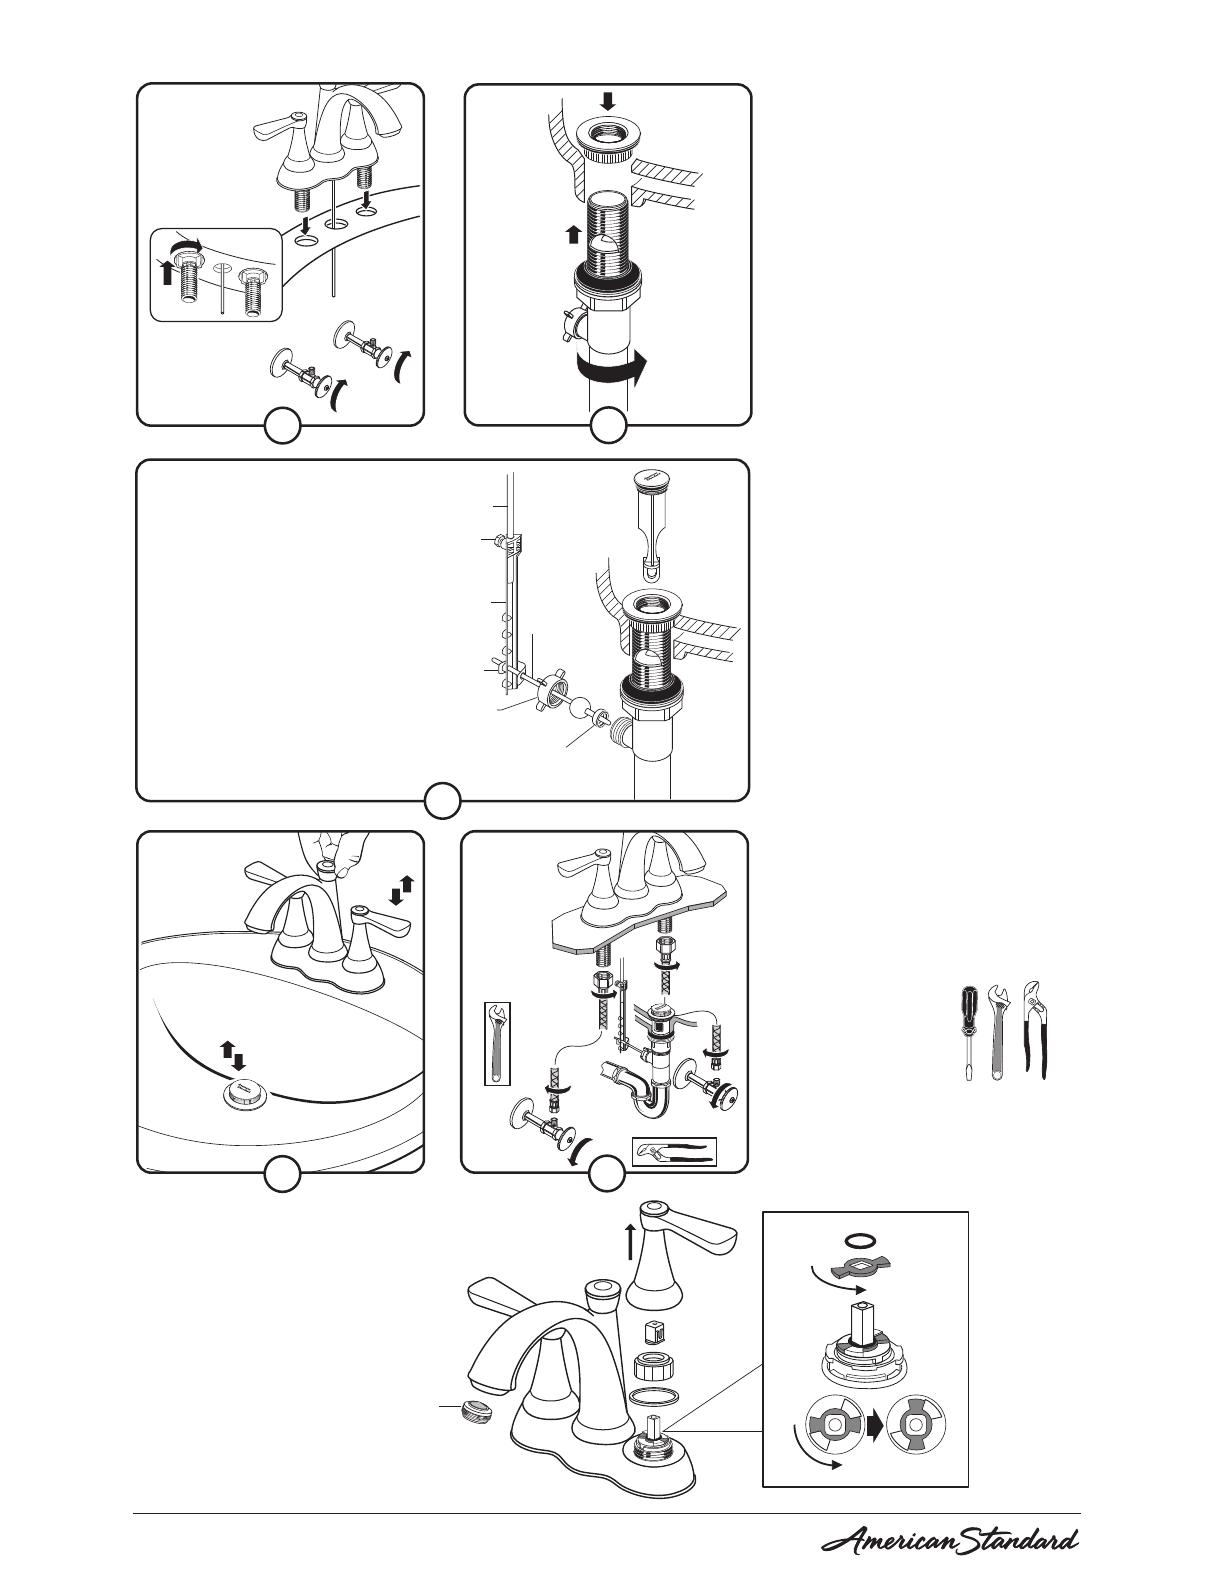
Installation Instructions
Instrucciones de Instalación
Kempton
™
Centerset Faucet
7416.201
Kempton
™
Llave central de lavabo
7416.201
M965696_SP_EZ (9/15)
Care and Cleaning:
Do
:
Simply rinse the product clean with clear water, dry with
a soft cotton flannel cloth.
Do Not:
Clean the product with soaps, acid, polish, abrasives,
harsh cleaners, or a cloth with a coarse surface.
Recommended Tools
Note: Supplies and P-Trap
not included and must be
purchased separately
Debe: Lavar el producto sólo con agua limpia. secar con un paño suave de algodón.
No Debe: Limpiar el producto con jabones, ácido, productos para pulir, abrasivos,
limpiadores duros ni con un paño grueso.
Para el Cuidado:
Herramientas Recomendadas
Nota: No están incluidos los suministros flexibles o elevadores
de cabeza redonda y se deben comprar por separado.
Off
Cerrado
1
4
Conexiones del Suministro
de Agua y Drenaje
Make Water
Supply and
Waste Connections
Test Installed Fitting
Hot
Cold
Caliente
Fría
On
Abrir
5
Test Installed Fitting
Pruebe el Accesorio
Instalado
Check Operation
of Pop-up
Prueba del
Funcionamiento
del Tapón
• Unthread PIVOT NUT (1) from drain body.
• Remove CLIP (2) from PIVOT ROD (3).
• Insert PIVOT ROD (3) through PIVOT NUT (1) as shown, making sure
the SEALS (4) are in place.
• Thread PIVOT NUT (1) onto drain body.
• Insert PIVOT ROD (3) through second or third hole in EXTENSION (5),
installing CLIP (2) as shown, to keep EXTENSION (5) in place.
• Insert POP-UP ROD (6) through faucet body and through EXTENSION (5).
Tighten EXTENSION NUT (7) to secure it.
• Desenrosque la TUERCA DE PIVOTE (1) del drenaje.
• Retire el CLIP (2) de la VARILLA DE PIVOTE (3).
• Inserte la VARILLA DE PIVOTE (3) a través de la TUERCA DE PIVOTE (1)
como se muestra en la imagen, asegurándose de que los SELLOS (4)
estén en su lugar.
• Enrosque la TUERCA DE PIVOTE (1) al drenaje.
• Inserte la VARILLA DE PIVOTE (3) a través del segundo o tercer agujero
de la EXTENSIÓN (5) e instale el CLIP (2) como se muestra en la imagen
para asegurar la EXTENSIÓN (5).
• Insertar la VARILLA DEL DRENAJE (6) a través del cuerpo de la llave y a
través de la EXTENSIÓN (5). Apriete la TUERCA DE EXTENSIÓN (7) para
asegurar la VARILLA DE DRENAJE (6).
3
1
2
5
6
7
4
2
3
