BMPRO Trek3 Installation guide

Category
Rechargeable batteries
Type
Installation guide
Trek3 Install Guide
TEAM
BMPRO
.COM
2. Mounting
1. Parts
3. Set up Mode
Set-up mode allows you to configure the Trek3.
To enter Set-up mode, hold down the Home Button until SET UP is
seen on the Battery display.
1. & 6. Menu Function Display: Displays various Set-Up menu
functions and information.
2. Edit: Use the Battery button to edit.
3. Back: Use the Home button go back.
4. & 5. Scroll Arrows: Use the Backlight and Water Pump buttons
to scroll.
To exit Set-up mode, repeatedly press the Back button.
RV battery monitor Trek3 is a smart battery monitor able to learn the actual battery capacity with time and provide more
accurate feedback to the user. It combines comprehensive battery data together with water tank level measurement on one
screen in a sleek design.
Trek3 is designed to work with BatteryPlus35 battery management system. Connected to the BatteryPlus35 via CAN bus, it
continuously monitors information providing vital data at a glance.
1. Battery Information
2. Battery Capacity Bar Graph
3. AC Connected: Appears when connected to AC mains
4. Battery Low: Appears when battery voltage is low.
5. Battery Off: Appears BatteryPlus35 has entered ECO Mode.
6. Battery Button: Enables ECO Mode.
7. Home Button: Enters Set-up Mode.
8. Backlight Button
9. Water Pump Button
10. Time Remaining
11. Input Amps
12. Water Pump Status
13. Tank Level Indicators
To mount the Trek3:
1. Drill holes in the wall for the connectors.
2. Use flat head screws with a maximum diameter of 4.0mm to
mount the Trek3 to the wall.
3. Connect the Trek3 to the wall using the provided connectors.
4. Attach the provided fascia cover to the Trek3.
DOC PART 038652
REV 1.0
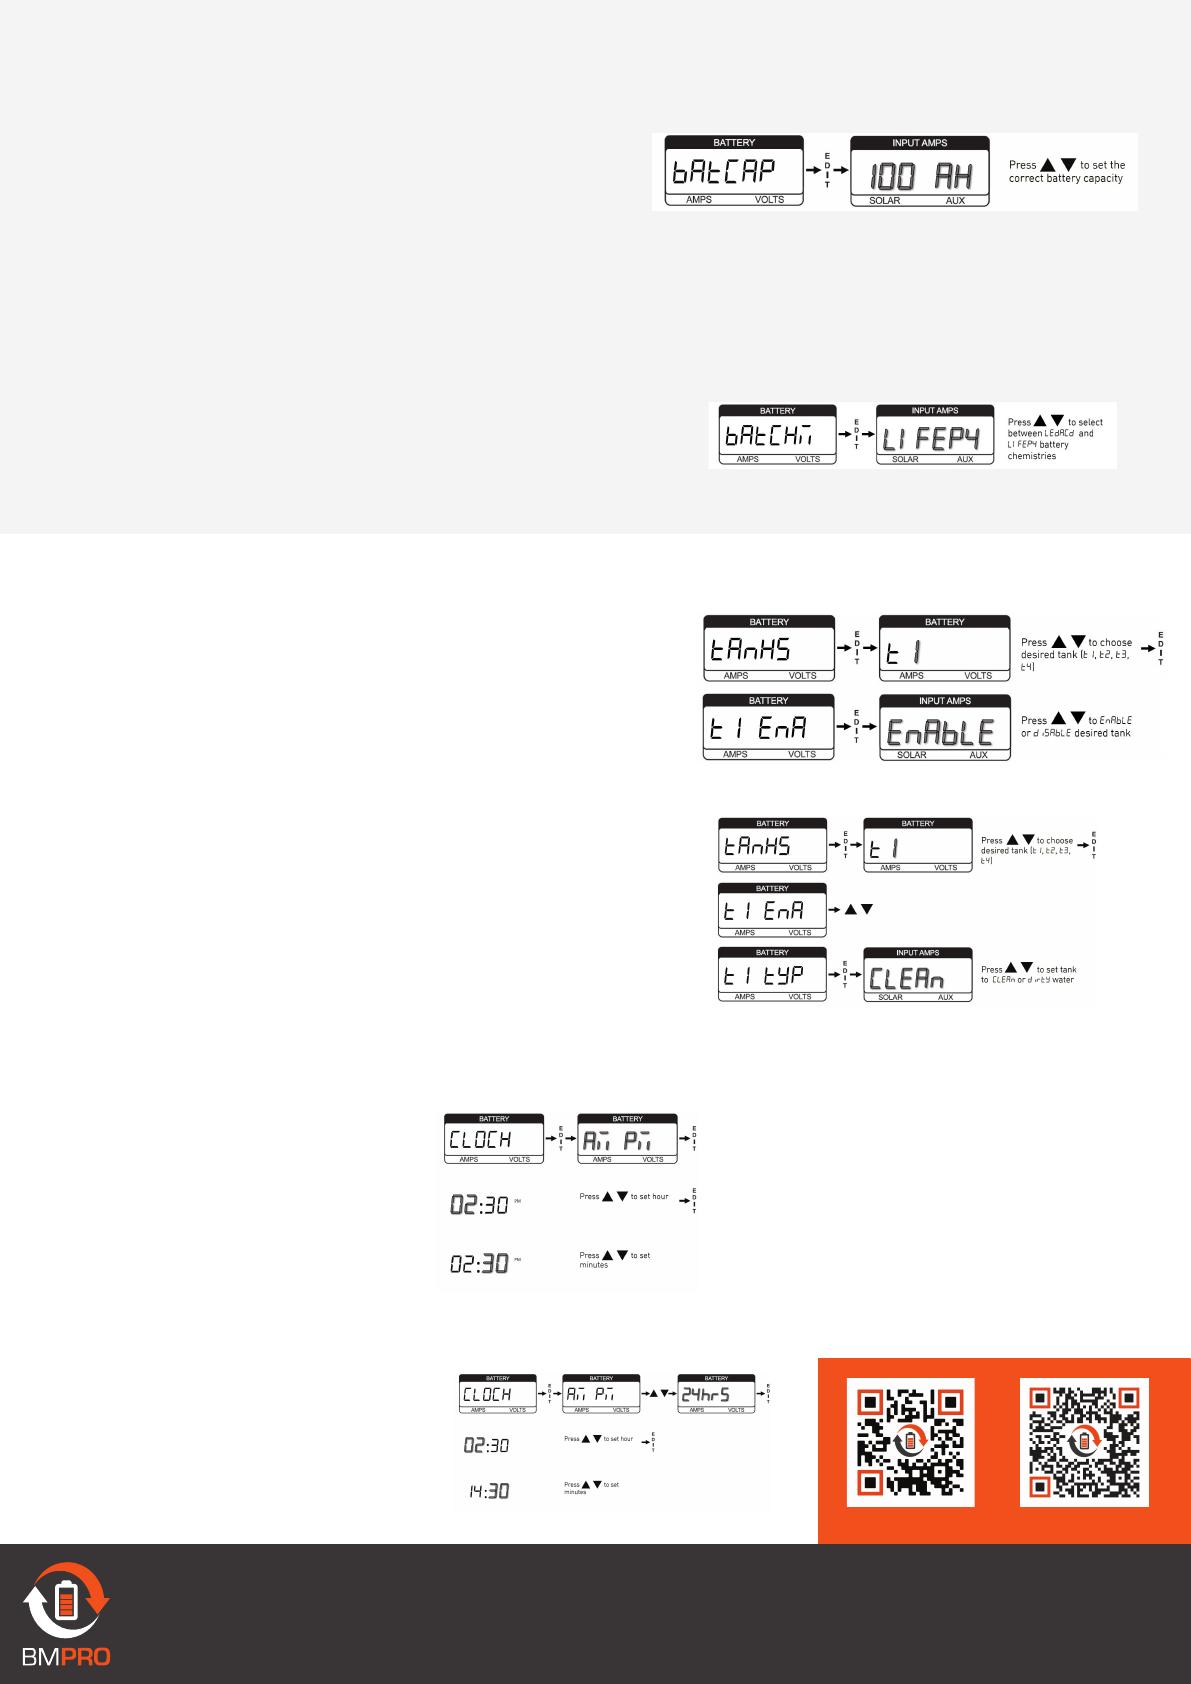
5. Configuring Water Tanks
4. Configuring Battery Capacity
6. Configuring the Clock
TEAM
BMPRO
.COM
MANUAL PRODUCT PAGE
To configure the battery capacity:
1. Enter Set-Up mode.
2. Navigate to the batCaP menu function.
3. Press Edit.
4. Use the Scroll Arrow buttons to set the correct battery capacity.
To enable water tank monitoring:
1. Enter Set-Up mode.
2. Navigate to the tAnKS menu function.
3. Press Edit.
4. Use the Scroll Arrow buttons to select the desired tank.
5. Press Edit.
6. Use the Scroll Arrow buttons to enable or disable the selected tank.
To configure the water tank type:
1. Enter Set-Up mode.
2. Navigate to the tAnKS menu function.
3. Press Edit.
4. Use the Scroll Arrow buttons to select the desired tank.
5. Press Edit.
6. Use the scroll arrows to change to tYP.
7. Press Edit.
8. Use the Scroll Arrow buttons to set the tank to CLEAn or dirtY.
To configure the clock for 12-hour time:
1. Enter Set-Up mode.
2. Navigate to the CLOCK menu function.
3. Press Edit.
4. Press Edit again.
5. Use the scroll arrows to set the hour.
6. Press Edit.
7. Use the scroll arrows to set the minute.
To configure the clock for 24-hour time:
1. Enter Set-Up mode.
2. Navigate to the CLOCK menu function.
3. Press Edit.
4. Use the scroll arrows to change to 24hrS.
5. Press Edit.
6. Use the scroll arrows to set the hour.
7. Press Edit.
8. Use the scroll arrows to set the minute.
DOC PART 038652
REV 1.0
5. Configuring Battery Chemistry
If you have a lithium battery and a BatteryPlus35-HA, you will need to configure
the battery chemistry to lithium.
1. To configure the battery chemistry:
2. 1. Enter Set-Up mode.
3. 2. Select the AdvAnC menu function.
4. 3. Navigate to the bAtCHM menu function.
5. 4. Press Edit.
6. 5. Use the Scroll Arrow buttons to set the correct battery chemistry
  • Page 1 1
  • Page 2 2

BMPRO Trek3 Installation guide

Category
Rechargeable batteries
Type
Installation guide

Ask a question and I''ll find the answer in the document

Finding information in a document is now easier with AI