Page is loading ...

Entry Pack TT
SET-250H
Instruction Manual Ver 1.00

1
Contents
Tarp x 1
Carry Bag x 1 Peg Case x 1 Connection Tape x 1 Pole Case x 1
Rope with Rope Tensioner
ForkedRope 10m (32' 8") x 2
3m (9'8") x 2
2m (6'6") x 2
Tent
Tarp
Steel Pole
280cm (9.1') x 1, 240cm (7.8') x 1
Steel Peg x 8
Inner Tent x 1,
Fly x 1
Pole (long) x 1
Pole (short) x 2
Carry Bag x 1Peg Case x 1 Pole Case x 1
Instruction Manual x 1 Repair Pipe x 1 Duralumin Peg x 24
Rope with Rope Tensioner
3m (9'8") x 4,
2.5m (8' 2.5") x 8
Thank you very much for purchasing a Snow Peak product. This product is a tarp and tent set
designed for camping. To use this product safely and correctly, please read these instructions
carefully. After reading these instructions, keep this manual in a safe place for future reference.
Although this product is expected to be complete and safe, please check that all accessory items
are included before attempting to assemble the product. Practice assembling and handling the
product in a safe location before using it while camping.
If you find anything in the instruction manual that is difficult to understand, or if you find a defect
with the product, stop using it immediately and contact the dealers where you purchased the
product or Snow Peak Customer Service.

Safety Precautions
Before use: please read thoroughly to ensure safety and to avoid accidents.
Misuse could easily result in a serious accident or death.
DANGER
The tent material is not flame-proof. Do not use combustion-based heat sources such
as lanterns, stoves or heaters, or open flames such as matches, candles, lighters or
cigarettes, inside the tent. The use of such heat or light sources inside a small enclosed
space is very dangerous and may result in fire, oxygen deficiency or carbon monoxide
poisoning.
Do not keep fuel, or flammable items for replenishing the fuel, inside the tent.
Pay close attention to the weather. If extreme weather is in the forecast, pack up camp
and evacuate to a safe place.
Do not bring heated items into the tent when they are at high temperatures. Inside the
tent, very high temperatures may cause heatstroke. Pay close attention to the temperature,
particularly when children are asleep inside the tent.
Choose a flat, well-drained area with firm ground to pitch the tent. Choose an area where there
is no chance of avalanches, landslides, wind gusts or sudden flooding.
The tarp has a large surface area and absorbs greater wind pressure than you may realize.
Regularly check the pegs and ropes are firmly secured during use. Stop using the tarp during
strong winds.
Misuse could result in serious injury to the user.
WARNING
This product is not intended to be in permanent use.
Sunlight can cause the surface of the Fly to heat up, potentially causing low-temperature
burns.
Do not assemble or use the tent close to a bonfire, fireworks, etc. Flying sparks can create
holes in the tent fabric.
Firmly hold the tent/tarp pole when assembling and disassembling the tent/tarp. Unexpected
accidents may occur due to the Pole ends recoiling, etc, so ensure that the surroundings are
safe, with no other people in the vicinity.
Firmly secure the Pegs, Guy Lines, etc.
If the tent is left in the sun for long periods, the materials may fade in color or the fabric may
deteriorate and lose strength. Do not leave the tent set up permanently.
Sap cannot be removedeasily. Do not setup the tent and tarpunder trees that frequently drop
sap.Ifsapis forcibly removed with solvent, etc., the fabric or coating may be damaged.
Misuse could result in injury to the user and/or damage to property.
CAUTION
2

A C
GJ
F
B D
HI
E
3 4
Pole Short (yellow end)
Pole Long (red end)
Reinforcing Cloth
Sleeve
Sleeve
Sleeve
Ventilation
Plastic
Hook
Side Door Panel
Corner Loop
Corner Loop
Corner Loop
Plastic Hook
Match the yellow Pole with
the yellow Sleeve and the red
Pole with the red Sleeve.
Match the yellow Pole with
the yellow Corner Tape, and
the red Pole with the red
Corner Tape, and insert.
The side with logo at the
bottom should face the
vestibule.
Connect the wall section to
the plastic ring.
Hook the bottom section
to the corner ring.
1
2
Check the position marked with and insert
the Pole into the Sleeve. Make sure to match
the end colors of the Sleeve and the Pole .
Make sure there is no
slack when pegging C
and D down.
Peg down these
parts if necessary.
Drive the peg into the groundat 45°.
3
Check the position marked with and insert
the pin into the end of the Pole, at the corner
of the Fly. Match the colors of the Pole end
and corner tape.
4
Attach the rope according to the P5 and also peg down the rope.
8
6
Insert the pin on the opposite side.
Slowly insert the pin into the end of pole
while adjusting the sleeve so it is positioned
in the center. If the pin is inserted with too
much force from one side, the other side
may curve widely and damage the Pole. Be
sure to communicate with your set-up
partner during this procedure.
5
Wrap [I] tape around the pole .
Hook [II] to the pole .
7
Secure to each corner loop, following the order shown below.
9
Hang the inner tent inside the fly sheet.
Wrap the tape
around the pole,
thread between
the tapes next to
the seam, and pull.
Vestibule
Rear Room
Sewn seam
Pole
Spread the Fly (beige color) on a flat area.
*Typically, the Vestibule should face downwind. If the Vestibule faces windward, not only will wind
and rain blow into the main entrance, but sudden and strong gusts may
Extend Pole (long) x 1 and Pole (short) x 2
and connect them firmly.
*Make sure to connect them without leaving
gaps at the joints.
Connect them without
leaving gaps at the joints.
Set-up Procedure Make sure that two or more people take part in the set-up.

5
3m 3m
2.5m 2.5m
2.5m
2.5m
3m 3m
2.5m 2.5m
2.5m
2.5m
Hammer the peg down vertically to secure the tent.
Hammer the peg
down diagonally.
Hammer the peg
down diagonally.
Hammer the peg
down diagonally.
Hammer the peg
down diagonally.
Reinforcing Cloth
Reinforcing Cloth
RingRing
Ring
Ring
Ring
Hammer the peg down vertically to secure the tent.
Rope Tensioner
Ring
How to attach the rope
Follow the instructions on the previous page (P. 4).
Reinforced Cloth
Rope Tensioner
View from Top
How to attach the rope with the tensioner to the fly; and how to secure the pegs
in the proper direction.

6
Docking
Purchase two tents for easy docking.
Please note: complete docking is not possible. The docking function does not prevent rainwater
from entering. Release the docking connection if rain is anticipated.
Connect the tents at the vestibules, the backrooms or the vestibule and the backroom (any
combination works). Secure the connection with the Velcro strap at two points on each
side, four points total.
1
Enter the room and stack the two front and side panels, then roll them up.
2
Cross the ropes with a ropetensioner, thensecure with apegandtighten tensioner.
3
Cross the ropes
Stack the two
panels and roll up.
D-ring
Pole Pass the tape through the first D-ring.
Wrap around the two Poles.
Pass the tape through the other D-ring.
Secure with Velcro.
Velcro

Tarp Set-Up Procedure Make sure that two or more people take part in the set-up.
1
Hold the pole with two people and determine the position of the tarp in relation to the tent.
3
Set the pole and rope
next to the gromment
of the tarp and tape.
2
Forked
10m (32.8') Rope
Forked
10m (32.8') Rope
2m (6'6") Rope
2m (6'6") Rope
3m (9'8") Rope
3m (9'8") Rope
240cm
(7.8') Pole
Overlap
280cm
(9.1') Pole
Tarp
Tent
Long Short
Tent
Tarp
Grommet Rope
Tensioner
Tape
Tape
Secure
Tarp
Tarp
240cm
(7.8') Pole
Adjustment
Adjuster
280cm
(9.1') Pole
Forked
10m (32.8')
Rope
Forked 10m (32.8') Rope
B
C
Position the tarp so that it slightly overlaps with the vestibule of the tent, as shown in the figure
above. First, attach the 2m ropes and 3m ropes as in the figure A on the right, and then set up
following the steps below.
Spread the tarp next to the side of the tent, secure the connection
tape, and adjust the length of the tape with the adjuster so it slightly
overlaps with the vestibule of the tent. Install the adjuster facing the
ground, so it’s easier to adjust after installation.
7
Connection Tape
Overlap
Grommet
Grommet
Pole Position
B C
Pole Position

Likewise, peg down the pole on the tarp side and then apply tension to the four ropes.
5
Complete the set up process by pegging down all four points and applying tension using
the rope tensioner.
6
Ground
Rope Tensioner Peg
Rope
90°
Be careful not to let the tarp sag.
Peg down
according to tape
direction.
4
Place the tarp-side pole (280cm) on theground andpeg down the forked rope attached to
the tape-side pole tip.Then, set the rope at a 45° angle to the pole and drive the peginto
the ground,angled towardthe rope at90°.
8
TensionTension
Tape Tape
Pole Pole
Forked 10m (32.8') RopeForked 10m (32.8') Rope
45°45°
45°45°
45°45°
45°45°
45°45°
45°45°
Tension
Tension
Peg downPeg down Peg down
Peg down
Peg down
Peg down Peg downPeg down

A combination of Polyester fabric is used in this product. Both materials are treated with a
high-quality, water-repellent finish. However, the level of water-repellent capacity and durability
may vary slightly due to the characteristics of each material.
The water-repellent finish will lose effectiveness after repeated use. When the water repellence
decreases, please use a water-repellent spray purchased from your local outdoor gear retailer.
When using such sprays, please follow the product’s instructions.
Materials with high waterproof capacity are used in this product. However, if the materials are in
contact with pools of water on the ground for long periods, the water may be absorbed into the
material, potentially resulting in discoloration.
Water-Repellent and Waterproof Functions
A UV protection treatment has been applied to the fly and tarp material. The UV protection
treatment will lessen the permeation of ultraviolet rays, which are harmful to humans, and slow the
deterioration of the Fly.
*The UV protection treatment does not completely shield humans from ultraviolet rays or stop the
deterioration of the material’s strength.
When the tent material is exposed to sunlight for long periods, color degradation or strength
deterioration may occur. Do not leave the product assembled permanently.
If the material deteriorates due to ultraviolet rays and is badly damaged, it may become irreparable.
Regarding the Effect of Ultraviolet Rays
A combination of Polyester fabric is used for this product. Taking the material characteristics into
consideration, we adopted processing and color patterns that will result in less color migration.
However, depending on storage conditions, slight color migration may occur. Do not store the
product while it is wet.
Before storing, the product should be cleaned and dried sufficiently. If the product is stored when
wet, the build-up of mold, bad odors, color migration and material deterioration will occur. Dry the
product sufficiently in a breezy and shaded area and clean the surface with a soft brush before
storing.
*Do not flip the tent over with poles still in the sleeves, as the poles may break, and cloth damage
may occur.
Clean and dry the surface of the poles before storing. If stored when wet, corrosion may occur,
resulting in strength deterioration. Keep the joints clean and apply a small amount of silicone
lubricant; applying an excessive amount of lubricant will stain the cloth. Ensure that the cords
inside the poles are not pulled unnecessarily.
Store the product in a well-ventilated area, away from heat and moisture.
Using the zipper when it is covered with mud, sand or dust may cause wear or damage.
Clean the zipper with a brush before use. Apply small amounts of silicone lubricant to the zipper
regularly to ensure smooth movement. Do not apply excessive amounts of lubricant as it will leave
stains on the cloth.
Minor damage to the cloth can be mended with repair tape that can be purchased from your local
outdoor gear retailer. Refer to the product instructions for the correct use of such repair tape.
Depending on the conditions during use, the tent material may deteriorate over a wide area, losing
its durability and becoming irreparable.
To maximize the longevity of this product, regularly check and maintain the product (including all
accessories such as the pegs).
Seam tape is pressure-capped at a temperature setting that prevents damage to the PU coating.
However, it may peel off as it is used repeatedly. If peeling is found, set an iron at a low temperature
and reattach only the peeling sections. Be aware that excessive heat will discolor or accelerate
deterioration of the fabric. If the PU coating is peeled off completely, it may be impossible to repair.
Sap cannot be easily removed. Do not set up this product under trees that frequently drop sap. If
sap is forcibly removed with solvent, etc., the fabric or coating may be damaged.
Maintenance & Storage
9

Broken pole
Tape
Tape
Repair
pipe
Q: What can be done if a pole is broken while the tent is in use?
A: For an emergency treatment, use a repair pipe or splint, and
secure with vinyl tape. Or fully disassemble the tent for repair.
Q: What can be done if the tent/tarp cloth is damaged or rips while
the tent is in use?
A: Seal the area with packing tape on both sides or use a tent repair
kit that can be purchased from your local outdoor gear retailer.
When using a repair kit, read the instructions carefully.
Q: What can be done when the water-repellent finish degrades?
A: The water-repellent finish will lose its effectiveness with repeated use. When the material’s water
repellence decreases, please use a water-repellent spray that can be purchased from your local
outdoor gear retailer. When using such sprays, please follow the product’s instructions.
Q: What can be done if mold develops on the tent material?
A: Wipe the affected area with a dry cloth and sterilize with alcohol. When the material has a color
change due to mold, this color change cannot be removed. Removing mold with excessive force
may result in further deterioration of the material and the coating finish.
FAQ
If a professional repair is necessary, please contact the dealer where the product was sold or Snow
Peak Customer Service.
Please dry and clean the product before sending it for repair.
Please stick a memo onto the damaged area of the product. In the memo, include details explaining
the circumstances that led to the damage.
The cost of repair will be determined as follows:
1If the damage is subject to warranty, transportation cost (both ways) and repair cost will be
covered by Snow Peak.
2If the damage is not subject to warranty, transportation cost (both ways) and repair cost will be
covered by the customer.
Regarding Repair
The specifications of Snow Peak products are determined based on field testing and quality control,
ensuring proper function and longevity of every product. If apparent defects in the manufacturing of
the product are found, the defective product will be repaired or exchanged free of charge. Damages,
as follows, are not covered under warranty.
Regarding Warranty
10

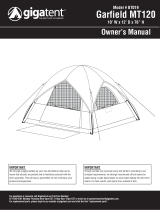
280c m (9.1')
Wing Pole
240cm ( 7. 8' )
Wing Pole
280cm (9.1')
220cm (7.2')
530cm (17.4')
285cm (9.4')
300cm (9.8')
780cm (25.6')
500cm (16.4')
(Indoor Height) 150cm (4.9')
1,640cm (53.8')
570cm (18.7')
Specifications
[Tent]
Material: Main Unit/75D Polyester Taffeta,
PU coating, Waterproof rating: 1,800mm
minimum, water-repellent finish, UV
protection treatment,Inner Tent/68D
Polyester Taffeta, Bottom/210D Polyester
Oxford, PU coating, Waterproof rating:
1,800mm minimum; Pole /A6061 ( 1 mm
(0.51")
Set Contents/Tent, Pole Long (x1), Pole
Short (x1), Duralumin Peg (x24), Rope with
Rope Tensioner (3m (9'8") x 4, 2.5m (8' 2.5') x
8), Repair Pile (x1), Carry Bag, Pole Case,
Peg Case
Carry Bag Size
66x25x25(h)cm(26”x9.8”x9.8”)
Weight 7. 9 (17.4l b s)
[Tarp]
Material: Main Unit/210D Polyester Oxford,
PU coating, Waterproof rating: 1,800mm
minimum, Teflon water-repellent finish, UV
protection treatment
Set Contents/Tarp, Connection Tape, Steel
Pole (280cm (9.1'), 240cm(7.8')), Steel Peg 30
(x8), Rope with Rope Tenstioner (forked 10m
(32.8') x 2, 3m (9'8") x 2, 2m (6'6") x 2), Carry
Bag, Pole Case, Peg Case
Carry Bag Size 80x17x19(h)cm
(30”x6.6”x7.4”)
Weight: 7.9kg (17.4 lbs)
Capacity:4 persons
MADE IN VIETNAM
For question or concerns
contact the Snow Peak
Customer Service Department.
Snow Peak USA Inc.
+1503-697-3330(9:00~17:00)
Email: [email protected]
404 NW 23rd Ave., Portland Oregon, 97210, USA
@snowpeakusa
Snow Peak USA Inc.
/