
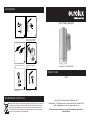
Down Facing wall light
Including: 1 x GU10 Max 35W
ILLUSTRATIONS
O87SS
PRODUCT CODE
34
1 2
56
Romve base and Front lens Mount the base to the wall
not to forget your main cable
should run through the base
Connect the three electrical
mains wires to the terminal
block
Fasten the xture to the base
tighten the two Philips/Star
screws
Insert the lamp Complete tting
Please read instructions before commencing installation and retain for
future reference.
Cape Town - 9 Racecourse Road, Milnerton, 7441
Johannesburg - 10 Milkyway Avenue, Linbro Business Park, Sandton, 2065
ENVIRONMENTAL PROTECTION
Waste electrical & Electronic equipment regulations requires that any of our products
showing this marking must not be disposed of with other household or commercial
waste. To prevent possible harm to the environment or human health from uncon-
trolled waste disposal, please separate any such products from other waste types
and recycle it responsibly at your local facilities.

• Fitting material: Stainless Steel with clear glass
• Lamp type: Including 1 x GU10 maximum 35W 230V
• Voltage: 220 – 240V~50Hz
• Protection against electric shock: Class 1. Requires earthing.
• IP Rating: 44. Dust Protected. Protected against solid foreign objects of 1.0mm Ø and
greater. Protected against splashing water.
• Commercial / domestic use
• Suitable for outdoor use
• Maximum Ambient temperature range: 20ºC - 40ºC
• Dimensions: (H)120mm x (W)76mm x (D)103mm
• Additional Information:
Spare Glass X758
Up or Down Facing
O87SS - attachments:
If the external exible cable or cord of this luminaire is damaged, it should be exclusively replaced
by the manufacturer or his service agent or a similar qualied person in order to avoid a hazard.To
ensure that you get maximum longevity and maximum use out of your luminaire, please observe
the following safety instructions.
Electrical products can cause death, injury, or damage to property. Installation of the luminaire
must be carried out by a qualied electrician, in accordance with SANS 10142. On completion
of installation, ensure that the Certicate of Compliance is updated.
• Before connecting this luminaire, ensure that voltage indicated on the rating label
corresponds with the mains voltage in your home.
• When changing the lamp, ensure that the power is turned off.
• This luminaire is checked in full for conformity to the quality standards and safety requirements.
• The manufacturer / supplier is not responsible for any damage of properties and persons,
caused by the incorrect use or installation of the luminaire.
• Should you be unsure of how to install this luminaire correctly, please consult a professional
electrician or your supplier for assistance.
• Ensure all items / components, threads and screws are tightly secured.
IMPORTANT:
• Tampering with this luminaire, i.e using silicon sealers or incorrect cabling, will invalidate
your warranty.
• When the protection glass is damaged, it should be replaced immediately.
• The luminaire must not be used without the protection glass.
• Please check whether the connection of the power cord is safe and reliable before installation.
• Always ensure that the mains supply voltage is correct.
• Always replace the lamp with one of an identical rating.
• Ensure that you do not place the luminaire near any combustible materials and / or surfaces.
• Choking hazard: May contain small parts. Keep away from children.
• Do not insert your ngers or any part of your body into the electrical contact and sockets of this
product whilst it is connected to the electricity supply.
SPECIFICATIONS
IMPORTANT SAFEGUARDS
• Before installation always ensure the power supply is turned off.
• This luminaire is only suitable for xed mounting.
• Choose a solid base where to install the xture tightly.
• Connect as indicated in the connection drawing.
• Fasten the base onto the wall.
• Connect the three electrical mains wires to the terminal block, according to the pictures,
Following the colour code. Brown or Red to live / Blue or Black to
neutral / Green-Yellow to earth.
• Fasten the xture to the base tighten the two Philips/Star screws.
• Insert the lamp.
• Screw the glass / lens back onto the tting.
• When you are done turn on power supply.
INSTALLATION
CLEANING
• Before cleaning always ensure the power supply is turned off.
• Do not immerse the luminaire in water.
• No abrasive products, solvents, detergent may be used to clean this luminaire.
• Ensure that the tting does not come in contact with corrosive chemicals, etc.
• Coastal areas ensure that the luminaire is cleaned fortnightly.
Stainless Steel
• Before installation,stainless steel must be treated with neutral oil.
• Use soft cloth soaked with WD-40 or equivalent neutral oil.
• Ensure the neutral oil covers all surfaces and reaches to all the joints.
• After treatment, dry the area with a soft cloth.
• In extreme corrosive environments, the treatment must be repeated at least 4 times a year.
• Example of an extreme location is an area by the sea, where the ocean salt carried by sea
spray contains chlorine.
• When deposited on the stainless steel it can very quickly corrode
• For cases with serious corrosion, use an abrasive paste (specially designed for stainless
steel or chrome) to remove the stain and then apply the neutral oil again.
Note
• Do not let any cleaning liquid enter the electrical wiring or your light tting during cleaning.
• When cleaning a surface with any chemical preparation or abrasive medium, a trial should
be done on a small area, to check that the resulting nish matches with the original.
• If wire brushes or scourers are used, these should be made of a similar or better grade of
stainless steel.
• Ensure that all abrasive media used are free from sources of contamination, especially iron
and chlorides.
• For brushed stainless steel nish, always clean along the grain of the stainless steel.
Failure to do so may alter the brushed nish look.
• Always follow the manufacturer instruction when using a cleaning agent.
-
 1
1
-
 2
2


