Dometic MX1200C User manual
- Category
- Split-system air conditioners
- Type
- User manual
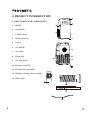
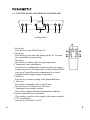
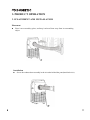
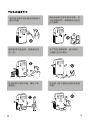
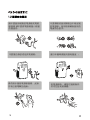
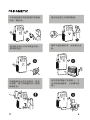
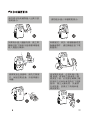
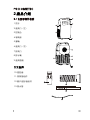
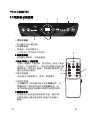
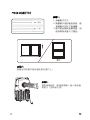
Dometic MX1200C is a portable air conditioner designed for personal cooling, featuring multiple modes to suit various needs. It offers cooling, dehumidification, and fan-only options, allowing you to customize your comfort level. With adjustable temperature settings and wind speeds, you can achieve your desired cooling effect. Additionally, the unit comes with a remote controller for convenient operation from a distance and a timer function for scheduled operation.
Dometic MX1200C is a portable air conditioner designed for personal cooling, featuring multiple modes to suit various needs. It offers cooling, dehumidification, and fan-only options, allowing you to customize your comfort level. With adjustable temperature settings and wind speeds, you can achieve your desired cooling effect. Additionally, the unit comes with a remote controller for convenient operation from a distance and a timer function for scheduled operation.


-
 1
1
-
 2
2
-
 3
3
-
 4
4
-
 5
5
-
 6
6
-
 7
7
-
 8
8
-
 9
9
-
 10
10
-
 11
11
-
 12
12
-
 13
13
-
 14
14
-
 15
15
-
 16
16
-
 17
17
-
 18
18
-
 19
19
-
 20
20
-
 21
21
-
 22
22
-
 23
23
-
 24
24
-
 25
25
-
 26
26
-
 27
27
-
 28
28
-
 29
29
-
 30
30
-
 31
31
-
 32
32


Dometic MX1200C User manual
- Category
- Split-system air conditioners
- Type
- User manual
Dometic MX1200C is a portable air conditioner designed for personal cooling, featuring multiple modes to suit various needs. It offers cooling, dehumidification, and fan-only options, allowing you to customize your comfort level. With adjustable temperature settings and wind speeds, you can achieve your desired cooling effect. Additionally, the unit comes with a remote controller for convenient operation from a distance and a timer function for scheduled operation.
Ask a question and I''ll find the answer in the document
Finding information in a document is now easier with AI
in other languages
Related papers
Other documents
-
SereneLife SLACHT128 Owner's manual
-
SereneLife Portable Air Conditioner Fan and Dehumidifier User manual
-
-
 Shinco SPF2-10C Owner's manual
-
Elba EPAC-A4010D(WH) Owner's manual
-
 Shinco PORTABLE AIR CONDITIONER User manual
-
 Shinco SPF2-08C Owner's manual
-
Sytech SYAC900 User manual
-
-
mundoclima Series MUPO-H4 User manual


