Page is loading ...

Visit our website at: http://www.harborfreight.com
Email our technical support at: [email protected]
Find the most recent manual
and software updates at
harborfreight.com
Owner’s Manual & Safety Instructions
Save This Manual Keep this manual for the safety warnings and precautions, assembly,
operating, inspection, maintenance and cleaning procedures. Write the product’s serial number in the
back of the manual near the assembly diagram (or month and year of purchase if product has no number).
Keep this manual and the receipt in a safe and dry place for future reference.
When unpacking, make sure that the product is intact
and undamaged. If any parts are missing or broken,
please call 1-888-866-5797 as soon as possible.
Copyright
©
2015 by Harbor Freight Tools
®
. All rights reserved.
No portion of this manual or any artwork contained herein may be reproduced in
any shape or form without the express written consent of Harbor Freight Tools.
Diagrams within this manual may not be drawn proportionally. Due to continuing
improvements, actual product may differ slightly from the product described herein.
Tools required for assembly and service may not be included.
Read this material before using this product.
Failure to do so can result in serious injury.
SAVE THIS MANUAL.
REV 16b

Page 2 For technical questions, please call 1-888-866-5797. Item 61624
SAFETY
ADVANCED
OPERATION
SETUP
BASIC
MAINTENANCE
TROUBLESHOOTING
Table of Contents
Safety ............................................................................. 2
Specifications .............................................................. 5
Components and Controls ....................................... 6
Setup ..............................................................................8
Default Settings ........................................................ 12
Basic Settings
Date and Time Settings ............................................ 13
Select Date Format, Set Date, Set Time,
Set Time Zone, Display Date and Time
General Settings ....................................................... 14
Select Language, Select Resolution for Cameras, Set
Menu Transparency, Set Output Monitor Resolution
Main User Settings ................................................... 15
Set Password for Main User, Set Menu Logout
Live View Settings ....................................................15
Enter Channel Name, Select Channel Name Position,
Select Channel Name Size, Hide Video (Covert)
Recording Settings .................................................. 16
Continuous Recording, Custom Scheduled Sessions
Monitor Settings ....................................................... 16
Adjust Image Controls, Custom Image Sessions
Quit Settings ............................................................. 16
Logout, Shutdown and Restart
Operation
Playback and Backup Recordings ........................ 17
Take Photos ............................................................. 18
View and Backup Photos ....................................... 18
View and Backup DVR's Activity ........................... 18
Maintain System ..................................................... 19
Restart Schedule, Update Firmware, Reset
Factory Settings, Import and Export Settings
Maintain Drives ....................................................... 19
Maintain and Format Hard Drive,
Format USB Flash Drive
Advanced Settings
Clock Settings ......................................................... 20
Auto Synchronize, Daylight Saving
Time and Timezone
Resolution and FPS Settings ................................ 21
User Management Settings ................................... 22
Set up Additional Users' Passwords
And Permissions
Privacy Mask ........................................................... 23
Block Areas From Being Viewed or Recorded
Audio Settings ........................................................ 23
Alarms and Notifications ....................................... 24
Motion Detection, Video Loss, Alarm
Schedules, and Email Setup
Network Configuration .......................................... 29
WARNING SYMBOLS AND DEFINITIONS
This is the safety alert symbol. It is used to alert you to potential
personal injury hazards. Obey all safety messages that
follow this symbol to avoid possible injury or death.
Indicates a hazardous situation which, if not avoided,
will result in death or serious injury.
Indicates a hazardous situation which, if not avoided,
could result in death or serious injury.
Indicates a hazardous situation which, if not avoided,
could result in minor or moderate injury.
Addresses practices not related to personal injury.
IMPORTANT SAFETY INFORMATION
Read all safety warnings and instructions.
Failure to follow the warnings and instructions may result in electric shock, fire and/or serious injury.
Save all warnings and instructions for future reference.

Page 3For technical questions, please call 1-888-866-5797.Item 61624
SAFETY
ADVANCED
MAINTENANCE
TROUBLESHOOTING
OPERATION SETUPBASIC
Installation Precautions
1. Check federal, state and local surveillance laws
before installing video
and/or audio surveillance equipment.
2. Install only according to these instructions.
Improper installation can create hazards.
3. Do not overreach when installing this product.
Keep proper footing and balance at all times.
This enables better control in unexpected situations.
4. Wear ANSI-approved safety goggles
during installation.
5. Keep installation area clean and well lit.
6. Keep children and bystanders out of
the area during installation.
7. Do not install when tired or when under the
influence of alcohol, drugs or medication.
Use Precautions
1. This product is not a toy. Do not allow
children to play with or near this item.
2. Use as intended only.
3. Do not modify.
4. Maintain product labels and nameplates.
These carry important safety information.
If unreadable or missing, contact
Harbor Freight Tools for a replacement.
Service
Have your DVR equipment serviced by a qualified repair person using only identical replacement parts.
This will ensure that the safety of the equipment is maintained.
Camera Safety Warnings
1. To prevent electric shock, do not attempt
to disassemble Camera. There are
no serviceable parts inside.
2. Do not expose the Power Adapter to rain
or wet conditions. Water entering the Power
Adapter will increase the risk of electric shock.
3. Do not abuse the Power Adapter cord. Never
use the cord for unplugging the plug from the
outlet. Keep cord away from heat, oil, sharp
edges or moving parts. Damaged or entangled
cords increase the risk of electric shock.
4. Handle Camera with care. Camera could be
damaged by improper handling or storage.
DVR Safety Warnings
1. Maintain adequate airflow around DVR.
2. Use supplied Power Adapter only.
3. To prevent electric shock, do not open the housing.
Only a qualified technician should open housing.
4. Do not expose the Power Adapter or DVR
console to rain or wet conditions. Water
entering the Power Adapter or DVR console
will increase the risk of electric shock.
5. Do not abuse the Power Adapter cord. Never
use the cord for unplugging the plug from the
outlet. Keep cord away from heat, oil, sharp
edges or moving parts. Damaged or entangled
cords increase the risk of electric shock.
6. Maintain labels and nameplates on the unit.
These carry important safety information.
If unreadable or missing, contact
Harbor Freight Tools for a replacement.
7. WARNING: The cord of this product contains
lead and/or di (2-ethylhexyl) phthalate (DEHP),
chemicals known to the State of California
to cause cancer, and birth defects or other
reproductive harm. Wash hands after handling.
(California Health & Safety Code § 25249.5, et seq.)
8. The warnings, precautions, and instructions
discussed in this instruction manual cannot
cover all possible conditions and situations
that may occur. It must be understood by the
operator that common sense and caution are
factors which cannot be built into this product,
but must be supplied by the operator.
SAVE THESE INSTRUCTIONS.

Page 4 For technical questions, please call 1-888-866-5797. Item 61624
SAFETY
ADVANCED
OPERATION
SETUP
BASIC
MAINTENANCE
TROUBLESHOOTING
Grounding
TO PREVENT ELECTRIC SHOCK AND DEATH FROM
INCORRECT GROUNDING WIRE CONNECTION:
Check with a qualified electrician if you are in doubt as to whether the outlet
is properly grounded. Do not modify the power cord plug provided with the tool. Never
remove the grounding prong from the plug. Do not use the tool if the power cord or plug
is damaged. If damaged, have it repaired by a service facility before use. If the plug
will not fit the outlet, have a proper outlet installed by a qualified electrician.
Figure A: Outlets for 2-Prong Plug
1. The included Power Adapters do
not require grounding.
2. The Power Adapters may be used in
either of the 120 volt outlets shown in the
preceding illustration. (See Figure A.)
Extension Cords
Note: Do not use an extension cord with the Power Adapters.
Symbology
Double Insulated
Canadian Standards Association
Underwriters Laboratories, Inc.
V
Volts
~
Alternating Current
A
Amperes

Page 5For technical questions, please call 1-888-866-5797.Item 61624
SAFETY
ADVANCED
MAINTENANCE
TROUBLESHOOTING
OPERATION SETUPBASIC
Specifications
DVR
Hard Drive 500 GB
Video Standard NTSC (United States, default) / PAL (Europe)
Video Codec H.264
Operating System Linux
Video I/O
Input: 8 BNC
Output: 1 HD / 1 BNC / 1 VGA
Audio Codec G.711
Audio I/O
Input: 4 RCA
Output: 1 RCA
Recording Resolution
960H D1
960H: 960 x 576
D1: 704 x 576
D1: 704 x 576
CIF: 352 x 288
Motion Detection Selectable Area and Sensitivity Detection
PTZ Interface RS485 - Supports Pelco-D/P camera (sold separately)
Network Interface RJ-45 10m/100m Ethernet Interface
USB Interface USB 2.0
DVR Input Rating 12VDC / 2A
Power Adapter Rating 12VDC / 5A - To power DVR and 8 300mA cameras.
Operating Temperature 14º - 131ºF
Cameras
Lens Type Fixed 6 mm
Horizontal Resolution 600 TVL
Effective Pixels 752H x 582V
Night Vision Type Infrared LEDs with Low Light Sensor
Image Type
Daylight: Color
Infrared: Black & White
Infrared Wavelength 850nm
Infrared Distance 30 ft. (indoors)
Ingress Protection Rating IP65 - Protected from low pressure water jets
Video Connector BNC
Camera Input Rating 12VDC / 300 mA
Cable Length 60 ft.
Operating Temperature 14° - 122°F

Page 6 For technical questions, please call 1-888-866-5797. Item 61624
SAFETY
ADVANCED
OPERATION
SETUP
BASIC
MAINTENANCE
TROUBLESHOOTING
Components and Controls
Read the ENTIRE IMPORTANT SAFETY INFORMATION section at the beginning of this
manual including all text under subheadings therein before set up or use of this product.
DVR Front Panel
9
10
11
12
1
22
16
15
14
17
18
19
20
21
13
2 3 4 5
6
7
8
1 Remote Control IR Receiver
2 Recording Indicator
3 Hard Drive Indicator
4 LAN Connection Indicator
5 Hard Drive Full Indicator
6 Fast Forward/Backward
7 Search - Bring up Playback
8 Menu
9 Move Left
10 Move Up
11 Move Right
12 Power Indicator
13 Escape - Go back
14 Record/Stop Recording
15 Playback
16 Pause
17 Back - Play Backward
18 PTZ Controller
19 Play Forward/Backward Slowly
20 Rotate through View Layout
21 Move Down
22 Open Menu
Confirm Selected Operation
DVR Back Panel
11
6
2 43
7 9 10
8
5
1 BNC Video Input 8
2 BNC Video Output 1
3 VGA Video Output 1
4 RCA Audio Input 4
5 RJ45 LAN Ethernet Port 1
6 RCA Audio Output 1
7 HD Video Output 1
8 USB Port 2
9 RS485 PTZ Connector 1
10 12VDC Power Input 1

Page 7For technical questions, please call 1-888-866-5797.Item 61624
SAFETY
ADVANCED
MAINTENANCE
TROUBLESHOOTING
OPERATION SETUPBASIC
DVR Accessories
BNC to RCA Cable
BNC
(from DVR)
RCA
(to Monitor)
Remote Control Functions
Rotate through Live View Layout
Search - Bring up Playback
1 - 8 Select Channel
9 & 0 No Function
Esc Go Back
-/-- No Function
MENU
Open Menu
Confirm Selected Operation
▲
Move Up
Live View Layout
▼
Move Down
Live View Layout
◄ Move Left
Move Right
ADD No Function
FN Open System Setup
Open Record Setup
Playback
Go back one hour
Go forward one hour
Step through playback slowly
Playback 2x, 4x, 8x, 16x
Go back 4x, 8x, 16x
Play/Pause
Note: Requires 2 AAA
batteries (not included)
Remote
Control
Mouse
Use Mouse to
navigate DVR
Camera and Accessories
Power
(from Cable)
Video
(to Cable)
Camera
Hood
Lens
Video
(from Camera)
Video
(to DVR)
Power
(to Camera)
Power
(from Splitter)
Cable - 60 ft.
Power Splitter
Power
(to Cameras)
Power
(to DVR)
Power
(from Adapter)
Power
Adapter
Power
(to Splitter)
Screws
Anchors
Camera Mounting
Hardware

Page 8 For technical questions, please call 1-888-866-5797. Item 61624
SAFETY
ADVANCED
OPERATION
SETUP
BASIC
MAINTENANCE
TROUBLESHOOTING
Setup
Read the ENTIRE IMPORTANT SAFETY INFORMATION section at the beginning of this manual
including all text under subheadings therein before set up or use of this product.
NOTICE: CHECK FEDERAL, STATE AND LOCAL SURVEILLANCE LAWS BEFORE
INSTALLING VIDEO AND/OR AUDIO SURVEILLANCE EQUIPMENT.

Page 9For technical questions, please call 1-888-866-5797.Item 61624
SAFETY
ADVANCED
MAINTENANCE
TROUBLESHOOTING
OPERATION SETUPBASIC
CONNECT AND TEST ALL EQUIPMENT AND CAMERA LOCATIONS
BEFORE MOUNTING CAMERAS.
Designate Location for DVR and Monitor
When planning location for DVR and Monitor:
1. Select a clean, dry, well ventilated, dust-free,
indoor location with a 120V outlet nearby.
2. If connecting DVR to Network, make sure
the DVR is located close to a router.
3. Take into consideration the length
of the Camera Cables.
CAUTION! Route the Cables so as
to avoid a tripping hazard.
4. Make sure location will remain within
Operating Temperature.
A. Connect Monitor
Connect monitor or TV (sold separately) to DVR using:
1. BNC to RCA cable (included),
2. HD cable (sold separately) or
3. VGA cable (sold separately).
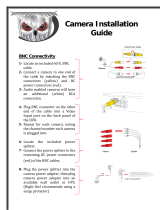
B. Connect Cameras and Audio
NOTICE: Do not join cables together end-to-end. Video loss may occur. If extra length is needed,
longer cables (sold separately) and a higher amperage power adapter (sold separately) should be used.
1. Connect Video (Yellow) from Cameras
to Cables. Push together and twist
connectors clockwise to secure.
2. Connect Power (Red) from Cameras to Cables.
3. Connect Video (Yellow) from Cables to DVR.
4. Connect Power (Red) from Cables to Splitter.
5. Protect connections from moisture
with electrical tape.
6. Audio:
a. Connect up to 4 audio surveillance microphones
(sold separately) to Audio Inputs. All
connected microphones will record sound.
b. Connect speaker (sold separately) to
Audio Output. Only one channel at
a time can be live monitored.
c. Go to Audio Settings on
page 23 to enable audio.
NOTICE: CHECK FEDERAL, STATE AND
LOCAL AUDIO SURVEILLANCE LAWS
BEFORE INSTALLING MICROPHONE.
Plan Mounting Locations for Cameras
DO NOT MOUNT CAMERAS YET!
Note: If adding extra cameras, use Item 62468.
1. Adjust Hood as needed to protect the lens.
Hood
2. When planning mounting locations and angles:
a. Take into consideration the length of the Cables.
CAUTION! Route the Cables so as
to avoid a tripping hazard.
b. Select locations under eaves to shelter
Cameras from rain and direct sunlight.
c. Select locations high enough so that
Cameras are visible, but out of reach.
d. Verify that installation surfaces have no hidden
utility lines before drilling or driving screws.
e. Make sure no strong light will shine
directly into Camera Lenses.
f. To avoid mounting the Cameras upside down,
make sure the Hood is above the Lens.
g. Do not point Camera through a window, glaring
may occur, resulting in poor quality images.
C. Connect Mouse
Plug Mouse into either USB Port on back of DVR. Use Mouse to navigate DVR.

Page 10 For technical questions, please call 1-888-866-5797. Item 61624
SAFETY
ADVANCED
OPERATION
SETUP
BASIC
MAINTENANCE
TROUBLESHOOTING
D. Connect Power
Note: Connect power using a surge
protector (sold separately).
1. Plug Monitor into surge protector.
2. Plug Red plug from Power Splitter
into Power Input on DVR.
3. Plug Power Adapter into Power Splitter
4. Plug Power Adapter cord into Power Adapter
5. Plug Power Adapter plug into surge protector.
6. Plug surge protector into 120V outlet.
CAUTION! The Power Adapter MUST be
plugged in indoors in a clean, dry location.
a. System will boot up and initialize.
b. After initialization is complete,
system will display Live View.
Note: To safely turn DVR off, see
Quit Settings on page 16.
Live View
09/10/2015 11:24:51
S146597127
CH01
CH04
CH07 CH08
CH05
CH02 CH03
CH06
Network
Connection
Alarm
Log Net ID
Hard Drive
Status
Channel Icons
Channel Recording
Double-Click Icon to Open Record Setup
Motion Detection On
Double-Click Icon to Open Alarm Setup
Network Connected
Audio Monitoring On**
Audio Monitoring Off
**Click channel to be monitored, icon will appear on channel being monitored.
Note: If monitoring audio, take care when clicking on monitor's screen, it is possible to change audio monitoring
icon to another channel. If this happens, click on channel to be monitored to restore audio monitoring.
Double-click image to view in full screen. Double-click again to return to previous view.
Note: Go to Default Settings on page 12 for a list of what the DVR will automatically do.

Page 11For technical questions, please call 1-888-866-5797.Item 61624
SAFETY
ADVANCED
MAINTENANCE
TROUBLESHOOTING
OPERATION SETUPBASIC
E. Mount Cameras
CONNECT AND TEST ALL EQUIPMENT AND CAMERA LOCATIONS
BEFORE MOUNTING CAMERAS.
Mount Cameras under eaves. Place
Cable Connections inside walls to shelter
them from rain and direct sunlight.
Using the Base as a template, mark locations
of mounting holes on mounting surface.
Note: Route Cable through slot on Base to keep Base
flush with mounting surface while marking holes.
Solid Surface
1. Using a drill bit slightly smaller than the Screws,
drill pilot holes into the marked locations.
2. Position Camera so that mounting
holes align with pilot holes.
Note: Route Cable through slot on Base to
keep Base flush with mounting surface.
3. Drive Screws through mounting holes in
Base and into pilot holes until the Camera is
securely attached to the mounting surface.
Hollow Surface
1. Using a drill bit slightly smaller than the
Anchors, drill holes in the marked locations.
2. Tap Anchors into the holes until they are
almost flush with mounting surface.
3. Position Camera so that mounting
holes align with anchors.
Note: Route Cable through slot on Base to
keep Base flush with mounting surface.
4. Drive Screws through mounting holes in
Base and into anchors until the Camera is
securely attached to the mounting surface.
Camera Adjustment
1. Loosen Adjustment Wheel, rotate Camera as
needed, then tighten Adjustment Wheel.
2. Loosen Adjustment Screw, tilt Camera as
needed, then tighten Adjustment Screw.
Note: Only loosen Adjustment Screw
slightly, do not remove it.
Adjustment
Wheel
Adjustment
Screw
F. Set Date and Time
Note: Use Mouse to navigate the DVR.
1. Right click on screen,
click System Setup.
2. Click Time.
3. Put cursor in Date box,
click keys to set date.
4. Put cursor in Time box,
click keys to set time.
5. Click OK.
Mounting
Holes
Cable
Slot
Base

Page 12 For technical questions, please call 1-888-866-5797. Item 61624
SAFETY
ADVANCED
OPERATION
SETUP
BASIC
MAINTENANCE
TROUBLESHOOTING
Default Settings
After Date and Time are set, the DVR will automatically perform the following functions.
Default Settings (after setting Date and Time) To Change Default Settings
Menus • Will time out after 5 minutes • Go to page 15
Password • Off • Go to page 15
Recording
• Date and recording time will be visible on recordings
• All Channels record 24/7 (with or without camera connected)
• Go to page 14
• Go to page 16
Motion
Detection
• Off • Go to page 24
Video
• Resolution - D1: 704 x 576
• 30 Frames per Second (FPS)
• Go to page 21
Menus
*PTZ is optional Pan/Tilt/Zoom camera (sold separately).
Right-Click Menu - Right-Click on Screen
System Setup Operation and Settings
View Layout Change Live View Layout
Video Adjust
Set Image Modes
Adjust Brightness, Contrast, etc.
PTZ* PTZ Controls
Clients View network user connections
Snapshot Saves .bmp Image to Photos
Photos Stores Images
Record Setup Set Up Recording Schedule
Playback Playback Recordings
Clear Alarm Clear current or all alarms
Pop-Up Menu - Hover Over Bottom of Screen
System
Setup
View
Layout
Zoom
Sequence
Video
Adjust Snapshot
Photos
Quit
Playback
Record
Setup
PTZ
System Setup Operation and Settings
View Layout Change Live View Layout
Sequence
Rotate Through Live
View/Stop Rotation
Video Adjust
Set Image Modes
Adjust Brightness,
Contrast, etc.
Zoom Zoom in and out
PTZ* PTZ Controls
Snapshot Saves .bmp Image to Photos
Photos Stores Images
Record Setup Set Up Recording Schedule
Playback Playback Recordings
Quit Logout, Shutdown, Restart

Page 13For technical questions, please call 1-888-866-5797.Item 61624
SAFETY
ADVANCED
MAINTENANCE
TROUBLESHOOTING
OPERATION SETUPBASIC
System Setup Menu - Right-Click or Pop-Up Menu > System Setup
When Login Screen opens:
• If Password has not
been set, click Login.
• If Password has been
set, enter Password,
then click Login.
Exit from any menu by right-clicking on screen
Basic Settings
Date and Time Settings ............................................................................................................. 14
Select Date Format
Set Date
Set Time
Set Time Zone
Display Date and Time
General Settings ........................................................................................................................ 14
Select Language
Select Resolution for Cameras
Set Menu Transparency
Set Output Monitor Resolution
Main User Settings .................................................................................................................... 15
Set Password for Main User
Set Menu Logout
Live View Settings .....................................................................................................................15
Enter Channel Name
Select Channel Name Position
Select Channel Name Size
Hide Video (Covert)
Recording Settings ....................................................................................................................15
Continuous Recording
Custom Scheduled Sessions
Monitor Settings ........................................................................................................................16
Adjust Image Controls
Custom Image Sessions
Quit Settings ..............................................................................................................................16
Logout, Shutdown and Restart

Page 14 For technical questions, please call 1-888-866-5797. Item 61624
SAFETY
ADVANCED
OPERATION
SETUP
BASIC
MAINTENANCE
TROUBLESHOOTING
Date and Time Settings
General > Time
Select Date Format, Set Date, Set Time, Set Time Zone, Display Date and Time
1. Date and Time:
a. Time Format: MM/DD/YYYY is selected by
default. Change to other format if desired.
b. Set Date: Enter current date.
Note: The DVR uses a 24 hour clock, where
midnight is 00:00, noon is 12:00, and 11:00 pm is 23:00.
c. Set Time: Enter current time.
d. Click Apply to save date and time settings.
2. Auto Synchronize Time: This is an Advanced
setting. (Go to Clock Settings on page 20.)
3. Timezone Setting: This is an Advanced setting.
(Go to Clock Settings on page 20.)
4. Open daylight saving time: This is an Advanced
setting. (Go to Clock Settings on page 20.)
5. Display the date and time: Date and time
is displayed in upper right hand corner of
monitor by default. Uncheck box to disable.
Click Apply to save changes and leave menu open.
Click OK to save changes and close menu.
Changes will not be saved if you click
Cancel or right click on screen.
General Settings
General > General
Select Language, Select Resolution for Cameras, Set Menu Transparency, Set Output Monitor Resolution
1. Language: English is selected by
default. Change if desired.
2. NTSC/PAL: Default is NTSC, which is the standard
in the United States. LEAVE IT SET TO NTSC.
3. Camera:
a. D1 resolution is selected by default. D1 is the
proper setting for the included cameras.
b. If using 960H cameras (sold separately),
change setting to 960H.
Note: System will prompt restart after changing setting.
4. Transparency (of menus): Opaque is
selected by default. Change if desired.
5. Monitor Resolution: Select resolution of
monitor connected to DVR. (Refer to monitor's
owner's manual for correct resolution.)
6. Display Net ID: Net ID (Network configuration
information) is displayed in upper right hand corner
of monitor by default. Uncheck box to disable.
Click Apply to save changes and leave menu open.
Click OK to save changes and close menu.
Changes will not be saved if you click
Cancel or right click on screen.

Page 15For technical questions, please call 1-888-866-5797.Item 61624
SAFETY
ADVANCED
MAINTENANCE
TROUBLESHOOTING
OPERATION SETUPBASIC
Main User Settings
General > User
Set Password for Main User, Set Menu Logout
(To add additional users, go to User Management Settings on page 22)
Main User is named admin, name
cannot be changed.
1. User List: admin is selected by default. Click Edit.
2. Password: Enter Password, then click OK.
Note: To add other users, go to User
Management Settings on page 22.
NOTICE: If the wrong password is entered 3 times,
the DVR will sound an alarm. If this happens, remove
power plug from back of DVR, wait 15 seconds then
plug back in. If you are locked out of DVR because
of a password problem, call 1-888-866-5797.
3. Automatic Logout: Default is Wait 5 min. After 5
minutes of inactivity, menus will close and login will
be required to access menus again. To change:
a. Deselect Automatic Logout check
box to leave menus open.
b. Change wait time for menus to close.
Click Apply to save changes and leave menu open.
Click OK to save changes and close menu.
Changes will not be saved if you click
Cancel or right click on screen.
Live View Settings
Channel > Preview > View Setting
Enter Channel Name, Select Channel Name Position, Select Channel Name Size, Hide Video (Covert)
1. Ch Name: Enter Channel name. For
example, "Driveway" or "Backyard".
2. OSD Position: Select where
Channel Name will appear on monitor.
a. Bottom.
b. Top.
c. None: No name will appear.
3. OSD Size: Select size of Channel Name.
4. Hide Video (Covert): Click box to
hide live image on monitor.
Note: Camera will still record even if the
image can't be seen on monitor.
Click Apply to save changes and leave menu open.
Click OK to save changes and close menu.
Changes will not be saved if you click
Cancel or right click on screen.
Channel > Preview > Privacy Mask
This is an Advanced setting.
(Go to Privacy Mask on page 23.)

Page 16 For technical questions, please call 1-888-866-5797. Item 61624
SAFETY
ADVANCED
OPERATION
SETUP
BASIC
MAINTENANCE
TROUBLESHOOTING
Recording Settings
Right Click or Pop-Up Menu > Record Setup
Continuous and Custom Scheduled Sessions
1. Continuous: By default, all channels record
24/7, whether or not cameras are connected.
Note: To conserve hard drive space, deselect
Channels without a camera connected.
2. Scheduled: If desired, create 2 Custom
Scheduled Sessions for each camera.
a. Deselect Rec Camera boxes
for desired channels.
b. Select Set boxes to the left of Set buttons
in in first Scheduled column.
c. Click corresponding Set buttons
to set start and end times.
d. Repeat for second column.
Click OK to save changes and close menu.
Changes will not be saved if you click
Cancel or right click on screen.
Click Default to restore default settings.
Monitor Settings
Right-Click or Pop-Up Menu > Video Adjust
Adjust Image Controls, Custom Image Sessions
Brightness
Saturation
Enhanced
Note: Adjusting image controls does not affect
recordings, only monitor view is affected.
1. Channel: Select Channel to adjust.
2. Mode: If desired, create 2 Custom Image
Sessions. For example, create Session 1
for daytime and Session 2 for night time.
a. Select Session 1.
b. Set start time and end time.
c. Use - and + buttons to manually adjust
Brightness, Contrast, Saturation,
Hue and Sharpness, or
d. Click Standard, Soft, Bright or Enhanced to
automatically adjust Brightness, Contrast,
Saturation, Hue and Sharpness.
e. Click Save.
f. Select Session 2, then repeat steps b. through e.
g. Repeat for other channels.
Click Apply to save changes and leave menu open.
Click OK to save changes and close menu.
Changes will not be saved if you click
Cancel or right click on screen.
Quit Settings
Pop-Up Menu > Quit
Logout, Shutdown and Restart
1. Click Logout to log out user. Will require
password to Log in (if password has been set).
2. Click Shutdown to safely turn DVR off. To turn DVR
on, unplug Power Supply, then plug in Power Supply.
3. Click Restart to restart DVR.

Page 17For technical questions, please call 1-888-866-5797.Item 61624
SAFETY
ADVANCED
MAINTENANCE
TROUBLESHOOTING
OPERATION SETUPBASIC
Operation
Playback and Backup Recordings ........................................................................................... 17
Take Photos ............................................................................................................................... 18
View and Backup Photos .......................................................................................................... 18
View and Backup DVR's Activity .............................................................................................. 18
Maintain System ........................................................................................................................ 19
Restart Schedule, Update Firmware, Reset Factory Settings, Import and Export Settings
Maintain Drives .......................................................................................................................... 19
Maintain and Format Hard Drive, Format USB Flash Drive
Playback and Backup Recordings
Right-Click or Pop-Up Menu > Playback
1. Date: Enter Date. Enter time if desired.
(If no time is entered, recordings for
entire day will be displayed.)
2. Alarm Type (All): Select All or individual type:
a. Scheduled
b. Manual
c. Alarm
d. Motion Detection
3. Select Channel(s), then click Play,
click
X
to close Playback.
Playback
Go back one hour
Backstep - go back 2 seconds per click
Go back 4x, 8x, 16x
Snapshot - take photo while in playback
Pause
Playback
Playback 2x, 4x, 8x, 16x
Playback Slowly
Step - playback 2 seconds per click
Go forward one hour
4. Backup: Click Backup.
a. Select Start Time, Time Length and Type.
b. Install USB flash drive into back of DVR.
Note: If "Unformatted U-Disk " error
appears, format USB flash drive according
to Maintain Drives on page 19.
c. Click Backup. A folder named with the recording
date will be created on the flash drive.
d. The USB flash drive can be plugged into
another device to view or transfer recordings.
Note: Some flash drives include special file
handling software and may not be compatible.

Page 18 For technical questions, please call 1-888-866-5797. Item 61624
SAFETY
ADVANCED
OPERATION
SETUP
BASIC
MAINTENANCE
TROUBLESHOOTING
Take Photos
Right-Click or Pop-Up Menu > Snapshot
1. Click Snapshot, cursor will turn into camera icon.
2. Click area within desired channel to
take photo of that channel.
3. Window will pop up to let you know
snapshot was saved successfully.
4. Right-click to exit Snapshot mode.
Note: If monitoring audio, take care when clicking
on monitor screen, it is possible to change
audio monitoring icon to the channel being
photographed. If this happens, click on channel
to be monitored to restore audio monitoring.
View and Backup Photos
Right-Click or Pop-Up Menu > Photos
1. Select Search Type and Channel.
Enter Start and End dates.
2. Click Search.
3. Highlight file to view photo.
4. Backup:
a. Install USB flash drive into back of DVR. Click
All or check individual boxes, then click Backup.
Note: If "Unformatted U-Disk " error
appears, format USB flash drive according
to Maintain Drives on page 19.
b. The USB flash drive can be plugged into
another device to view or transfer recordings.
Note: Some flash drives include special file
handling software and may not be compatible.
View and Backup DVR's Activity
Search >Log
1. Type: All is selected by default. Change
to search for specific type:
a. System Operation - Logs when DVR starts
up, setting are imported and exported.
b. Config Operation - Logs when any
configurations are changed.
c. Data Management - Logs when
Hard Drive is checked.
d. Alarm Event - Logs when motion events
start and stop and when emails are sent.
e. Recording Operation - Logs
when recordings start.
f. User Management - Logs when connecting
to the network and when users log in.
g. File Operation - Logs when records are
searched, played back and backed up.
2. Date: Today's date is selected by default.
Change date to search a different day or
deselect Date box to view logs for all dates.
3. Detail: Click to view detailed information
about the logged event.
4. Backup:
a. Click Backup, then click OK
when backup finished.
b. The USB flash drive can be plugged into
another device to view or transfer log files.
Note: Some flash drives include special file
handling software and may not be compatible.

Page 19For technical questions, please call 1-888-866-5797.Item 61624
SAFETY
ADVANCED
MAINTENANCE
TROUBLESHOOTING
OPERATION SETUPBASIC
Maintain System
System > Maintenance
Restart Schedule, Update Firmware, Reset Factory Settings, Import and Export Settings
1. Scheduled Restart: Select day for restart.
2. Enter time according 24 hour format. For
example, to restart at 9:00 PM, enter 21:00.
Click Apply to save changes and leave menu open.
Click OK to save changes and close menu.
Changes will not be saved if you click
Cancel or right click on screen.
3. Update: For updating firmware using a
USB flash drive. (Find the most recent
firmware updates at harborfreight.com.)
Note: If "Unformatted U-Disk" error
appears, format USB flash drive according
to Maintain Drives on page 19.
4. Reset Factory: Click to restore
system default settings.
a. Click OK.
IMPORTANT! Clicking OK will delete custom
settings you have made. Date and time, log
activity and recording are not affected. Will
need to reconnect Network by checking
Automatic(DHCP) again and clicking Apply or OK.
b. System will restart.
5. Import Setting: Import custom settings using
a USB flash drive. System will restart.
6. Export Setting: Export custom
settings using a USB flash drive.
Maintain Drives
Device > Storage
Maintain and Format Hard Drive, Format USB Flash Drive
1. When Hdisk is Full: Overlay is selected by
default. The Hard Disk Drive will overwrite
itself when full. Change if desired.
2. Format:
a. Highlight device to format - Hard Drive or
U Disk (U-Disk will appear as selection
if USB Flash Drive is installed).
b. Click Format button, then click OK.
IMPORTANT! Clicking OK will delete
all files from selected Drive.
3. Auto deleted video files:
a. Check box to automatically delete video files.
b. Enter how many days ago for
how long to save files.
Click Apply to save changes and leave menu open.
Click OK to save changes and close menu.
Changes will not be saved if you click
Cancel or right click on screen.

Page 20 For technical questions, please call 1-888-866-5797. Item 61624
SAFETY
ADVANCED
OPERATION
SETUP
BASIC
MAINTENANCE
TROUBLESHOOTING
Advanced Settings
Clock Settings............................................................................................................................ 20
Auto Synchronize, Daylight Saving Time and Timezone
Resolution and FPS Settings ................................................................................................... 21
User Management Settings ......................................................................................................22
Set up Additional Users' Passwords And Permissions
Privacy Mask .............................................................................................................................. 23
Block Areas From Being Viewed or Recorded
Audio Settings ........................................................................................................................... 23
Alarms and Notifications ..........................................................................................................24
Motion Detection, Video Loss, Alarm Schedules, and Email Setup
Clock Settings
General > Time
Auto Synchronize, Daylight Saving Time and Timezone
IMPORTANT! Clock Settings require
Network Configuration. You may need to contact
your Router manufacturer or Internet Service
Provider to configure your network. You may
also need to hire an Network Specialist.
• The DVR must be connected to your network.
(Go to Connect DVR to
Network on page 29.)
• After network connection is set up:
1. Auto Synchronize Time: Check box to
enable. The DVR's clock will synchronize
with Coordinated Universal Time (UTC).
2. Timezone Setting: Select your time zone.
3. Open daylight saving time: Check box to enable.
Click Apply to save changes and leave menu open.
Click OK to save changes and close menu.
Changes will not be saved if you click
Cancel or right click on screen.
/