Sierra Wireless AirLink GX400 Installation guide

Category
GPS receiver modules
Type
Installation guide

Sierra Wireless AirLink GX400 is a versatile modem designed for reliable cellular and GPS connectivity in demanding environments. With its rugged construction and advanced features, it's ideal for applications such as remote monitoring, fleet management, and precision agriculture. The GX400 supports high-speed data transmission, allowing for efficient transfer of large files and real-time data streaming. Additionally, its built-in GPS receiver provides accurate location information, enabling precise tracking and geospatial applications.

Sierra Wireless AirLink GX400 is a versatile modem designed for reliable cellular and GPS connectivity in demanding environments. With its rugged construction and advanced features, it's ideal for applications such as remote monitoring, fleet management, and precision agriculture. The GX400 supports high-speed data transmission, allowing for efficient transfer of large files and real-time data streaming. Additionally, its built-in GPS receiver provides accurate location information, enabling precise tracking and geospatial applications.

Sierra Wireless AirLink GX400 Modem Installation Guide 1 876-0238-000 Rev A1
Sierra Wireless AirLink GX400 Modem
Installation Guide
Obtaining Help for Your AgJunction Product
Modem Overview
This section lists the parts included with your modem and describes the LEDs, ports, and connections on the front and
rear of the modem.
What’s Included with Your Modem?
Your modem kit includes the following items at right:
•GX400 modem
WiFi version has an antenna port on the front
of unit (as shown at right) and includes a
detachable antenna
Non-WiFi version has no antenna port on the
front of the unit
DC power cable (4-pin power connector to 4-wire
unterminated)
GPS / cellular modem antenna
The DC power cable includes four unterminated wires. You
will only use three of the wires in your installation (you will
not use the green wire). See “Connecting the Cables” on
page 4.
This guide provides the following information:
Parts included in your kit
Front/rear panel overview (LEDs, ports, connections)
Steps for installing the antennas and the modem and
connecting the cables
Contact and Technical Support information (see bottom of this
page)
Please read this manual thoroughly before beginning the
installation.
Contact your local dealer for technical assistance.
To find the authorized dealer near you:
Enter your dealer information here for quick reference:
Phone: (800) 247-3808
Name: _______________________________________________
Phone: _______________________________________________
Email: _______________________________________________
If you need to contact AgJunction Technical Support:
Phone: (800) 247-3808
Email: support@agjunction.com
Modem
Power cable
GPS / cellular modem antenna
Sierra Wireless AirLink GX400 Modem Installation Guide 2 876-0238-000 Rev A1
Front Panel
The following are located on the modem’s front panel:
Rear Panel
Your setup will use only the following ports on the rear panel.
Reset button Press to reset the modem using its current settings. Press and hold for 10 seconds to reset the modem
to its factory defaults. When you press the reset button all LEDs display solid red.
LEDs Modem status indicators
Network
Red (solid)
Red (flashing)
Yellow (solid)
Yellow (flashing)
Green (solid)
Green (flashing)
No cell network
Attempting to connect to cell network
Cell network found, modem attempting to connect to network
Cell network not available
Connected to the cell network
Device in roaming mode
Signal (cellular network’s signal)
Red (solid)
Red (flashing)
Yellow (solid)
Green
Bad signal
No signal
Marginal signal
Good signal
Activity
Off No activity of transmitting or receiving
Power
Off
Green (flashing)
Red (solid)
Yellow (solid)
Green (solid)
Green w/ yellow flash
No power or input voltage detected 36 VDC or 9 VDC
Radio is transmitting or receiving
Device is not operational (Low power mode)
Device is entering low power mode or system is booting
Device is connected to correct voltage and operating correctly
Device had GPS fix
Cellular port Connect cellular antenna cable
GPS port Connect GPS cable antenna
Diversity/AUX port Not used in this installation
USB port Connect directly to laptop via USB cable to configure modem (AgJunction does not provide the
cables or software for this functionality—contact Sierra Wireless for more information)
Serial port Connect directly to laptop via serial cable to configure modem (AgJunction does not provide
the cables or software for this functionality—contact Sierra Wireless for more information)
Ethernet port Connect AgJunction Link or other components for communication to this port
DC Power Connect gray power cable
Note: Non-WiFi version shown at left. WiFi
version includes antenna port on front of unit
with detachable antenna—see page 1 for photos
of port.
Sierra Wireless AirLink GX400 Modem Installation Guide 3 876-0238-000 Rev A1
Mounting the Antennas
When planning the mounting location for your antennas (GPS and cellular), make sure the antennas:
Have an unobstructed view of the sky
Are in an area free from moving objects
Are at least two feet from a transmitting radio antenna (such as for a two-way or business band radio)
Note: If using a diversity antenna, make sure there is at least three feet between the cellular antenna and the diversity
antenna.
To mount each antenna:
1. Clean and dry the vehicle surface where you will attach the antenna mounting plate.
2. Remove the paper backing from the adhesive on the back of the mounting plate.
3. Position the mounting plate and press down hard for proper adhesion.
4. Attach the antenna to the antenna mounting base.
5. Place the magnetic mounted antenna on the plate.
Mounting the Modem
Note: AgJunction does not supply the mounting hardware for the modem.
The modem case is designed for use in extreme environments. If you will use the modem in extreme environments,
make sure you use cables designed and specified for this use to avoid cable failure.
Adhere to the following when mounting the modem:
You have sufficient room to install and, if necessary, replace cables
You can easily view the front panel LEDs
The modem has adequate airflow for cooling
The modem is free from direct exposure to the elements, such as sun, rain, and dust
The modem is securely mounted so as not to come loose or be damaged by other equipment
AgJunction recommends you ground the modem case or modem mounting bracket to protect against elec-
trostatic discharge. For example, ground the case or mounting bracket to the battery or power source nega-
tive terminal using a grounding strap under one of the mounting screws.
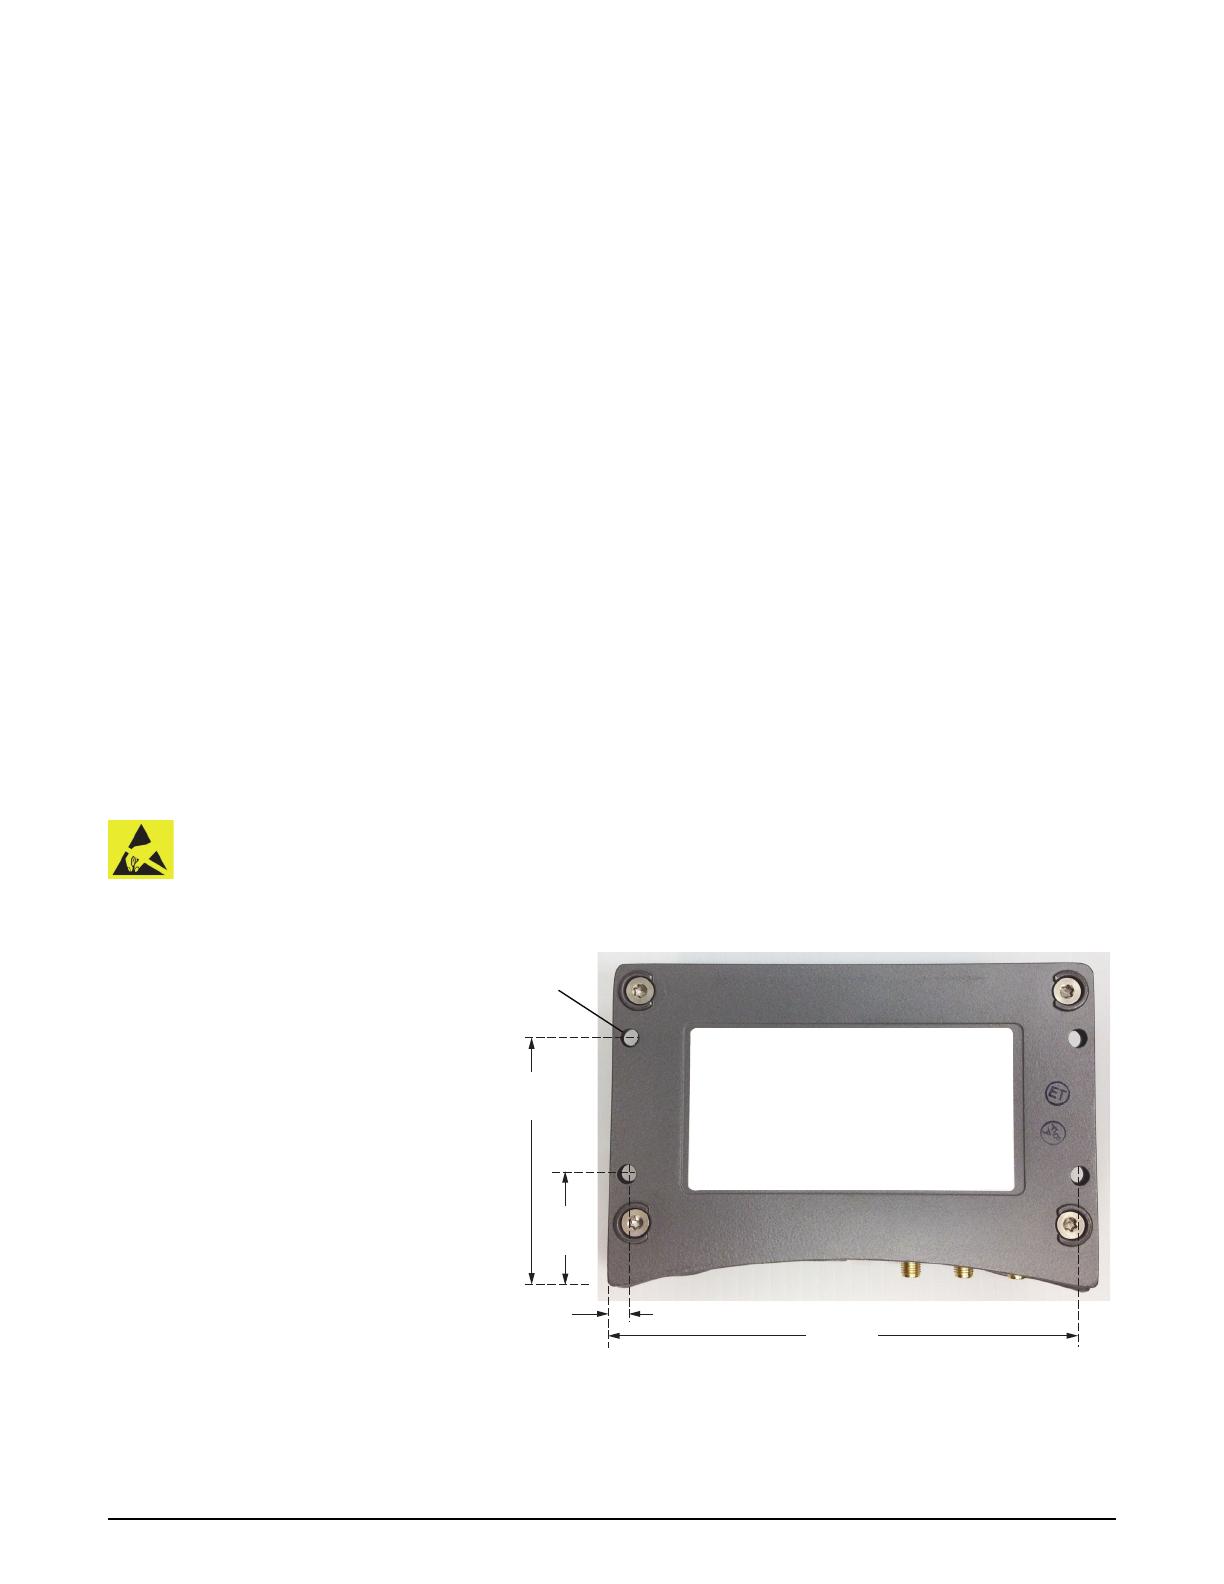
To mount the modem:
Using the four mounting holes
shown at right, securely fasten the
modem in your preferred location.
136.7 mm
(5.4 in)
5.2 mm
(0.2 in)
22.5 mm
(0.9 in)
62.5 mm
(2.5 in)
Mounting holes
5.3 mm (0.2 in)
4 places
Sierra Wireless AirLink GX400 Modem Installation Guide 4 876-0238-000 Rev A1
Connecting the Cables
Use the diagram at right to
connect the cables to the
modem.
(9 VDC to 36 VDC
12 VDC nominal)
Battery
or
Power Source
Green wire not
used in this
installation
White wire to
vehicle
ignition or VCC
Pin 4
Digital
I/O
Pin 3
Ignition
Sense
Pin 2
Ground
Pin 3
VCC
Black wire
to power
source
negative
Red wire
to power
source
positive
Gray power cable
to DC Power port
Cellular antenna cable GPS antenna cable
Wire colors shown at
left correspond to wire
colors of power cable
shown above right
Cellular antenna GPS antenna
  • Page 1 1
  • Page 2 2
  • Page 3 3
  • Page 4 4

Sierra Wireless AirLink GX400 Installation guide

Category
GPS receiver modules
Type
Installation guide

Sierra Wireless AirLink GX400 is a versatile modem designed for reliable cellular and GPS connectivity in demanding environments. With its rugged construction and advanced features, it's ideal for applications such as remote monitoring, fleet management, and precision agriculture. The GX400 supports high-speed data transmission, allowing for efficient transfer of large files and real-time data streaming. Additionally, its built-in GPS receiver provides accurate location information, enabling precise tracking and geospatial applications.

Ask a question and I''ll find the answer in the document

Finding information in a document is now easier with AI