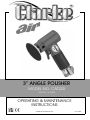
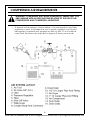
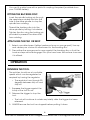
Clarke CAT220 is a powerful and versatile 3" angle polisher designed for a wide range of polishing and buffing tasks. With its lightweight and compact design, it's easy to handle and maneuver, making it ideal for both professional and DIY enthusiasts. The variable speed control allows you to adjust the speed to suit the task at hand, while the 3" backing pad and a range of included accessories, including foam applicator pads and a wool buffing mop, provide versatility for different surfaces and finishes.
Clarke CAT220 is a powerful and versatile 3" angle polisher designed for a wide range of polishing and buffing tasks. With its lightweight and compact design, it's easy to handle and maneuver, making it ideal for both professional and DIY enthusiasts. The variable speed control allows you to adjust the speed to suit the task at hand, while the 3" backing pad and a range of included accessories, including foam applicator pads and a wool buffing mop, provide versatility for different surfaces and finishes.


-
 1
1
-
 2
2
-
 3
3
-
 4
4
-
 5
5
-
 6
6
-
 7
7
-
 8
8
-
 9
9
-
 10
10
-
 11
11
-
 12
12
-
 13
13
-
 14
14
-
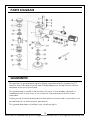 15
15
-
 16
16


Clarke CAT220 is a powerful and versatile 3" angle polisher designed for a wide range of polishing and buffing tasks. With its lightweight and compact design, it's easy to handle and maneuver, making it ideal for both professional and DIY enthusiasts. The variable speed control allows you to adjust the speed to suit the task at hand, while the 3" backing pad and a range of included accessories, including foam applicator pads and a wool buffing mop, provide versatility for different surfaces and finishes.
Ask a question and I''ll find the answer in the document
Finding information in a document is now easier with AI
Related papers
-
Clarke CAT131 User manual
-
Clarke X-Pro CAT140 Air Shear User manual
-
Clarke CAT184 AIRLINE FILTER Operating instructions
-
-
-
Clarke Rebel 65 User manual
-
Clarke CAT164 User manual
-
Clarke CFP11F User guide
-
Clarke X-Pro CAT146 Professional Mini Air Die Grinder User manual
-
Clarke CAT216 User manual
