Page is loading ...

www.vmacair.com
®
www.vmacair.com
Installation Manual for VMAC
Accessory
A900016 / A910006
Dual Battery Adaptor Kit for
2017+ Ford F-250 – F-350 6.2 L Gas
®


VMAC - Vehicle Mounted Air Compressors
VMAC Technical Support: 888-241-2289
VMAC Knowledge Base: www.kb.vmacair.com
1
Table of Contents
Safety .........................................................................3
General Information ...........................................................4
Parts List ...................................................................... 6
Modifying the Degas Bottle ...................................................10
Installing the Degas bottle Relocation Bracket ................................ 14
Modifying the Degas Hose .................................................... 17
Relocating the Battery ........................................................ 19
Relocating the Hood Strut ....................................................23

VMAC - Vehicle Mounted Air Compressors
VMAC Technical Support: 888-241-2289
VMAC Knowledge Base: www.kb.vmacair.com
2
Document: 1901049
Changes and Revisions
Revision Revision Details Revised by
Checked by
Implemented
Eng. Tech. Qual.
Mech. Elec.
A Initial Release MSP JKR AJH GB AMG 30 Jan 2017
B Bracket design change MSP CAM N/A BDJ AWM 24 April 2019
C ECN: 20-121 Add V900132/V910032 compatibility MSP CAM N/A MSP LPH 9 Jul. 2020
Additional Application Information
A900016 / A910006 Dual Battery Adaptor Kit for:
2017+ Ford F-250 – F-350 6.2 L Gas
Important Information
The information in this manual is intended for certified VMAC dealers who have
been trained in installation and service procedures and/or for anyone with
mechanical trade certification who have the tools and equipment to properly and
safely perform the service. Do not attempt this service without the appropriate
mechanical training, knowledge and experience.
Follow all safety precautions for mechanical work. Any fabrication for correct fit in
modified vehicles must follow industry standard “best practices”.
Notice
Copyright © 2020 VMAC Global Technology Inc. All Rights Reserved. These
materials are provided by VMAC for informational purposes only, without
representation or warranty of any kind, and VMAC shall not be liable for errors
or omissions with respect to the materials. The only warranties for VMAC
products and services are those set forth in the express warranty statements
accompanying such products and services, if any, and nothing herein shall be
construed as constituting an additional warranty. Printing or copying of any page
in this document in whole or in part is only permitted for personal use. All other
use, copying or reproduction in both print and electronic form of any part of this
document without the written consent of VMAC is prohibited. The information
contained herein may be changed without prior notice.
Printed in Canada
Registered Trademarks
All trademarks mentioned in this manual are the property of their respective
owners. VMAC’s use of manufacturers’ trademarks in this manual is for identification
of the products only and does not imply any affiliation to, or endorsement of said
companies.
Loctite®, Loctite® 242 and Loctite® 567 are registered trademarks of Henkel AG &
Company KGaA.
Ford® is a registered trademark of Ford Motor Company.

VMAC - Vehicle Mounted Air Compressors
VMAC Technical Support: 888-241-2289
VMAC Knowledge Base: www.kb.vmacair.com
3
Important Safety Notice
The information contained in this manual is based on sound engineering principles,
research, extensive field experience and technical information. Information
is constantly changing with the addition of new models, assemblies, service
techniques and running OEM changes. If a discrepancy is found in this manual,
contact VMAC Technical Support prior to initiating or proceeding with installation,
service or repair. Current information may clarify the issue. Anyone with knowledge
of such discrepancies, who proceeds to perform service and repair, assumes all
risks.
Only proven service procedures are recommended. Anyone who departs from the
specific instructions provided in this manual must first assure that their safety and
that of others is not being compromised, and that there will be no adverse effects
on the operational safety or performance of the equipment.
VMAC will not be held responsible for any liability, consequential damages, injuries,
loss or damage to individuals or to equipment as a result of the failure of anyone
to properly adhere to the procedures set out in this manual or standard safety
practices.
Safety should be the first consideration when performing any service operations.
If there are any questions concerning the procedures in this manual, or more
information is required, please contact VMAC Technical Support prior to beginning
repairs.
Safety Messages
This manual contains various warnings, cautions and notices that must be observed
to reduce the risk of personal injury during installation, service or repair and the
possibility that improper installation, service or repair may damage the equipment
or render it unsafe.
This symbol is used to call attention to instructions concerning
personal safety. Watch for this symbol; it points out important
safety precautions, it means, “Attention, become alert! Your personal
safety is involved”. Read the message that follows and be aware
of the possibility of personal injury or death. As it is impossible
to warn of every conceivable hazard, common sense and industry
standard safety practices must be observed.
This symbol is used to call attention to instructions on a specific
procedure that if not followed may damage or reduce the useful life
of the compressor or other equipment.
This symbol is used to call attention to additional instructions or
special emphasis on a specific procedure.
Safety

VMAC - Vehicle Mounted Air Compressors
VMAC Technical Support: 888-241-2289
VMAC Knowledge Base: www.kb.vmacair.com
4
General Information
Before Starting
Read this manual prior to beginning the installation to ensure familiarity with the
components and how they will fit on the system. Identify any variations
(i.e. different engine models, specific instructions for particular applications, etc.) in
this manual to ensure the correct instructions are used for the application.
Ordering Parts
To order parts, contact a VMAC dealer. The dealer will ask for the VMAC System
ID, part number, description and quantity. Locate the nearest dealer online at www.
vmacair.com/dealer-locator or call 1-877-912-6605.

VMAC - Vehicle Mounted Air Compressors
VMAC Technical Support: 888-241-2289
VMAC Knowledge Base: www.kb.vmacair.com
5
Table 1 — Torque Table
Standard Grade 8 National Coarse Thread
Size (in) 1/4 5/16 3/8 7/16 1/2 9/16 5/8 3/4
Foot pounds (ft•lb) 9 18 35 55 80 110 170 280
Newton meter (N•m) 12 24 47 74 108 149 230 379
Standard Grade 8 National Fine Thread
Size (in) 3/8 7/16 1/2 5/8 3/4
Foot pounds (ft•lb) 40 60 90 180 320
Newton meter (N•m) 54 81 122 244 434
Metric Class 10.9
Size (mm) M6 M8 M10 M12 M14 M16
Foot pounds (ft•lb) 4.5 19 41 69 104 174
Newton meter (N•m) 6 25 55 93 141 236
Special Tools Required
• None.
Torque Specifications
All fasteners must be torqued to specifications. Use manufacturers’ torque values
for OEM fasteners.
The torque values supplied in Table 1 are intended for VMAC supplied components,
or for use as a guide in the absence of a torque value provided by an OEM.
Torque values are with Loctite applied unless otherwise specified.
Apply Loctite 242 (blue) to all fasteners (except nylon lock nuts)
unless otherwise stated.

VMAC - Vehicle Mounted Air Compressors
VMAC Technical Support: 888-241-2289
VMAC Knowledge Base: www.kb.vmacair.com
6
Parts List
Figure 1 — Kit pack list
Kit Pack List
Item # Part # Qty Description
14800768 1 ASSY, DEGAS, DUAL BATTERY
21200976 2 BRACKET, BATT BOX MOUNT, FRONT
31200977 1 STRAP, BATT BOX MOUNT, RIGHT, FRONT
41200978 1 STRAP, BATT BOX MOUNT, LEFT, FRONT
52200181 1 BATTERY BOX, FORD
62200182 1 BATTERY COVER, FORD
71700034 36.0 HOSE, HEATER BLACK 150 PSI, 1
8 3550950 1 CABLE, BATTERY, POSITIVE
93550952 1 CABLE, BATTERY, NEGATIVE
10 1901049 1 INSTRUCTIONS, A900016, A910006
11 3801180 1 FASTENER PACK, DUAL BATT, FORD 6.2L

VMAC - Vehicle Mounted Air Compressors
VMAC Technical Support: 888-241-2289
VMAC Knowledge Base: www.kb.vmacair.com
7
(image on next page)
Fast Pack 3801180
Item # Part # Qty Description
13801225 1 FAST PACK, BATT BOX, FRONT
1.1 1560532 2 NUT, CLIP, M6 X 1.0
1.2 1520583 2 BOLT, HHCS, FL, M6 X 1.0 X 20
1.3 2200183 1 BOLT AND SPACER, BATTERY, FORD
1.4 1520629 4BOLT,HHCS,GR10.9,PL,FL,M10X 1.5X 16
1.5 1520601 2 BOLT, HHCS FL PL, M8 X 1.25 X 12
1.6 1520598 2 BOLT, HHCS, ZNPL M10 X 1.5 X 130
1.7 1520537 2 BOLT, HHCS G10.9, M10 X 1.5 X 150
1.8 1560512 4 NUT, FLANGE PL, M10 X 1.5
23801182 1 FASTENER PACK, BATTERY BOX
2.1 1520635 4 BOLT, HHCS, FLHD, M10 X 1.50 X 20
2.2 1570236 4 WASHER, SPLIT LOCK, 7/16
2.3 1520627 2 BOLT, HHCS, FL PL, M8 X 1.25 X 20
2.4 1560515 2 NUT, M8 X 1.25 FL PL
33801183 1 FASTENER PACK, DEGAS RELOCATION
3.1 1520570 1 BOLT,HHCS FL LK PL, M8 X 1.25 X 16
3.2 5800151 1 BATTERY STRAP, 1.5”X 54”
3.3 1520627 1 BOLT, HHCS, FL PL, M8 X 1.25 X 20
3.4 1560515 1 NUT, M8 X 1.25 FL PL
3.5 1200903 1BRACKET, UNLOADER
43801180 1 FAST PACK, STRUT RELOCATION
4.1 1201064 1 BRACKET, HOOD STRUT, FORD
4.2 1520617 1 BOLT,FLAT HEAD,PL, M8 X 1.25 X 16MM
4.3 1570067 1WASHER, SAE, 5/16
53801445 1 FAST PACK, DEGAS BOTTLE, 2020+
5.1 1520601 1 BOLT, HHCS, M10 X 1.5 X 120
5.2 1520570 2 BOLT,HHCS FL LK PL, M8 X 1.25 X 16
5.3 2200210 2 CLAMP, STRAP, 1 1/2
5.4 2200062 1 CLAMP, HOSE HS24

VMAC - Vehicle Mounted Air Compressors
VMAC Technical Support: 888-241-2289
VMAC Knowledge Base: www.kb.vmacair.com
8
Figure 2 — Fast Pack 3801180

VMAC - Vehicle Mounted Air Compressors
VMAC Technical Support: 888-241-2289
VMAC Knowledge Base: www.kb.vmacair.com
9
Fast Pack, 3801160 (V900122 / V910022)
Item # Part # Qty Description
93801160 0 FASTENER PACK, DEGAS BOTTLE
9.4 4900097 1 CONNECTOR, 1” X 1” OD POLY INSERT
9.5 1700034 44.0 HOSE, HEATER BLACK 150 PSI, 1
9.6 1520601 1 BOLT, HHCS FL PL, M8 X 1.25 X 12
9.7 2200047 3 CLAMP, HOSE HS16
9.8 1520570 2 BOLT,HHCS FL LK PL, M8 X 1.25 X 16
9.9 2200210 2 CLAMP, STRAP, 1 1/2
9.10 2200062 1 CLAMP, HOSE HS24
Figure 3 — Fast Pack 3801160
The components shown below are found in the main compressor kit
fastener pack and are shown here for reference only.
Fast Pack, 3801408 (V900132 / V910032)
Figure 4 — Fast Pack 3801408
Item # Part # Qty Description
12 3801408 0 FASTENER PACK, HOSE EXTENSION
12.1 2200047 3 CLAMP, HOSE, HS16
12.2 4900097 1 FTG, STR, 1”HOSE-1”HOSE
12.3 1700034 8.0 HOSE, HEATER BLACK 150 PSI, 1

VMAC - Vehicle Mounted Air Compressors
VMAC Technical Support: 888-241-2289
VMAC Knowledge Base: www.kb.vmacair.com
10
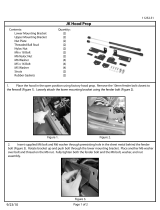
Modifying the Degas Bottle
This accessory kit is intended for 2017+ Ford F-250 and F-350, 6.2 L
gas engine vehicles equipped with dual batteries.
The instructions are to be used in conjunction with the installation
instructions included with the V900122 (70 cfm) / V910022 (150
cfm) system(s). Please read these instructions, as well as the
“Preparing for Installation” chapter in the V900122 / V910022
manual prior to modifying the degas bottle
Figure 5 — Separate degas bottle from battery tray
☐ With the battery tray / degas bottle assembly removed from the vehicle, cut
the battery tray away from the degas bottle (Figure 5).
☐ Remove the molded tab beside the fill level markings on the degas bottle
(Figure 6).
Figure 6 — Separate degas bottle from battery tray
The degas bottle is designed to contain vehicle coolant under
pressure. Care must be used when modifying the degas bottle to
ensure that the integrity of the degas bottle is not compromised.

VMAC - Vehicle Mounted Air Compressors
VMAC Technical Support: 888-241-2289
VMAC Knowledge Base: www.kb.vmacair.com
11
☐ Remove the (×3) tabs on the side of the degas bottle (Figure 7).
☐ Remove the excess material from the back of the degas bottle (Figure 8).
Figure 7 — Remove molded tabs
Figure 8 — Remove excess material
Remove excess
material
Remove tabs

VMAC - Vehicle Mounted Air Compressors
VMAC Technical Support: 888-241-2289
VMAC Knowledge Base: www.kb.vmacair.com
12
☐ Measure 1/4 in from the bottom of the degas bottle, and remove the excess
material (Figure 9).
☐ Cut the face of the lower fins at a 45° angle (Figure 10).
Figure 9 — Remove bottom fins
Figure 10 — 45° angle cut
1/4 in
Remove excess
material
45°


VMAC - Vehicle Mounted Air Compressors
VMAC Technical Support: 888-241-2289
VMAC Knowledge Base: www.kb.vmacair.com
14
Installing the Degas bottle Relocation
Bracket
☐ Thread the hold down strap into the degas bottle bracket with the serrations
on the buckle pointing toward the driver side fender (this will make it easier to
tighten once the assembly is installed) (Figure 12).
☐ Install the bracket into the vehicle, in the original degas bottle / battery tray
location, using the supplied fasteners (Figure 13).
Figure 12 — Installing the hold down strap
Figure 13 — Secure bracket to frame
P/N: 1520570
P/N: 1520601
P/N: 1520570

VMAC - Vehicle Mounted Air Compressors
VMAC Technical Support: 888-241-2289
VMAC Knowledge Base: www.kb.vmacair.com
15
☐ Install the degas bottle into the bracket, ensuring that the tab on the bracket
engages the slot on the outside of the degas bottle, and the fins engage the
slots at the base of the bracket (Figure 14).
☐ Secure the degas bottle using the hold down strap (Figure 15).
Figure 14 — Installing the degas bottle
Figure 15 — Securing the degas bottle

VMAC - Vehicle Mounted Air Compressors
VMAC Technical Support: 888-241-2289
VMAC Knowledge Base: www.kb.vmacair.com
16
Figure 16 — Routing the driver side battery extension cables
☐ Once the hold down strap is tightened, cut the excess strap material leaving
approximately 6 in.
☐ To prevent the strap from fraying, seal the cut end of the strap with a propane
torch or similar heat source.
☐ Install the OEM battery cables onto the posts on the VMAC degas bracket.
☐ Install the VMAC battery cables onto the posts on the VMAC degas bracket.
☐ Route the VMAC battery cables along the inner fender and to the inside of the
body mount. Installation will continue later in the manual. (Figure 16).
☐ Ensure the cables are adequately protected from sharp edges and secured
against snags from any road hazards.

VMAC - Vehicle Mounted Air Compressors
VMAC Technical Support: 888-241-2289
VMAC Knowledge Base: www.kb.vmacair.com
17
Modifying the Degas Hose
Figure 17 — Modifying the degas hose
☐ Measure 2 in from the engine side of the 90° curve and cut the hose (Figure 17).
Figure 18 — Remove quick connect cuff
☐ Cut the cuff from the OEM quick connect (Figure 18).
2 in

VMAC - Vehicle Mounted Air Compressors
VMAC Technical Support: 888-241-2289
VMAC Knowledge Base: www.kb.vmacair.com
18
Figure 19 — Rotate the quick connect fitting
OEM location Modified location
☐ Rotate the quick connect approximately 15° counter clockwise and loosely
install the supplied hose clamp (Figure 19).
Figure 20 — Secure the degas hose
☐ Insert the 1 in hose barb into the hose and secure with a supplied hose clamp.
☐ Install the supplied 45 in heater hose onto the hose barb and secure with a
supplied hose clamp.
☐ Install the hose assembly onto the degas bottle and route the hose to the
engine spigot.
☐ Cut the hose to the required length (approximately 30 in) and secure it to the
engine spigot.
☐ Rotate the hose on the quick connect to remove any stress or kinking and
tighten the hose clamp.
☐ Install the P-clip bracket on the base of the degas bracket in the hole closest to
the quick connect (Figure 20).
/